
Important
This APP tuning tutorial is only applicable to CoreWing flight controllers. Other manufacturers' flight controllers are not currently supported!!!
Important
CoreWing APP download link: https://www.corewing.com/website/download
I. Flight Principle Introduction
The V-tail configuration is a design that integrates and simplifies the traditional empennage structure. It combines the horizontal stabilizer (elevator) and vertical stabilizer (rudder) into two control surfaces mounted at an angle, forming a V-shape, known as V-tail. The corresponding control surfaces are also called Ruddervators. Compared to traditional fixed-wing aircraft, the main features of V-tail include:
Lighter structure and less drag: Eliminates one tail surface, suitable for long-endurance or high-speed aircraft;
More responsive control: The coupled pitch and yaw design provides quicker response in certain attitude controls;
Easier wiring: The simplified tail structure is suitable for blended-wing-fuselage designs or compact layouts.

II. Equipment Preparation
Required Equipment:
1) Flight Controller: CoreWing F405 WING V2 / SpeedyBee F405 WING APP / SpeedyBee F405 WING MINI - Any of these flight controllers are applicable to this tutorial.
2) RC Transmitter: Using RadioMaster Boxer / RadioMaster TX16S as examples.
3) Receiver: Using SpeedyBee ELRS Nano 2.4G RX as an example.
4) GPS Module: Using Beizheng BZ-251 GPS Module as an example.
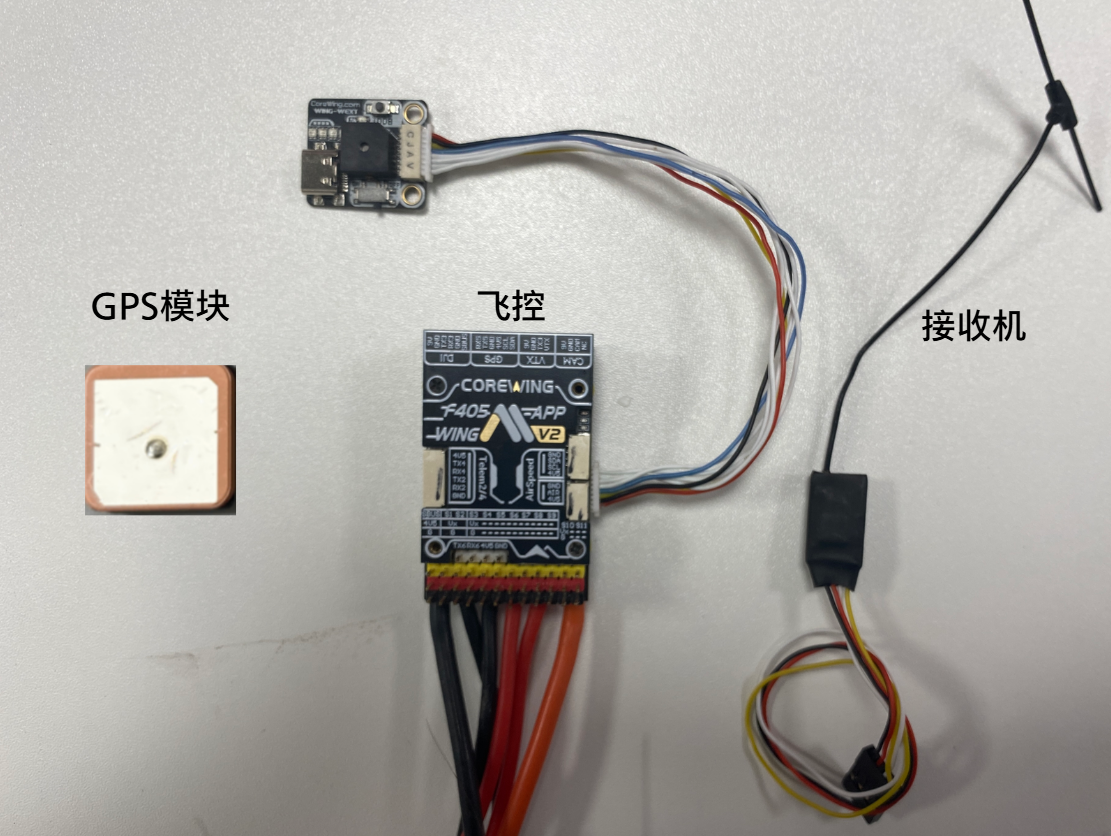
5) Motor: Zhonghangdian factory 2204 KV1870 motor, suitable for Zhonghangdian ALTUS, for reference only.
6) ESC: Zhonghangdian factory 30A ESC, suitable for Zhonghangdian ALTUS, for reference only.
7) Servo: 9g metal servo, suitable for Zhonghangdian ALTUS, for reference only.
8) Battery: 4S1P 4000mAh battery, suitable for Zhonghangdian ALTUS, for reference only.
9) Propeller: 5-inch tri-blade propeller, suitable for Zhonghangdian ALTUS, for reference only.
Optional Equipment:
1) Analog VTX: Using SpeedyBee TX 1600 VTX and RunCam Phoenix2 SE V2 camera as examples.
2) HD VTX: Using DJI O4 AIR UNIT VTX as an example.
3) Airspeed Sensor: Digital airspeed sensor is recommended.

Important
For AP expert tuning introduction of CoreWing APP, refer to this article: https://docs.corewing.com/plane/software/corewing-app/corewingapp-aptuning.html
How to update flight controller firmware - using Mission Planner GCS: https://docs.corewing.com/plane/beforetuning/mp-fw-update.html
How to update flight controller firmware - using INAV GCS: https://docs.corewing.com/plane/beforetuning/inav-fw-update.html
III. Initial Setup
3.1 Accelerometer Calibration
Important
Note: When calibrating the accelerometer, be sure to remove the flight controller from the aircraft and place it on a flat surface for calibration to improve accuracy and ensure stable flight!
Use a data cable or battery to power the flight controller and wireless board.
Click Required Hardware.
Click Accelerometer Calibration.
Click Start Calibration.
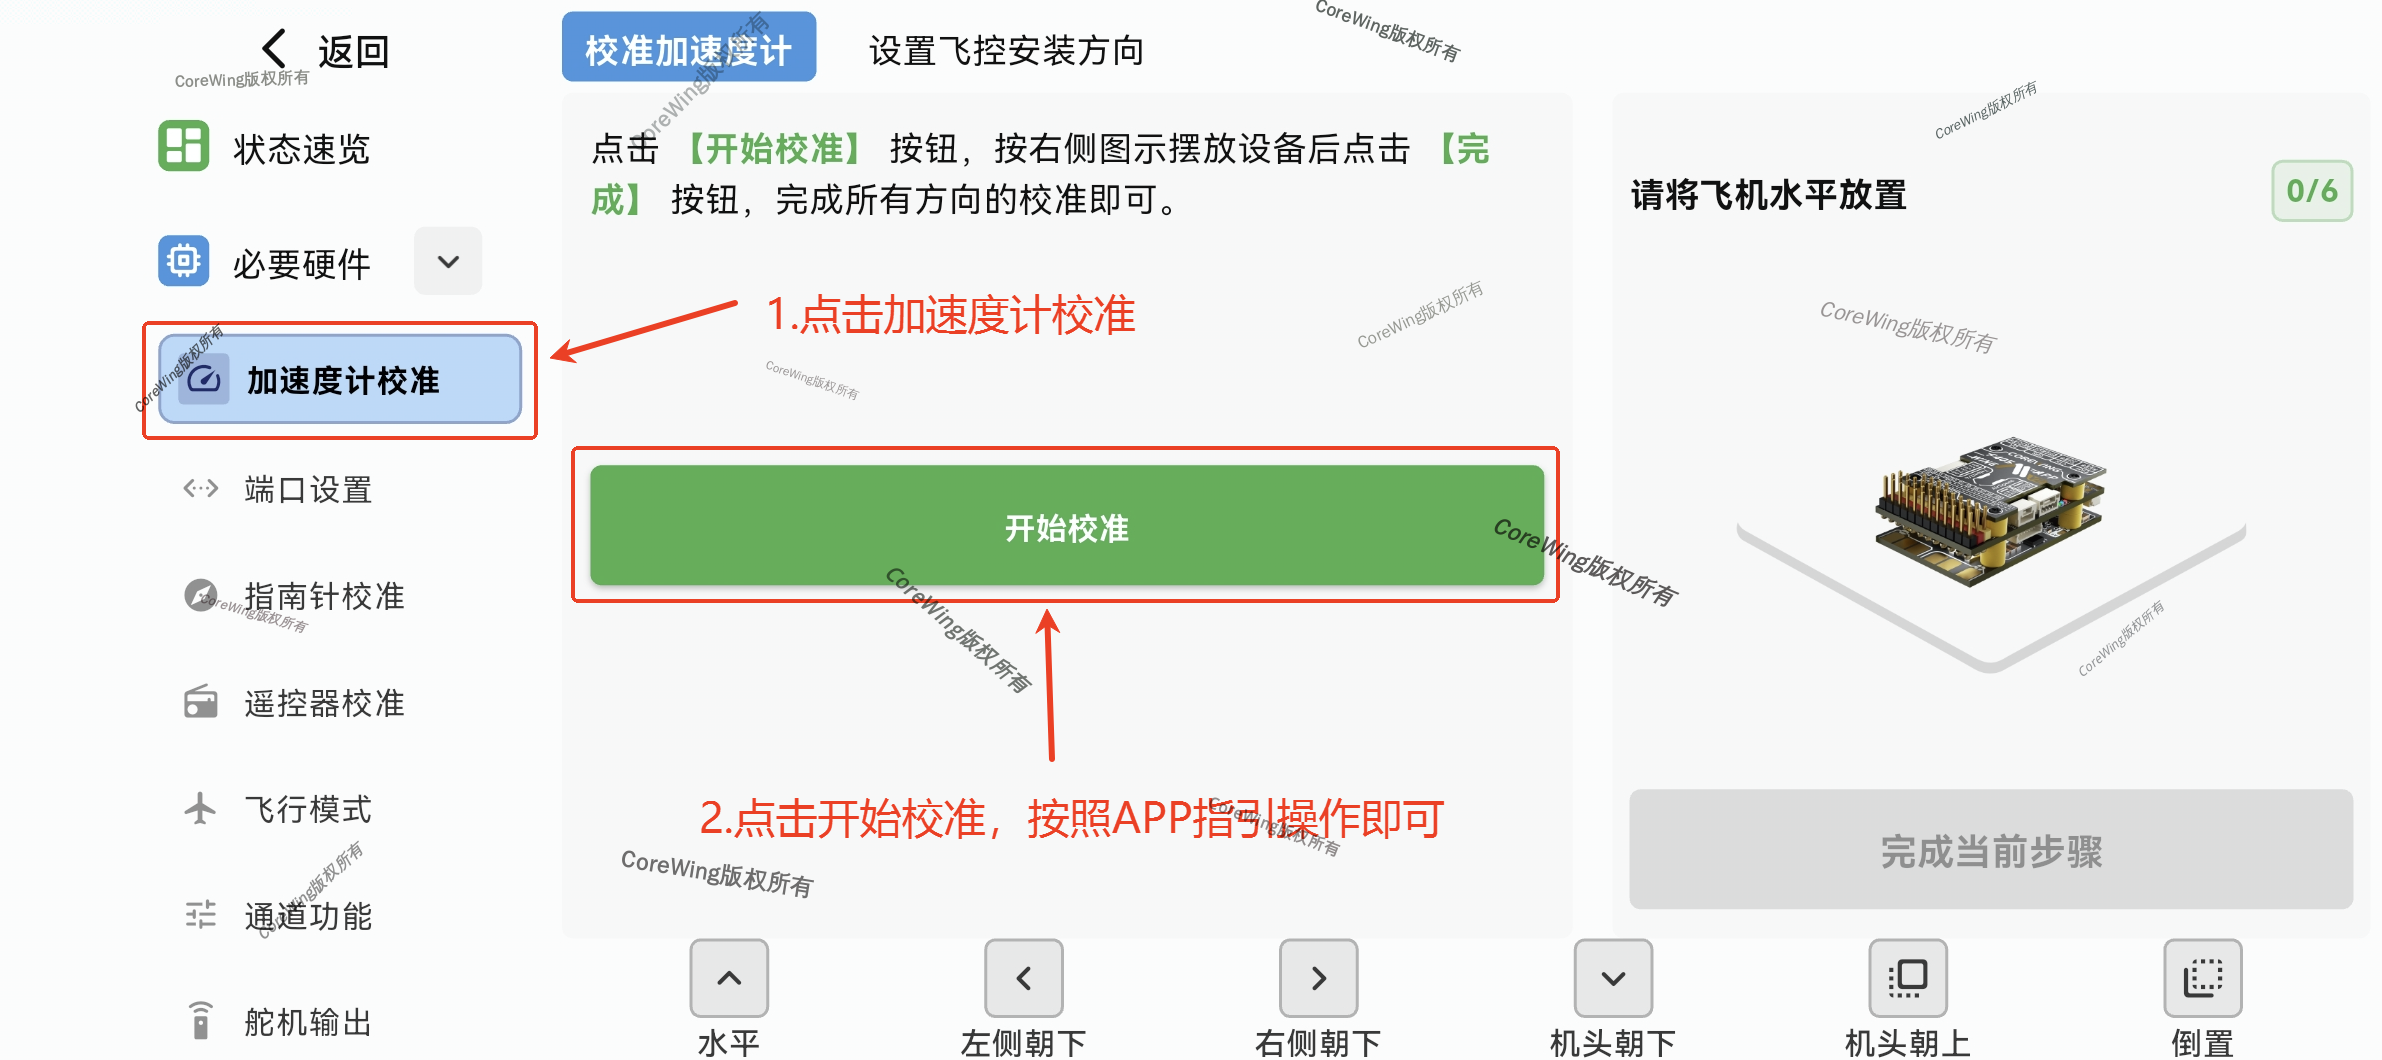
- For specific operation steps, please follow the APP guide:
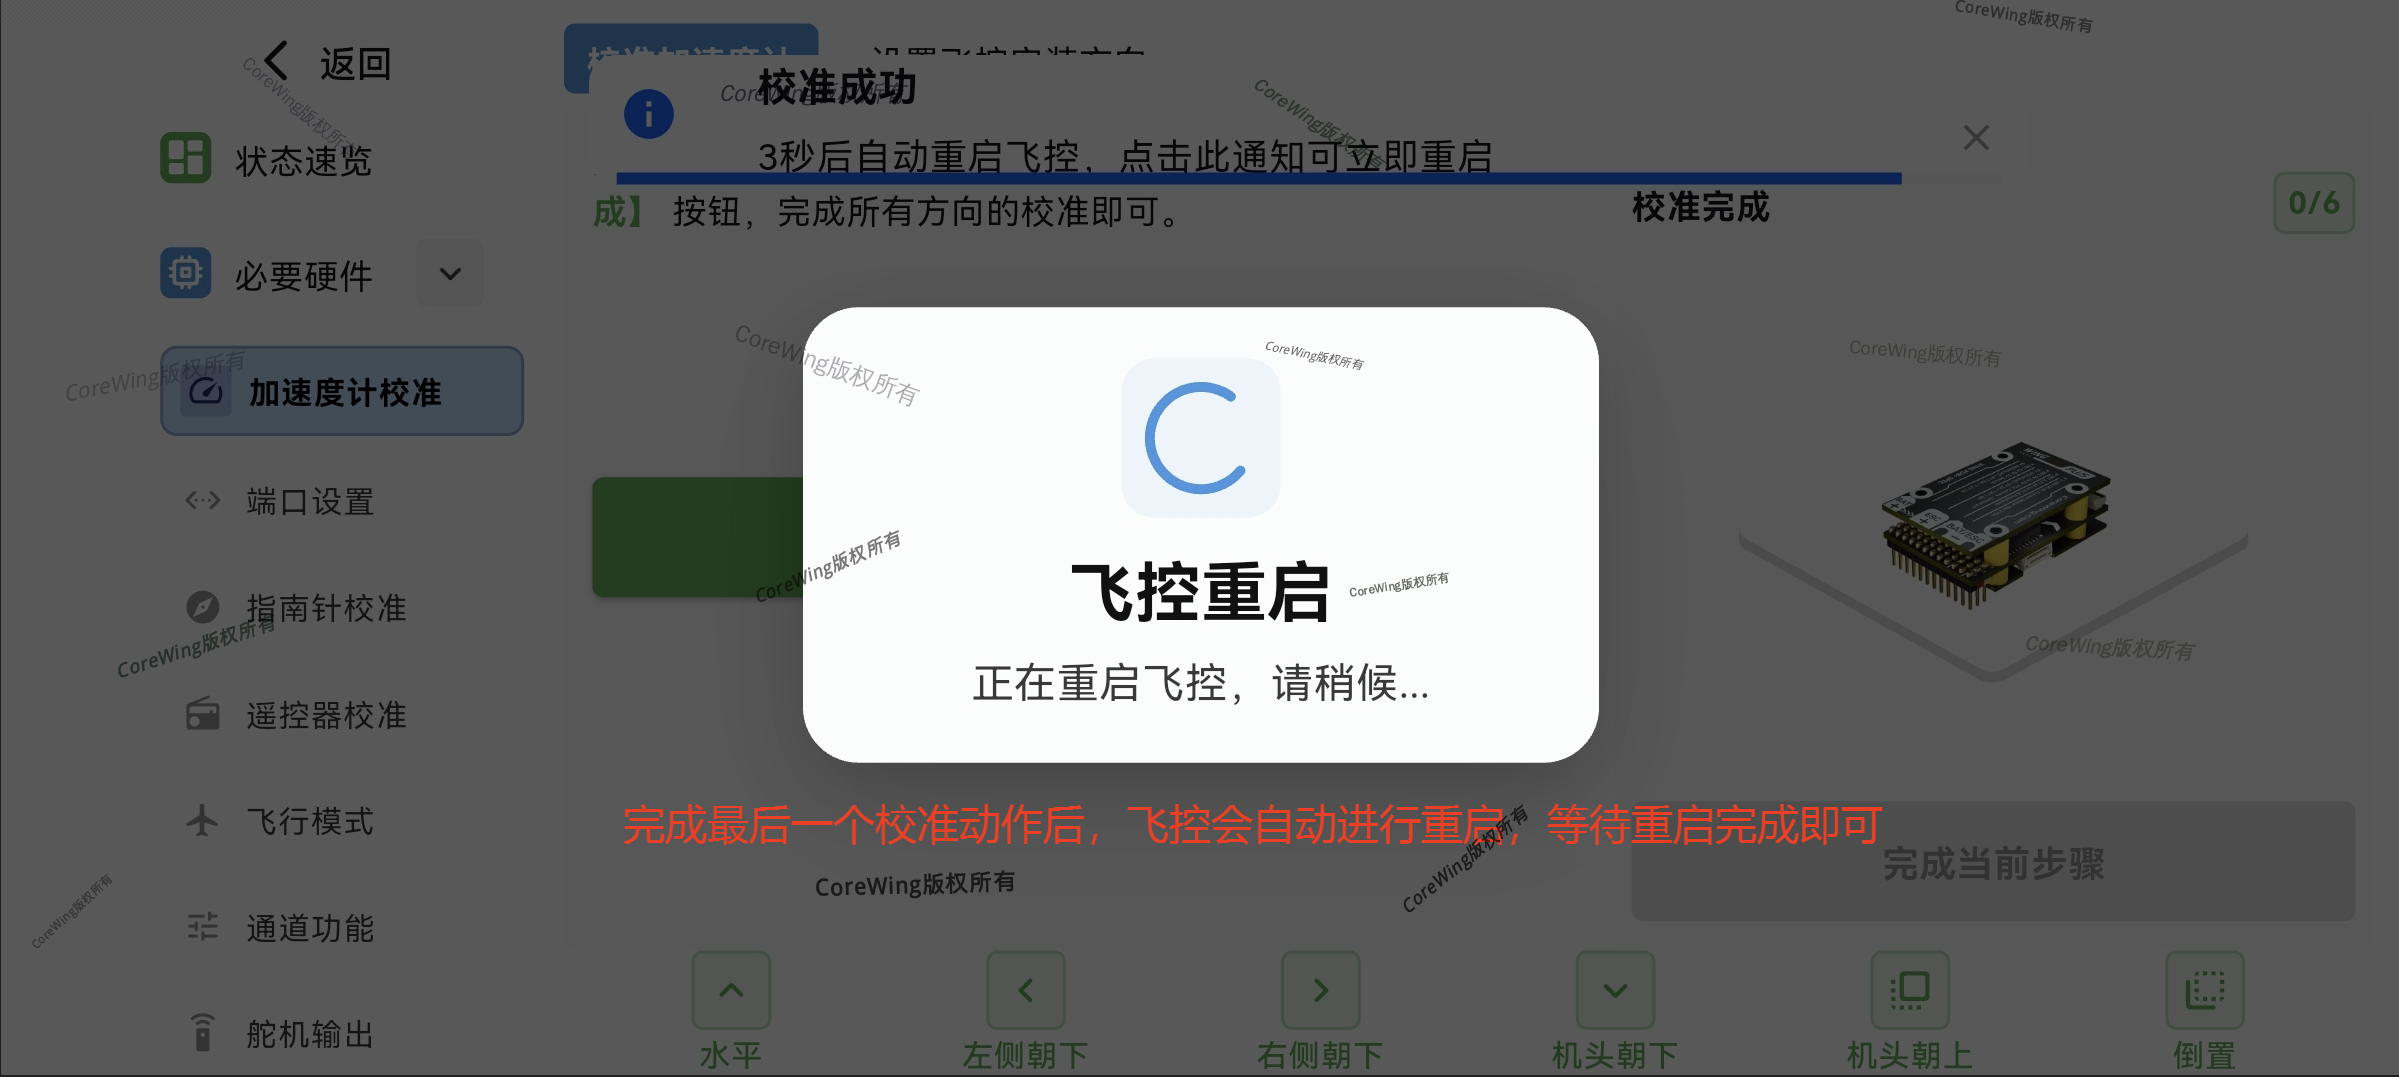
Important
During use, if there are significant temperature and climate changes, the gyroscope has suffered severe impacts, or sensors have been replaced, the accelerometer needs to be recalibrated!
Important
For detailed accelerometer calibration procedures, refer to: https://docs.corewing.com/plane/ardupilot/settings/fc/accel-calibration.html
3.2 Remote Control Settings and Flight Mode Settings
Important
Navigate to the MDL/MIXES page and check if the remote control CH1-CH4 matches the following settings. If not, please modify the mixing.

3.2.1 Arm Channel Settings
1. Remote Control Settings
Select a two-position switch
Navigate to the
MDL/MIXESpage and configure its mixing asCH5

2. Ground Control Station Settings
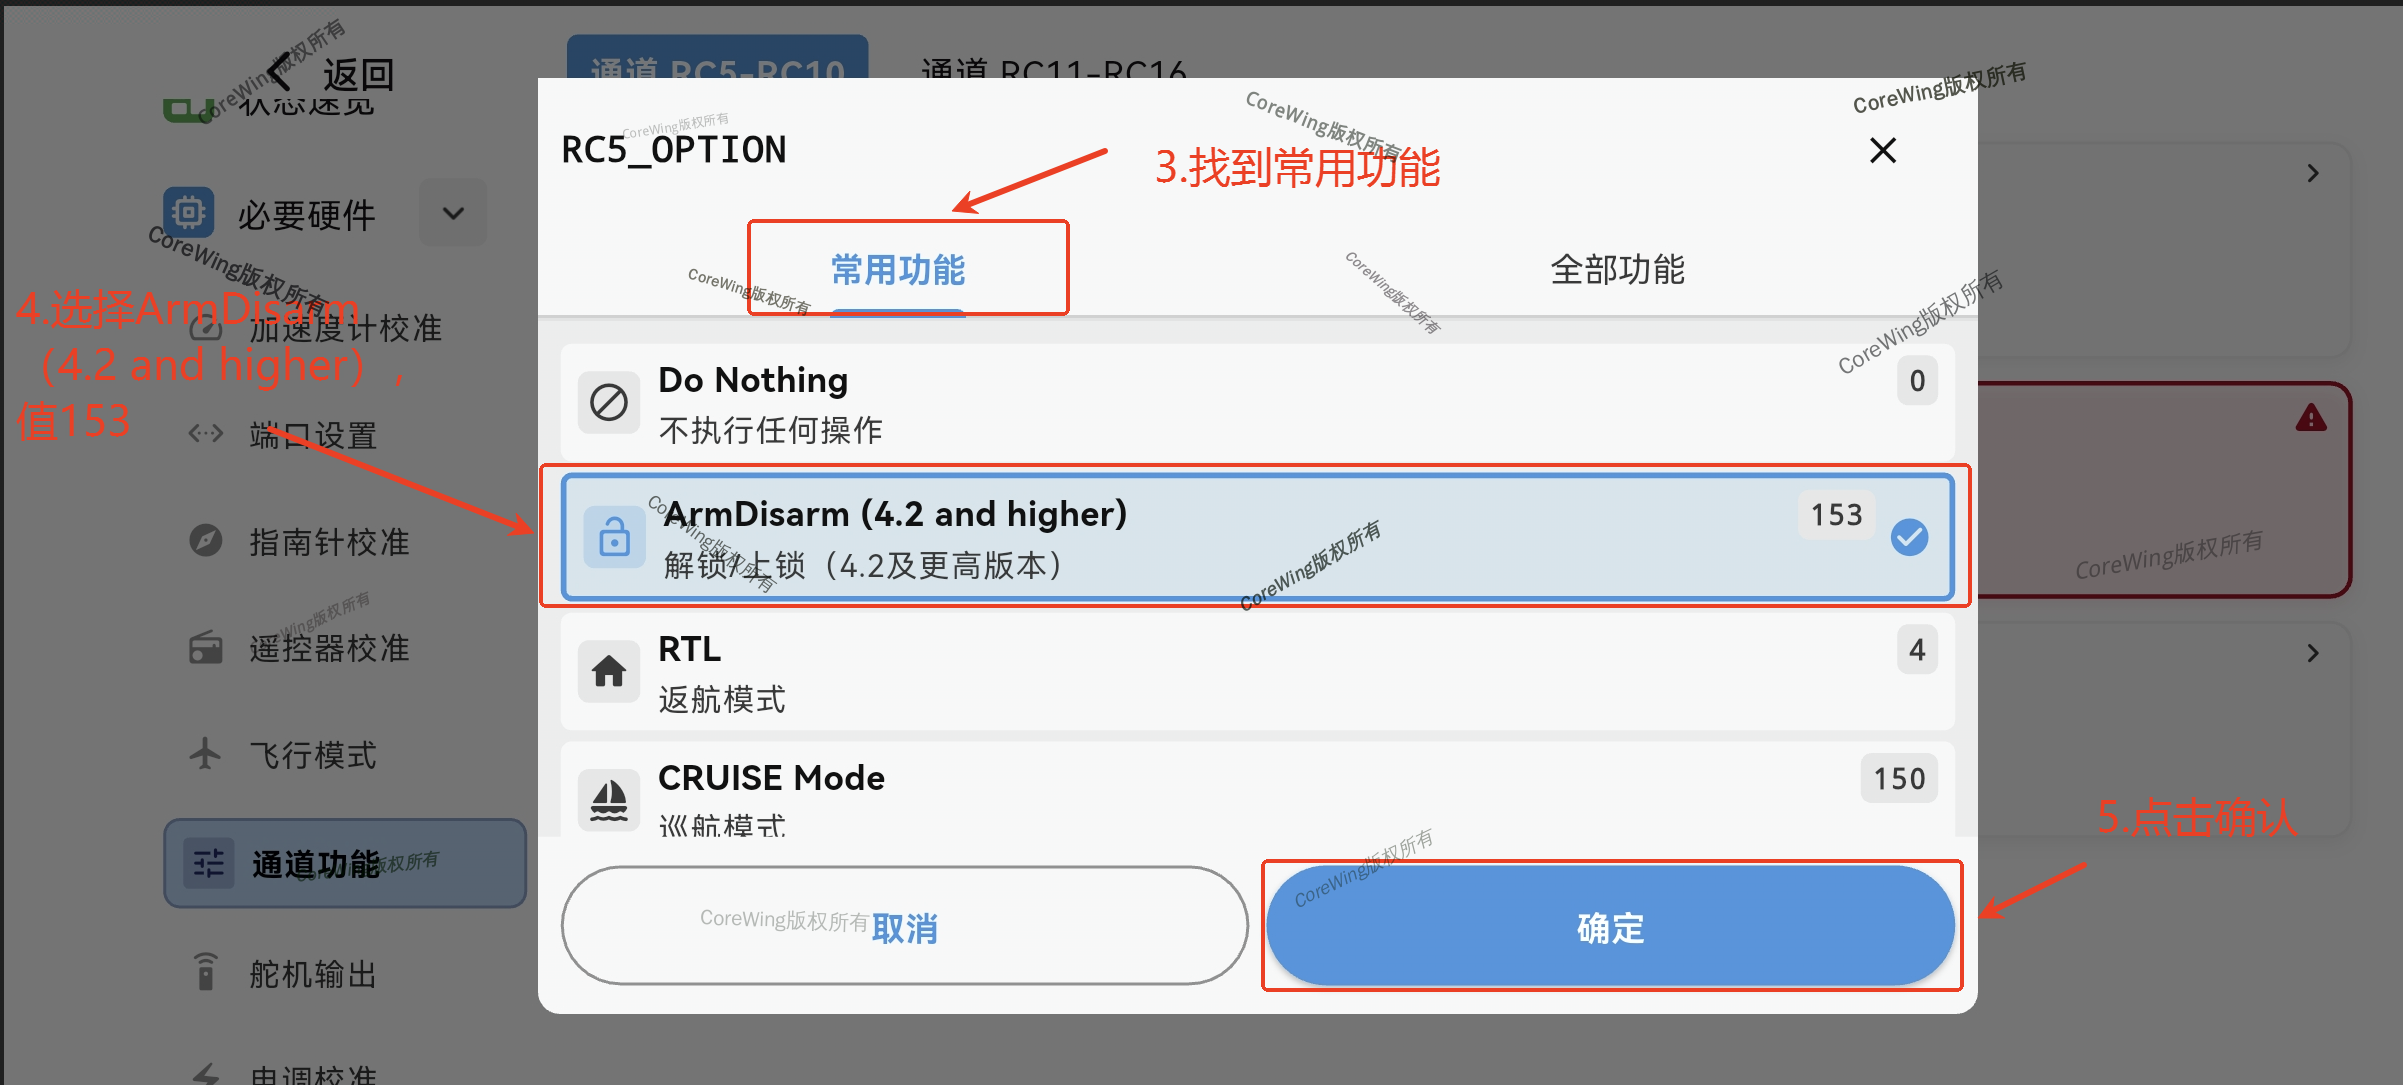
- Click Channel Functions, select RC5
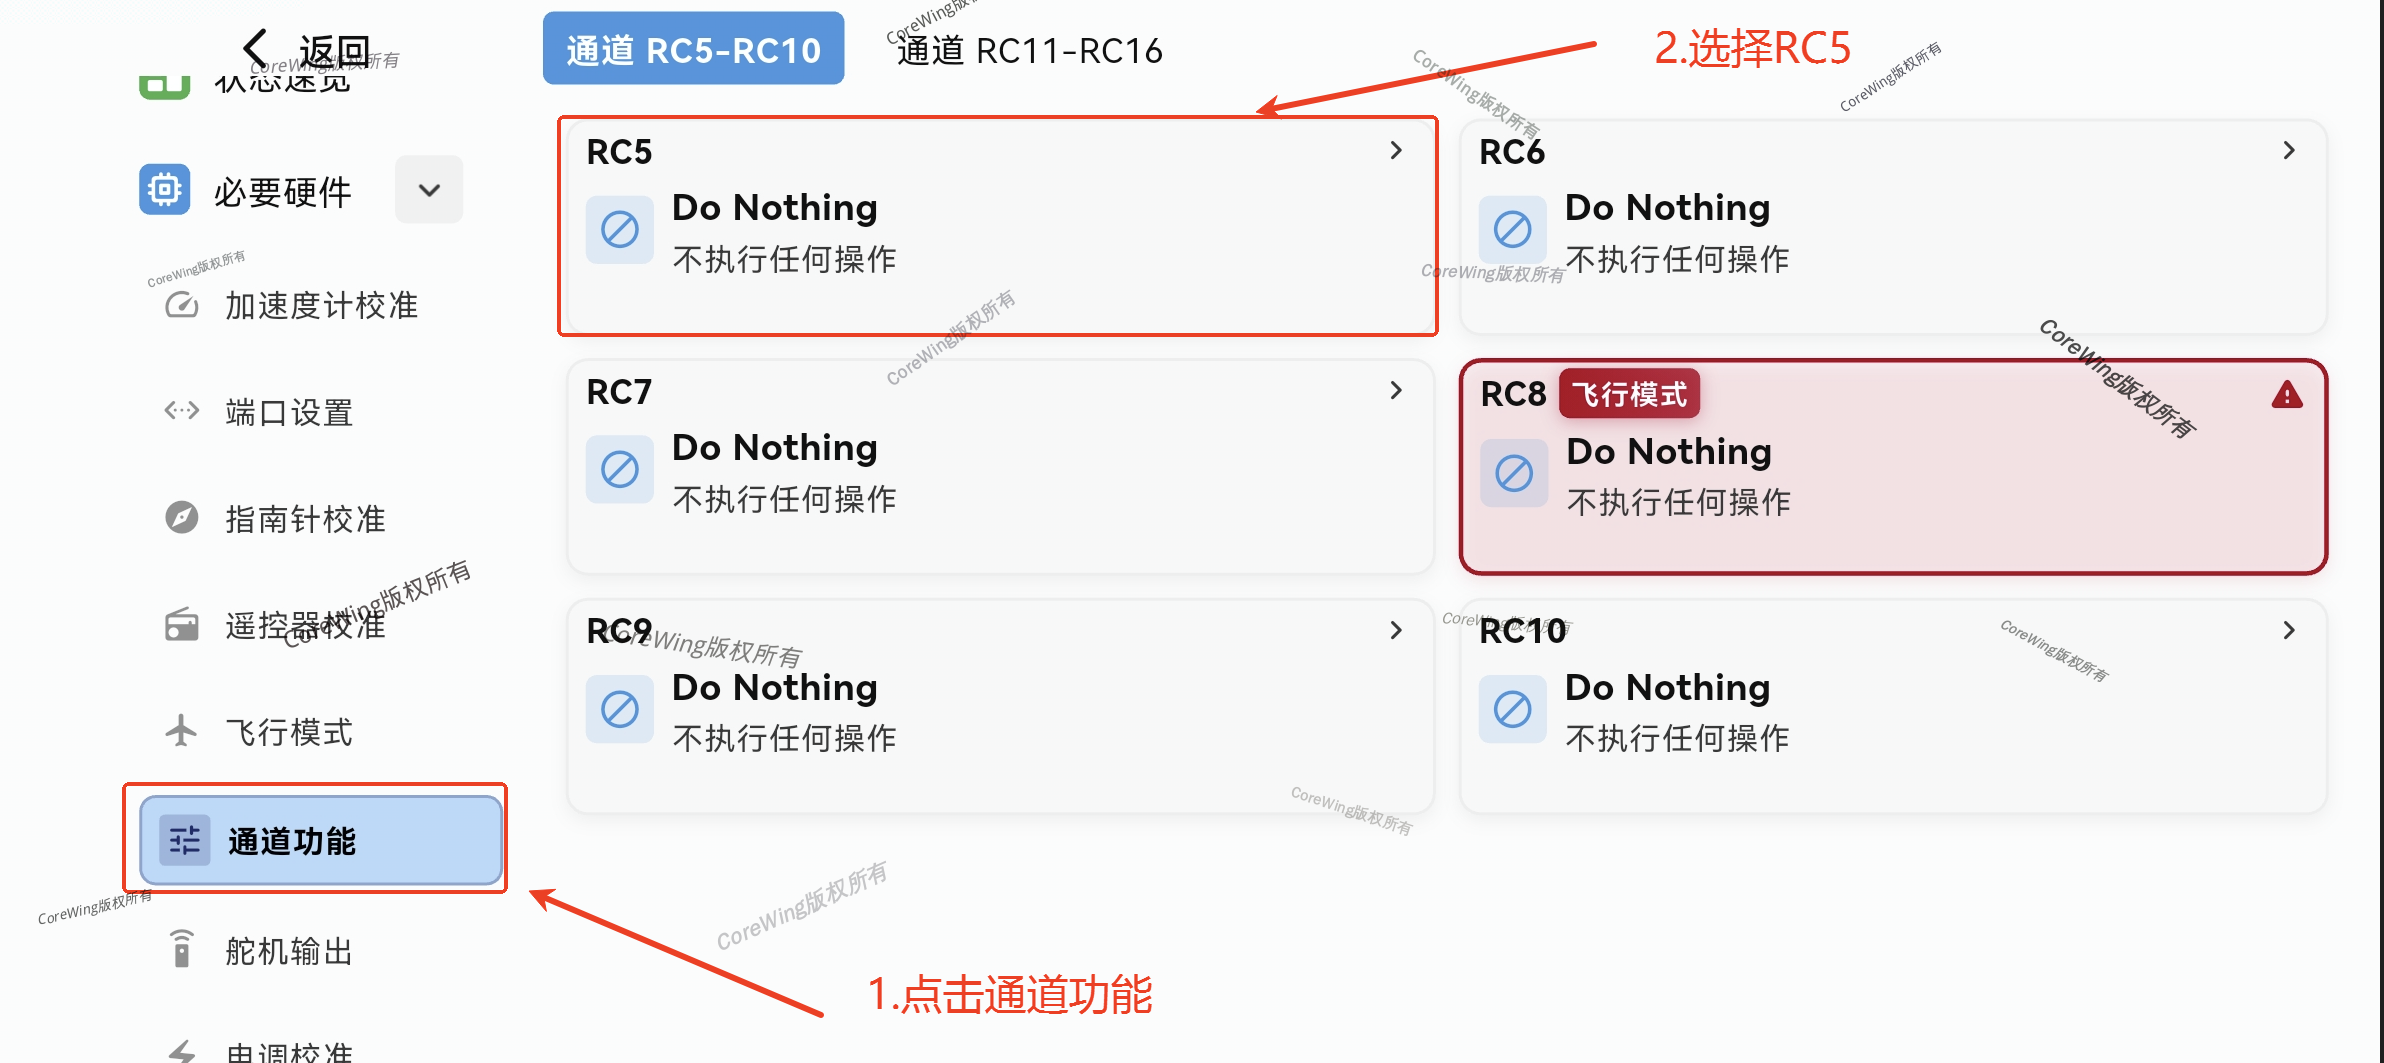
Click Common Functions, find
ArmDisarm(4.2 and higher), value153Click Confirm
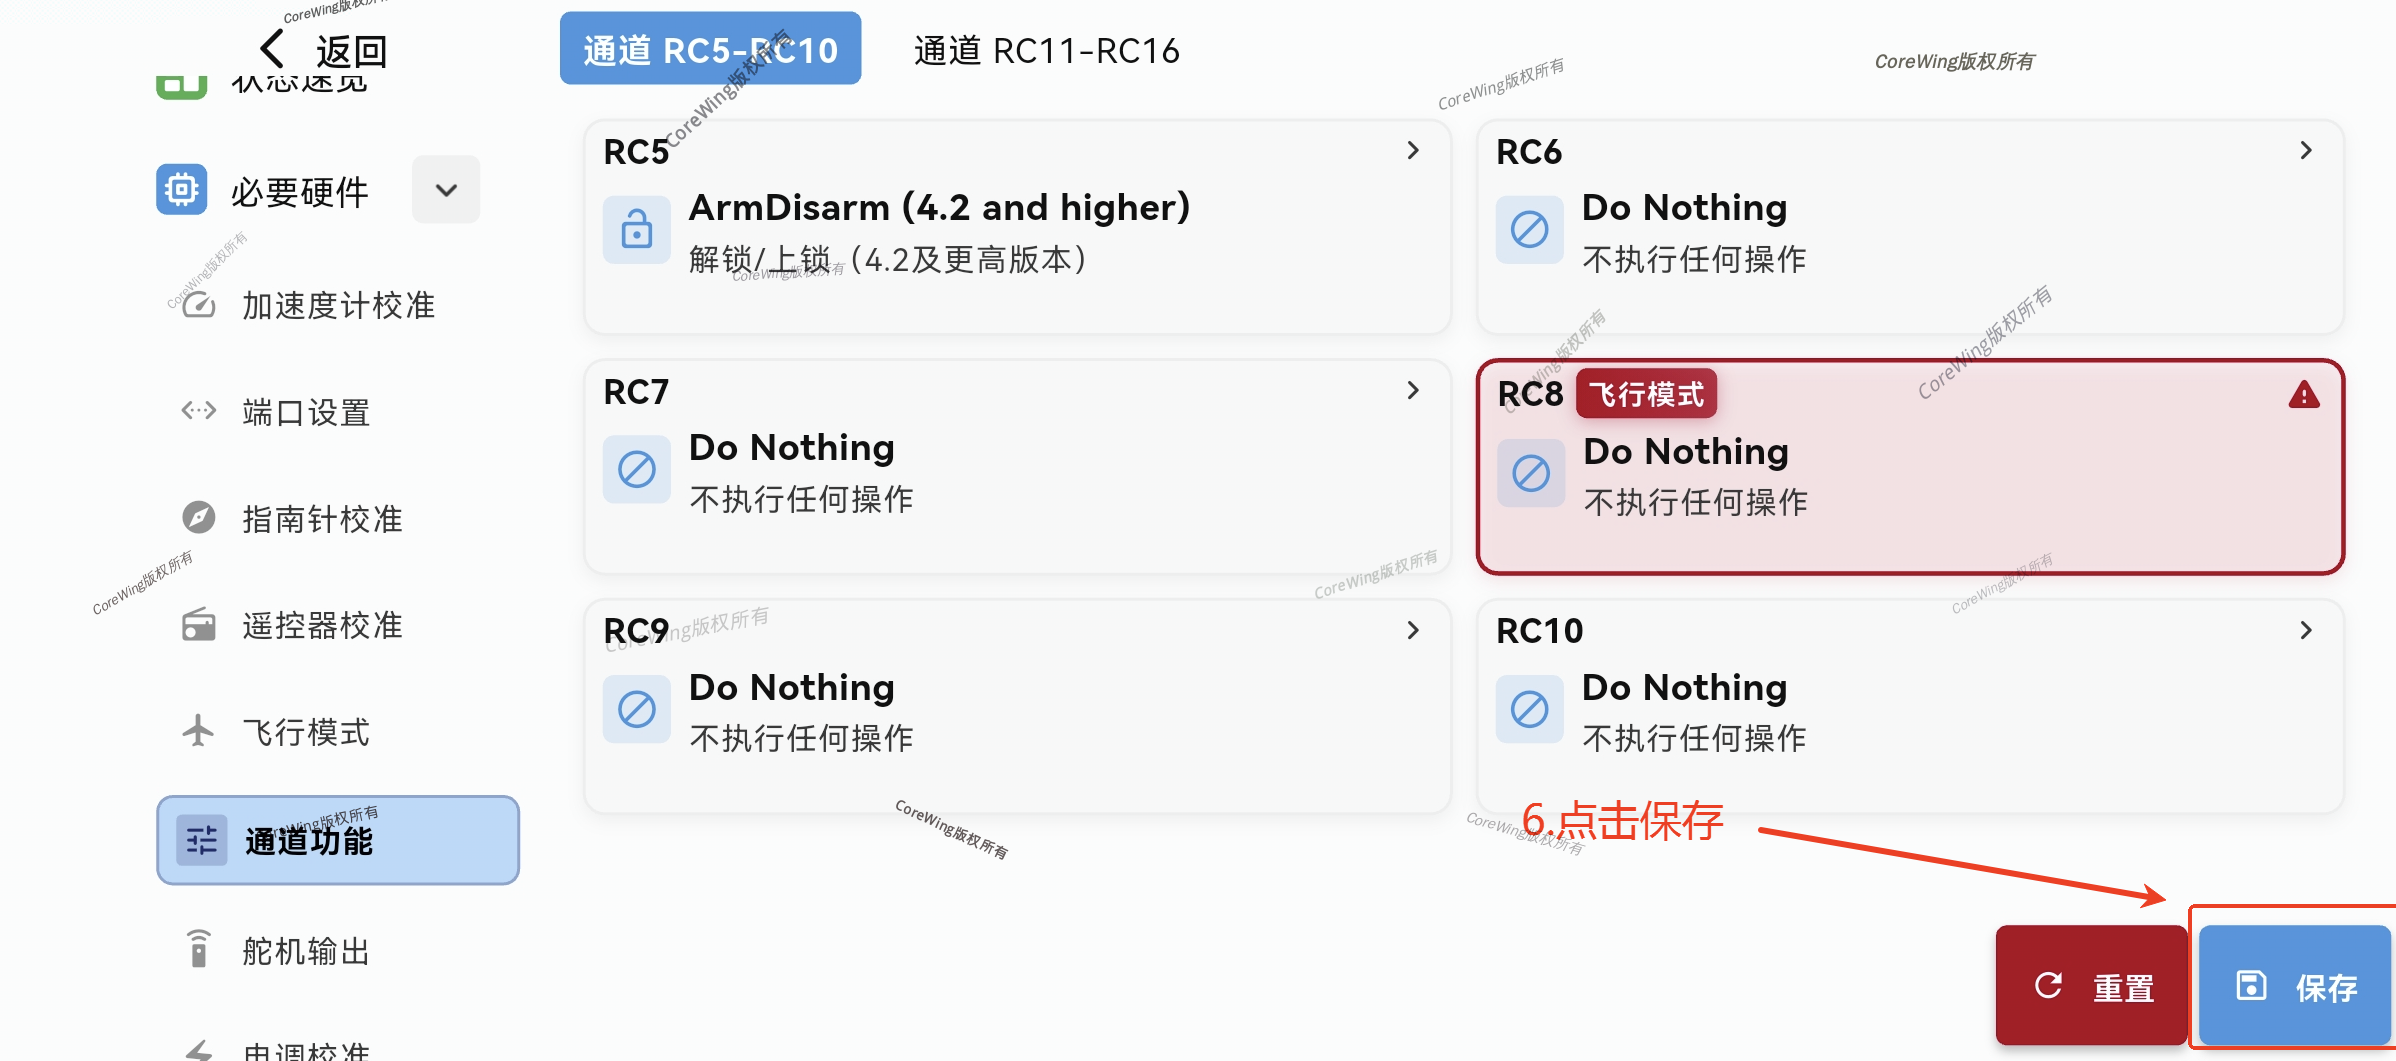
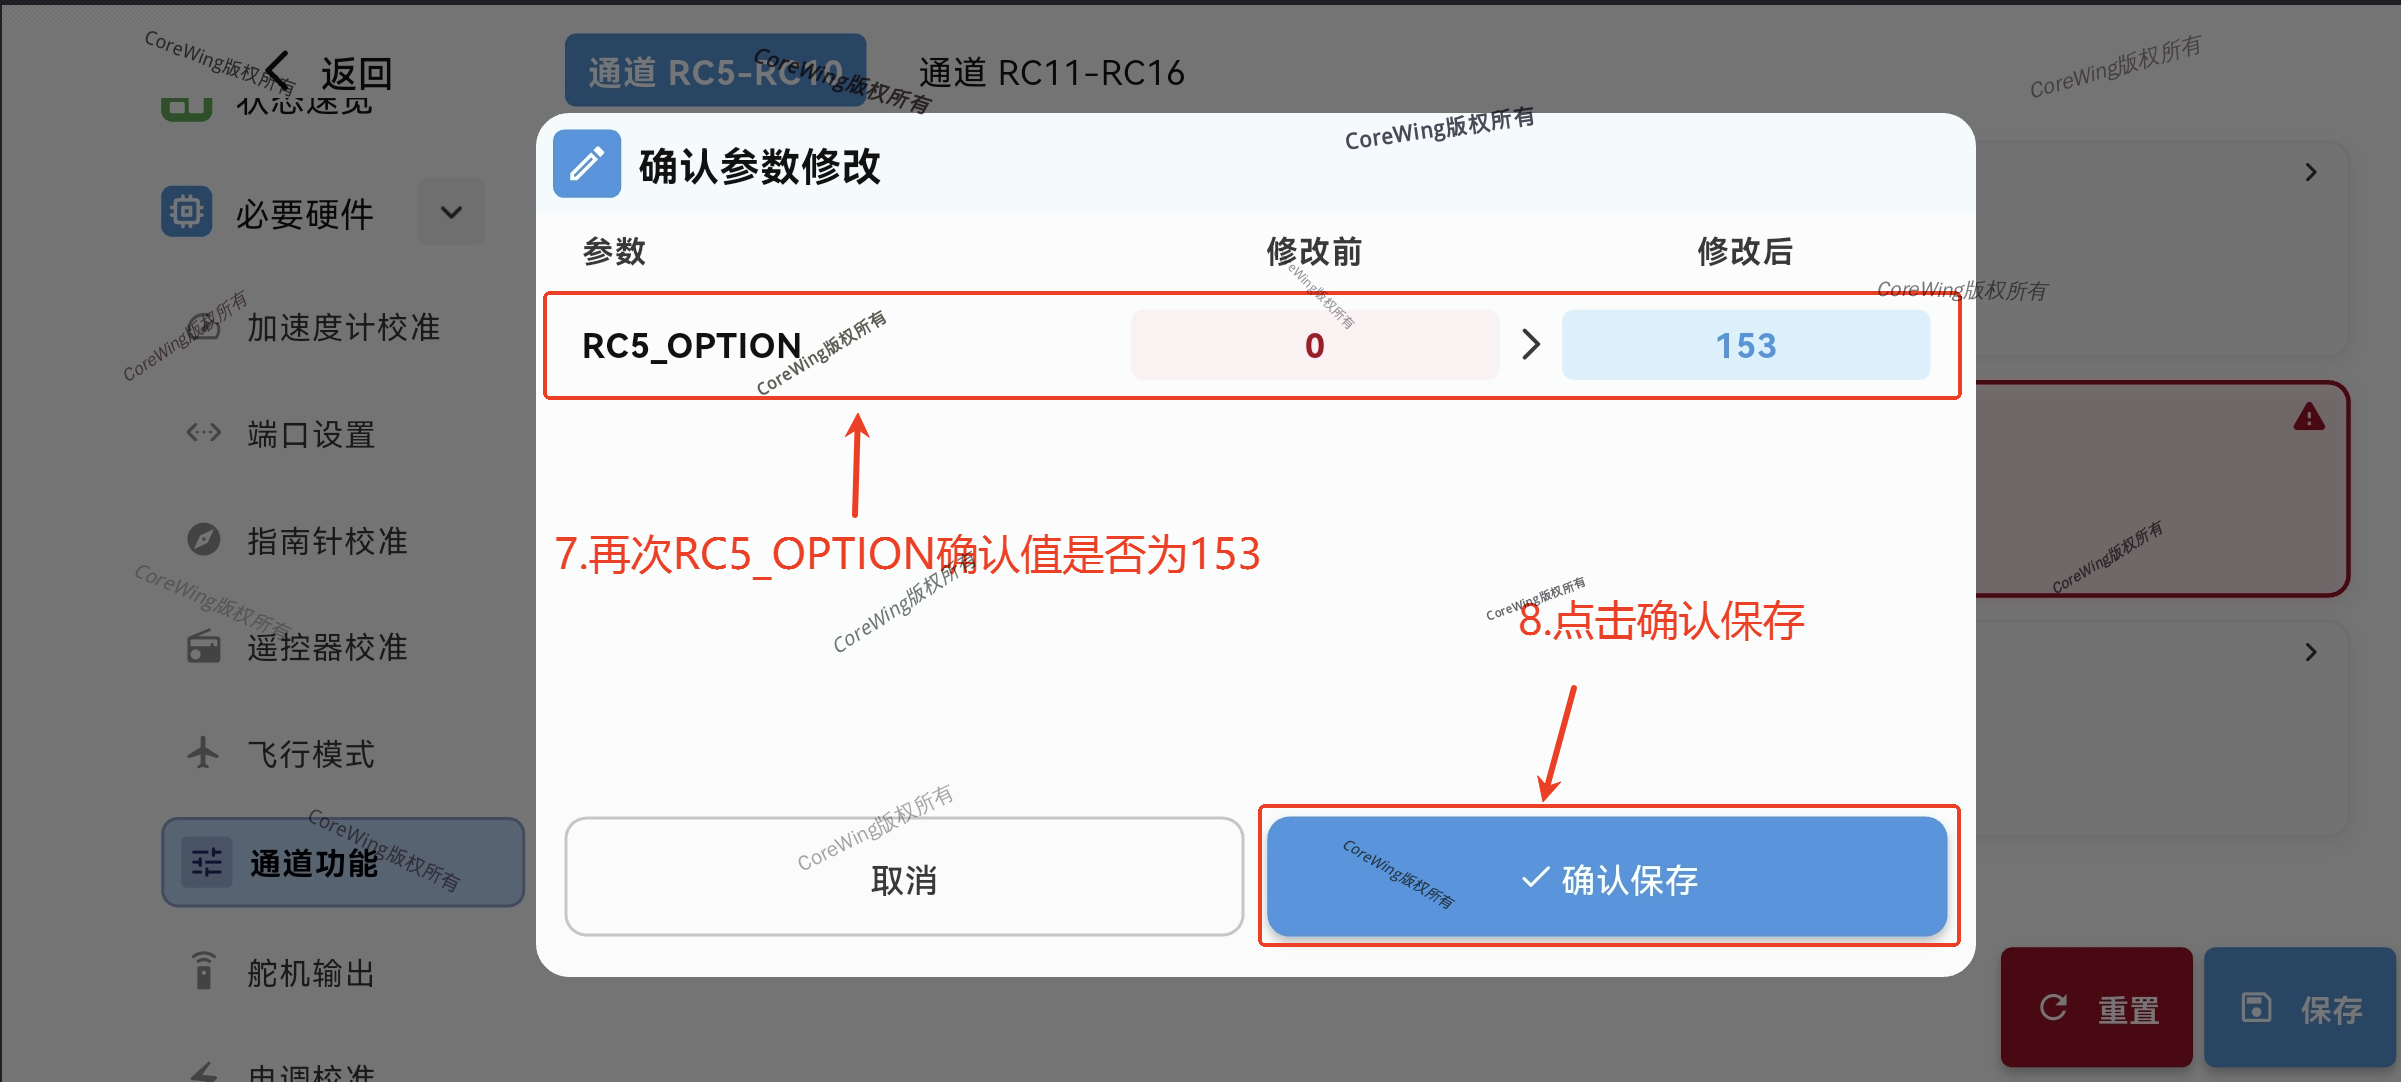
- Click Save in the bottom right corner, confirm the parameter modification is
153, click Confirm to save
Important
For detailed information on how to set arming and disarming, refer to this article: https://docs.corewing.com/plane/ardupilot/settings/fc/arming-disarm-setup.html
3.2.2 Return-to-Home Channel Settings
1. Remote Control Settings
Select a two-position switch
Navigate to the
MDL/MIXESpage and configure its mixing asCH6(can be set according to actual situation, for reference only)

2. Enable Return-to-Home Switch Settings
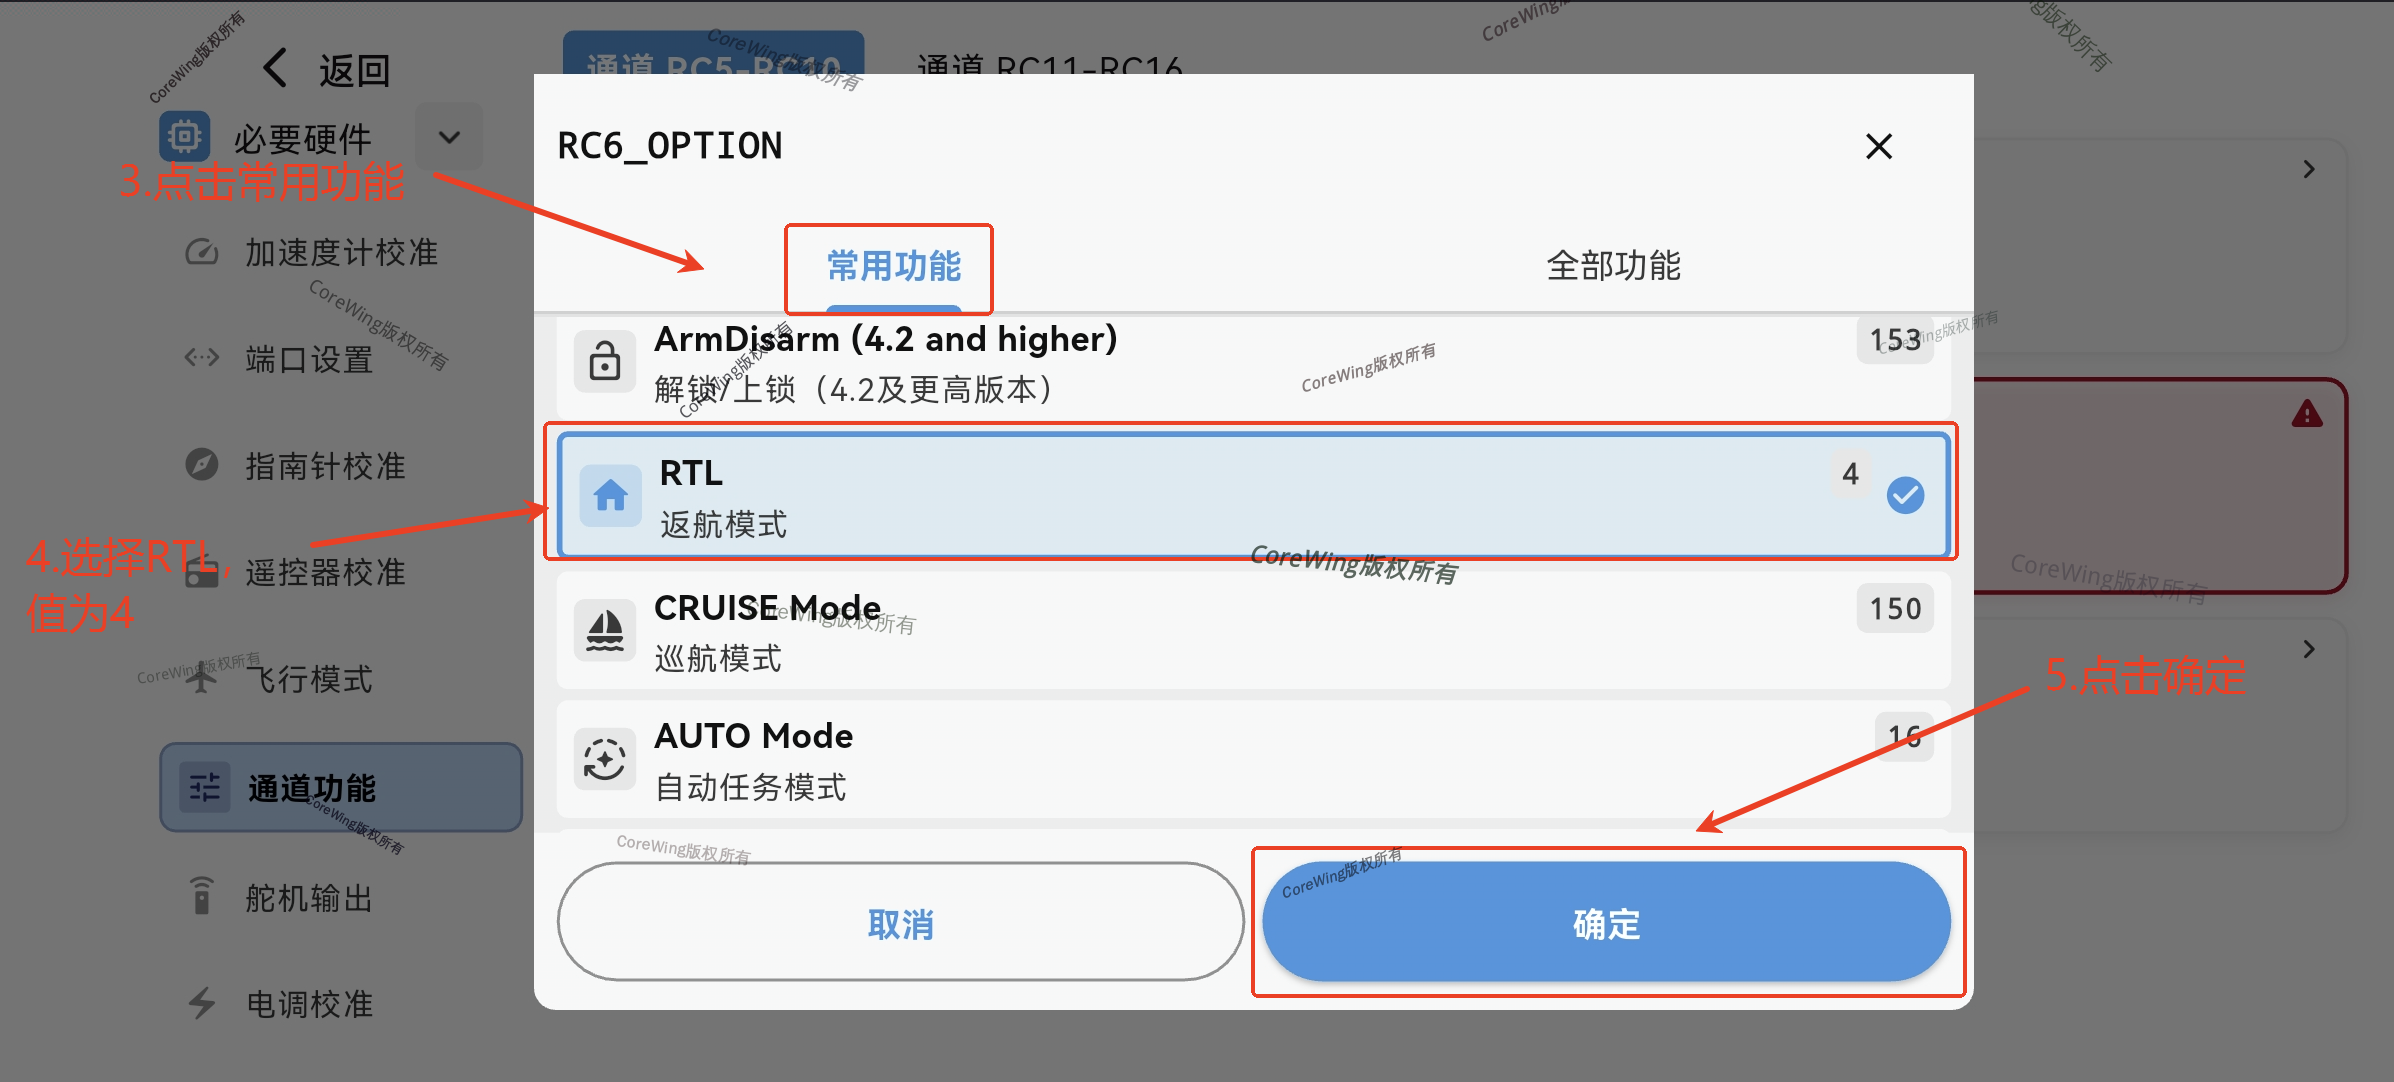
Click Channel Functions, select
RC6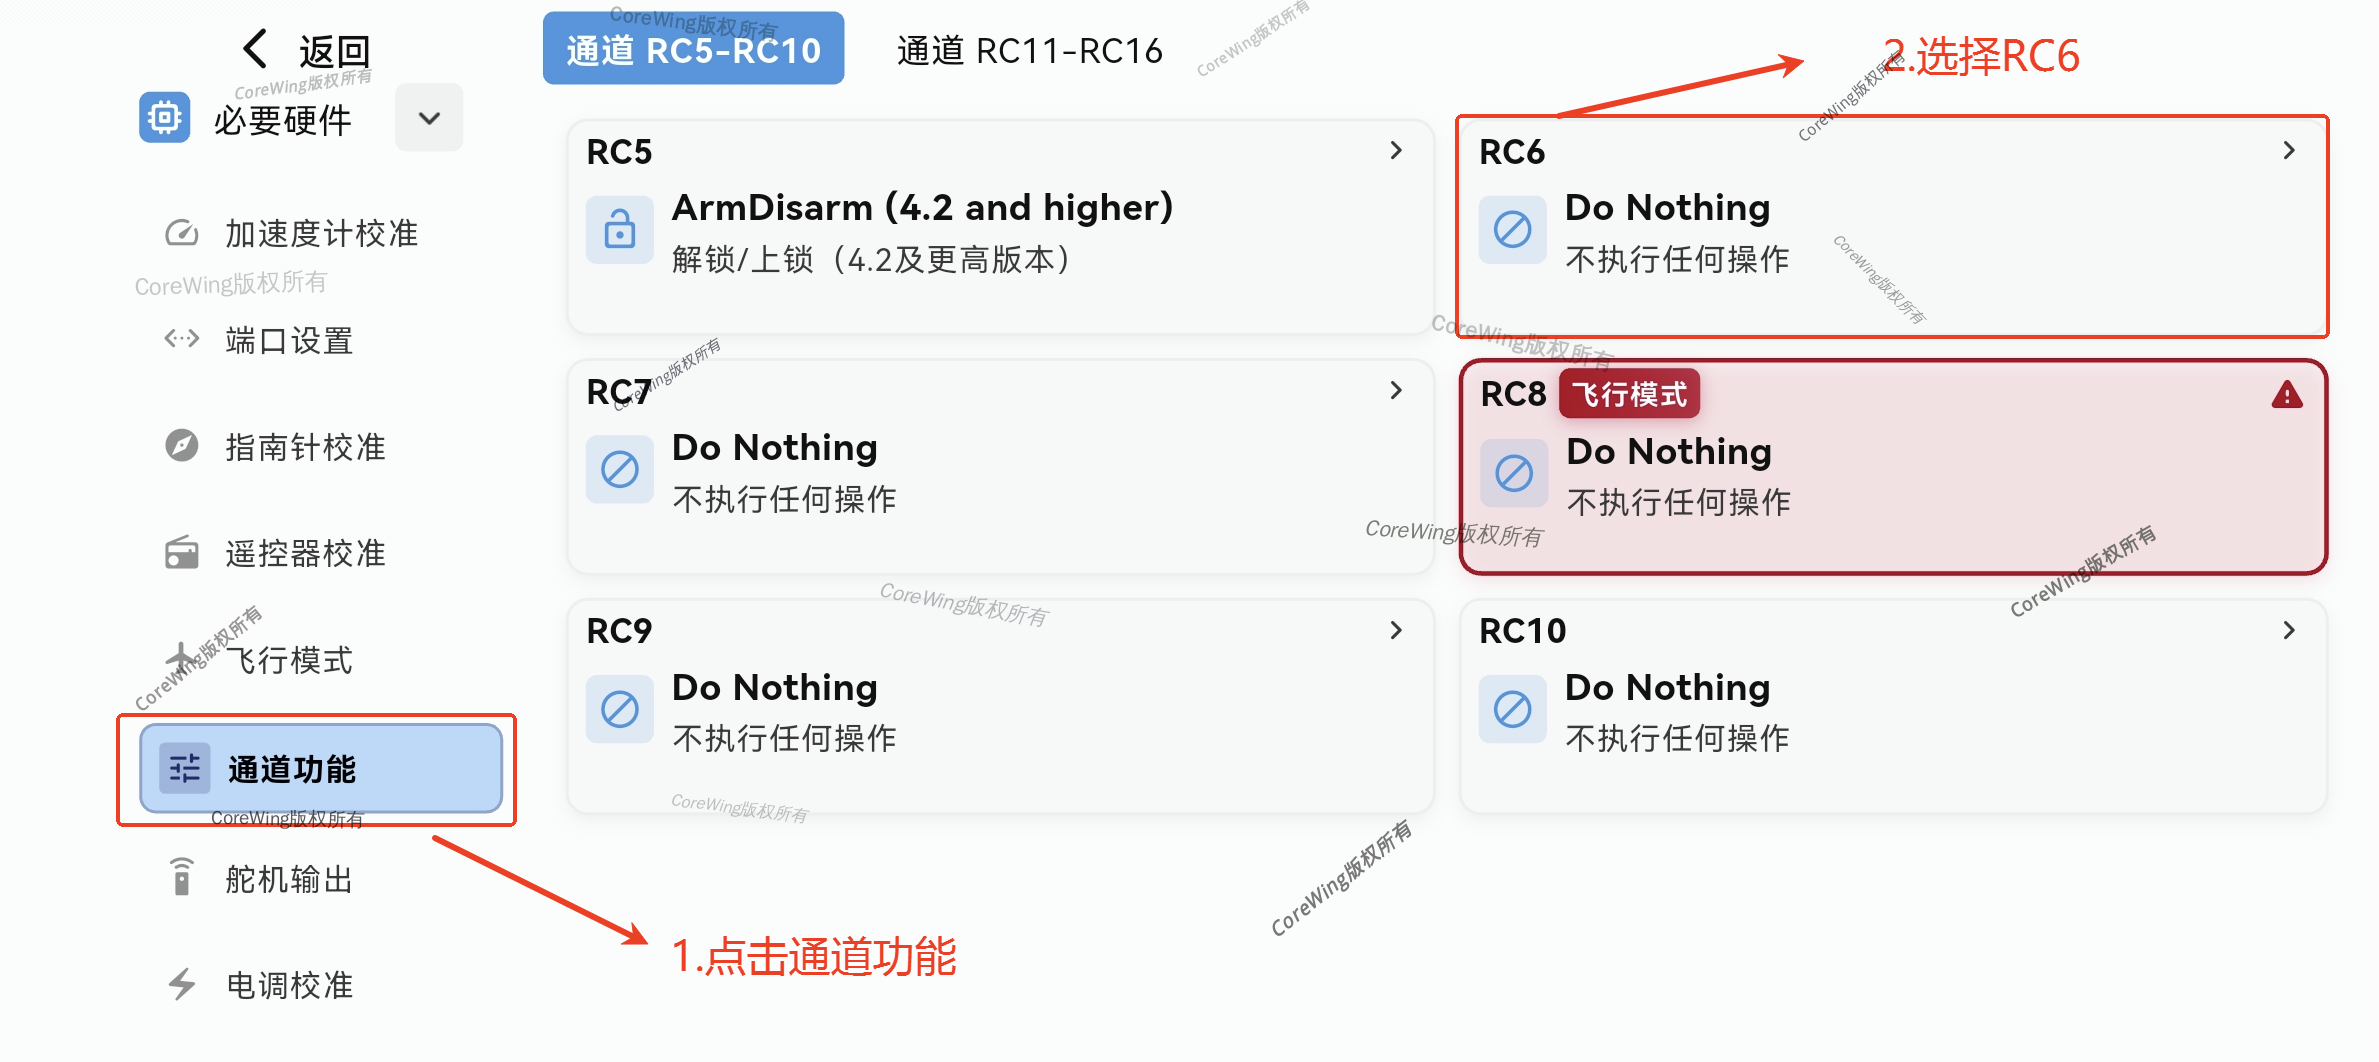
Click Common Functions, find
RTLReturn-to-Home mode, value4Click Confirm
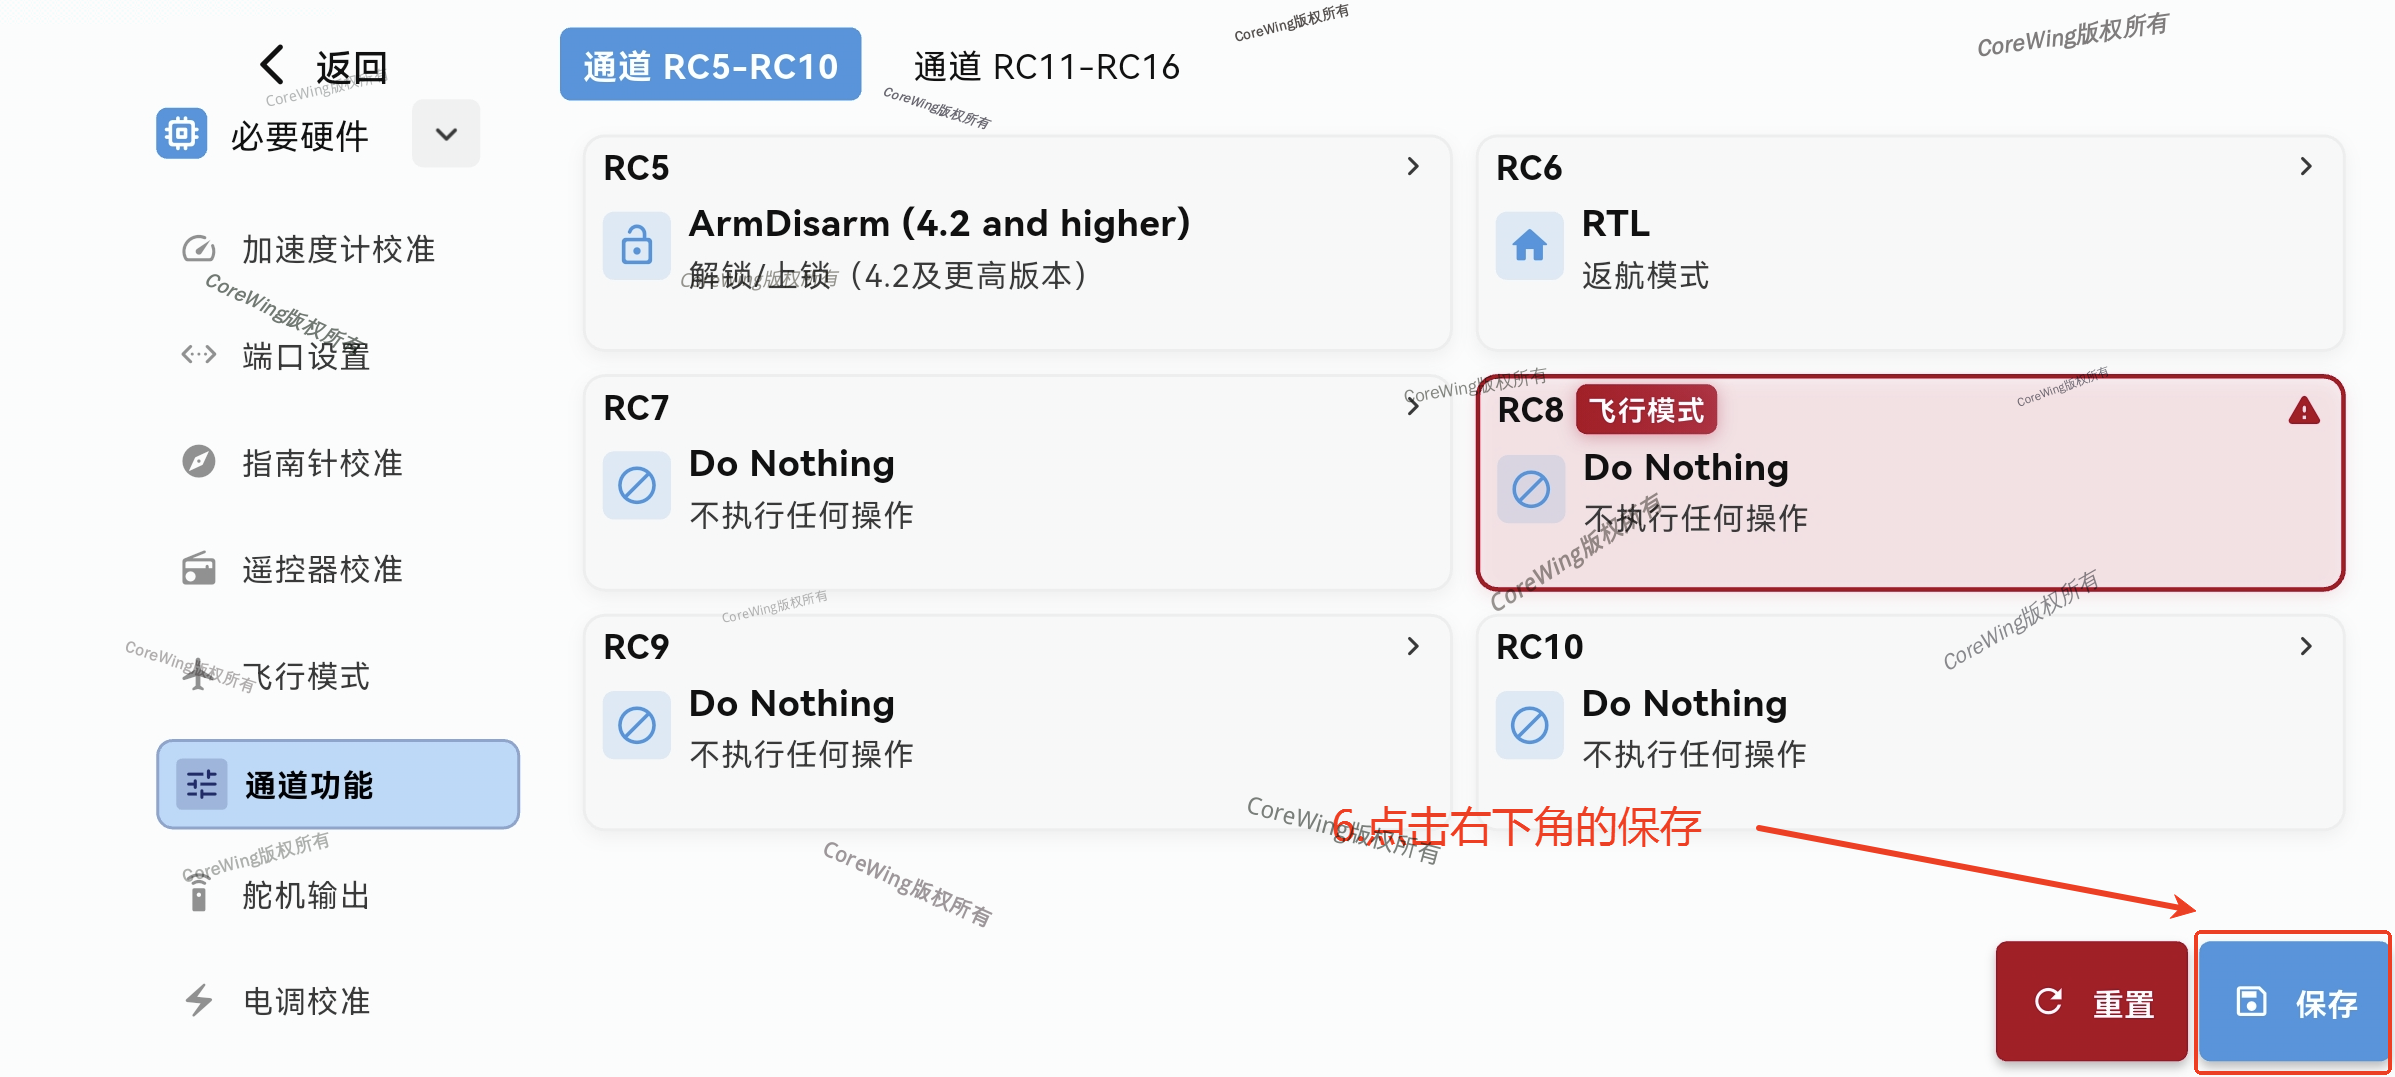
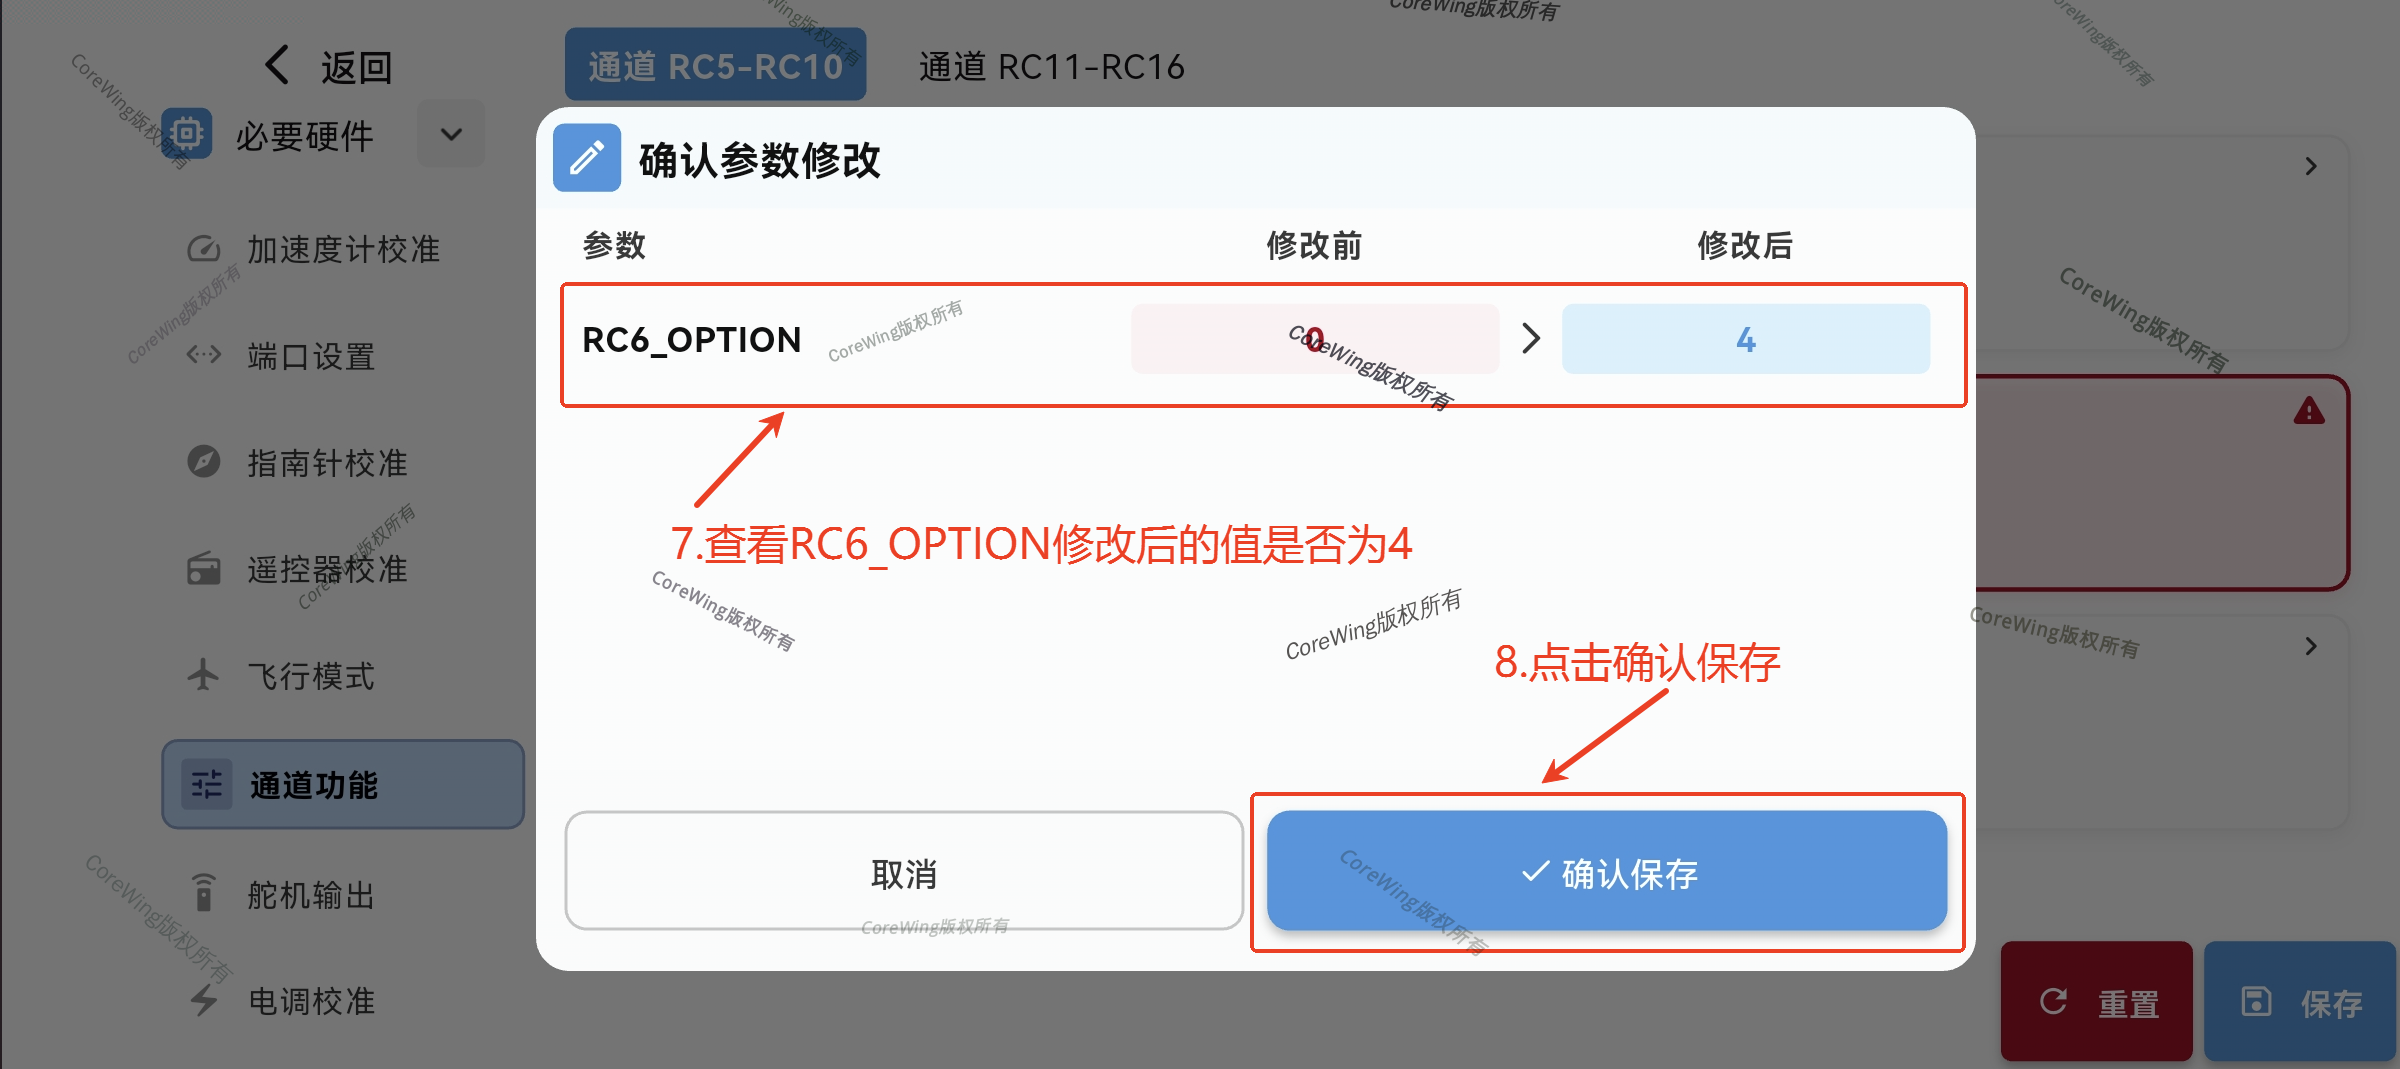
Click Save in the bottom right corner, confirm the parameter modification is
4, click Confirm to save
3.2.3 Flight Mode Settings
1. Remote Control Settings
Select a three-position switch, set the three-position flight mode switch
Navigate to the
MDL/MIXESpage and configure its mixing asCH8

2. Ground Control Station Settings
Flight Mode Channel Settings:
Click Flight Modes, click Flight Mode Channel
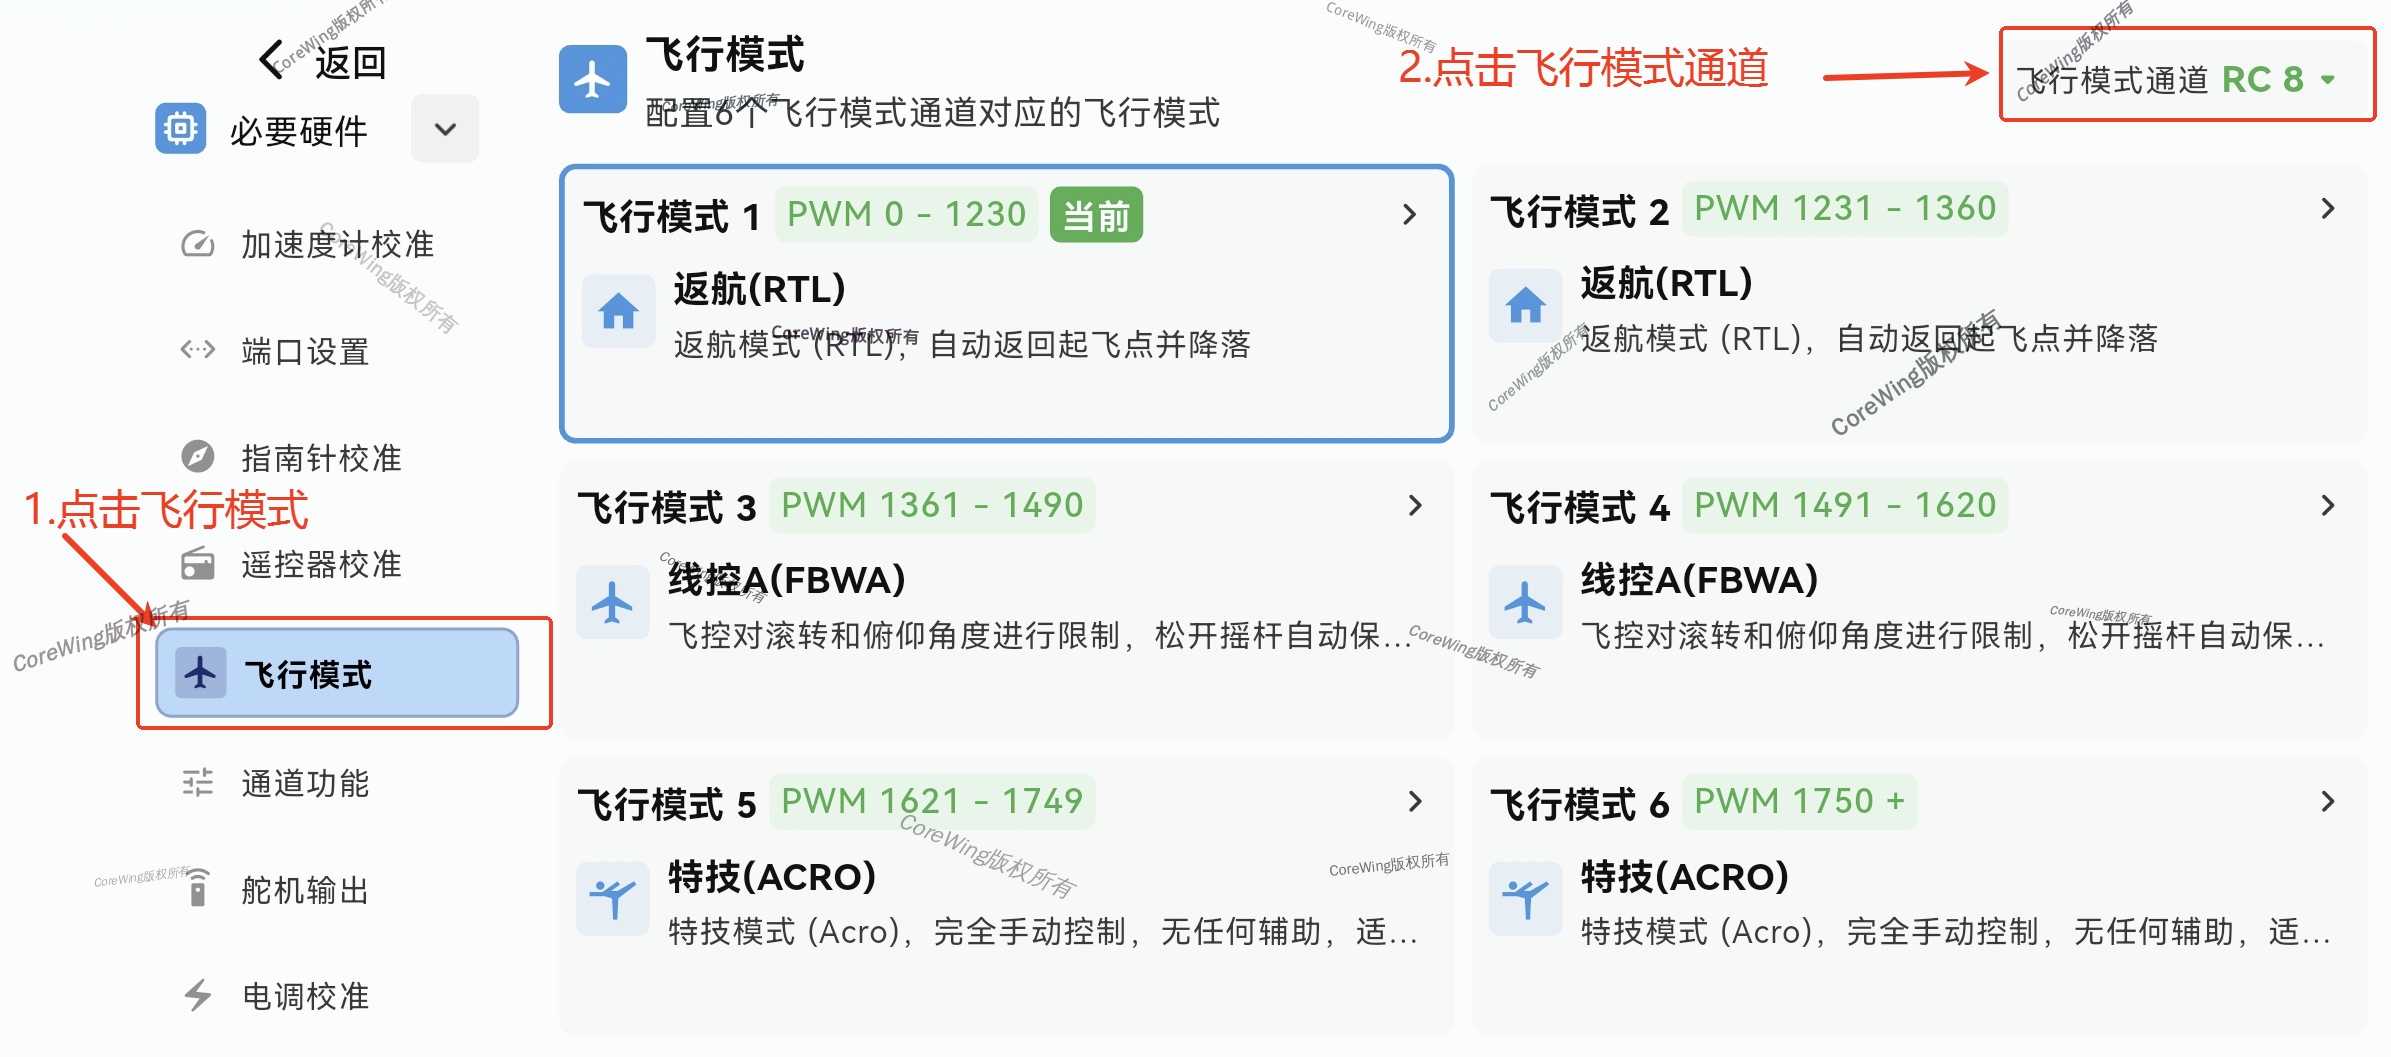
Set the flight mode channel to
RC8, click Confirm
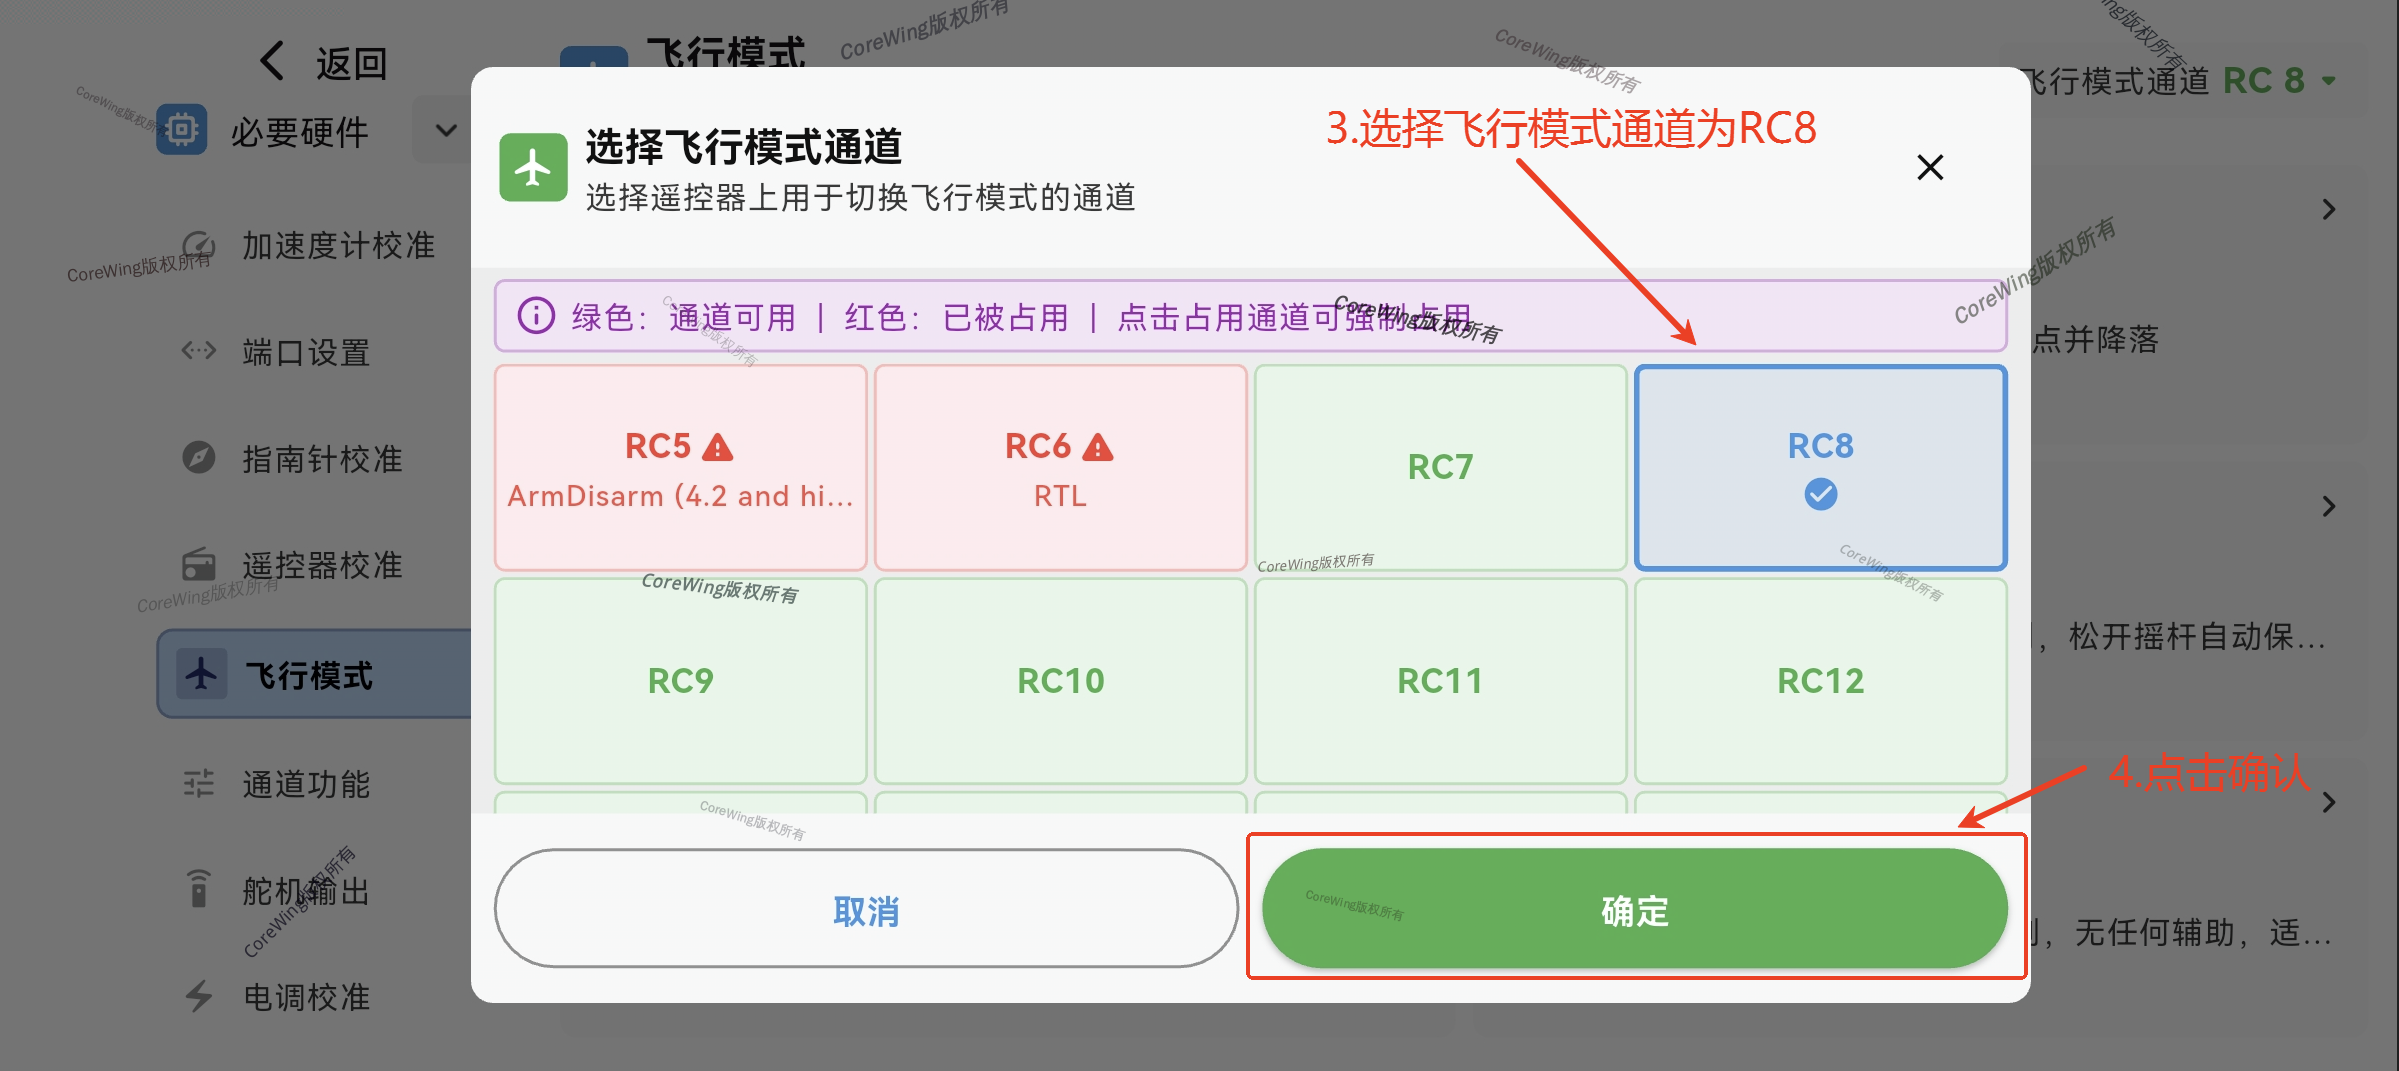
Flight Mode Settings:
Set flight modes 1, 2 to ACRO;
Set flight modes 3, 4 to FBWA;
Set flight modes 5, 6 to AUTOTUNE.
After setting, click Save
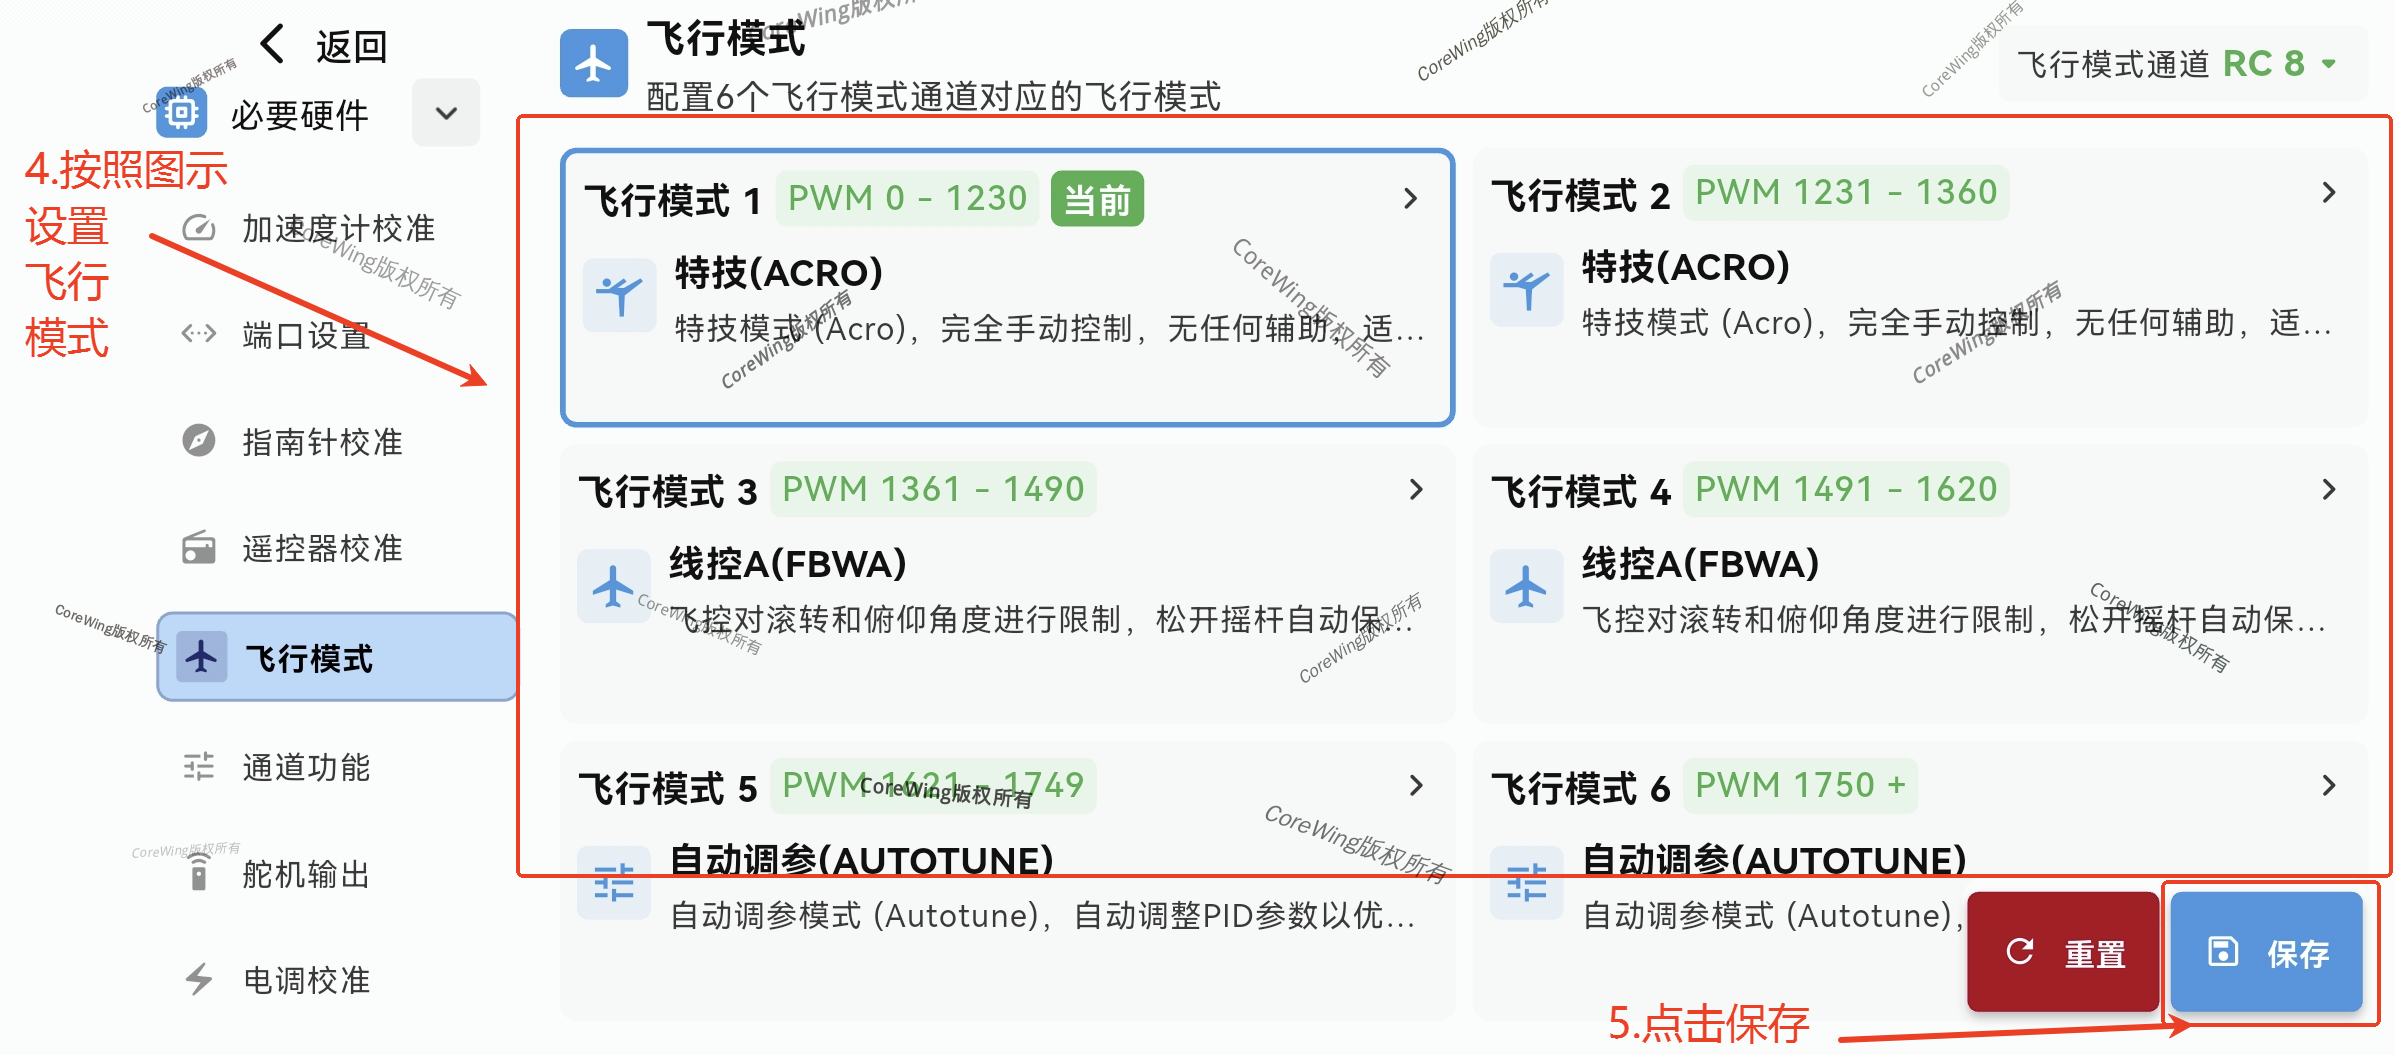
Important
For detailed information on how to set a six-position flight mode switch, refer to: https://docs.corewing.com/plane/ardupilot/settings/rc/sixpos-switch.html
Important
For detailed information on flight modes, refer to this article: https://docs.corewing.com/plane/ardupilot/settings/fc/flight-modes.html
3.2.4 Remote Control Calibration
Important
Please bind the remote control with the receiver before proceeding with the following steps.
For information on how to bind an ELRS receiver with the remote control, refer to this article: https://docs.corewing.com/plane/ardupilot/settings/rc/elrs-bind.html
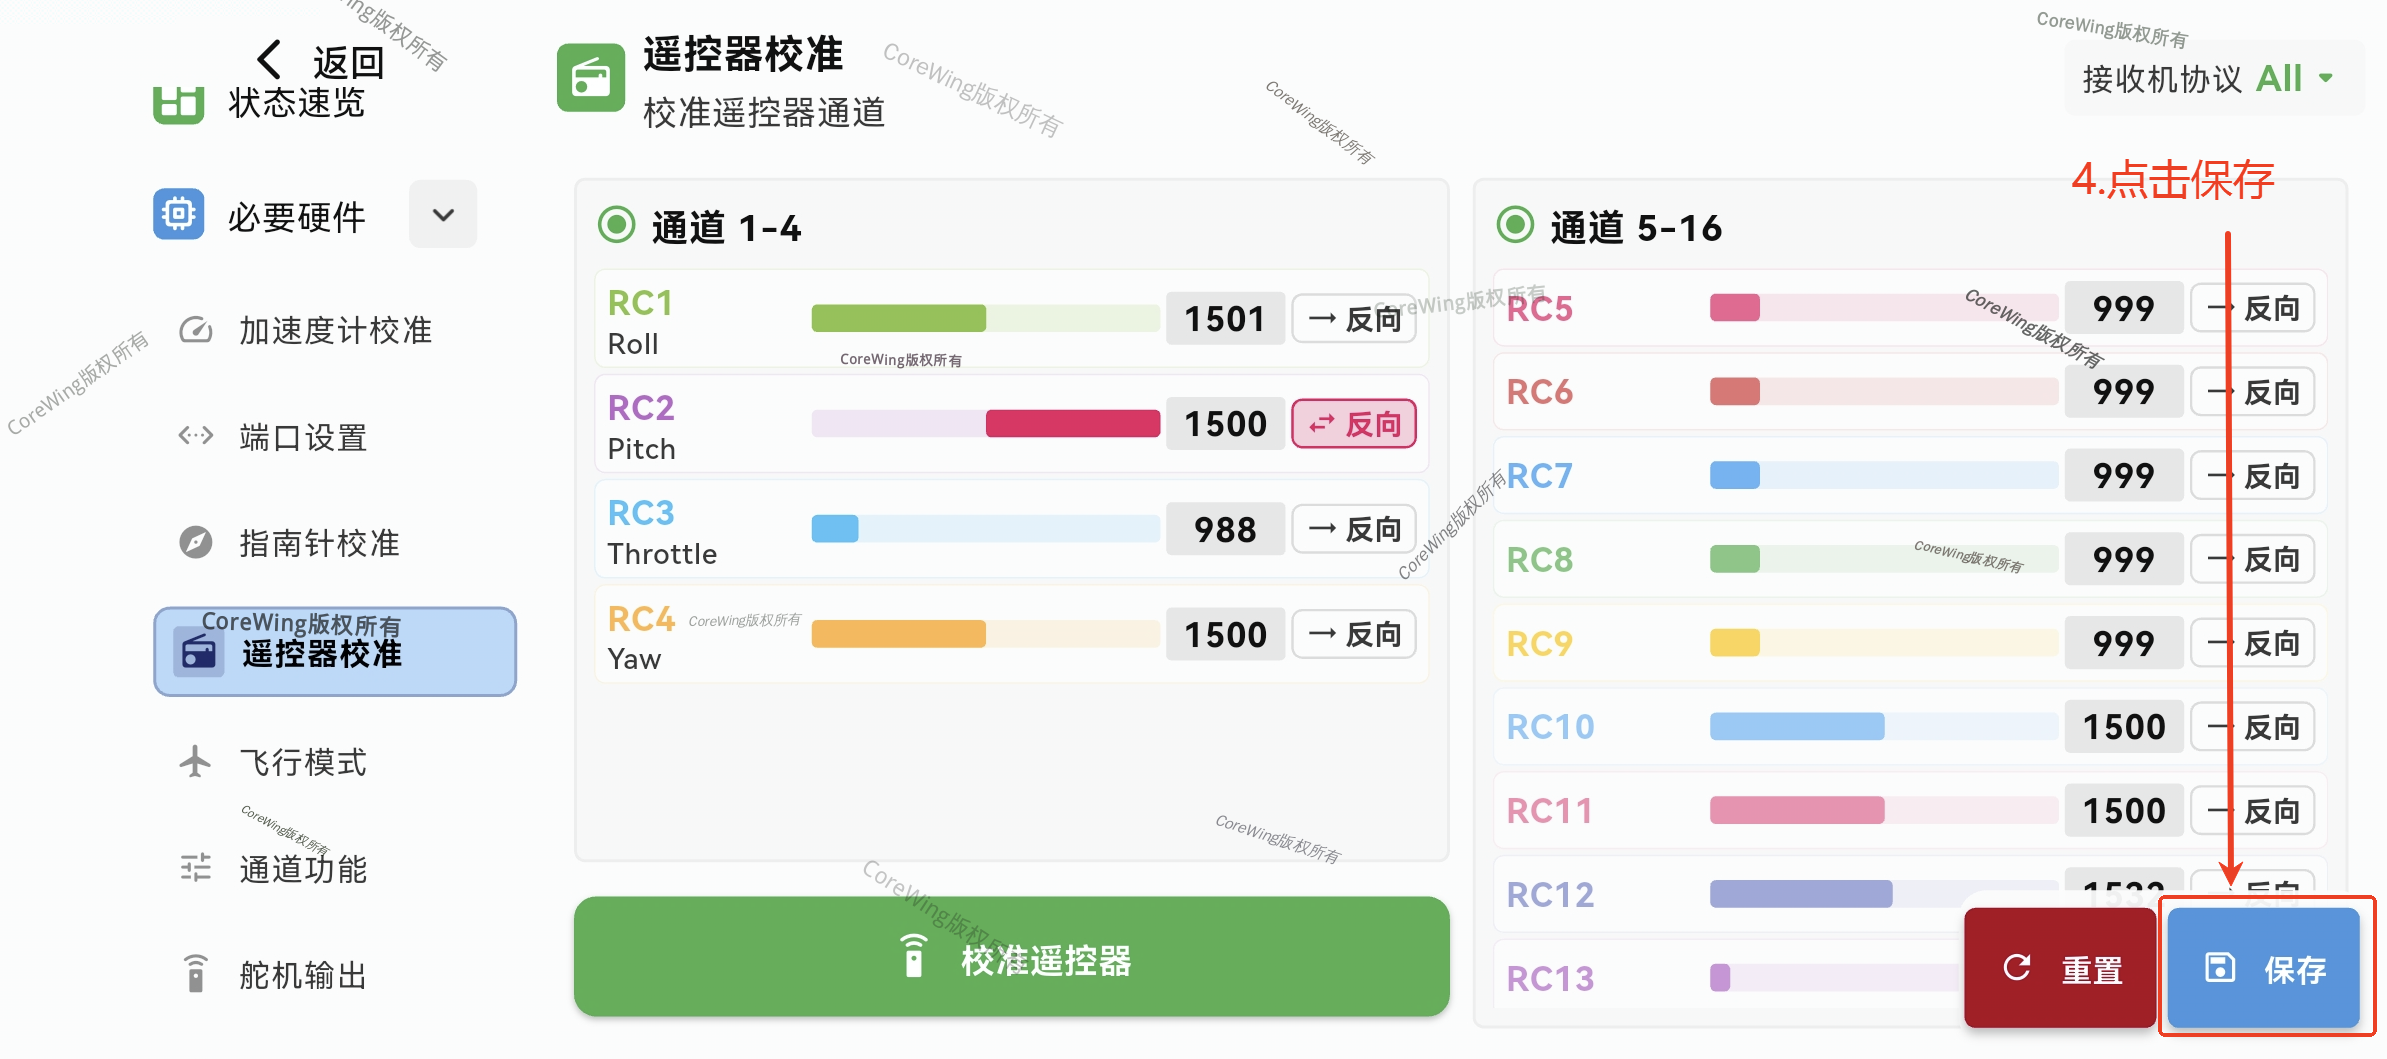
- Click Remote Control Calibration, click the reverse of RC2 to reverse pitch
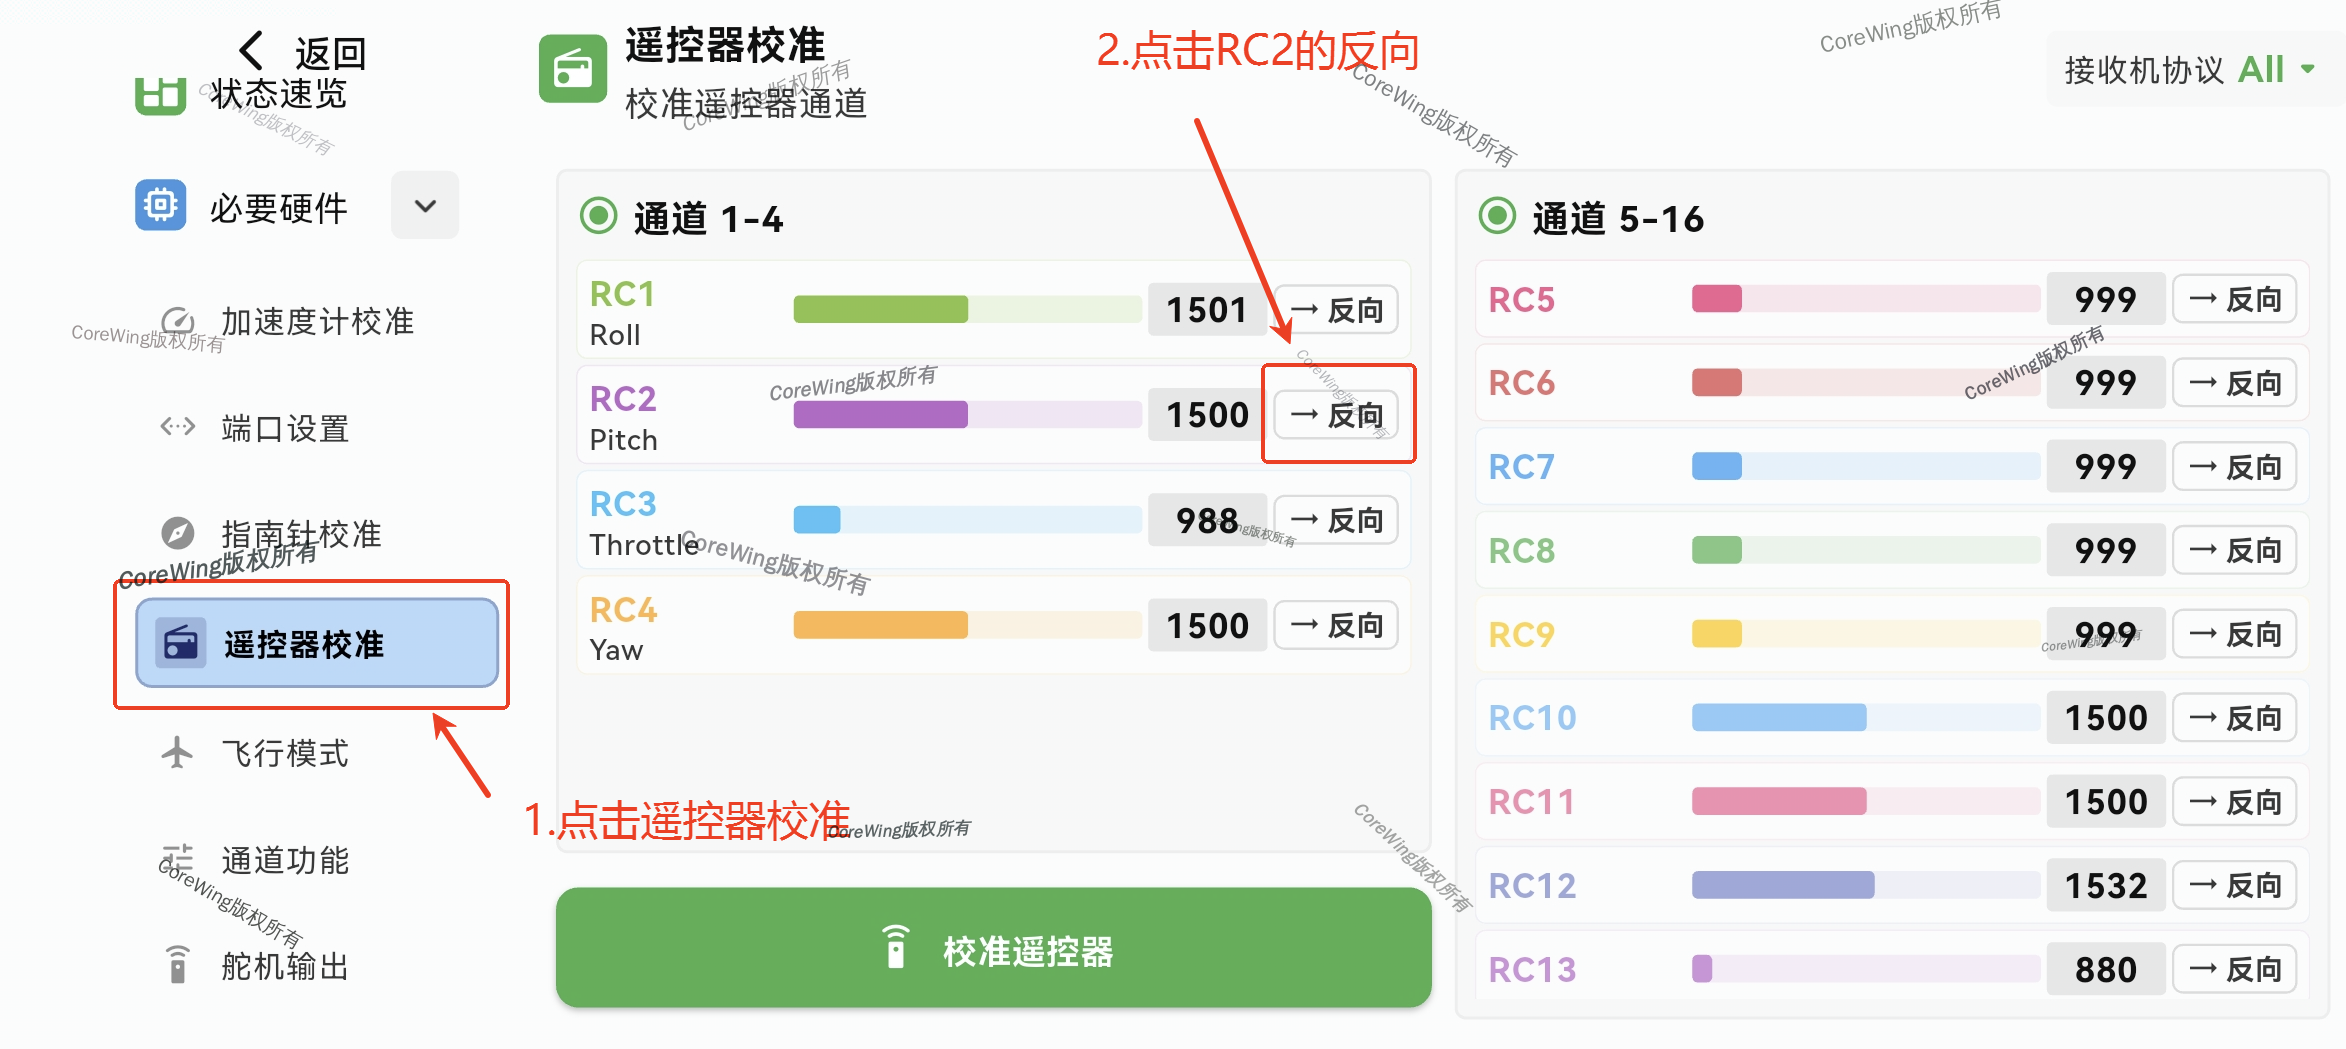
- Click Confirm
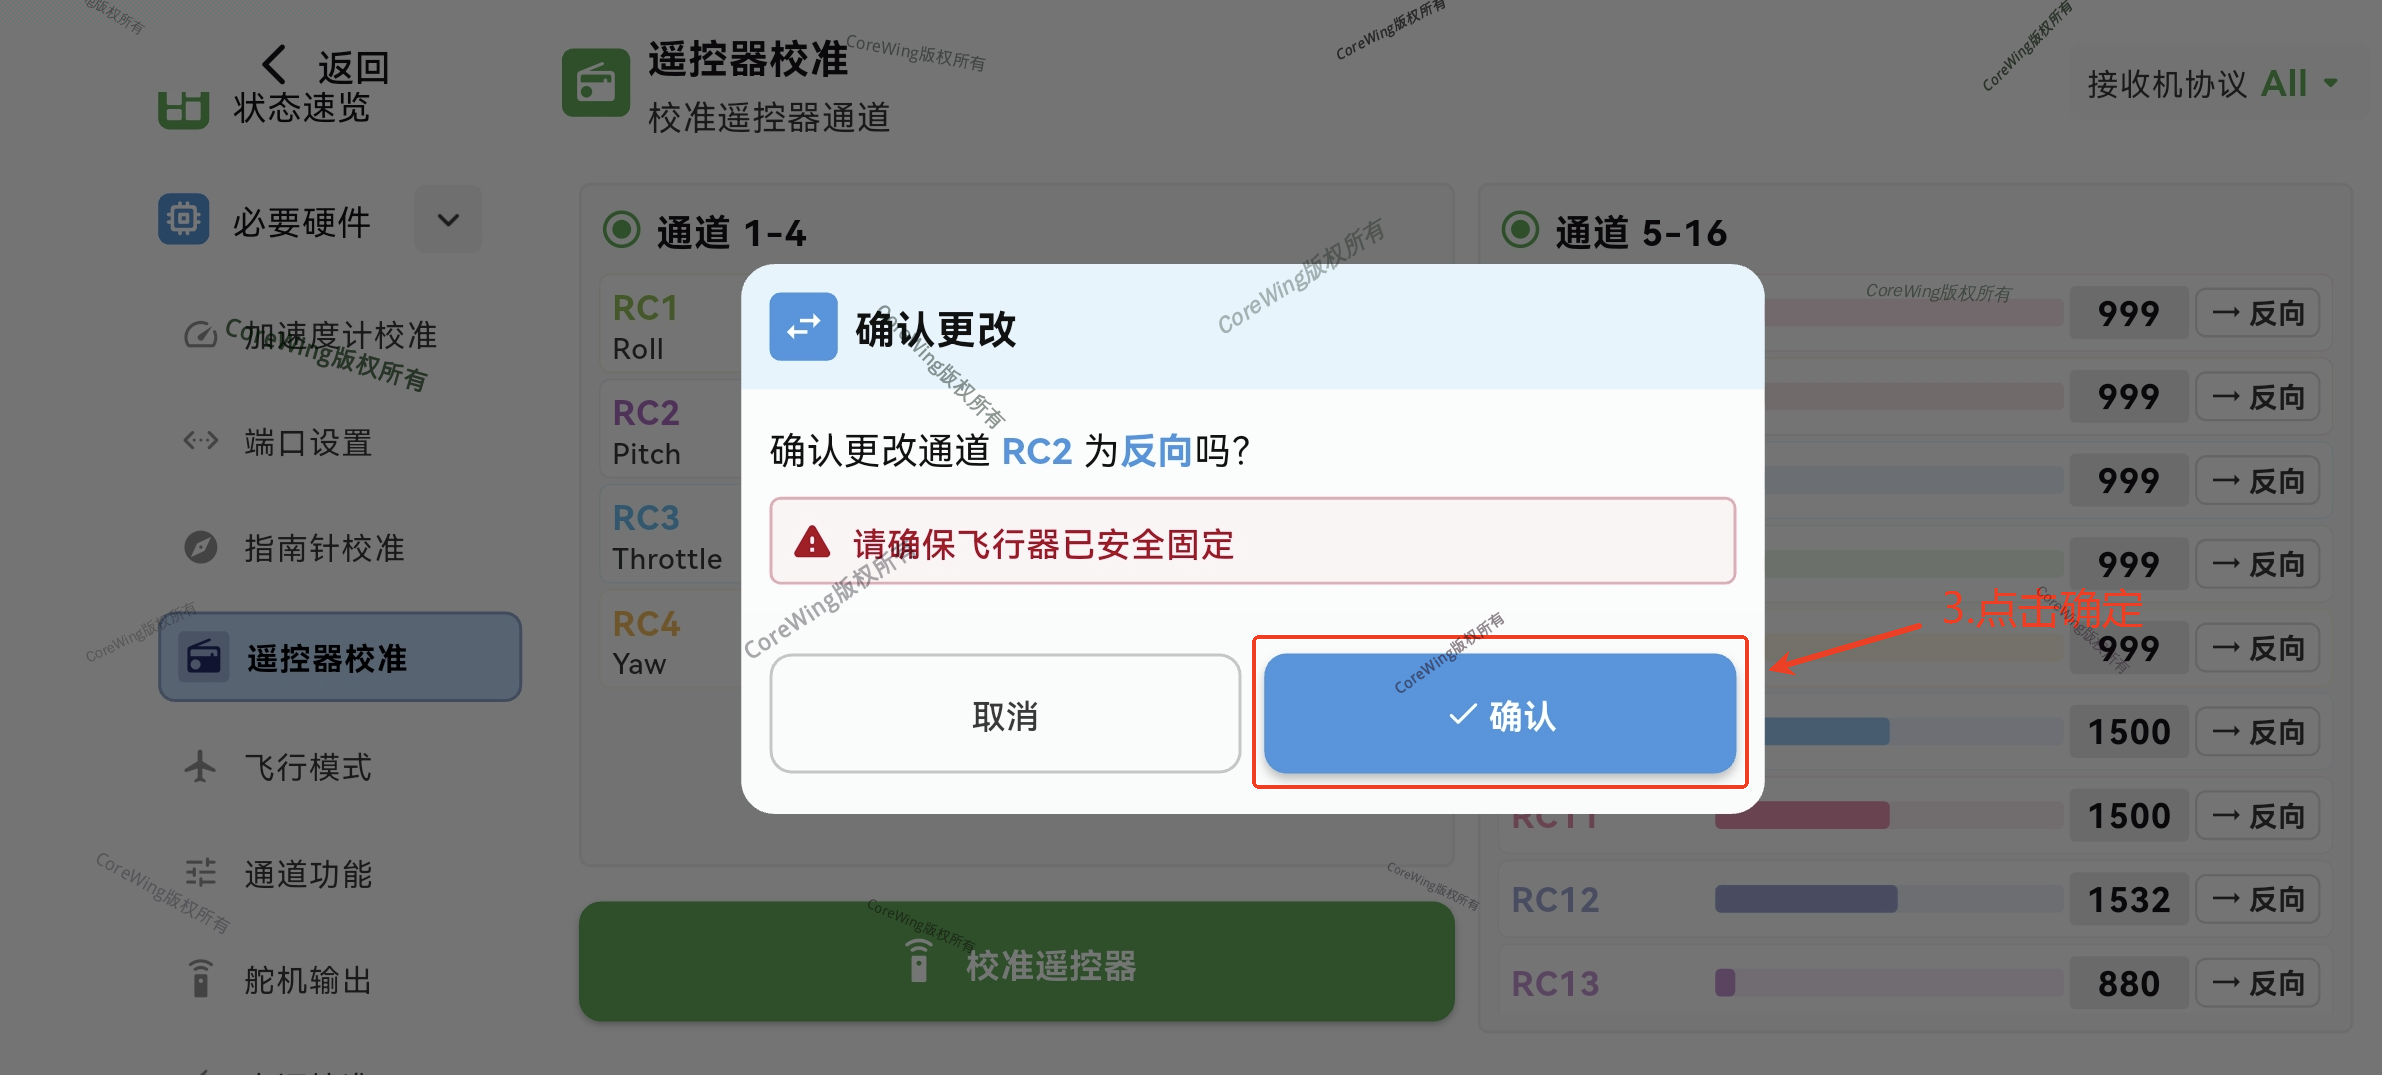
- Click Save
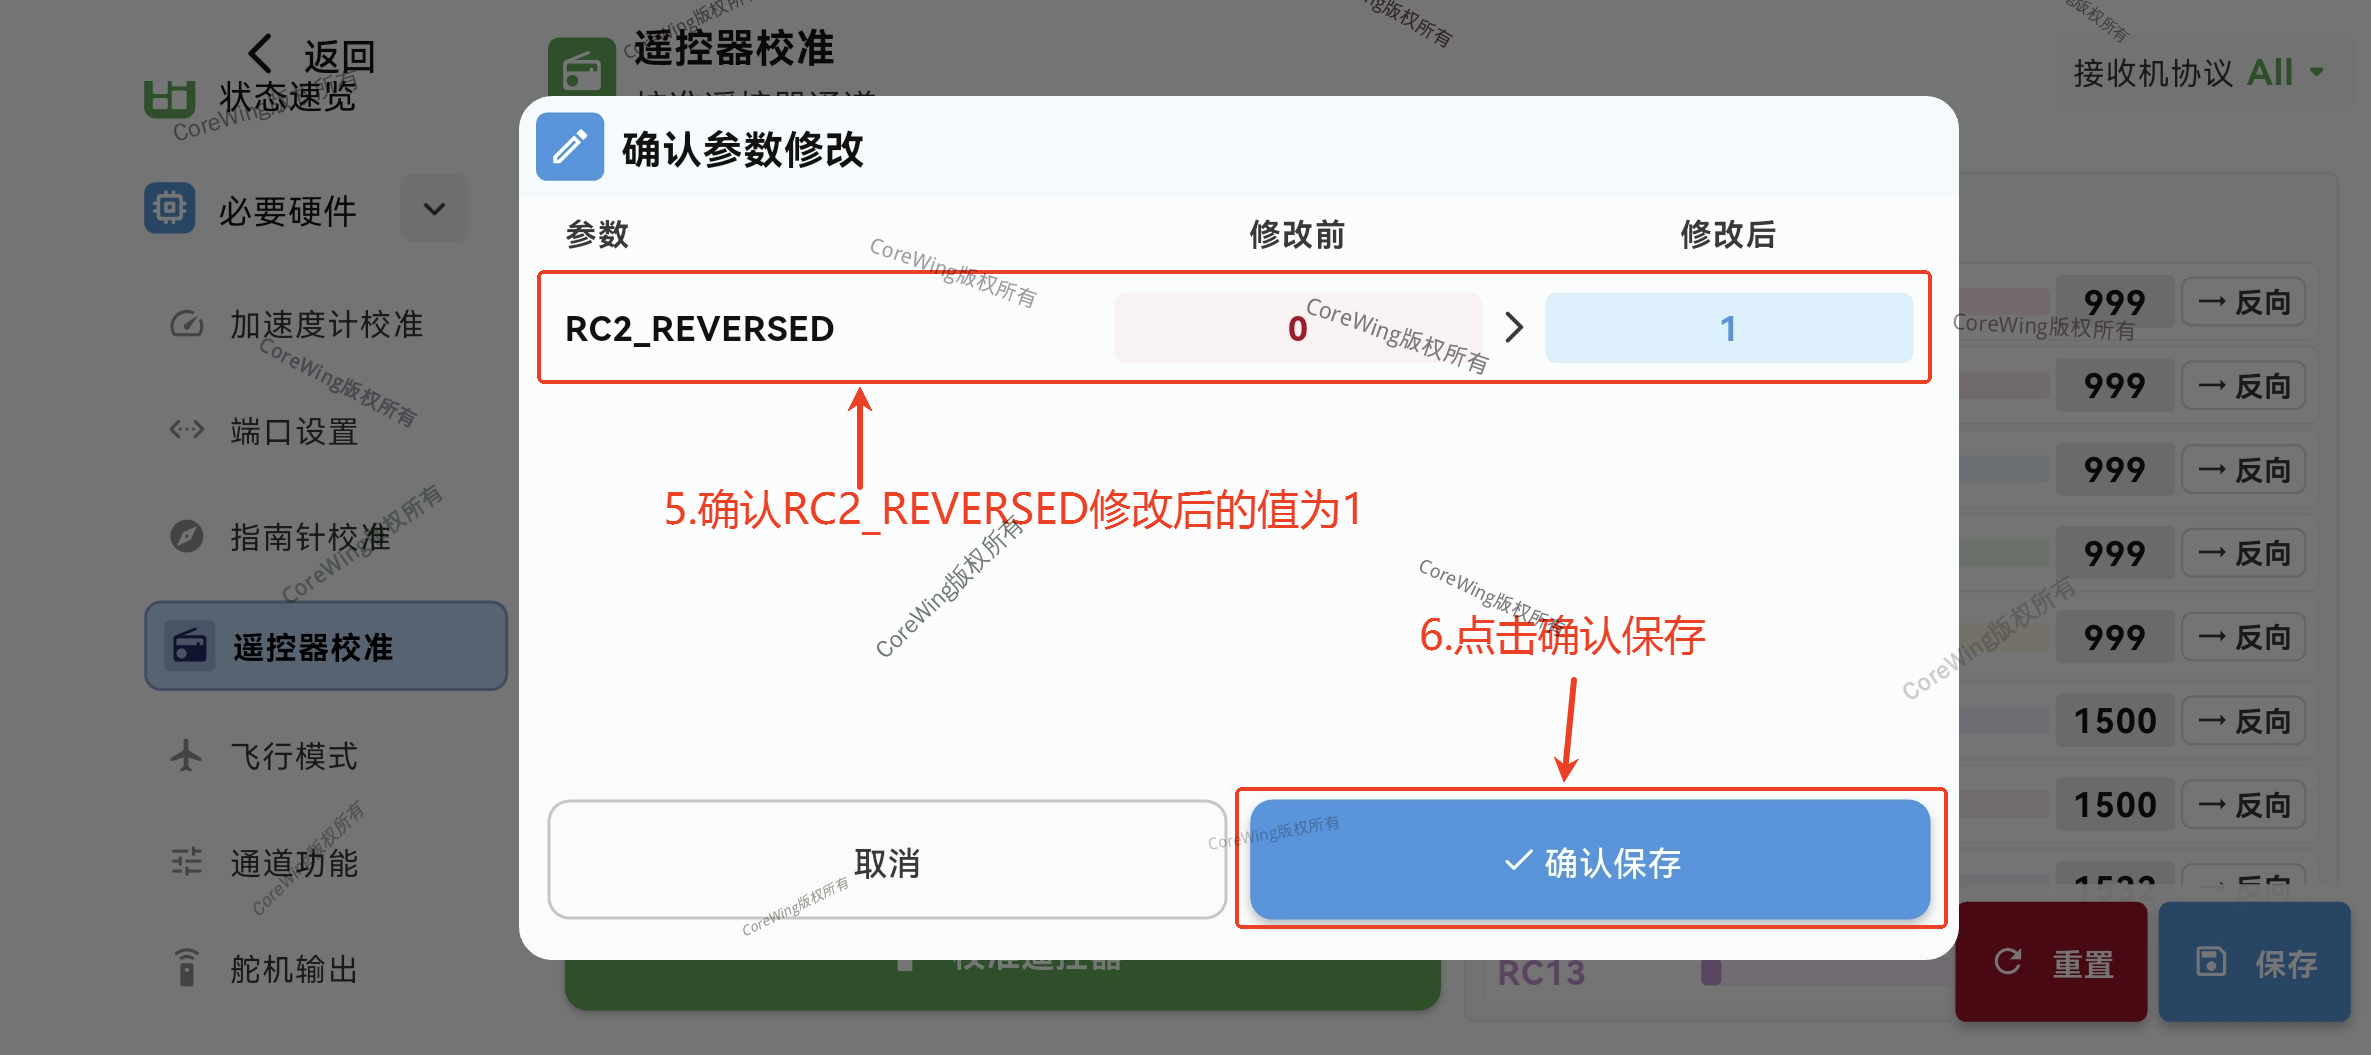
- Confirm the modified value of
RC2_REVERSEDis1, click Confirm to save
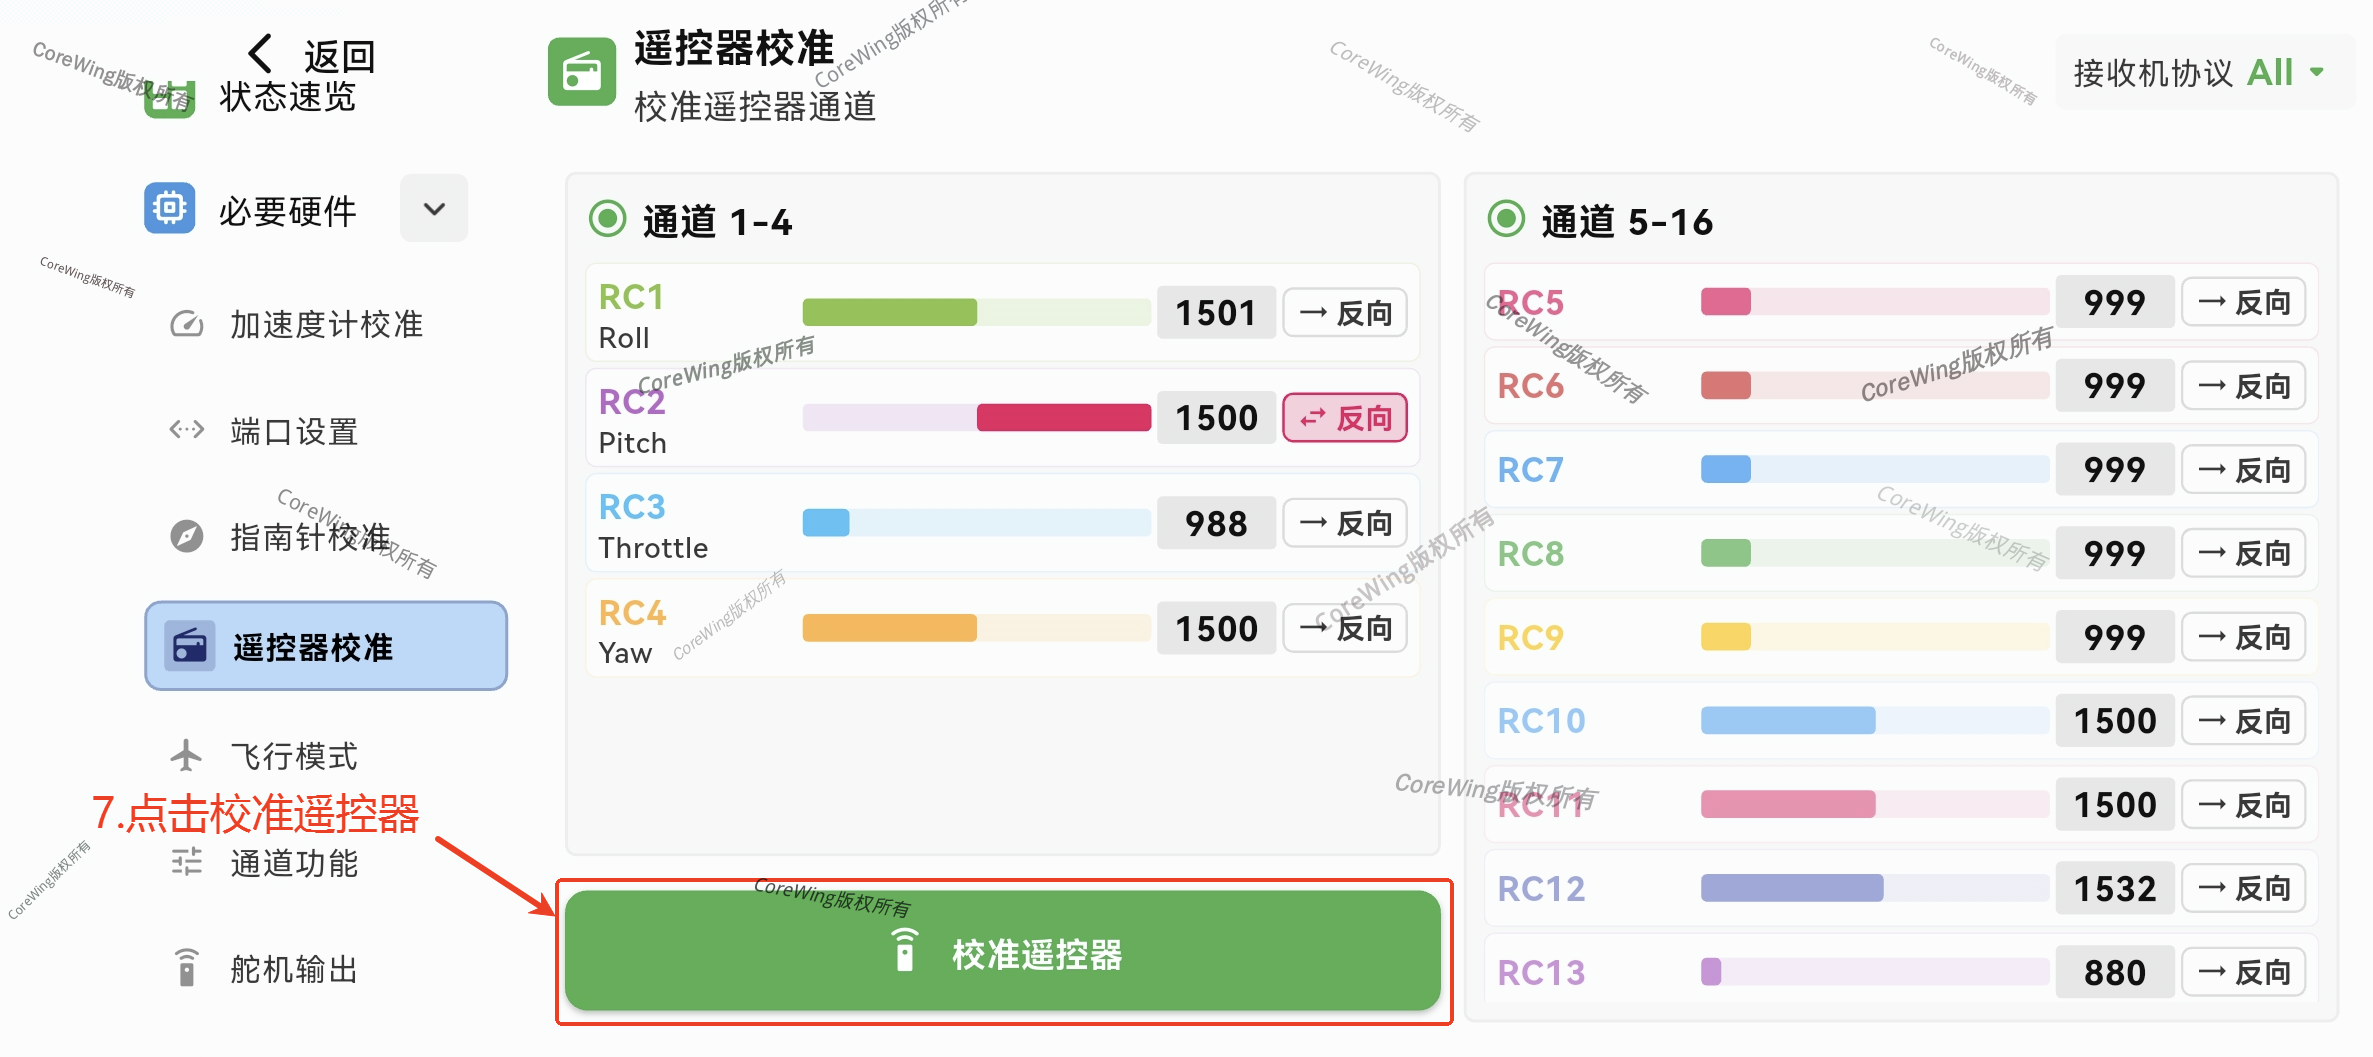
- Click Calibrate Remote Control
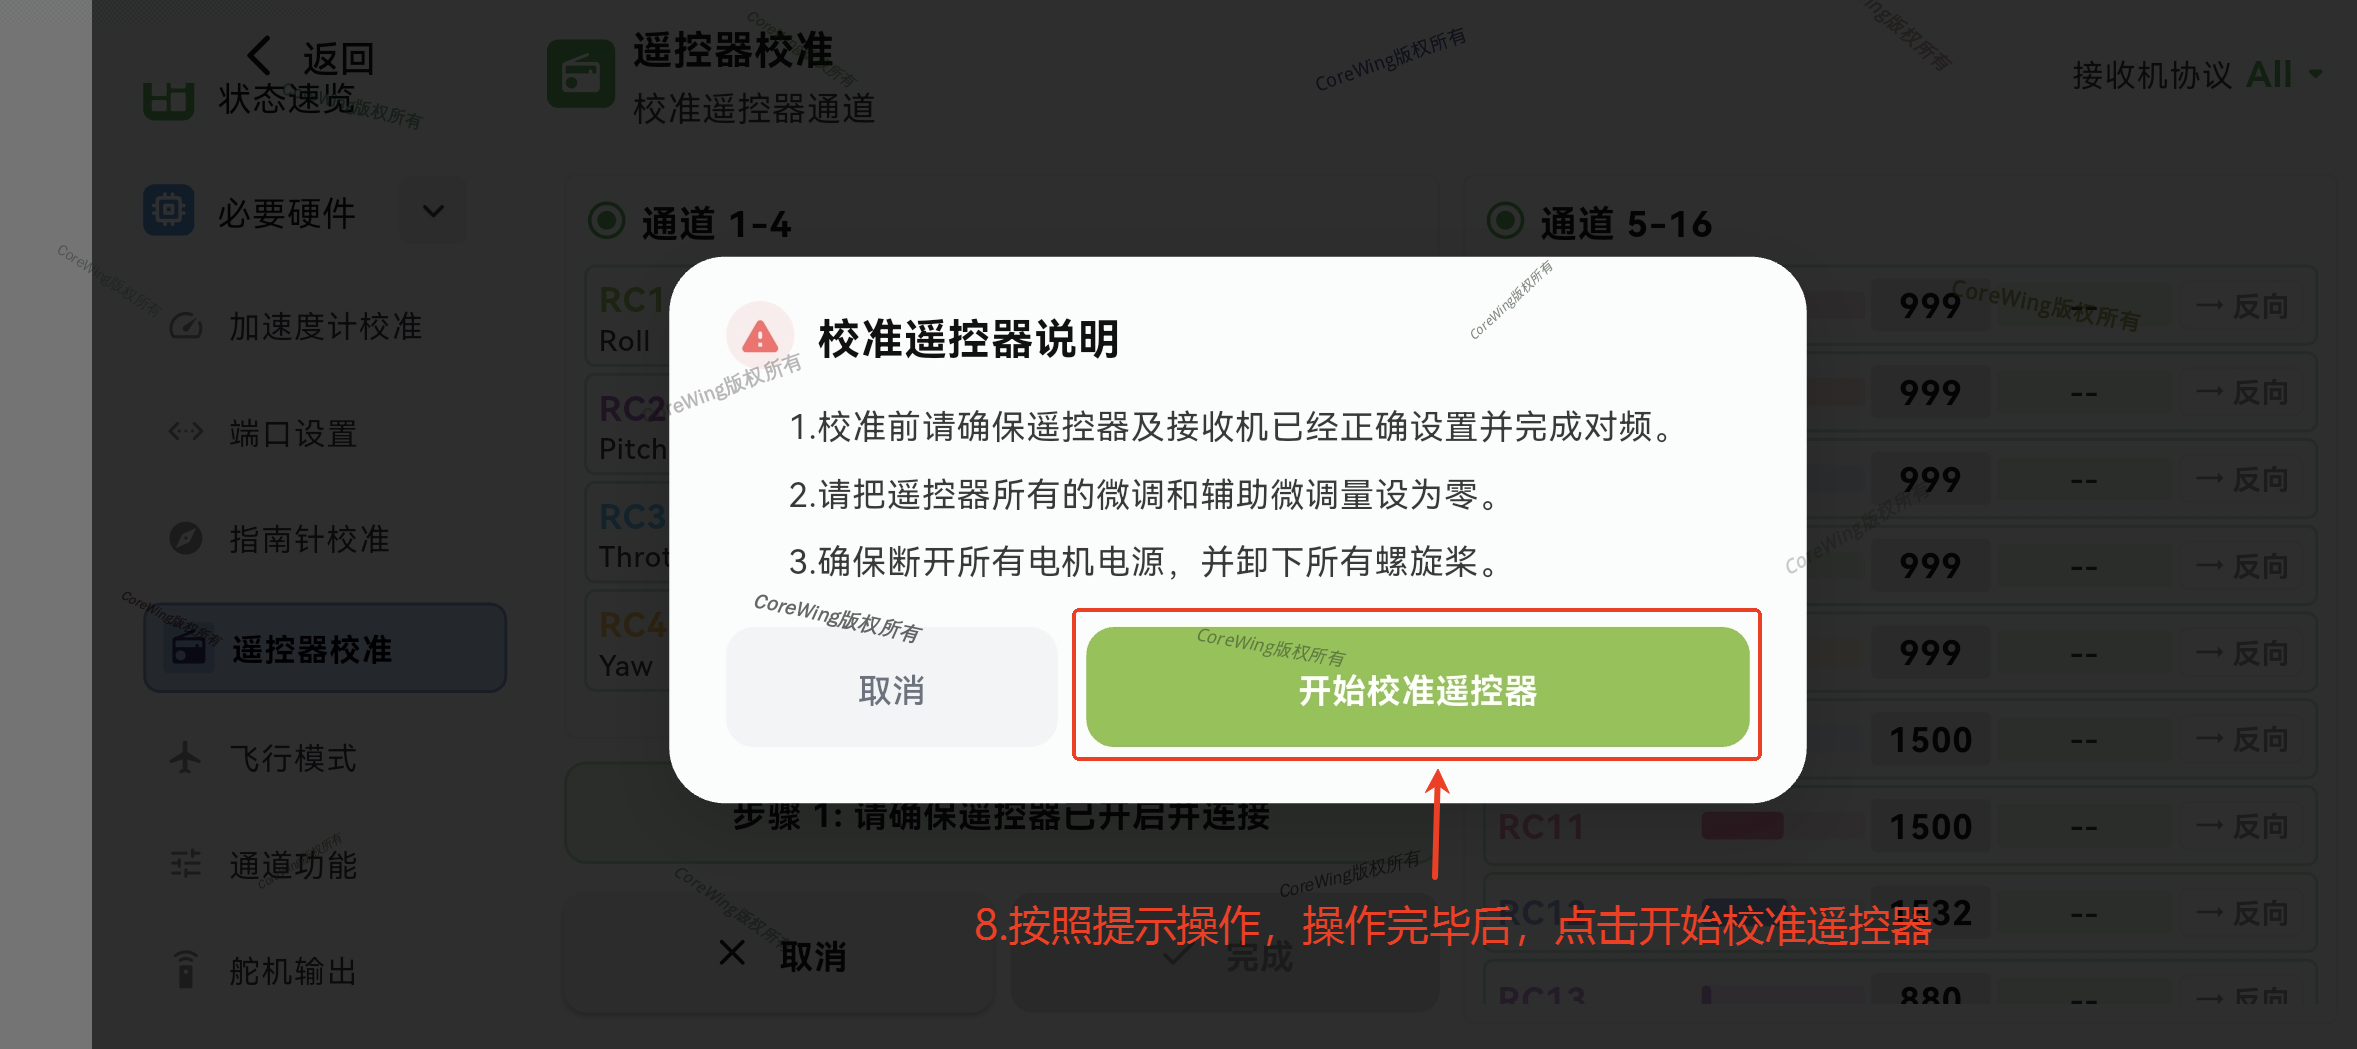
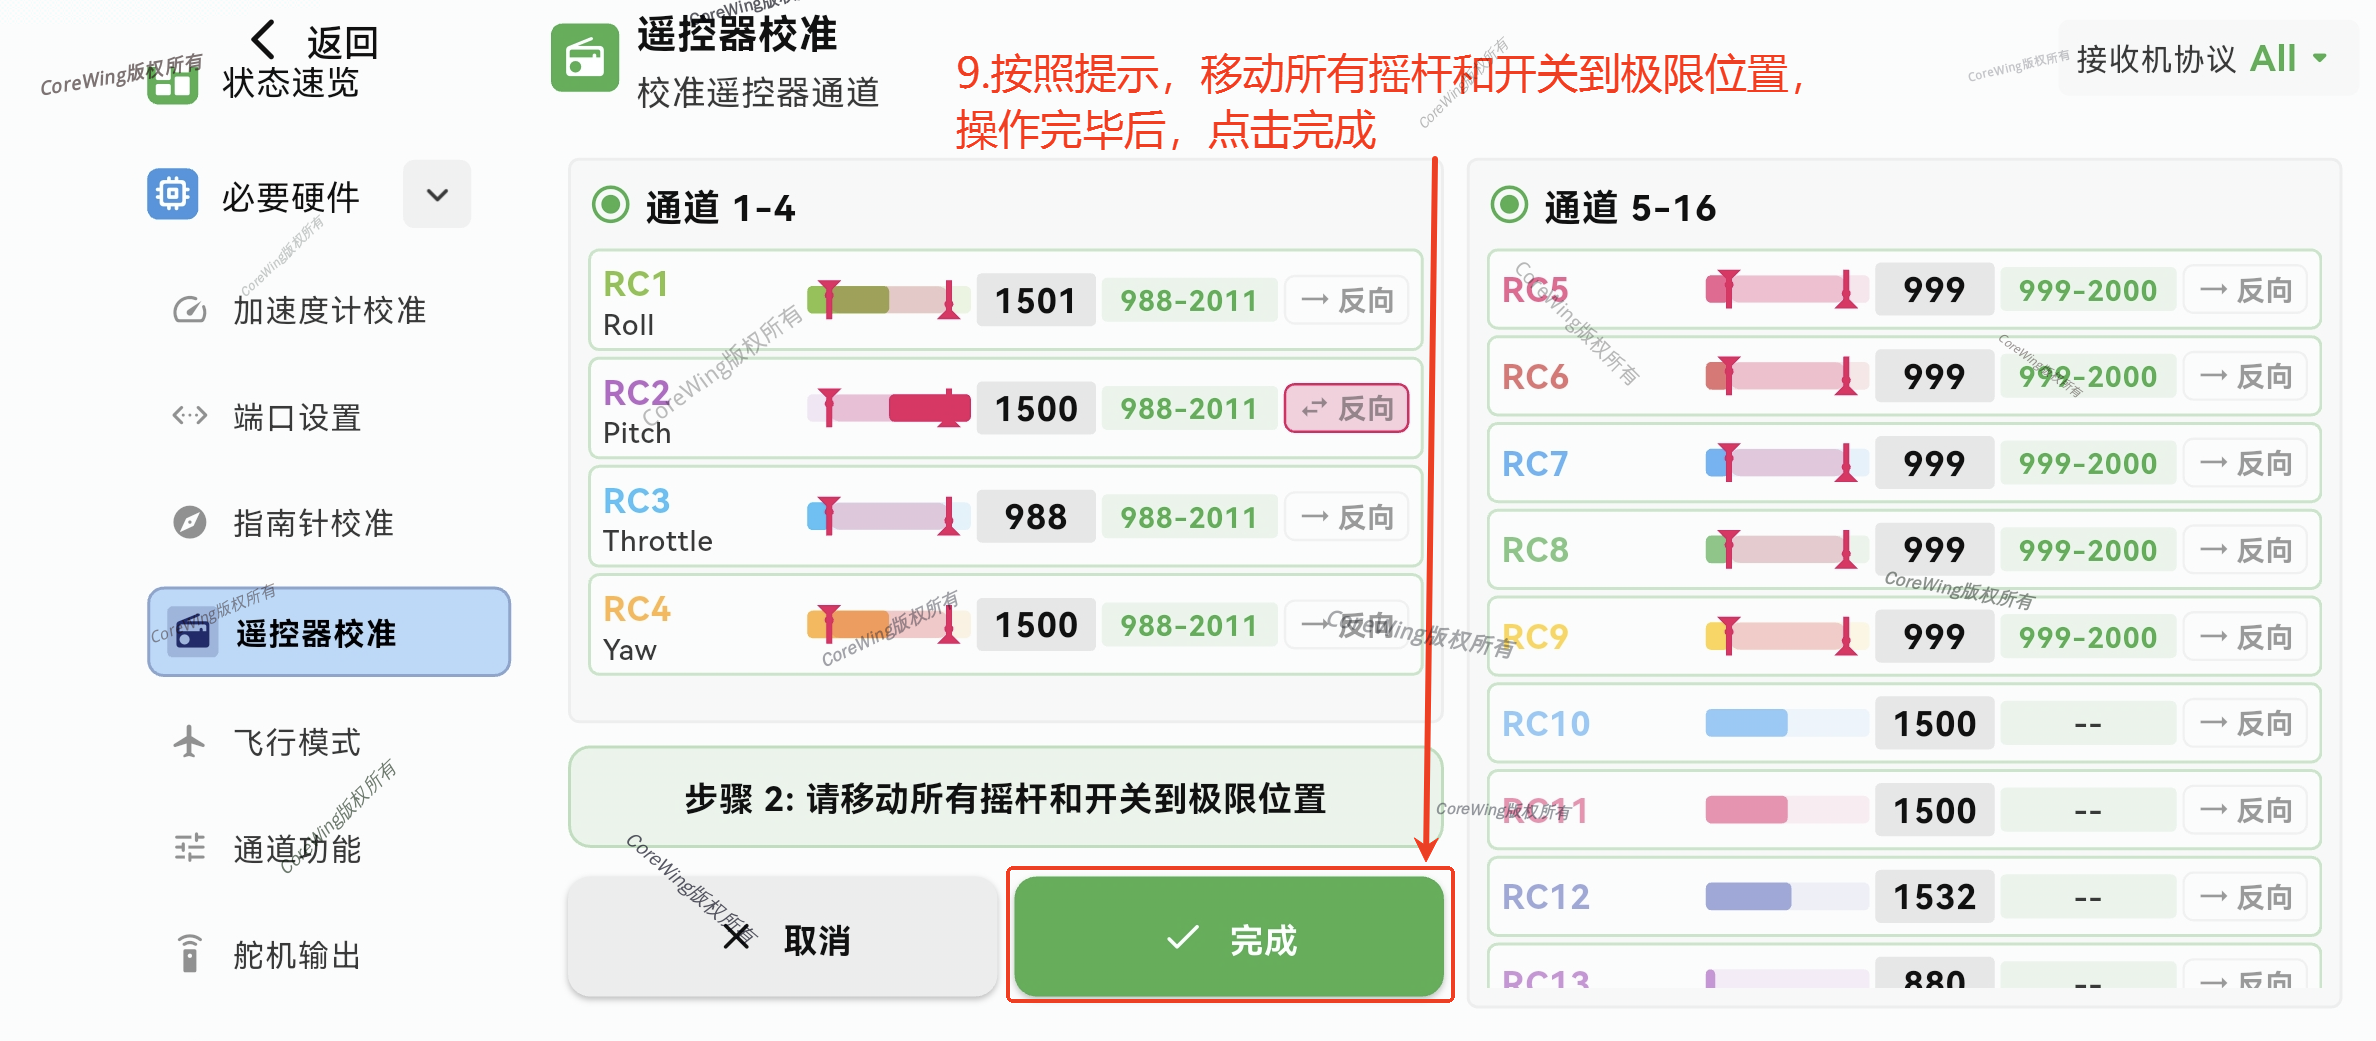
- Follow the prompts, after completion, click Start Remote Control Calibration
- Follow the prompts, move all sticks and switches to their extreme positions, after completion, click Done
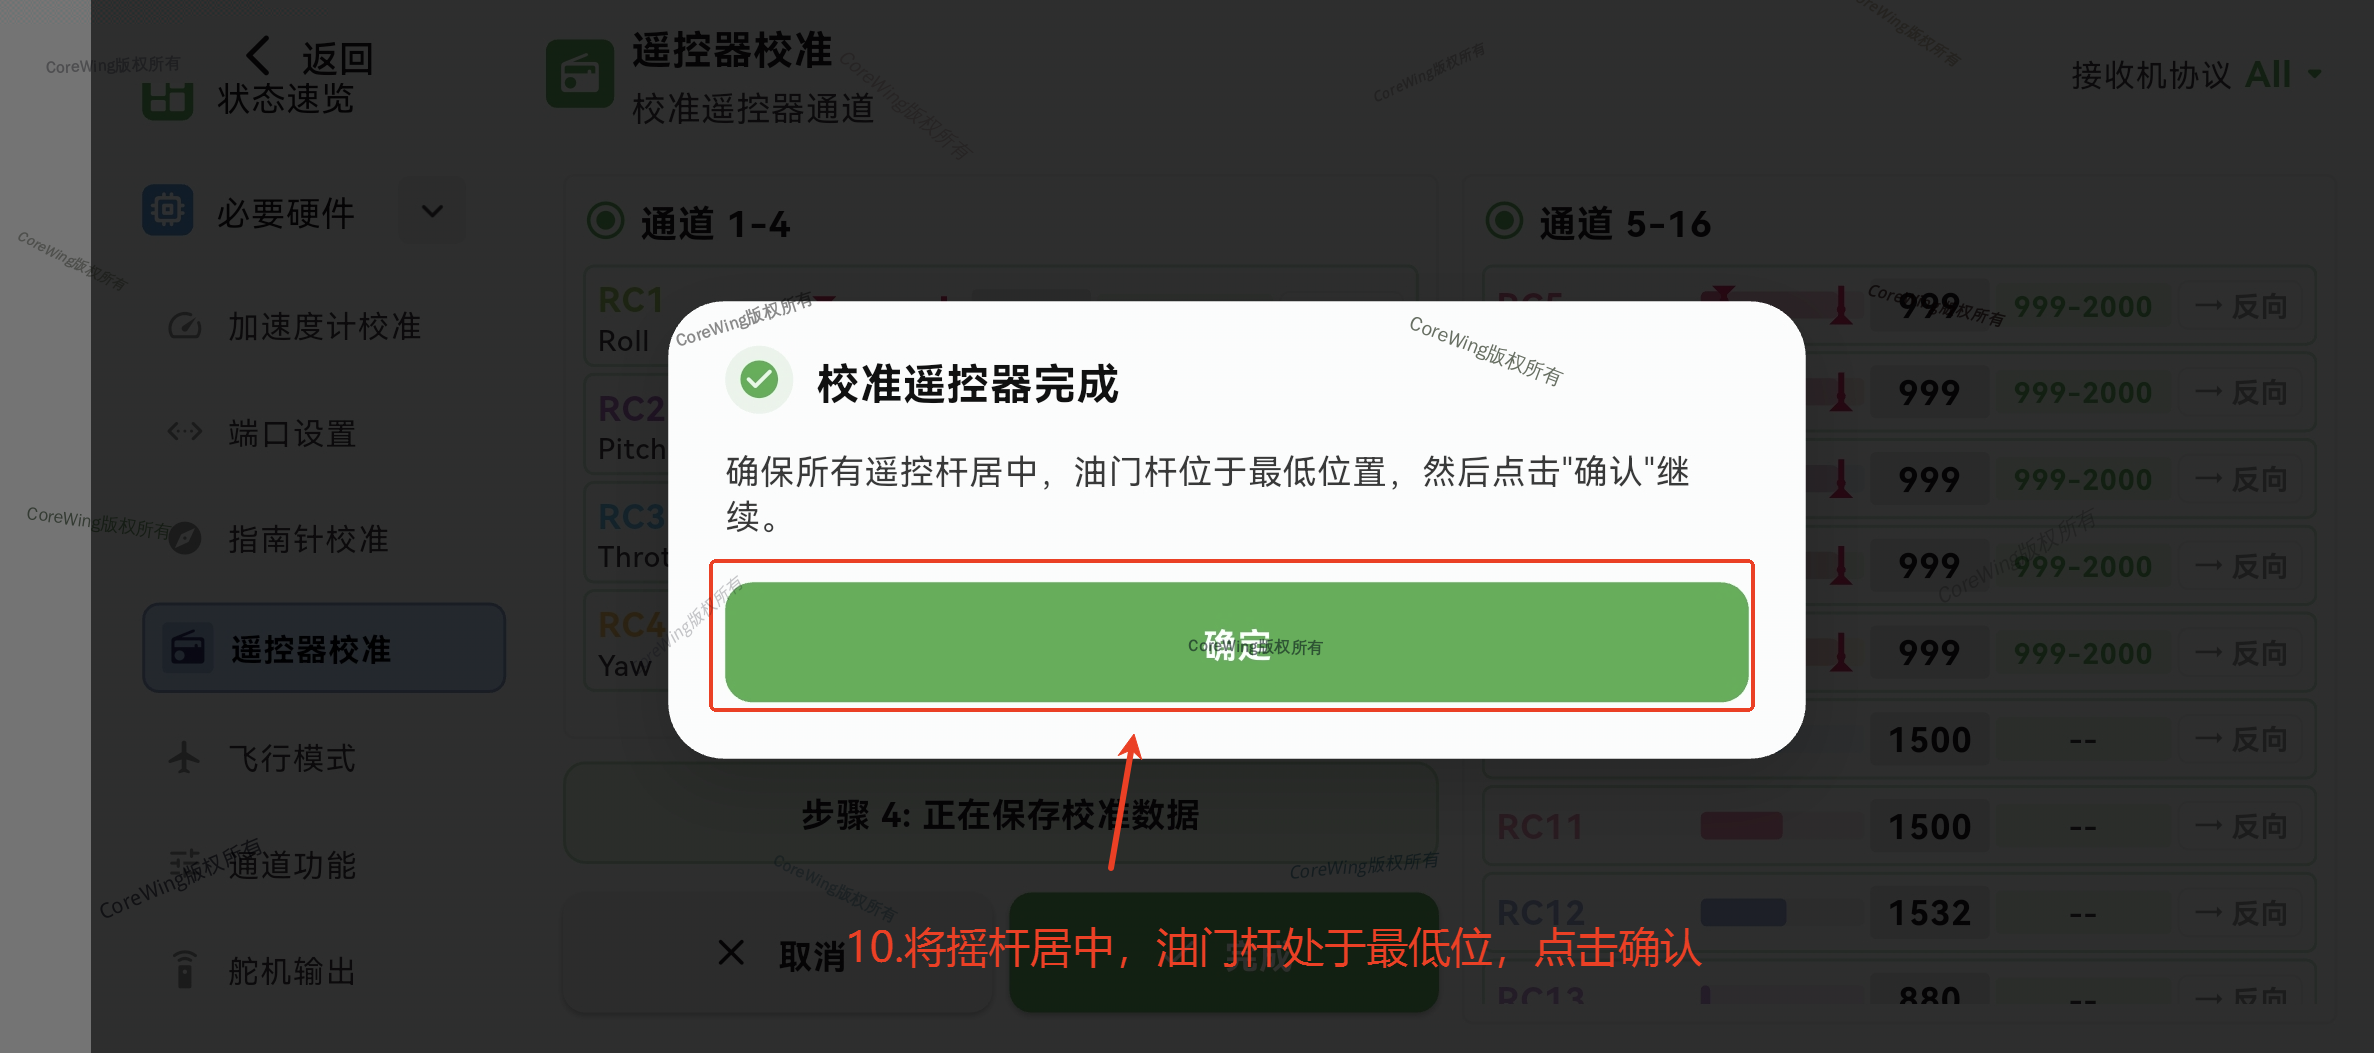
- Center the sticks, set the throttle stick to the lowest position, click OK
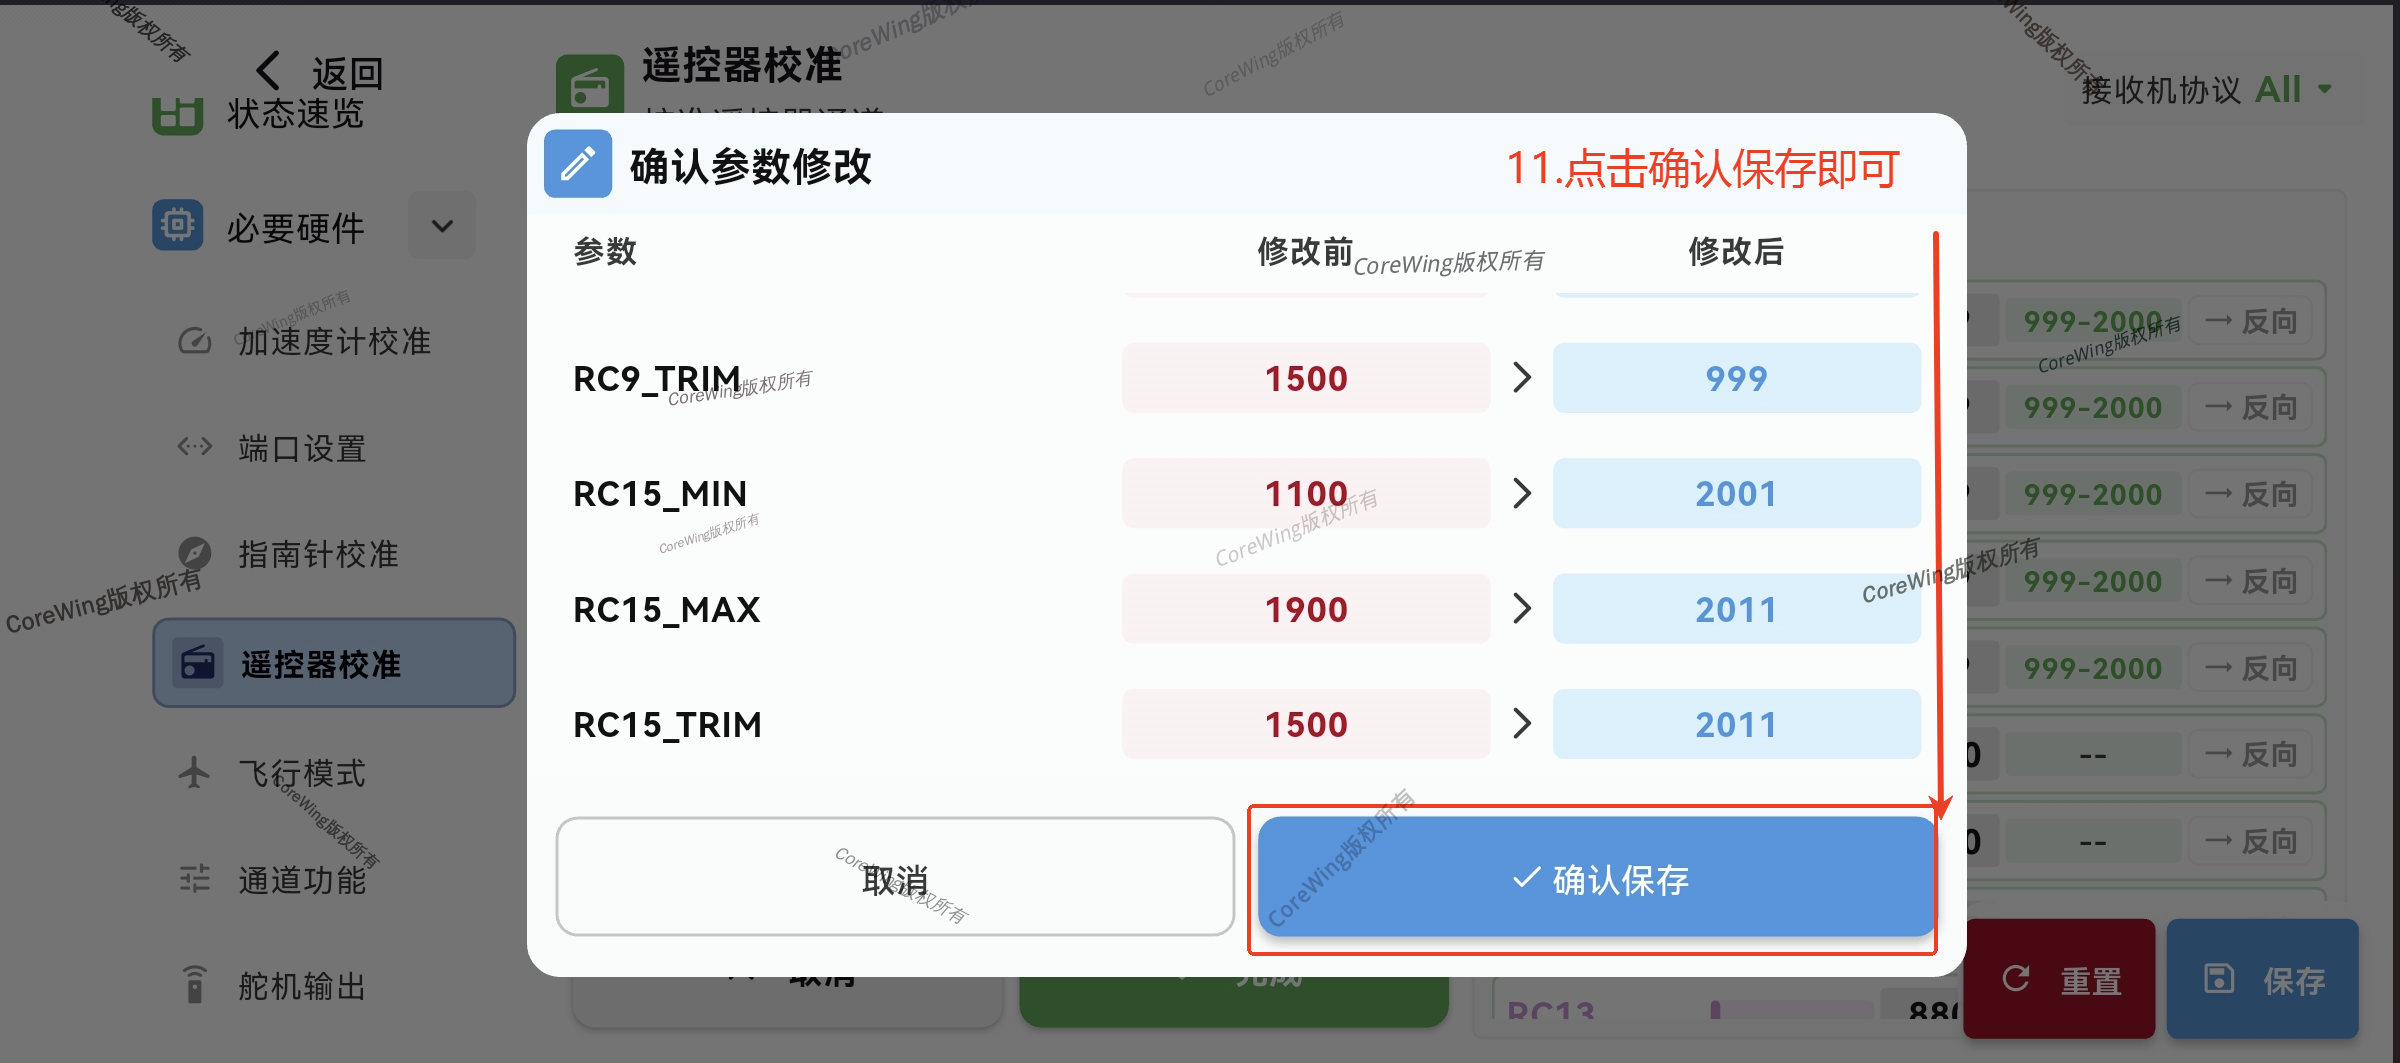
- Click Confirm to save
Important
For detailed remote control calibration procedures, refer to: https://docs.corewing.com/plane/ardupilot/settings/fc/calibration.html
IV. Equipment Installation
4.1 Flight Controller Wiring
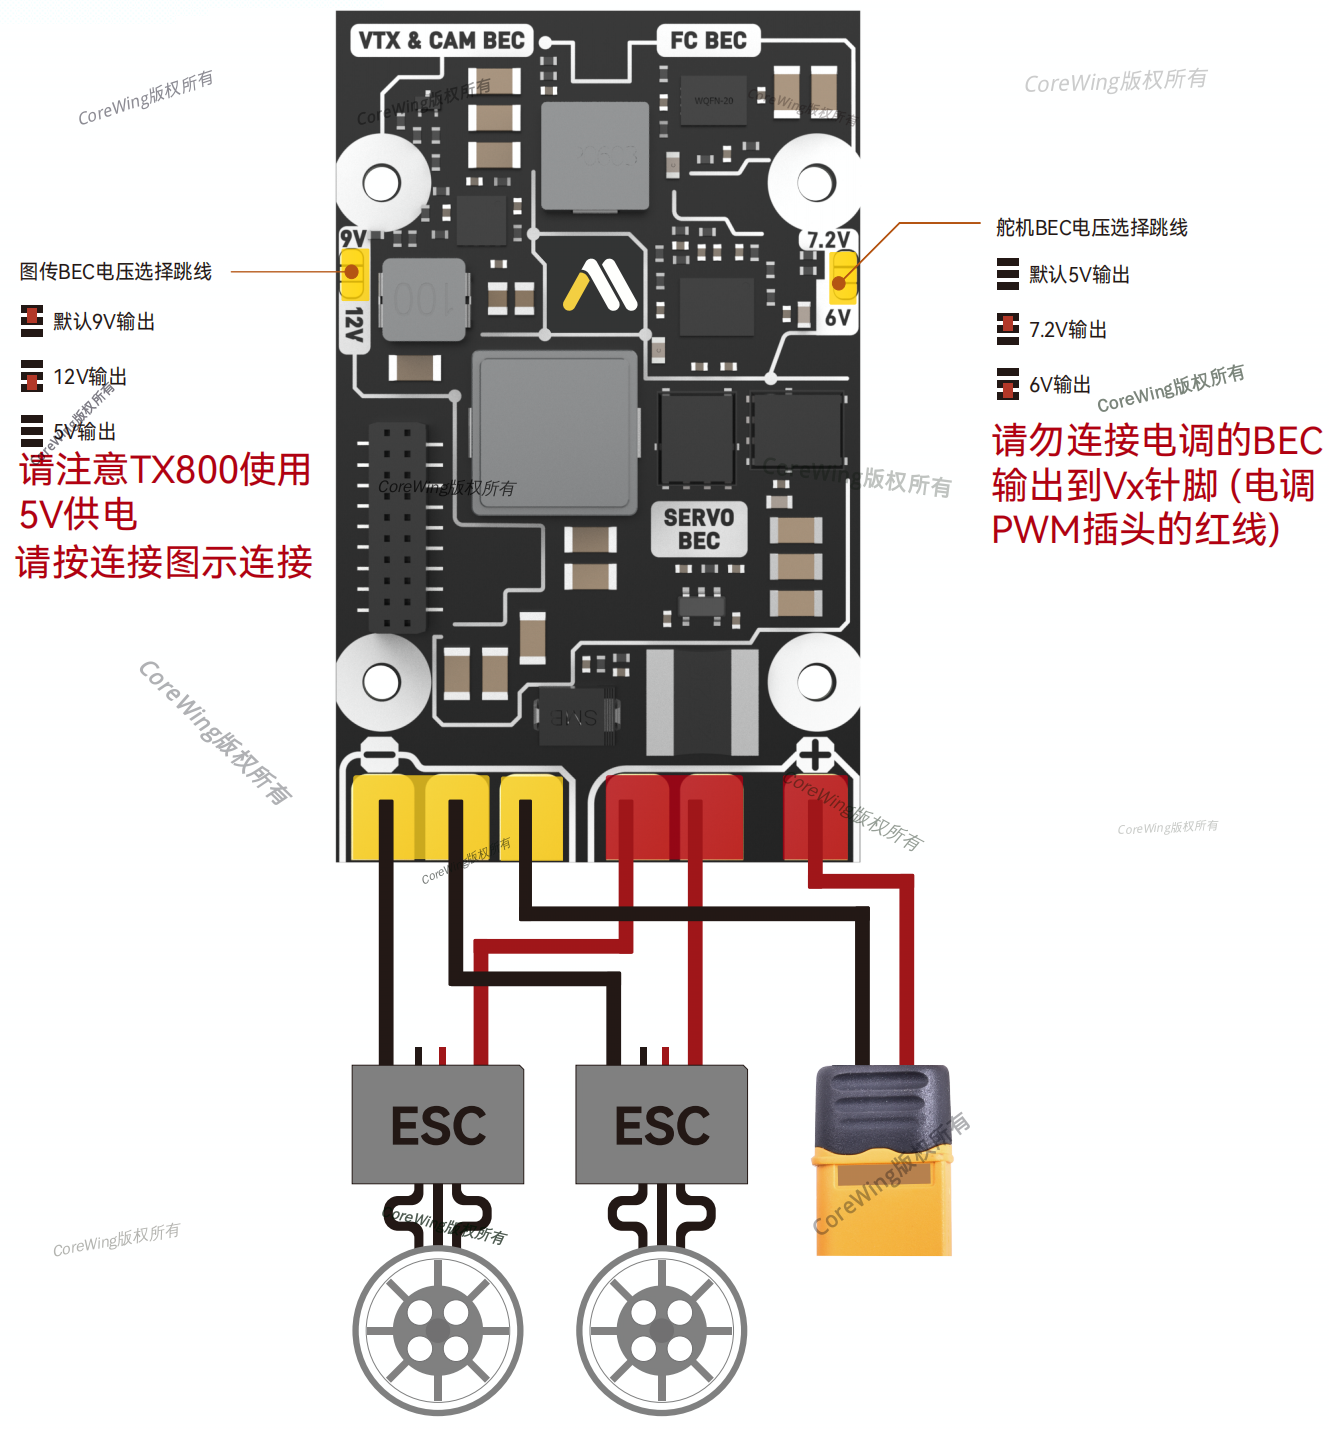
- Power Wiring
Important
Note:
The positive power terminal must be connected to the designated pad.
ESC refers to the electronic speed controller.
When soldering, ensure there are no cold joints.
4.2 Flight Controller Installation
The flight controller should be installed at the aircraft's center of gravity. Refer to the diagram below for installation:

Important
If you need to adjust the flight controller's orientation, refer to this article for setup: https://docs.corewing.com/plane/ardupilot/settings/fc/orientation-setup.html
4.3 Peripheral Installation and Configuration
- Peripheral Wiring
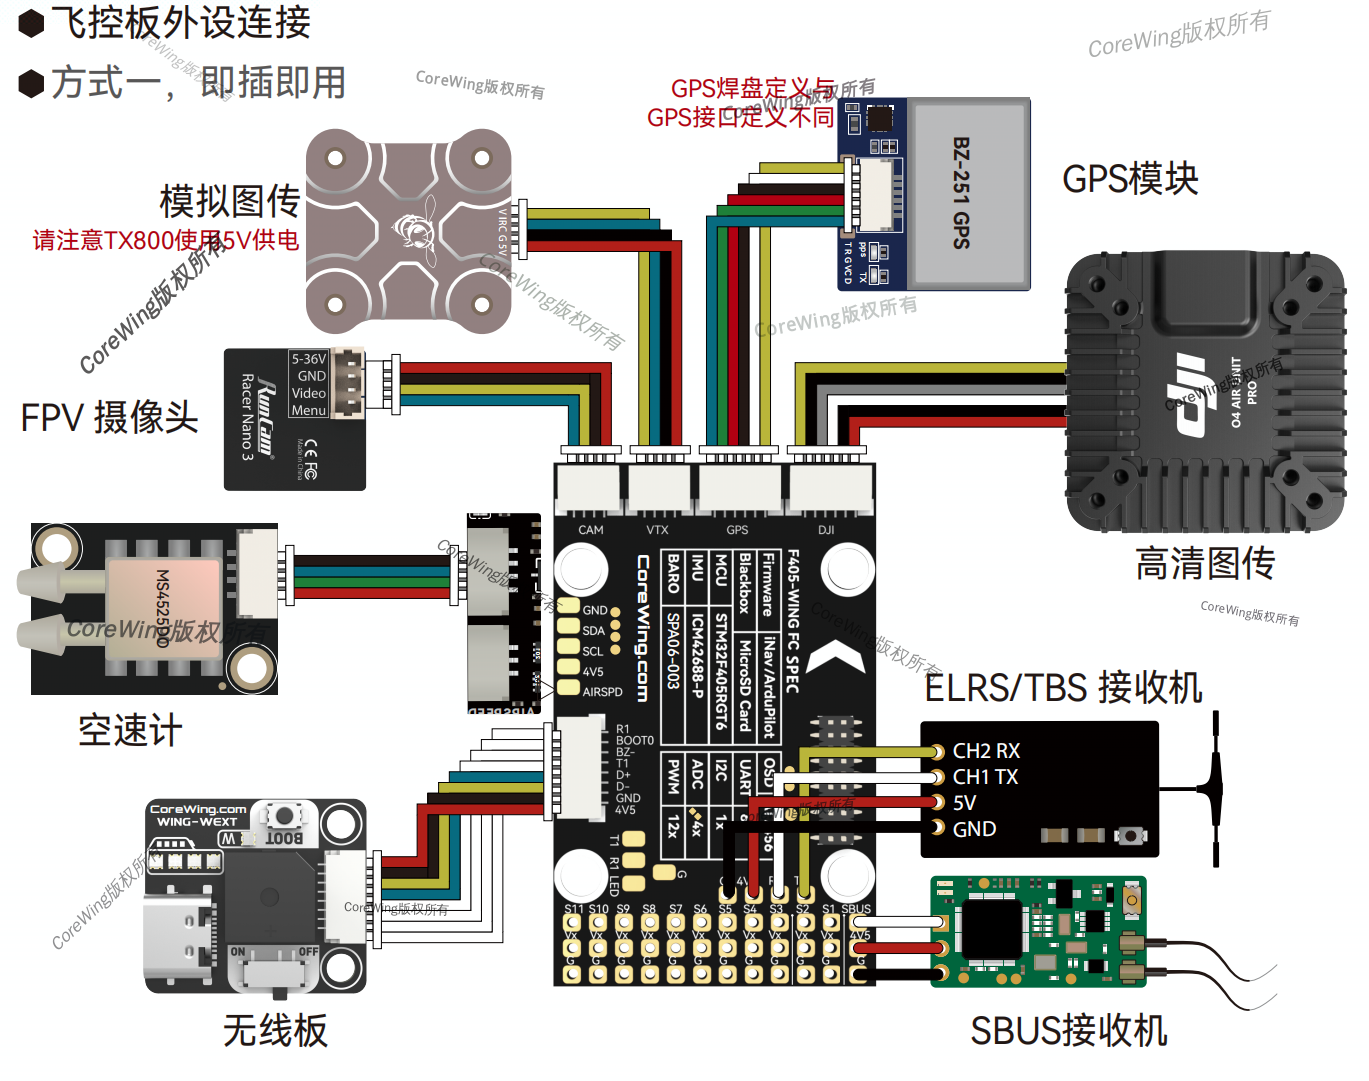
4.3.1 Receiver Installation and Configuration
The installation position is shown in the figure. Route the antenna outside the airframe and secure it with tape:

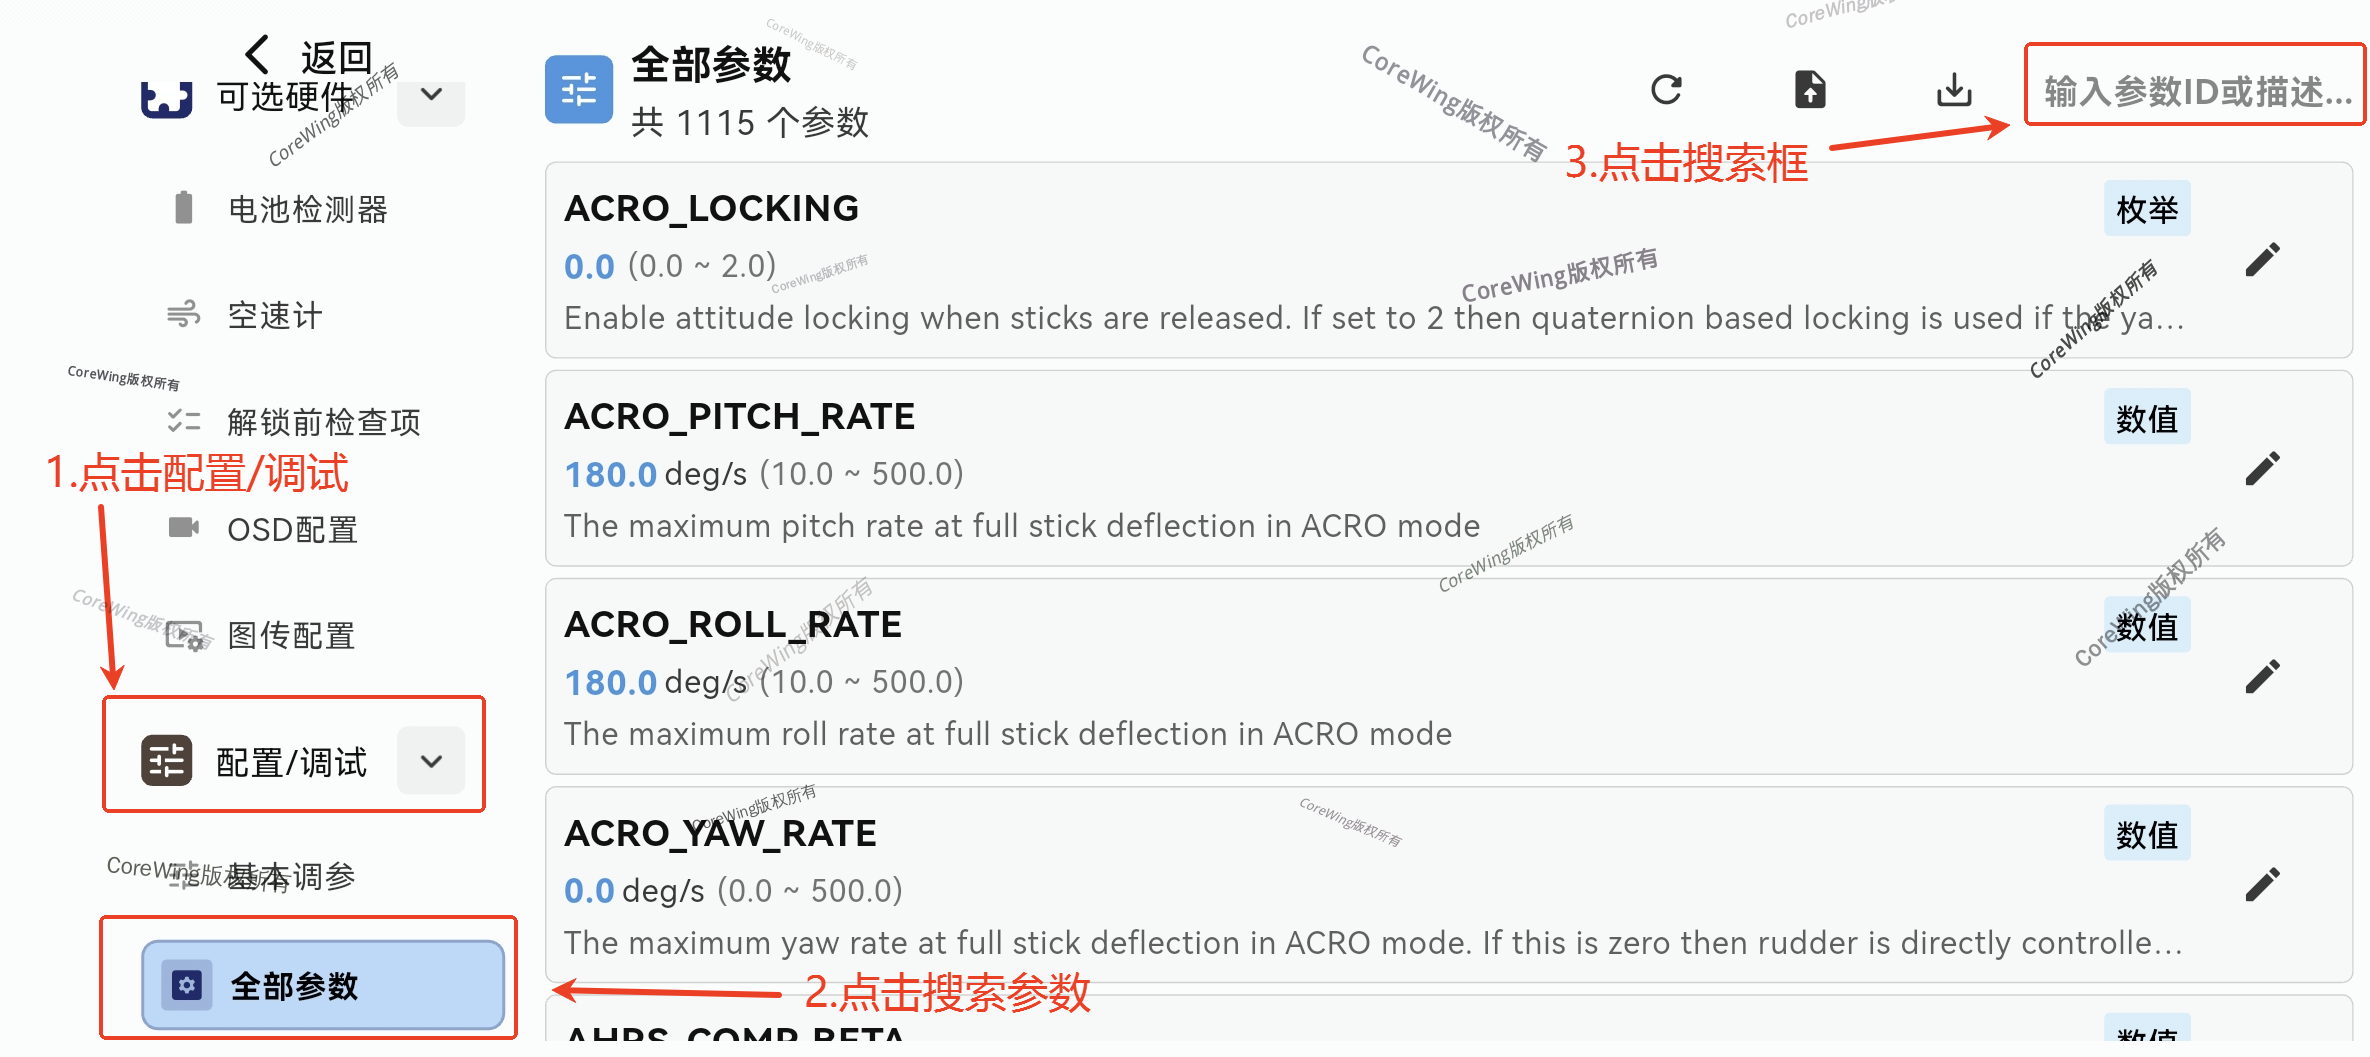
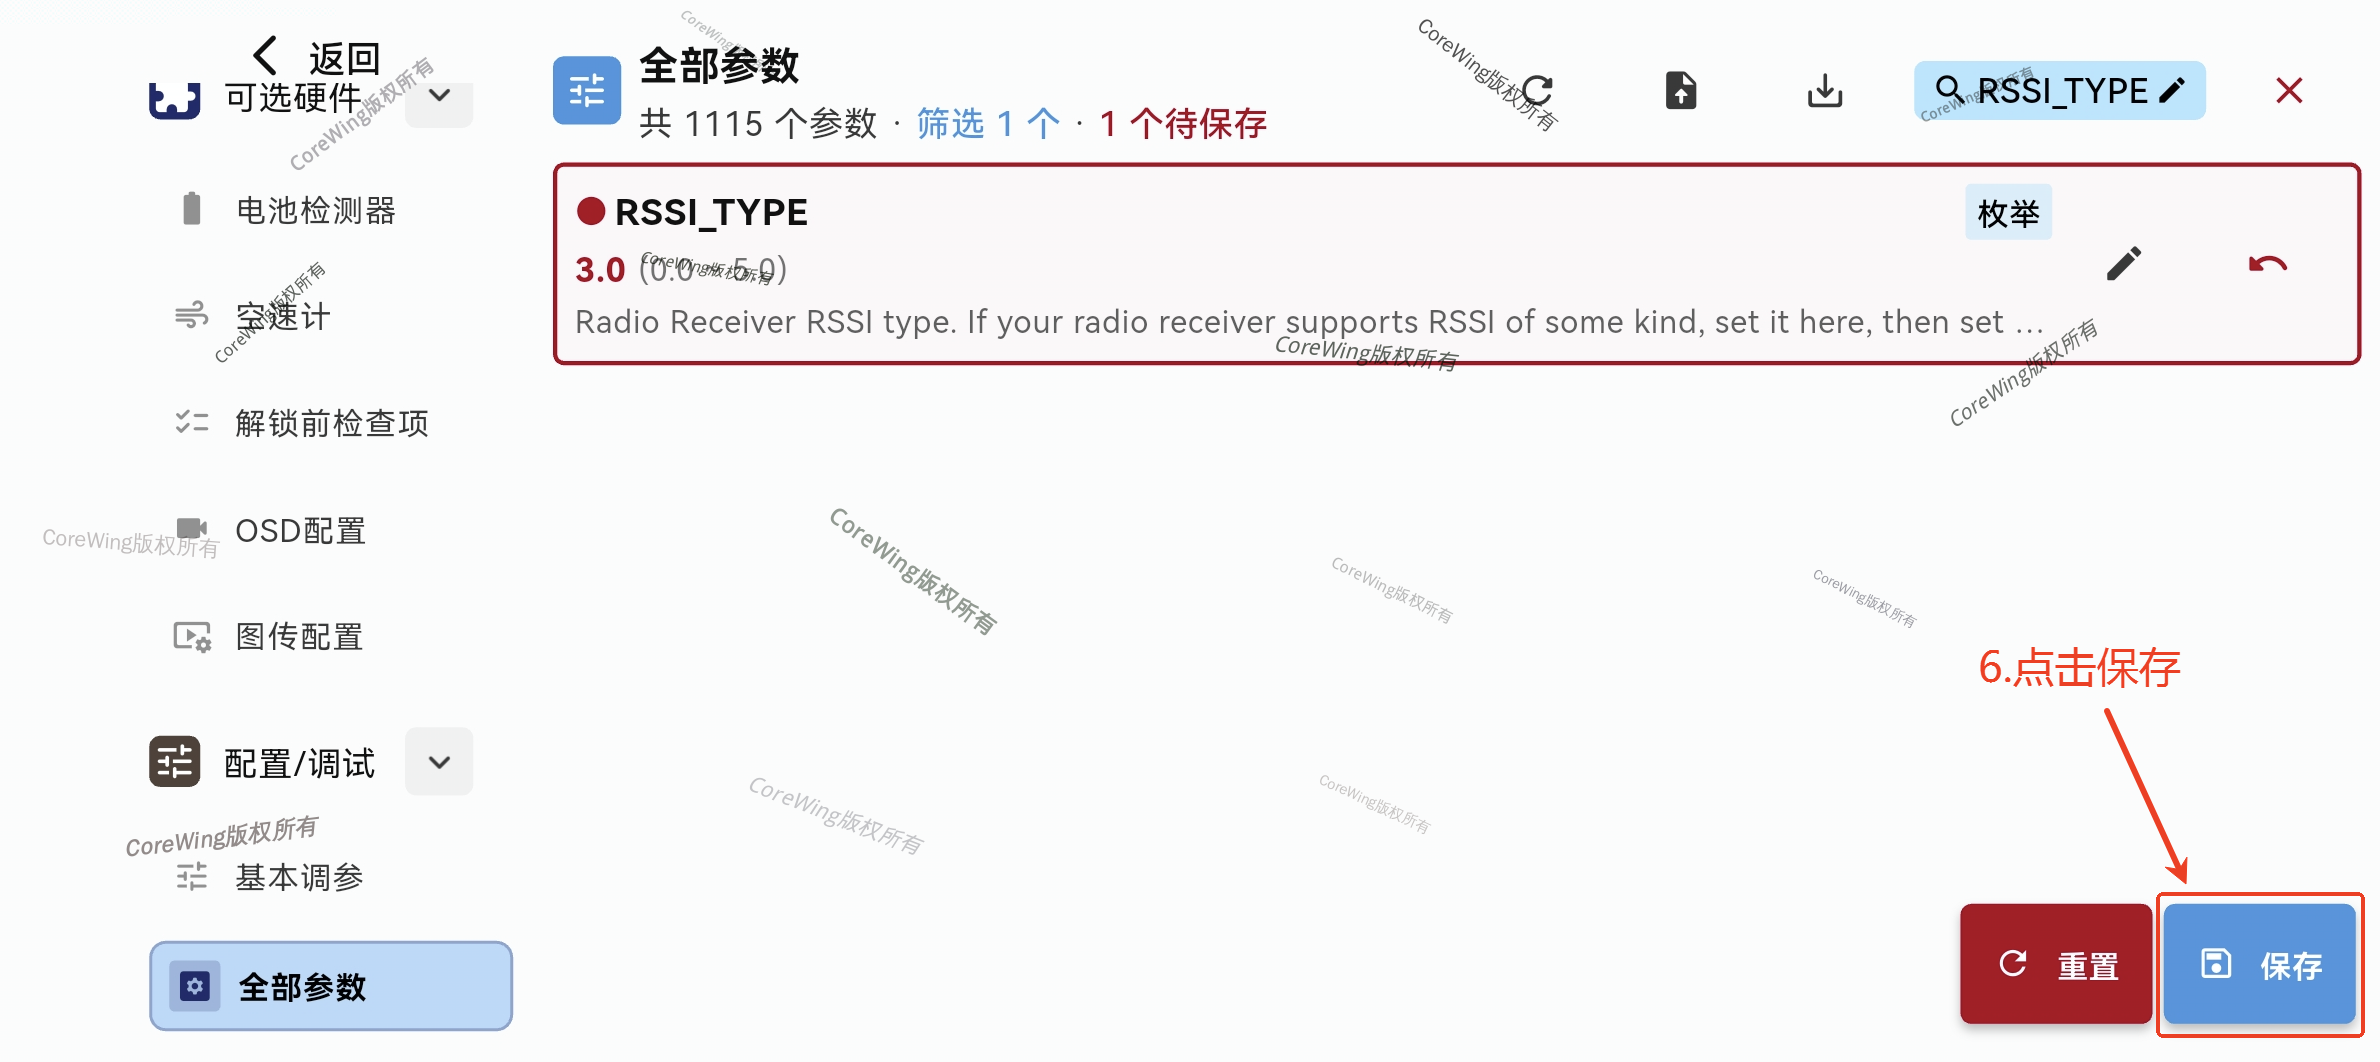
Configure RSSI_TYPE:
Click Config/Tuning, click All Parameters, click the search box
Enter
RSSI_TYPE, change the value ofRSSI_TYPEto3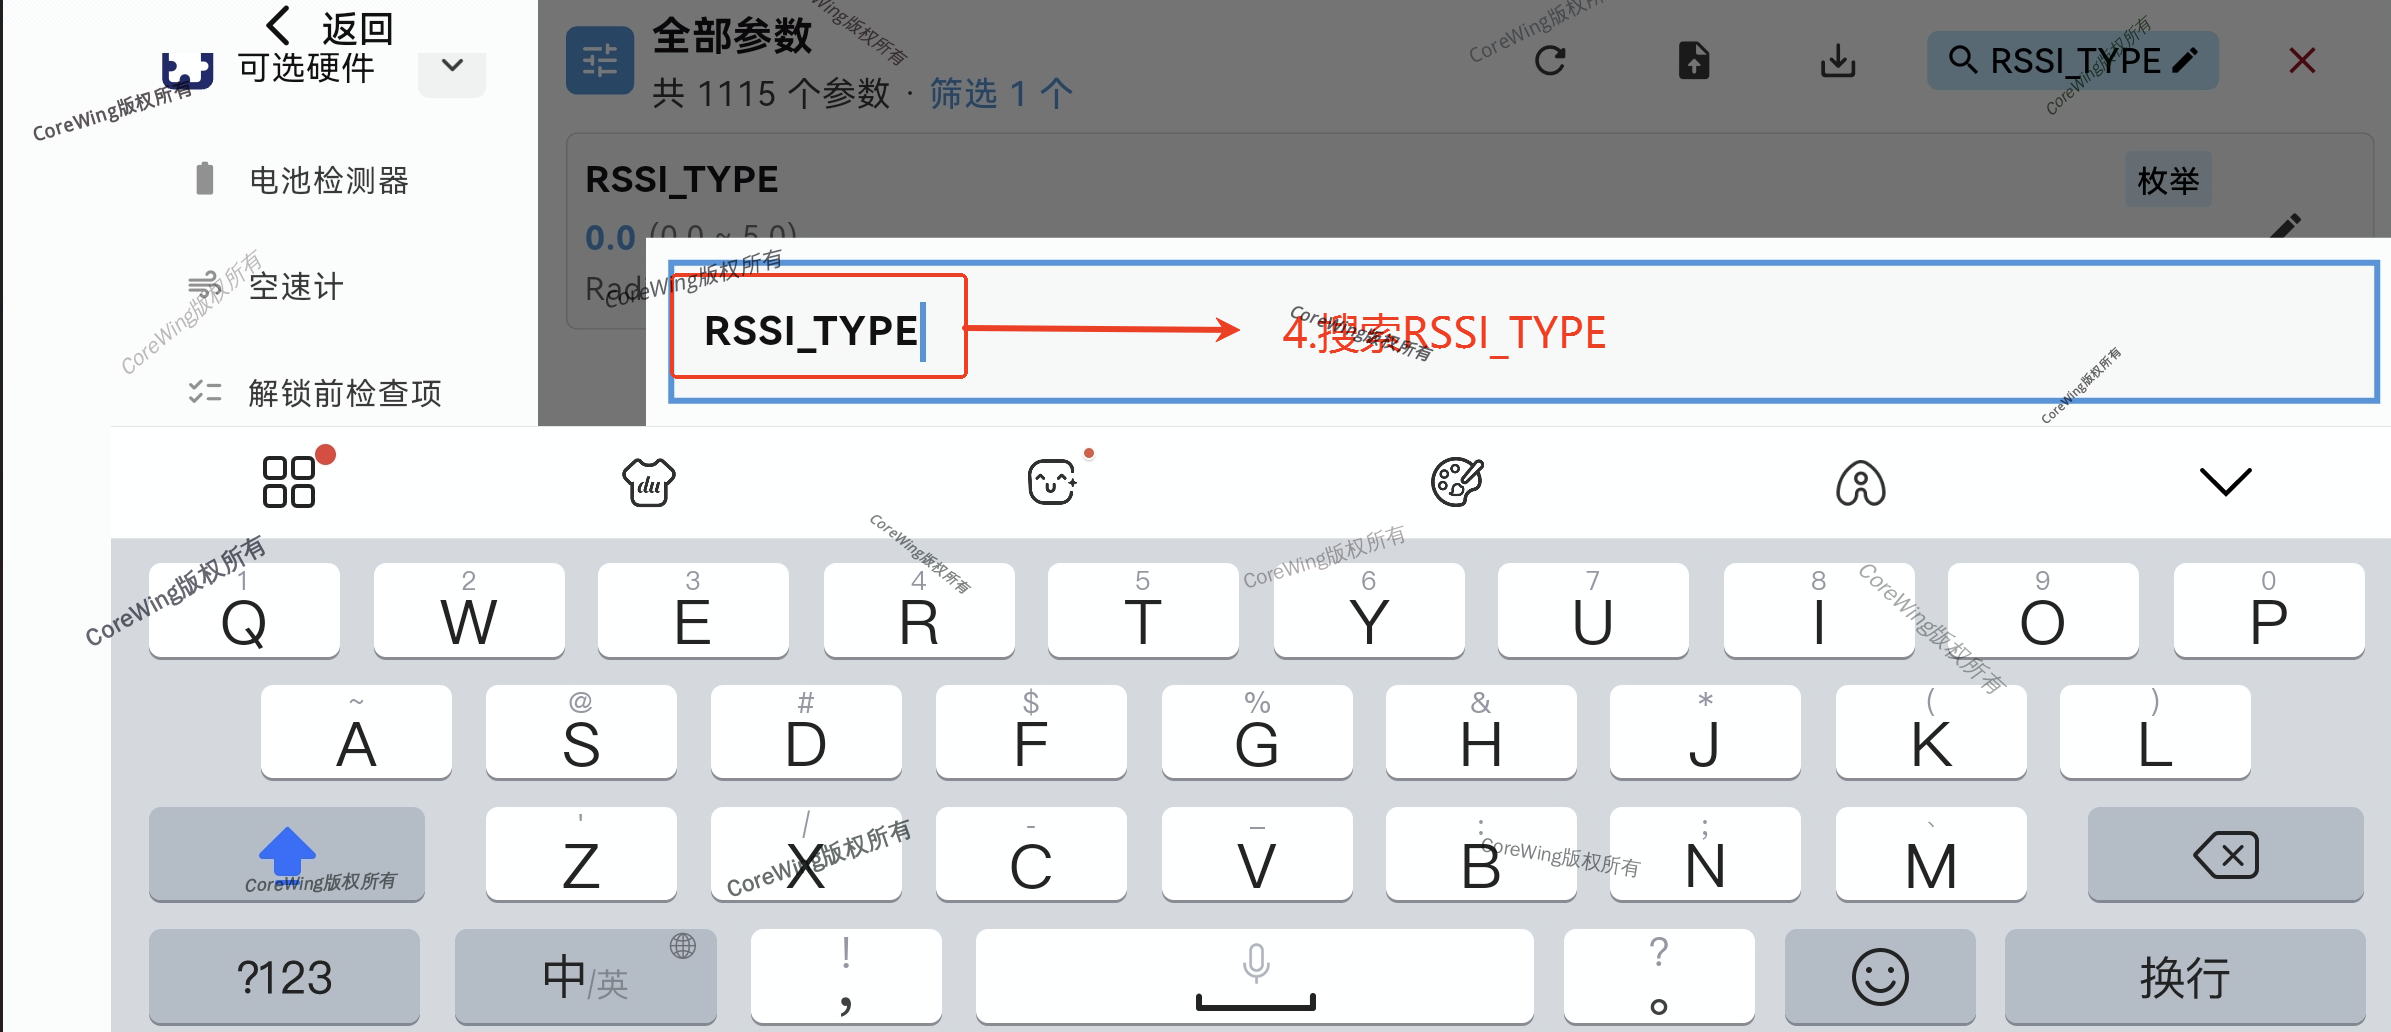
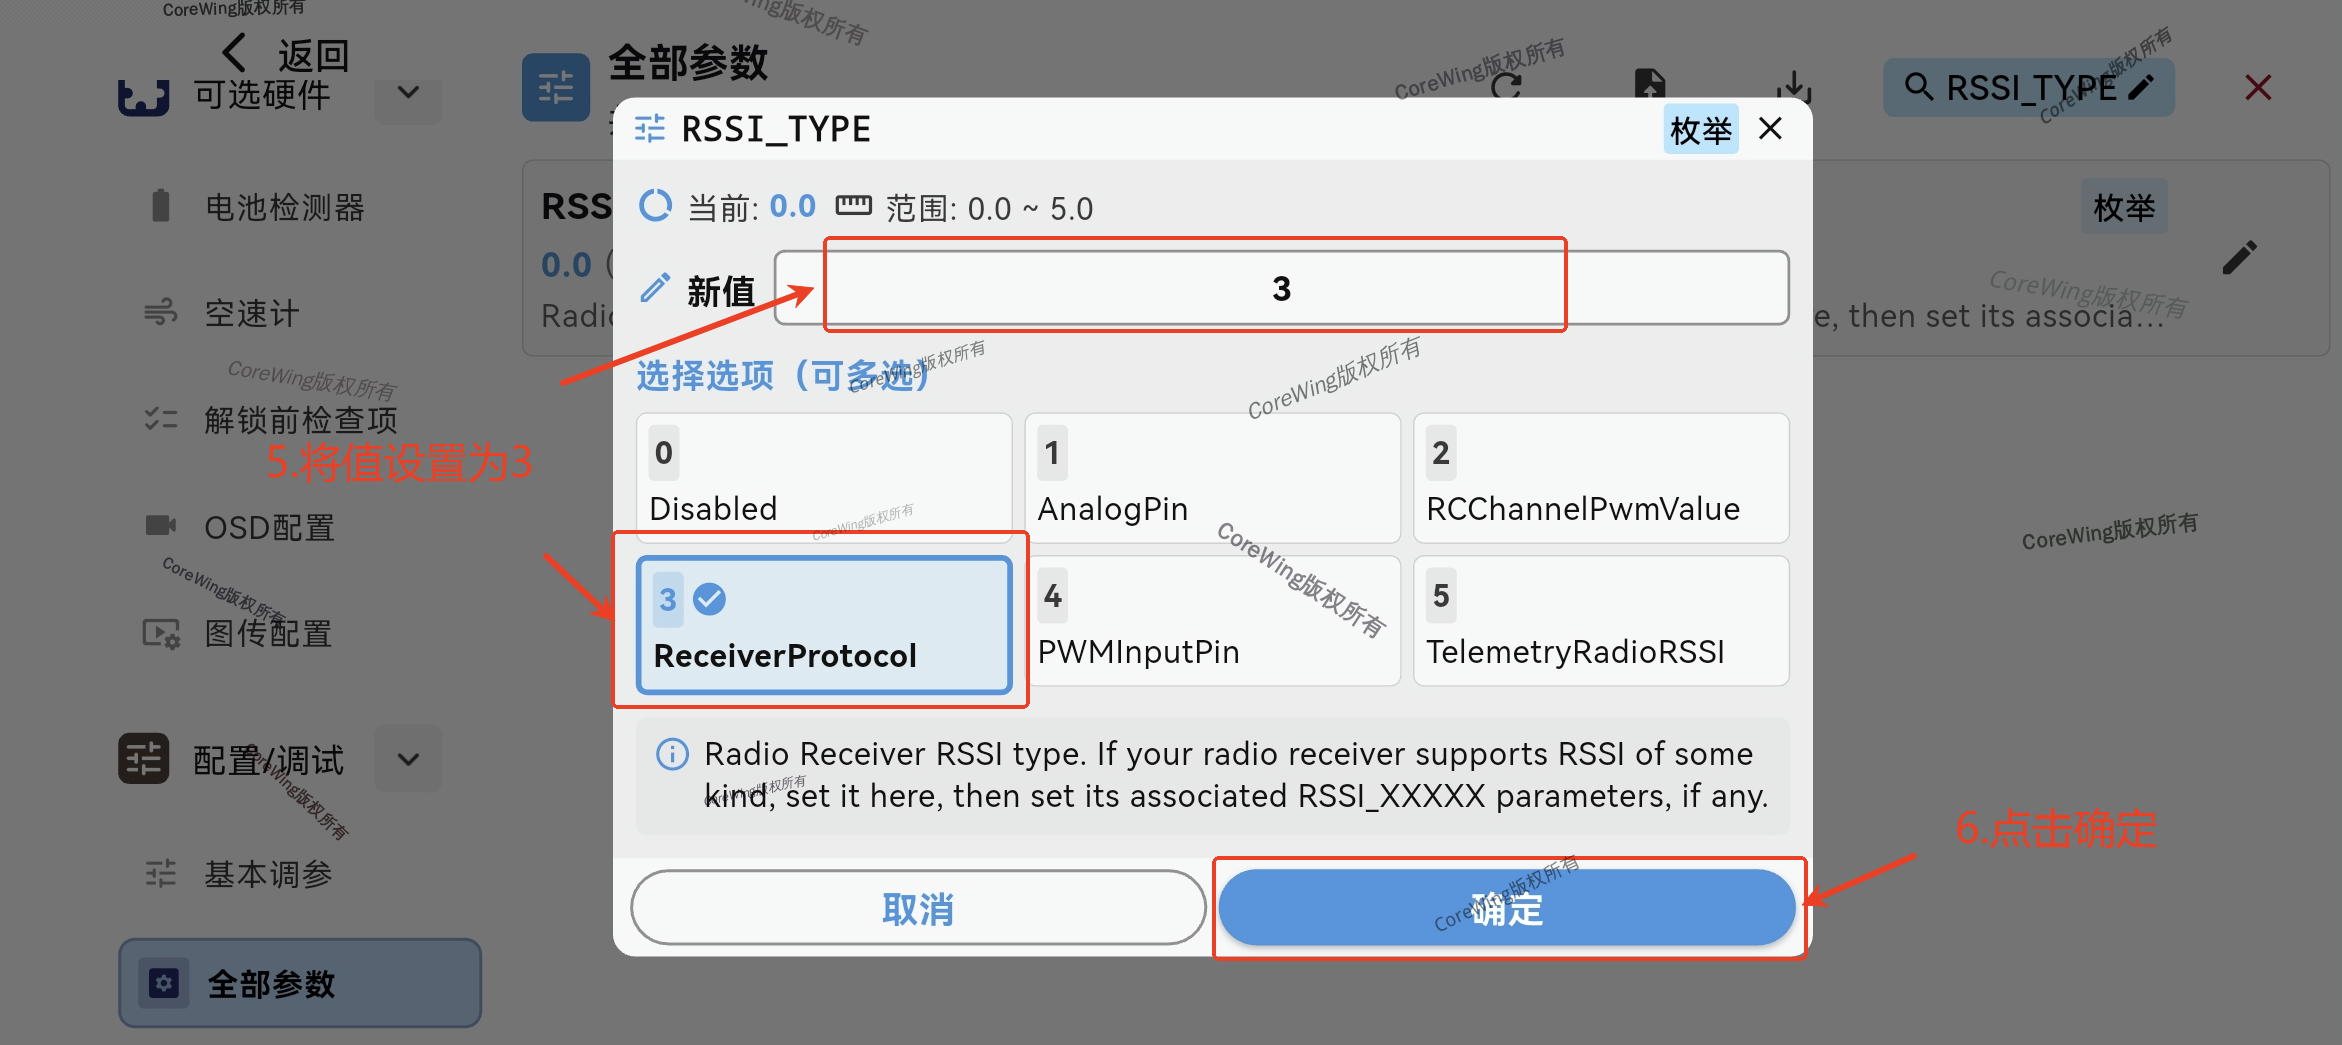
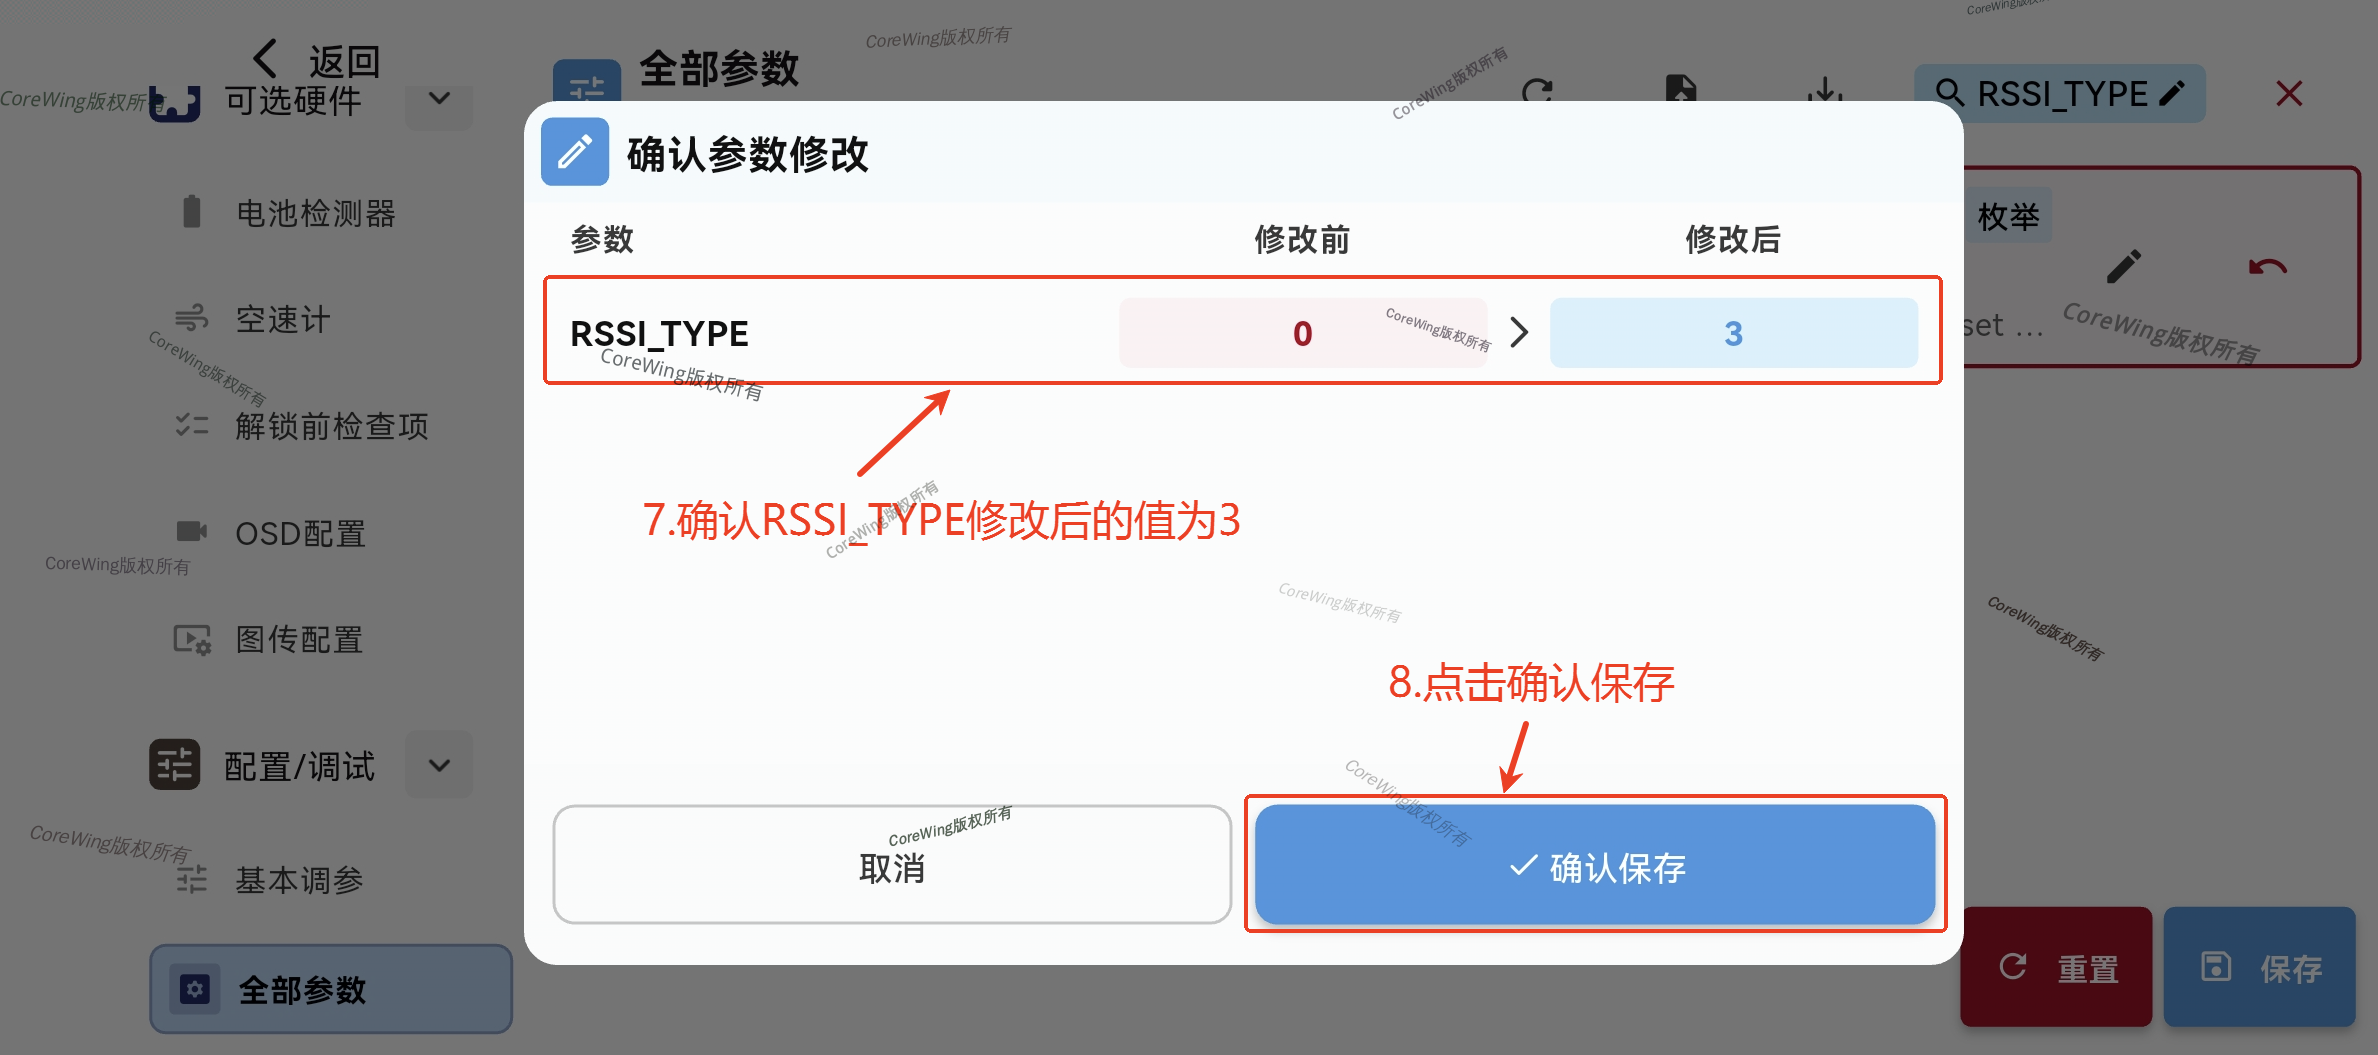
Click Save, confirm the modified value is
3, click Confirm to save
4.3.2 Servo Output Configuration (Servo and Motor Setup) and Control Surface Check
Important
The flight controller has a built-in BEC. If the ESC also has a built-in BEC, you must remove the middle power wire and insulate it properly to prevent it from contacting conductors during flight, which could cause a short circuit!
Output Wiring:

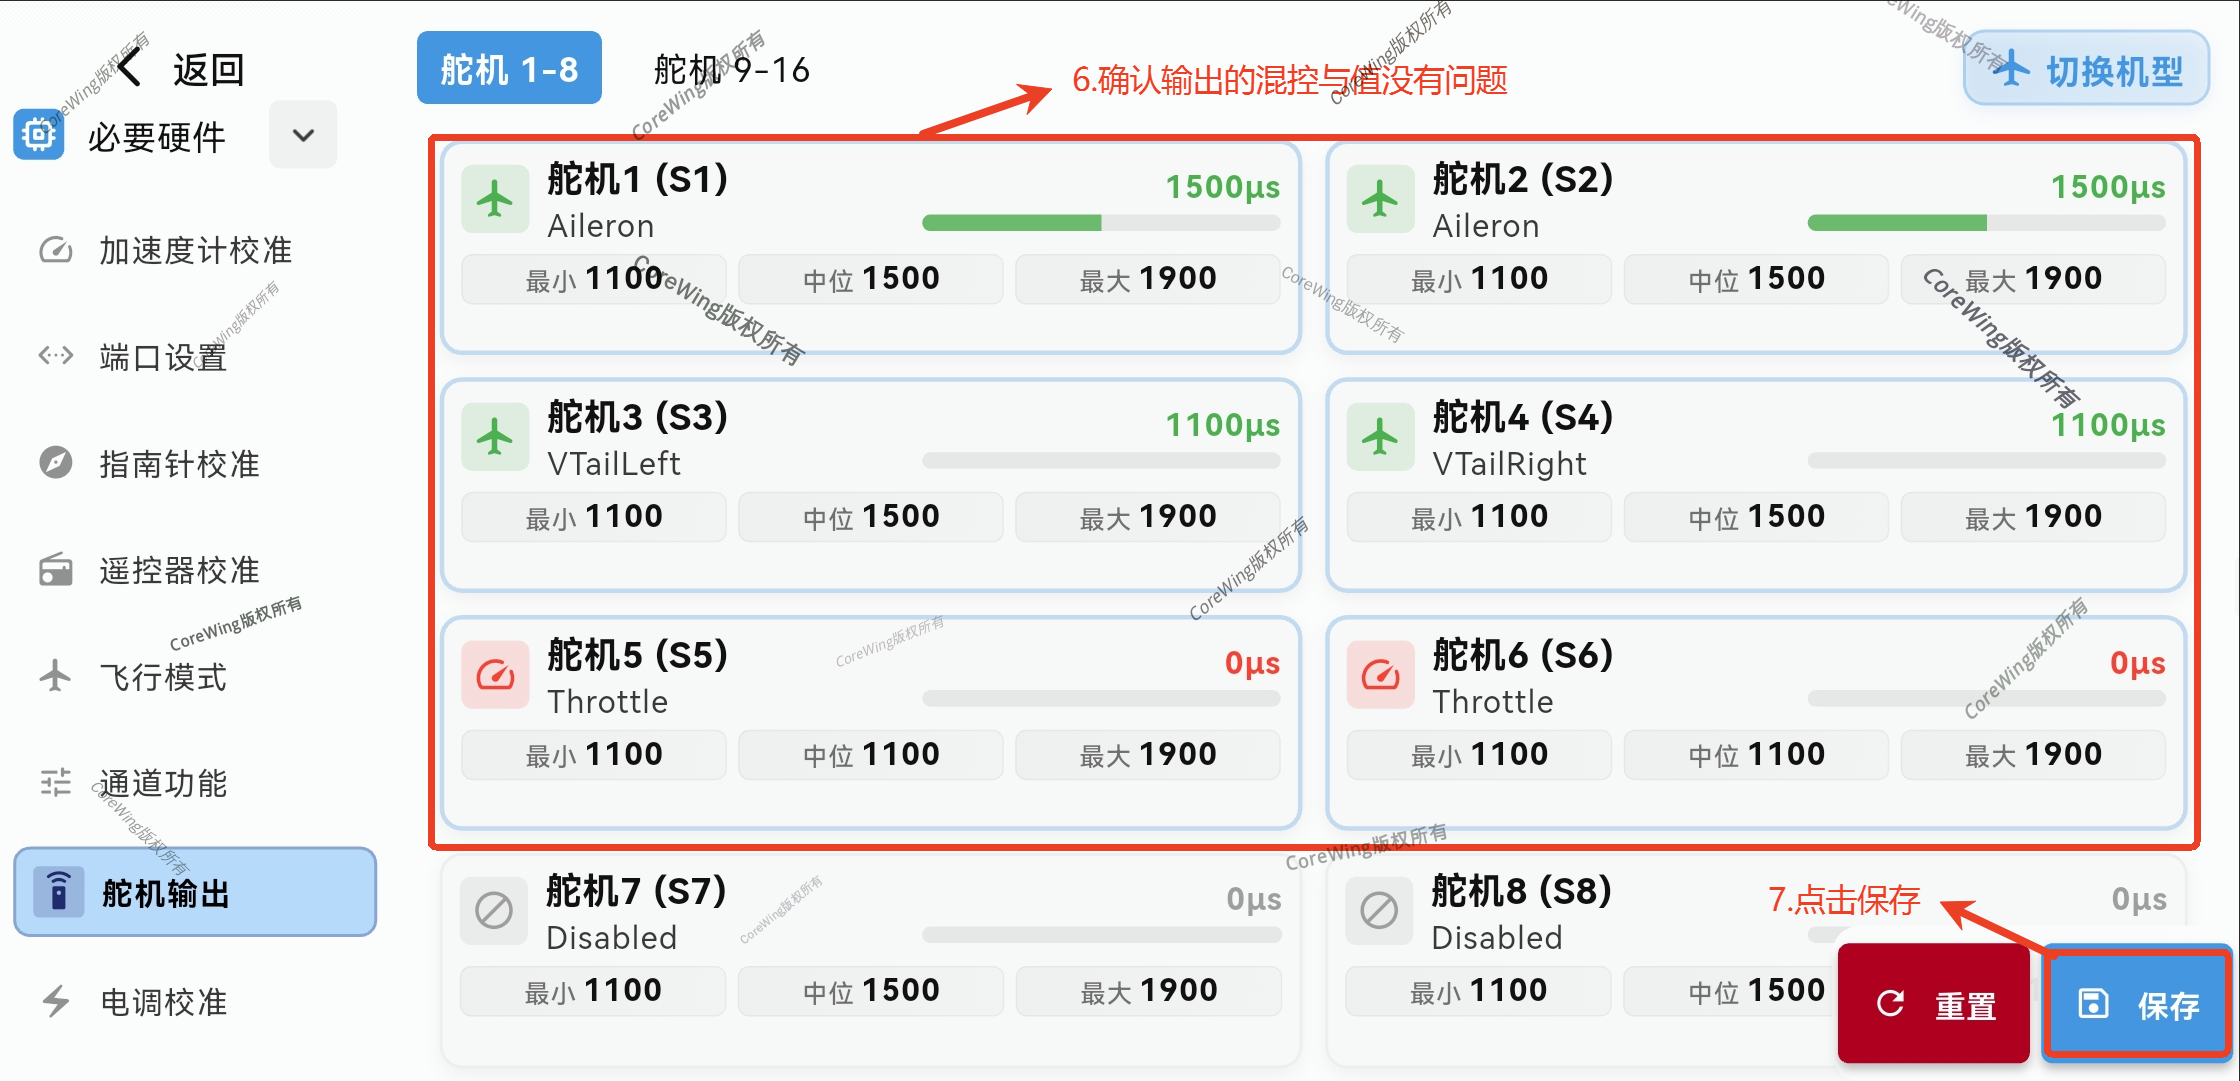
| Channel | Output | Description |
|---|---|---|
| S1 | Aileron | Left aileron |
| S2 | Aileron | Right aileron |
| S3 | VTailLeft | Left V-tail |
| S4 | VTailRight | Right V-tail |
| S5 | Throttle | Throttle |
| S6 | Throttle | Throttle |
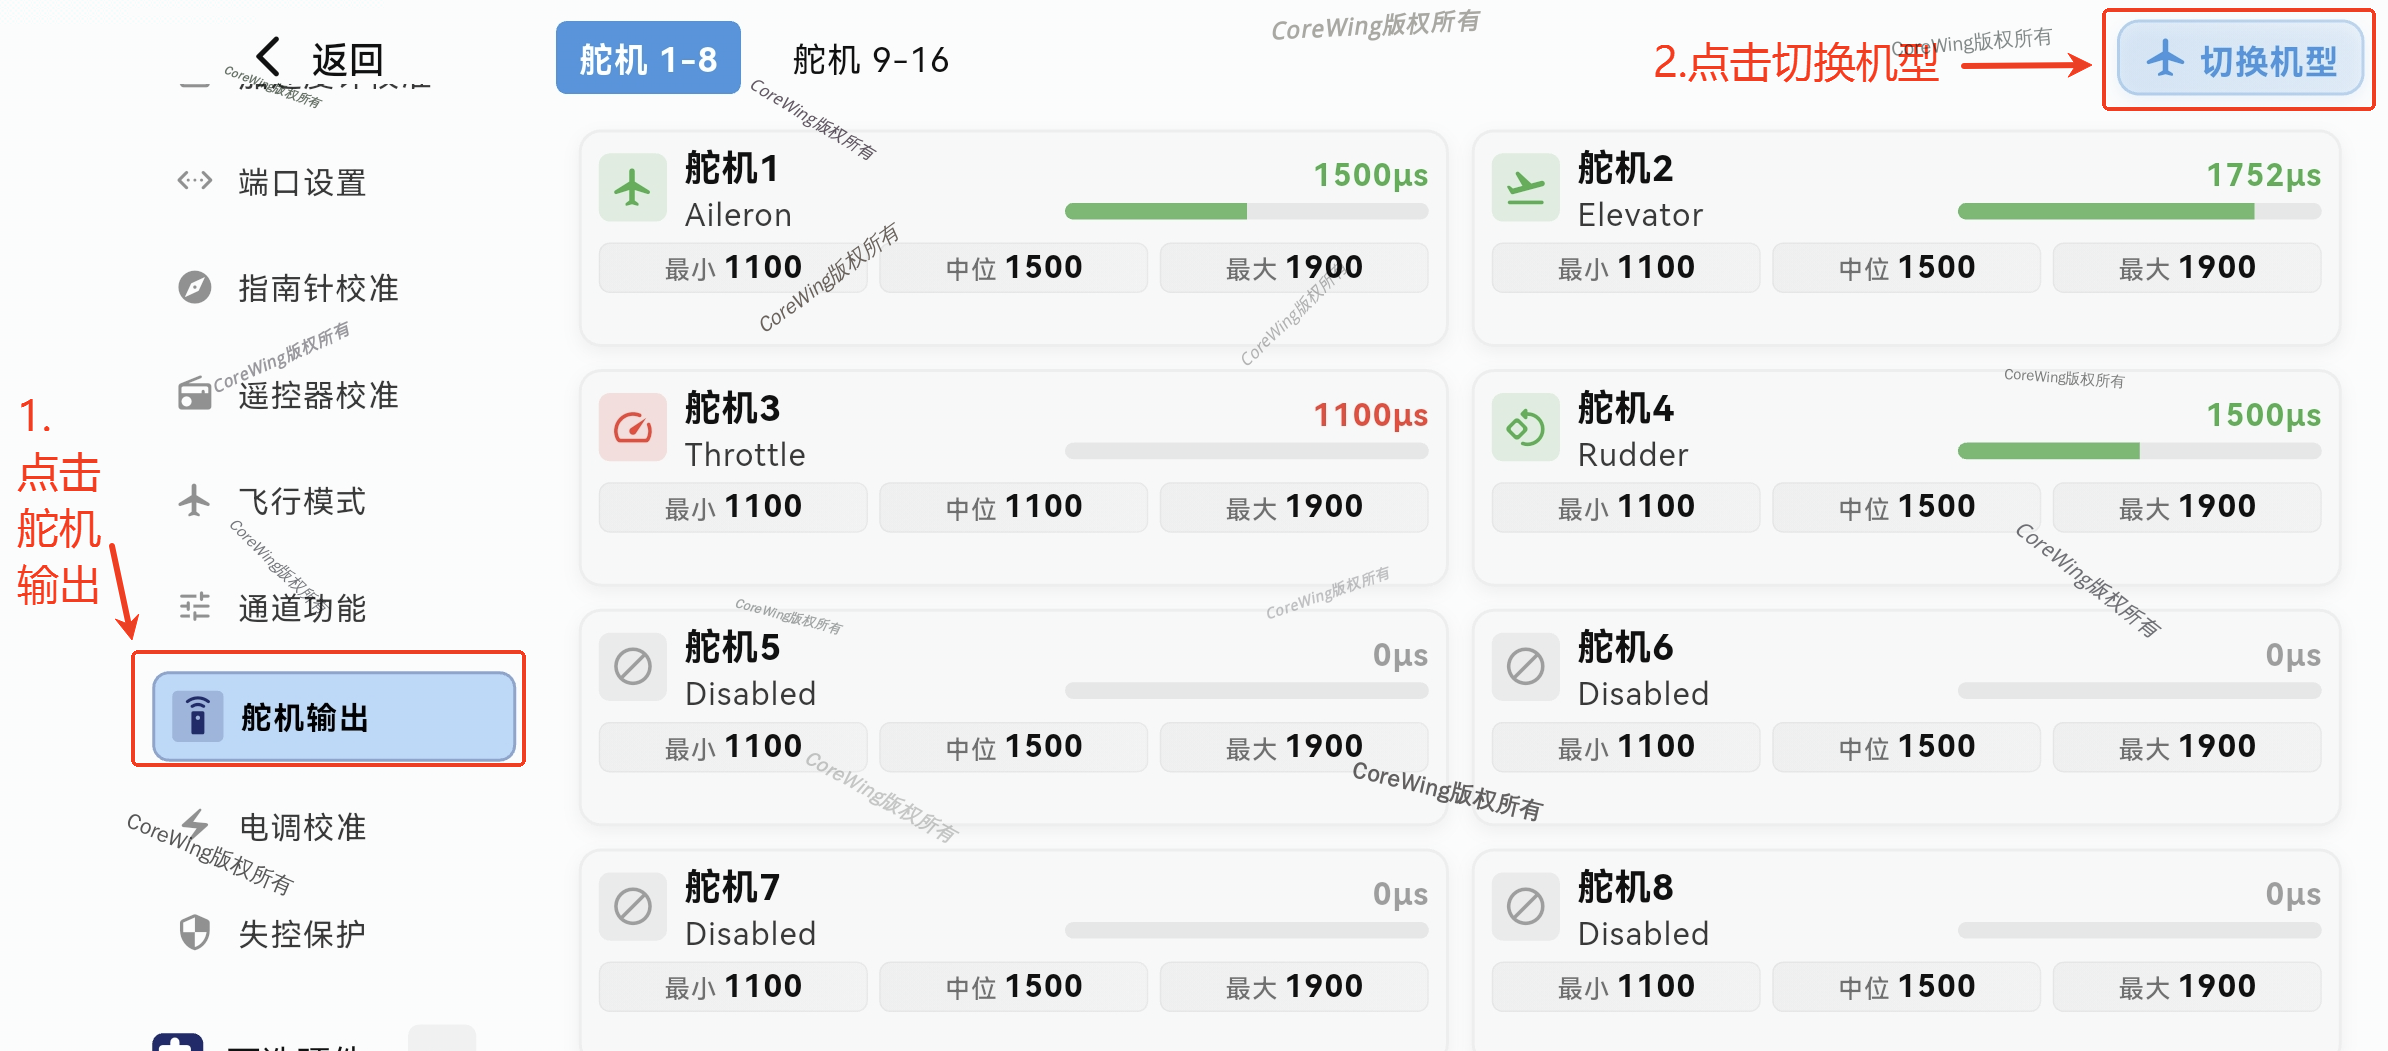
- Click Servo Output, click Change Aircraft Type
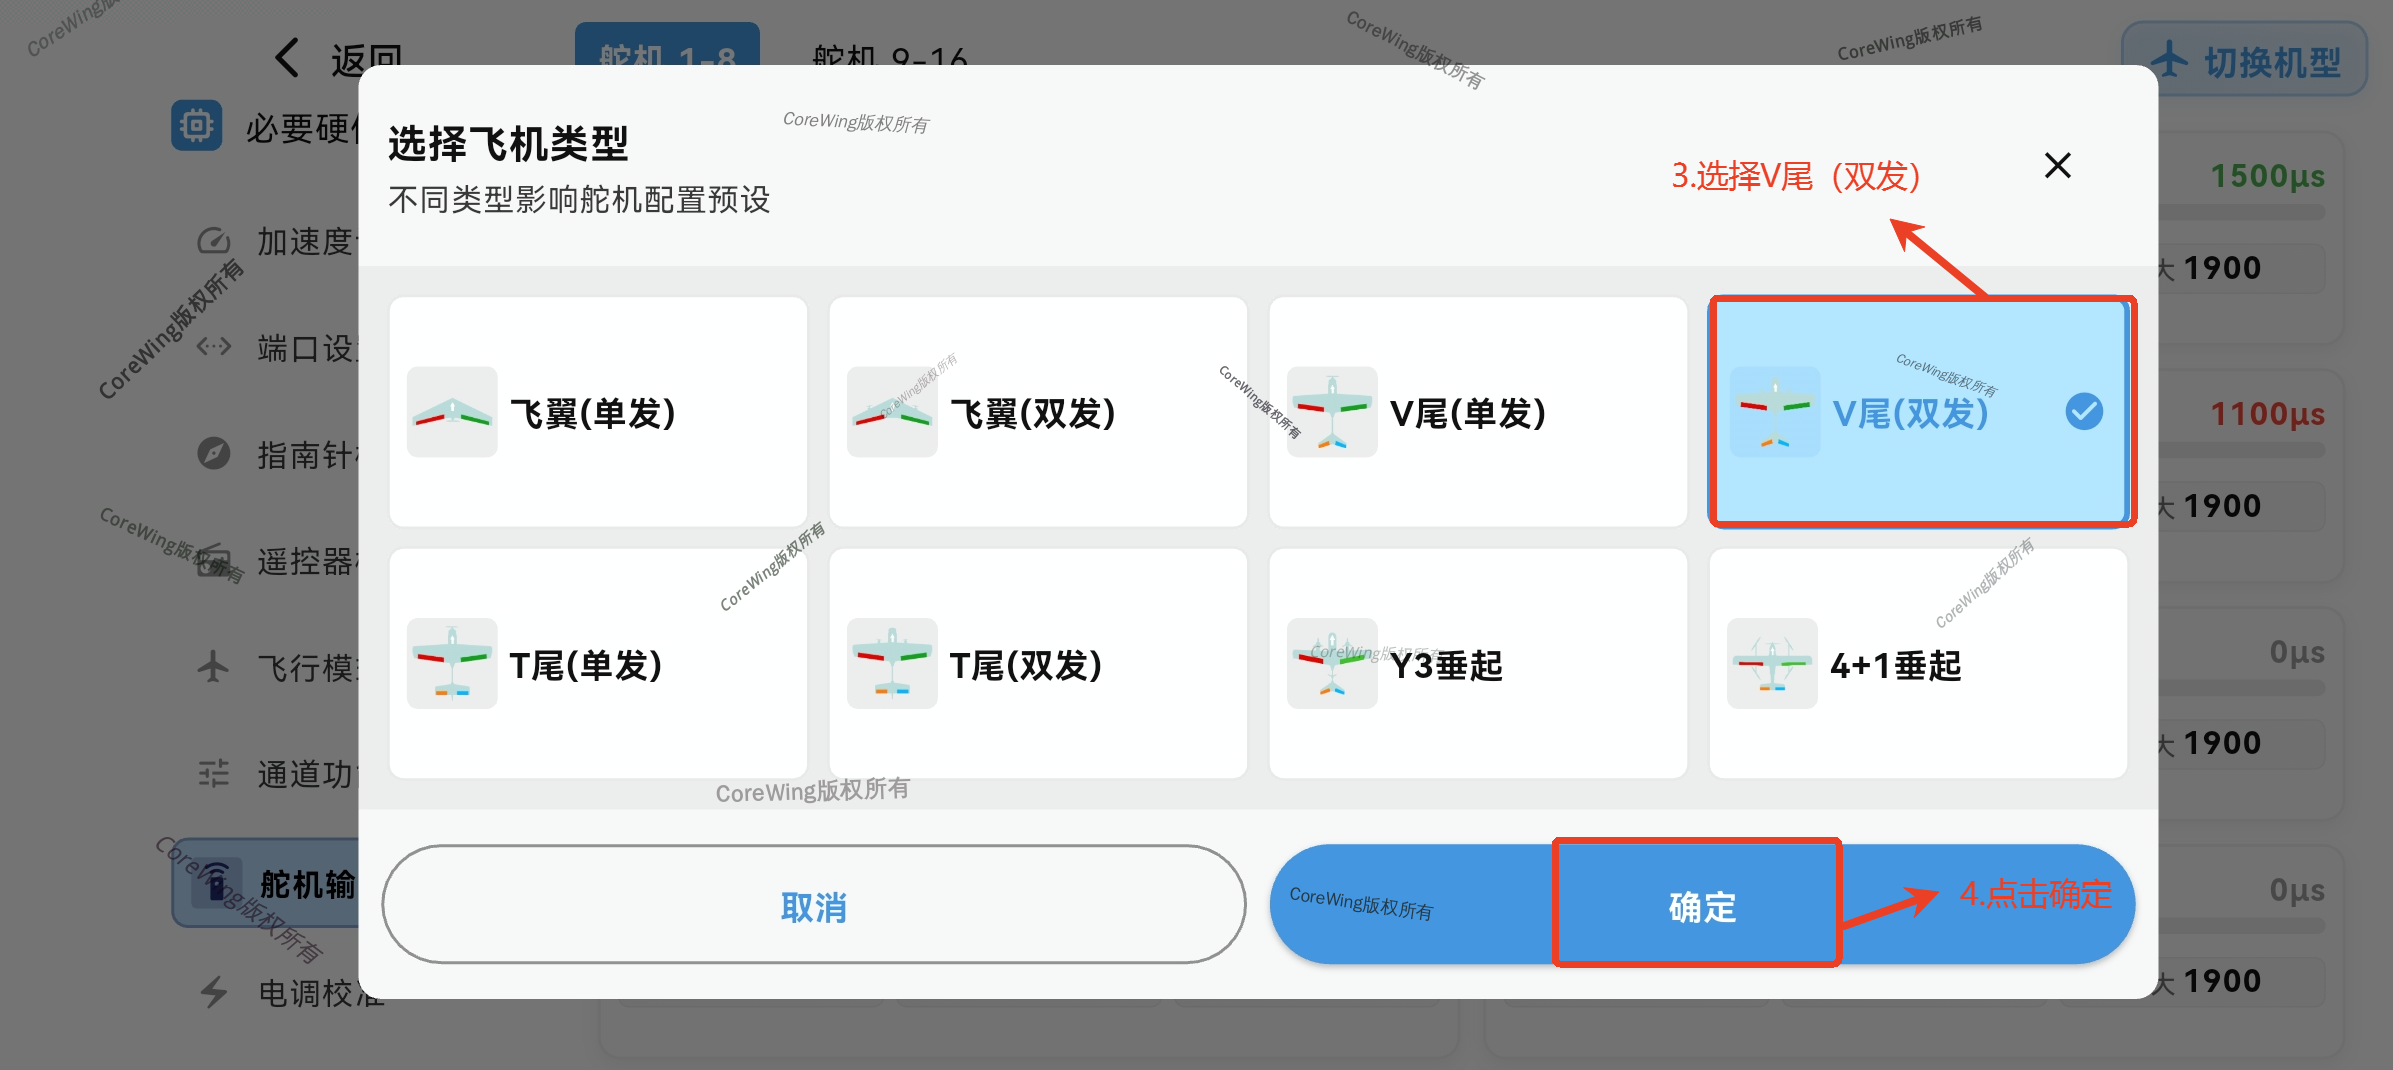
- Select V-tail (Twin), click OK, click Confirm Change
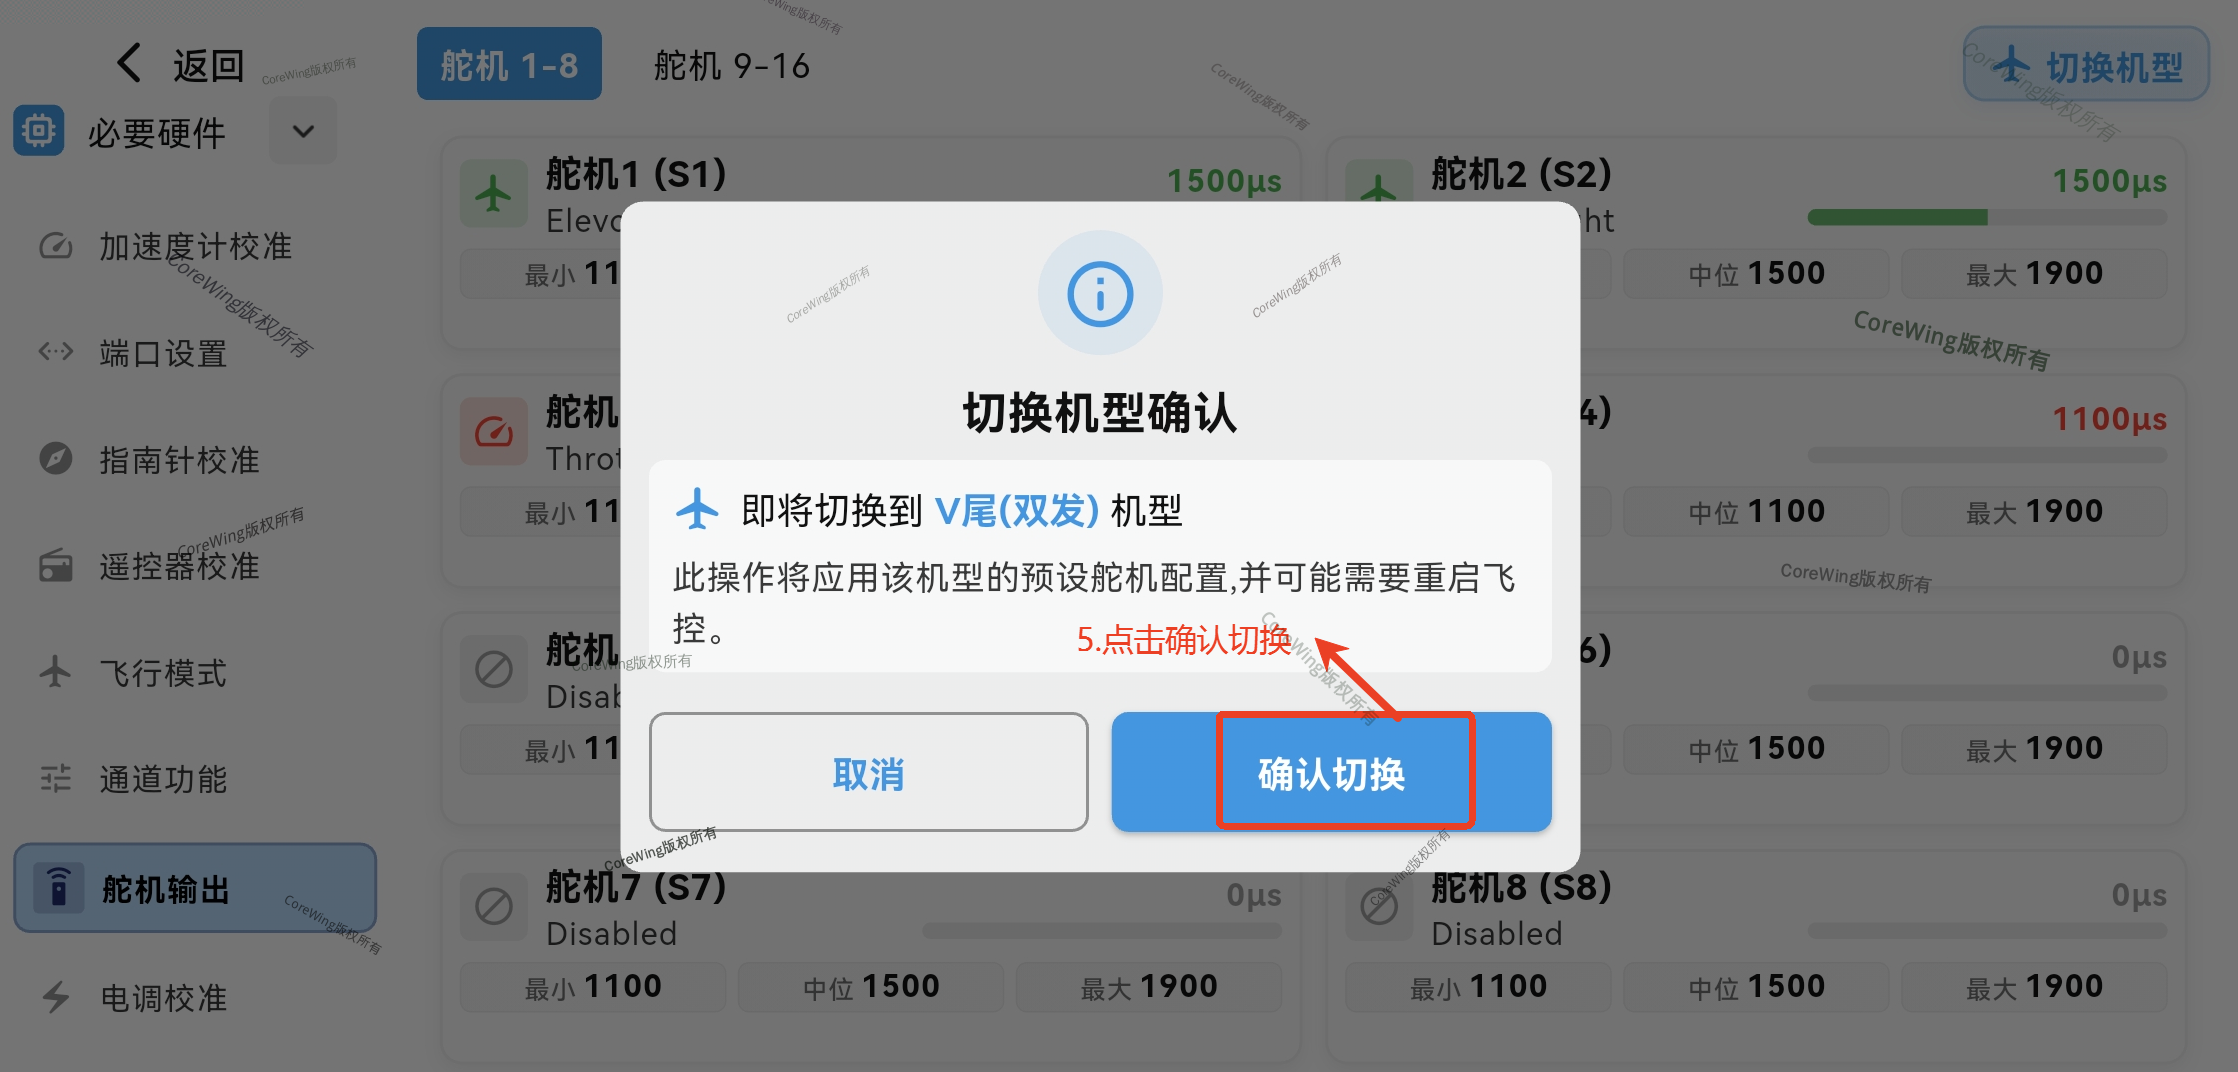
- Confirm the output mixing and values are correct, click Save
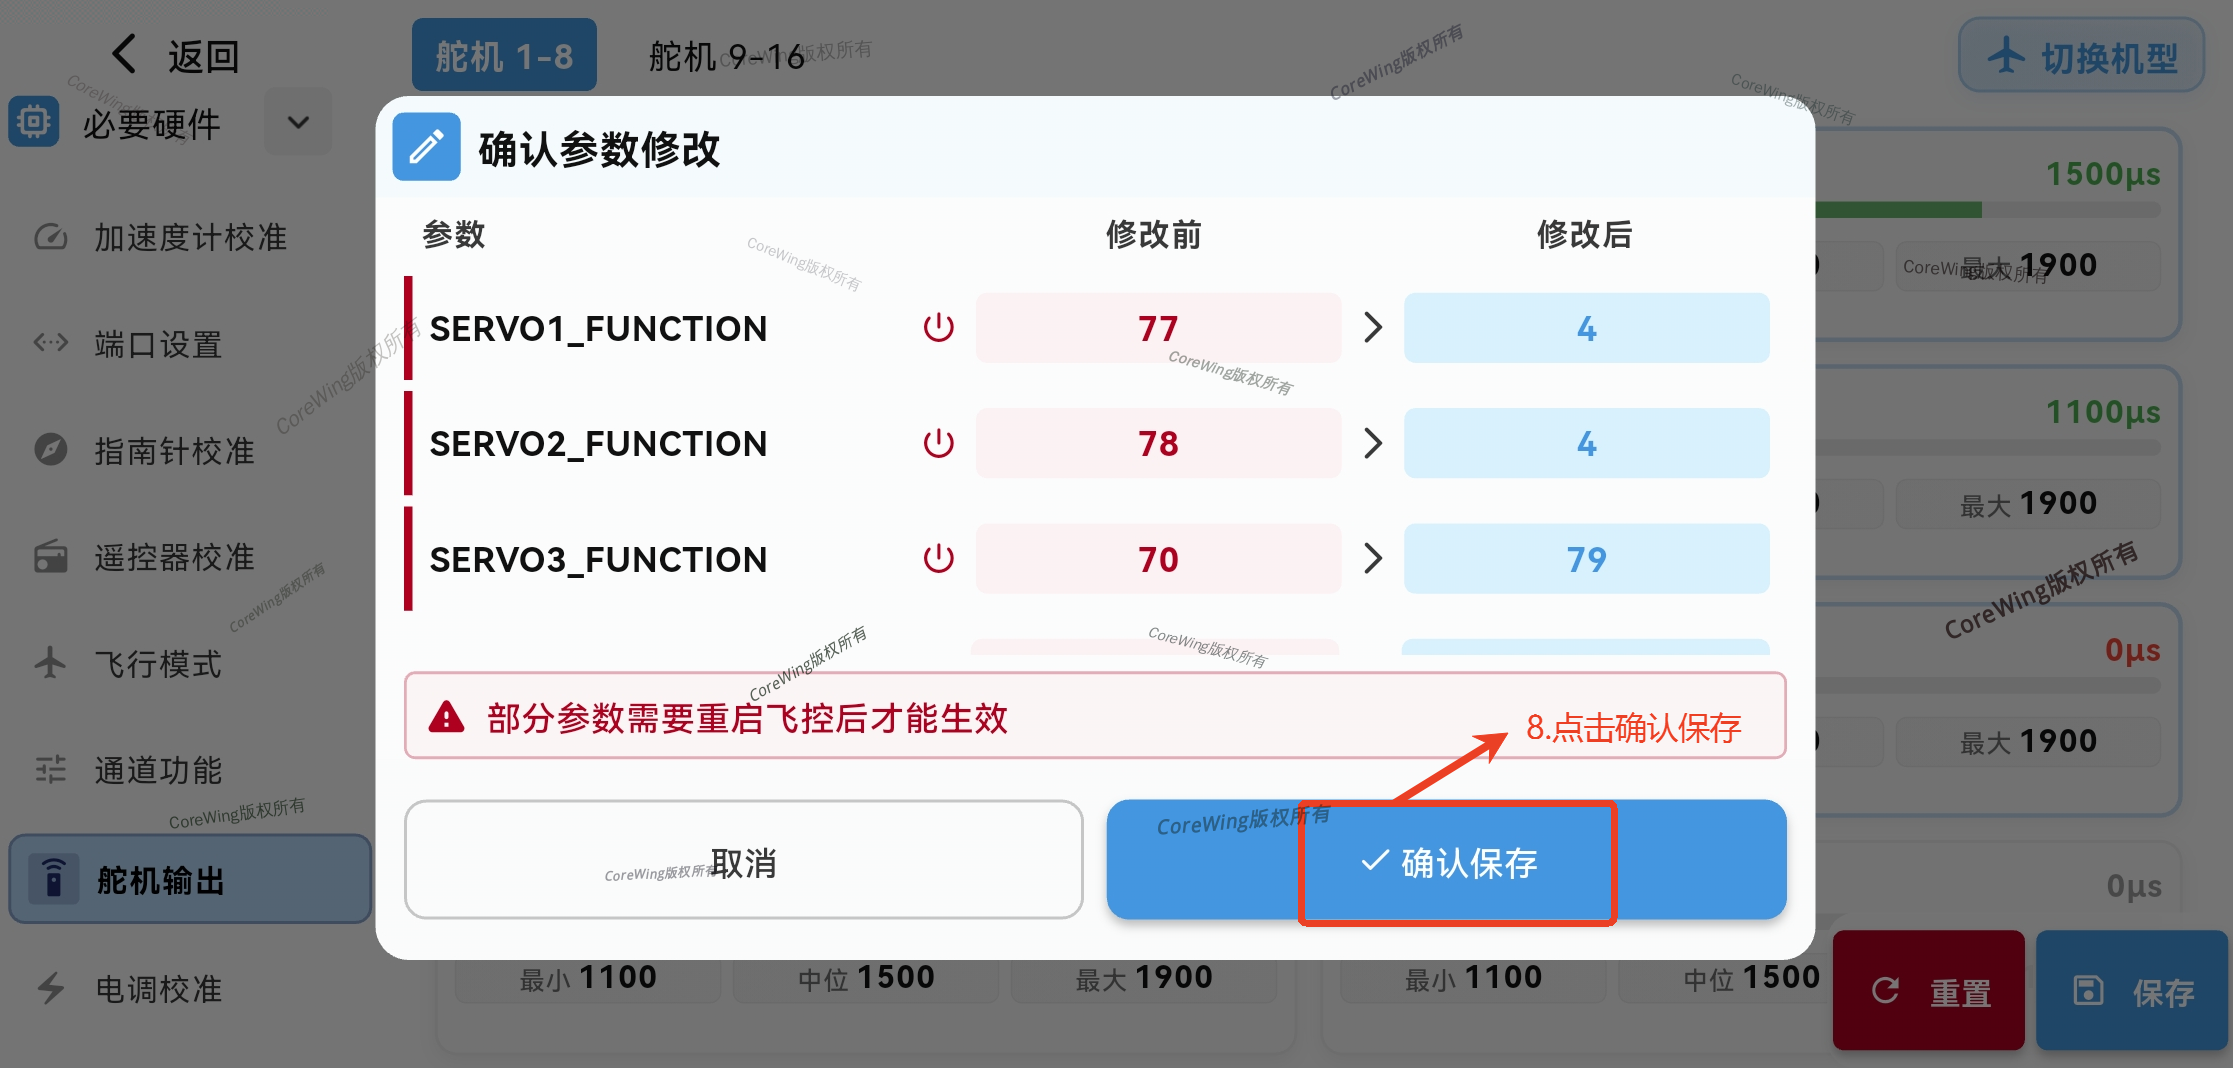
- Click Confirm Save
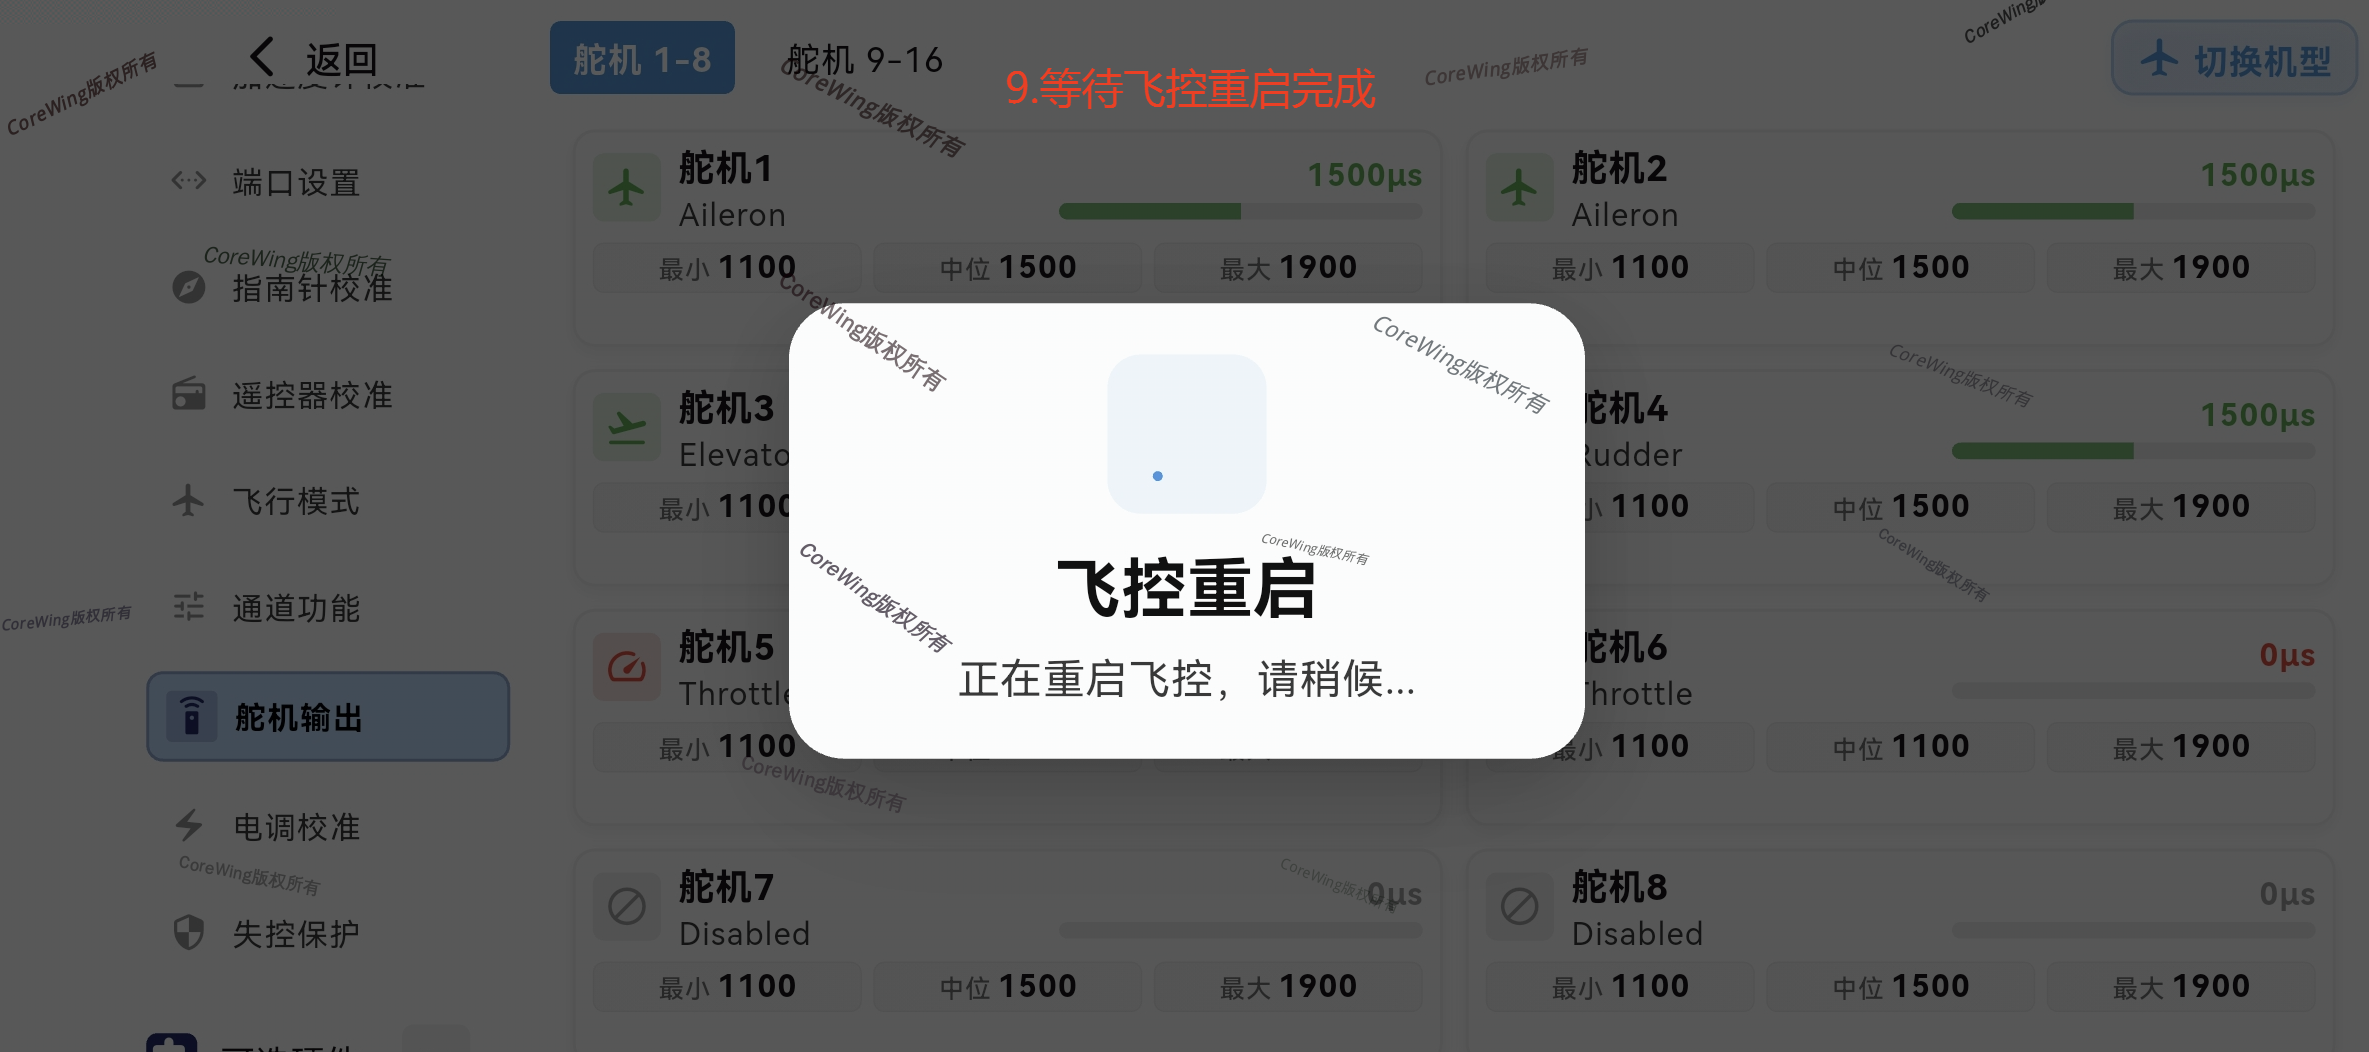
- Wait for the flight controller to restart completely
Important
Note:
The minimum and midpoint values for throttle should be consistent. When using the app for tuning, changing the output does not automatically update the throttle midpoint value, so please check this carefully.
Configure output settings according to timer groups as much as possible, placing similar devices in the same group. For timer group information, refer to the flight controller manual "Part5-Pin Mapping-ArduPilot Pin Mapping" section.
Control Surface Check:
a. In stabilize mode, control surface feedback check
Important
Switch the flight mode to FBWA Mode
When the aircraft rolls left, the left wing control surface deflects down, and the right wing control surface deflects up.
When the aircraft rolls right, the left wing control surface deflects up, and the right wing control surface deflects down.
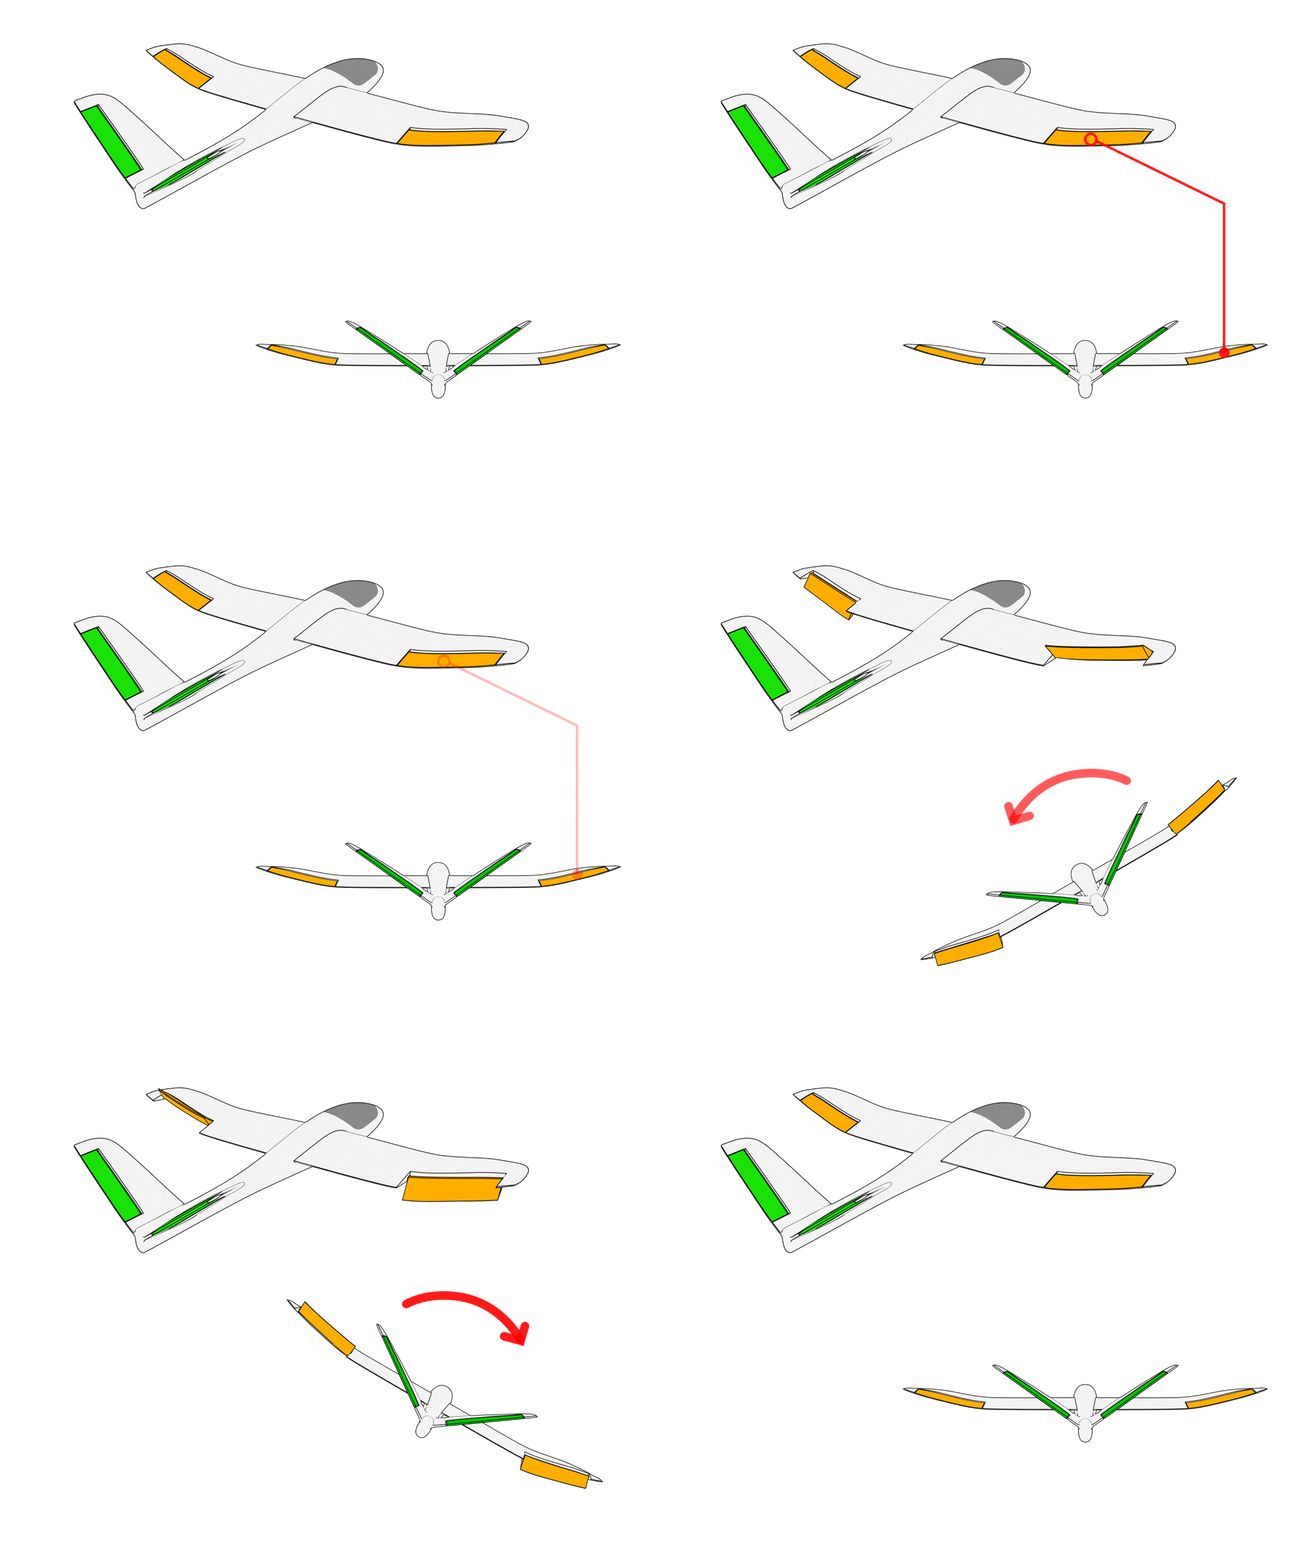
When the aircraft pitches up, the response is both control surfaces deflecting down.
When the aircraft pitches down, the response is both control surfaces deflecting up.
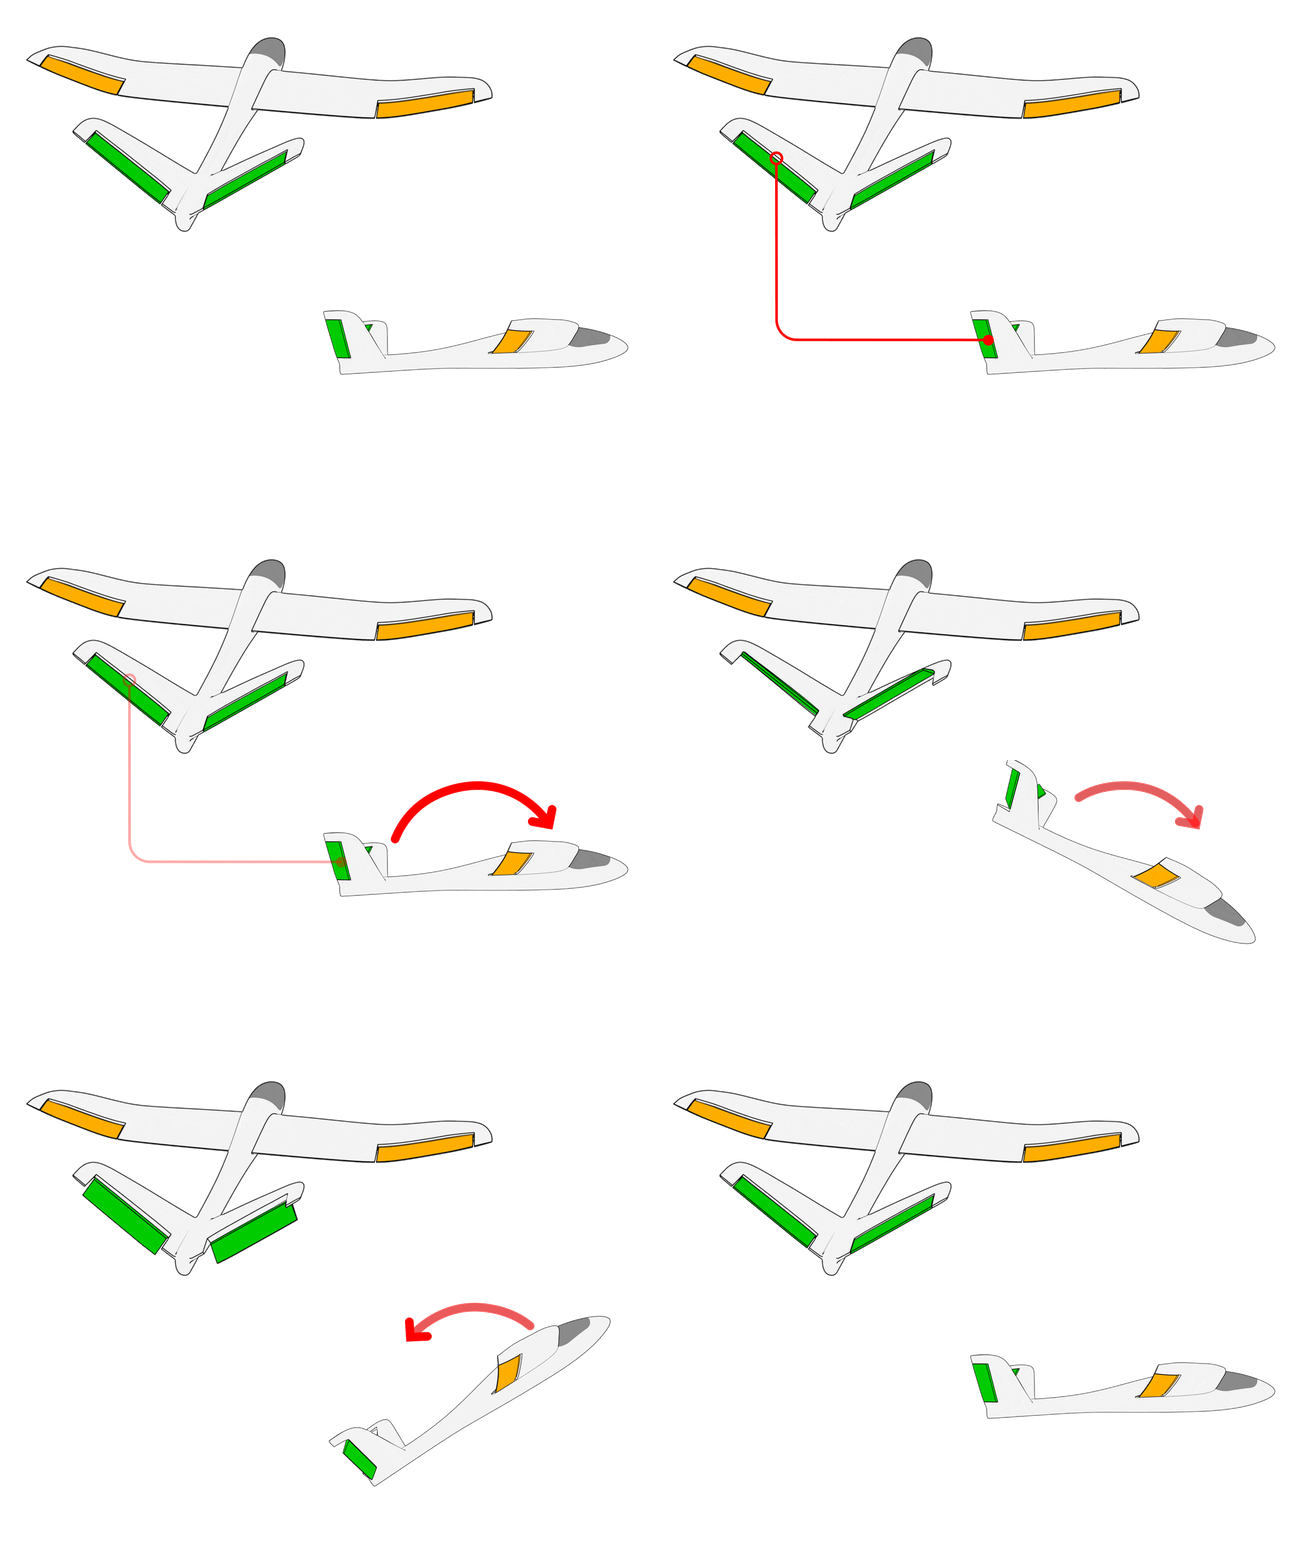
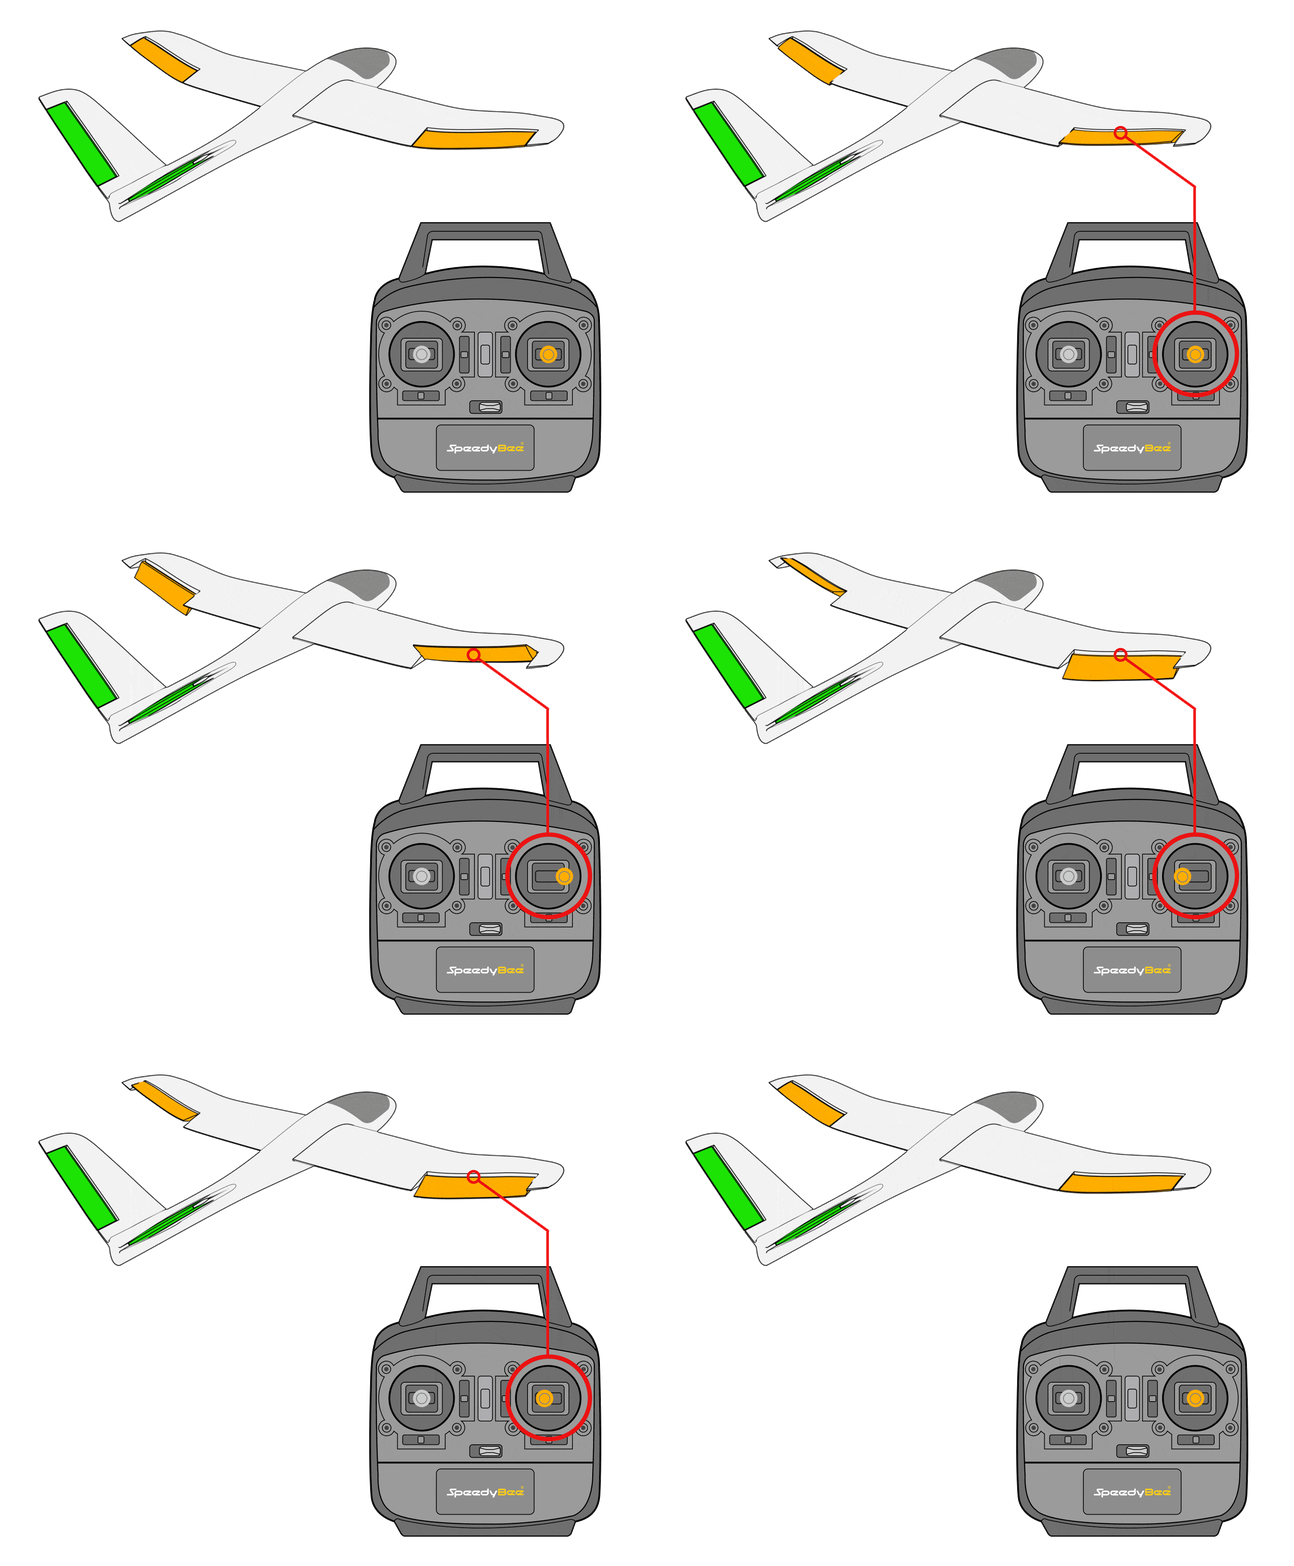
b. In manual mode, control surface feedback check
Important
Switch the flight mode to ACRO Mode
When moving the aileron stick left, the response is the left wing control surface deflecting up and the right wing control surface deflecting down.
When moving the aileron stick right, the response is the left wing control surface deflecting down and the right wing control surface deflecting up.
When moving the elevator stick up, the response is both control surfaces deflecting down.
When moving the elevator stick down, the response is both control surfaces deflecting up.
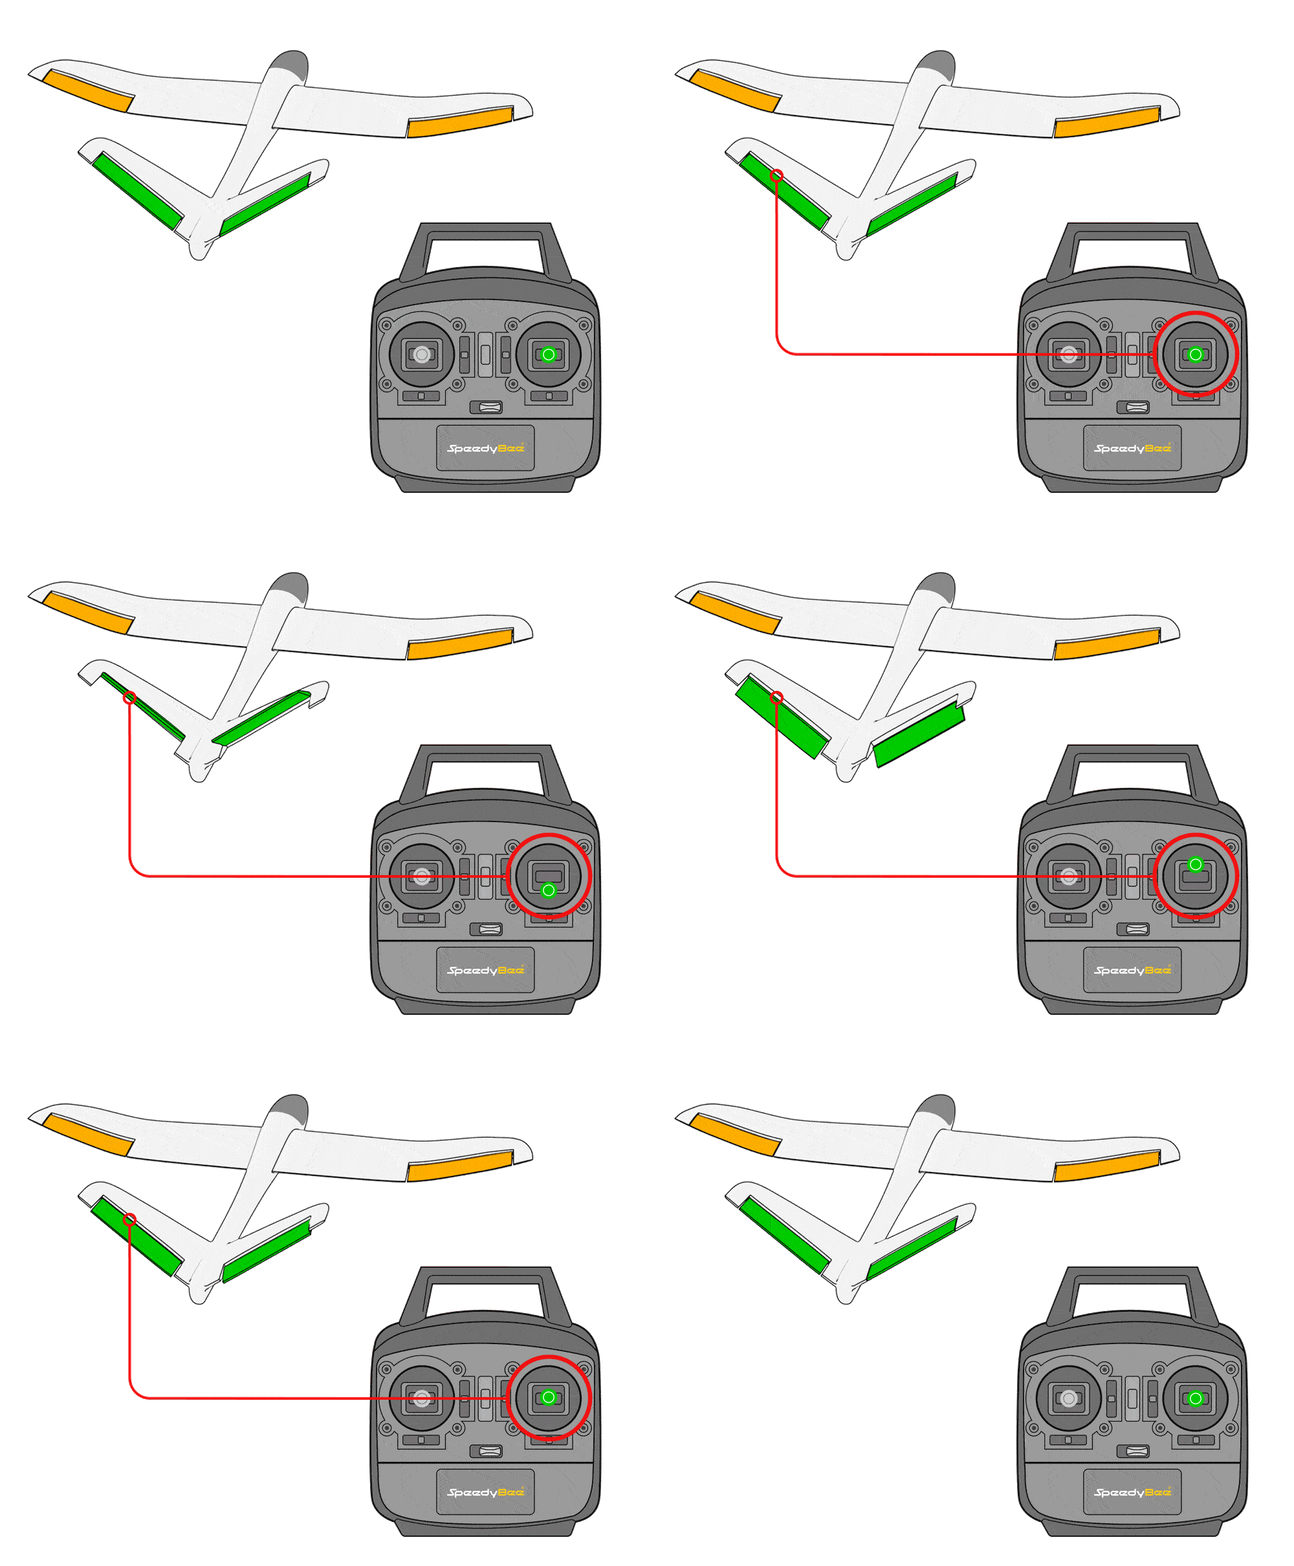
When moving the rudder stick left, the response is both control surfaces deflecting left.
When moving the rudder stick right, the response is both control surfaces deflecting right.
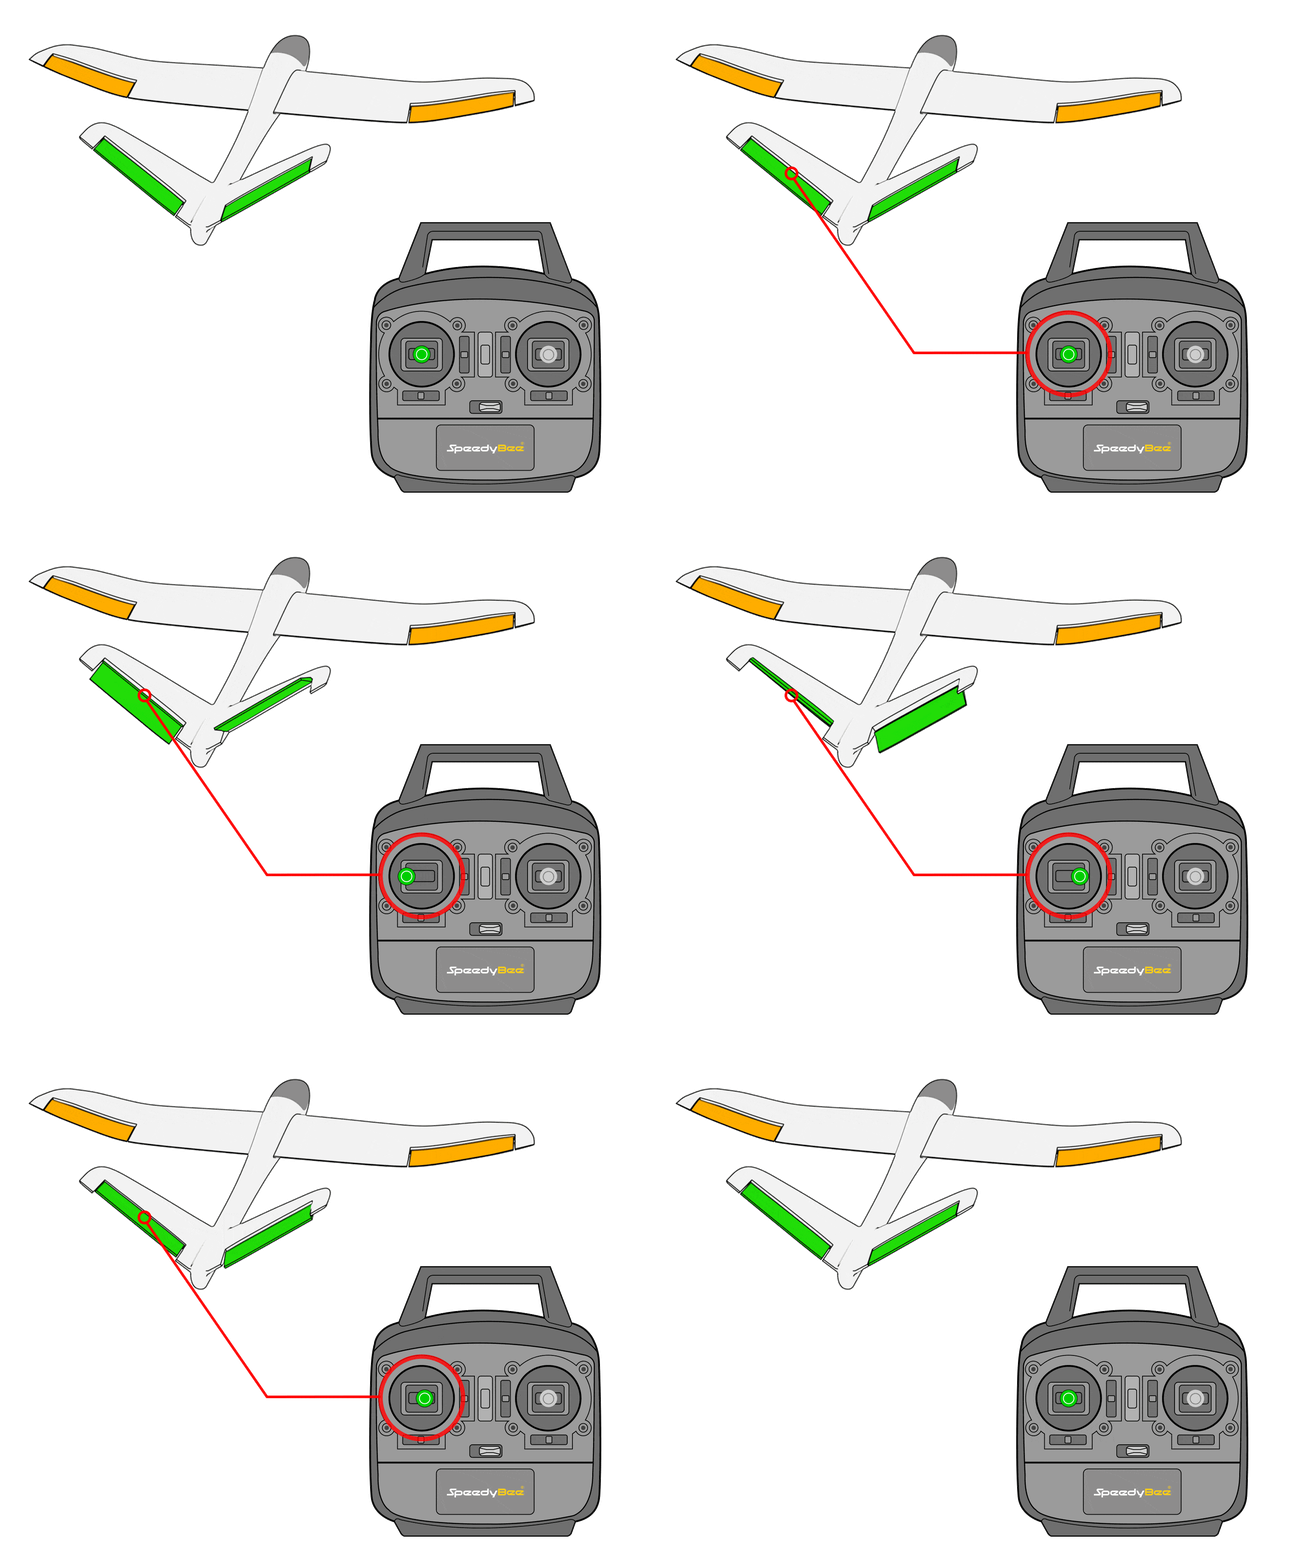
Check the stabilize feedback first, then check the manual feedback. If the stabilize feedback is incorrect, simply reverse the incorrect control surface channel.
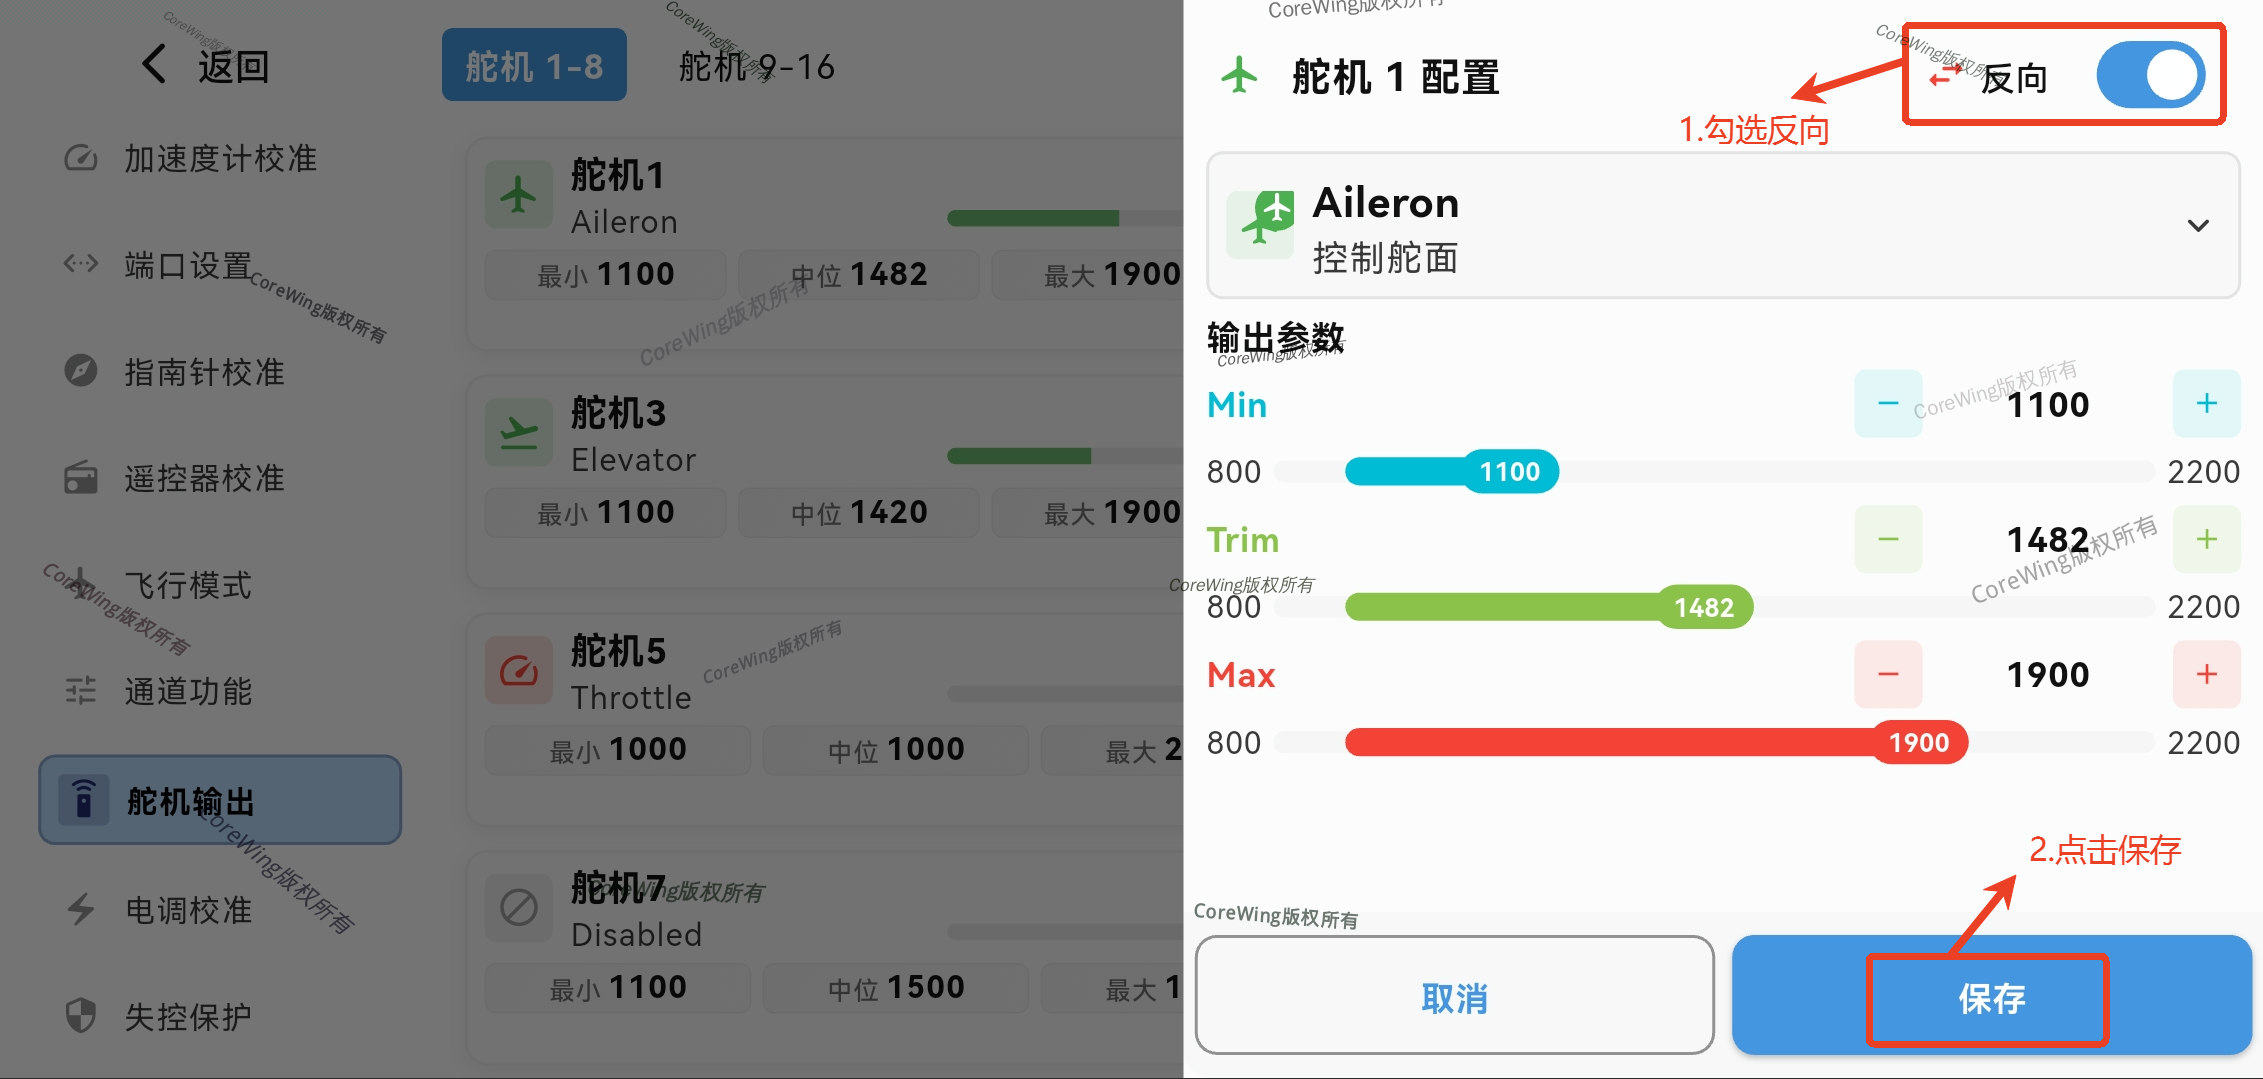
Important
In stabilize mode, if the rudder control via the RC transmitter is correct, then the rudder feedback in stabilize mode must also be correct. If the stabilize feedback is incorrect, please check the rudder feedback from RC transmitter control.
Important
For detailed information on how to confirm if control surface feedback is correct, refer to this article: https://docs.corewing.com/plane/ardupilot/settings/fc/dir-check.html
4.3.3 GPS Module Installation
The installation position is shown in the figure. Secure the module base with 3M adhesive. Ensure the module is installed securely, as this will significantly affect flight performance:
Important
Install the module level and vertically, without tilting, otherwise the installation angle cannot be set correctly.

Important
Install away from metal components such as magnetic battery covers, metal pushrods, etc., as these will interfere with the compass.
Install away from the receiver, servo wires, motors, and other equipment, as these will interfere with the compass.
Confirm that the installation is secure.
For detailed installation procedures for different modules, refer to their respective manuals.
4.3.4 VTX Installation and OSD Configuration
- Analog VTX Installation:

- Analog VTX Parameter Configuration:
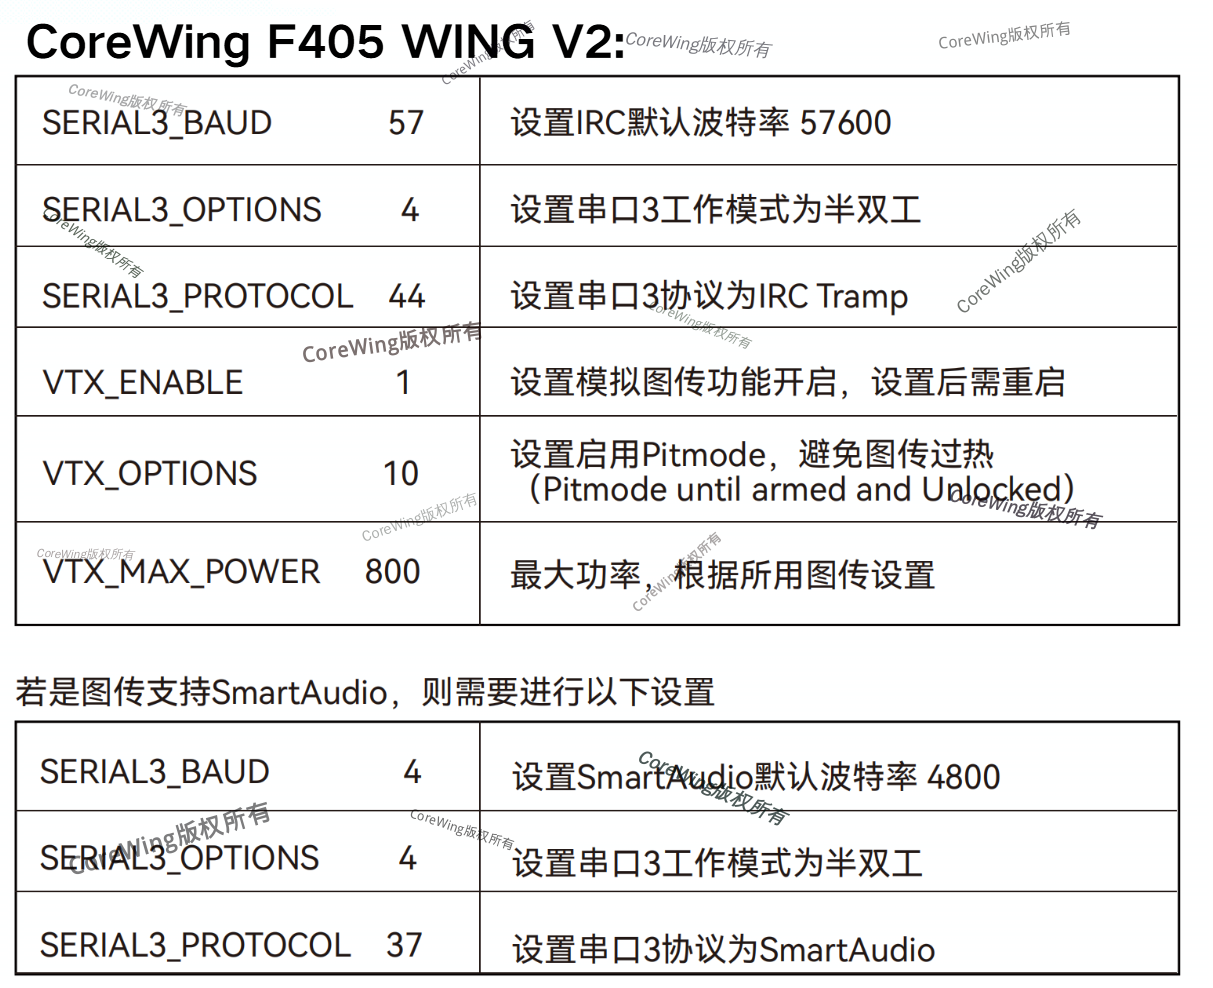
- Click VTX Configuration, click Analog VTX
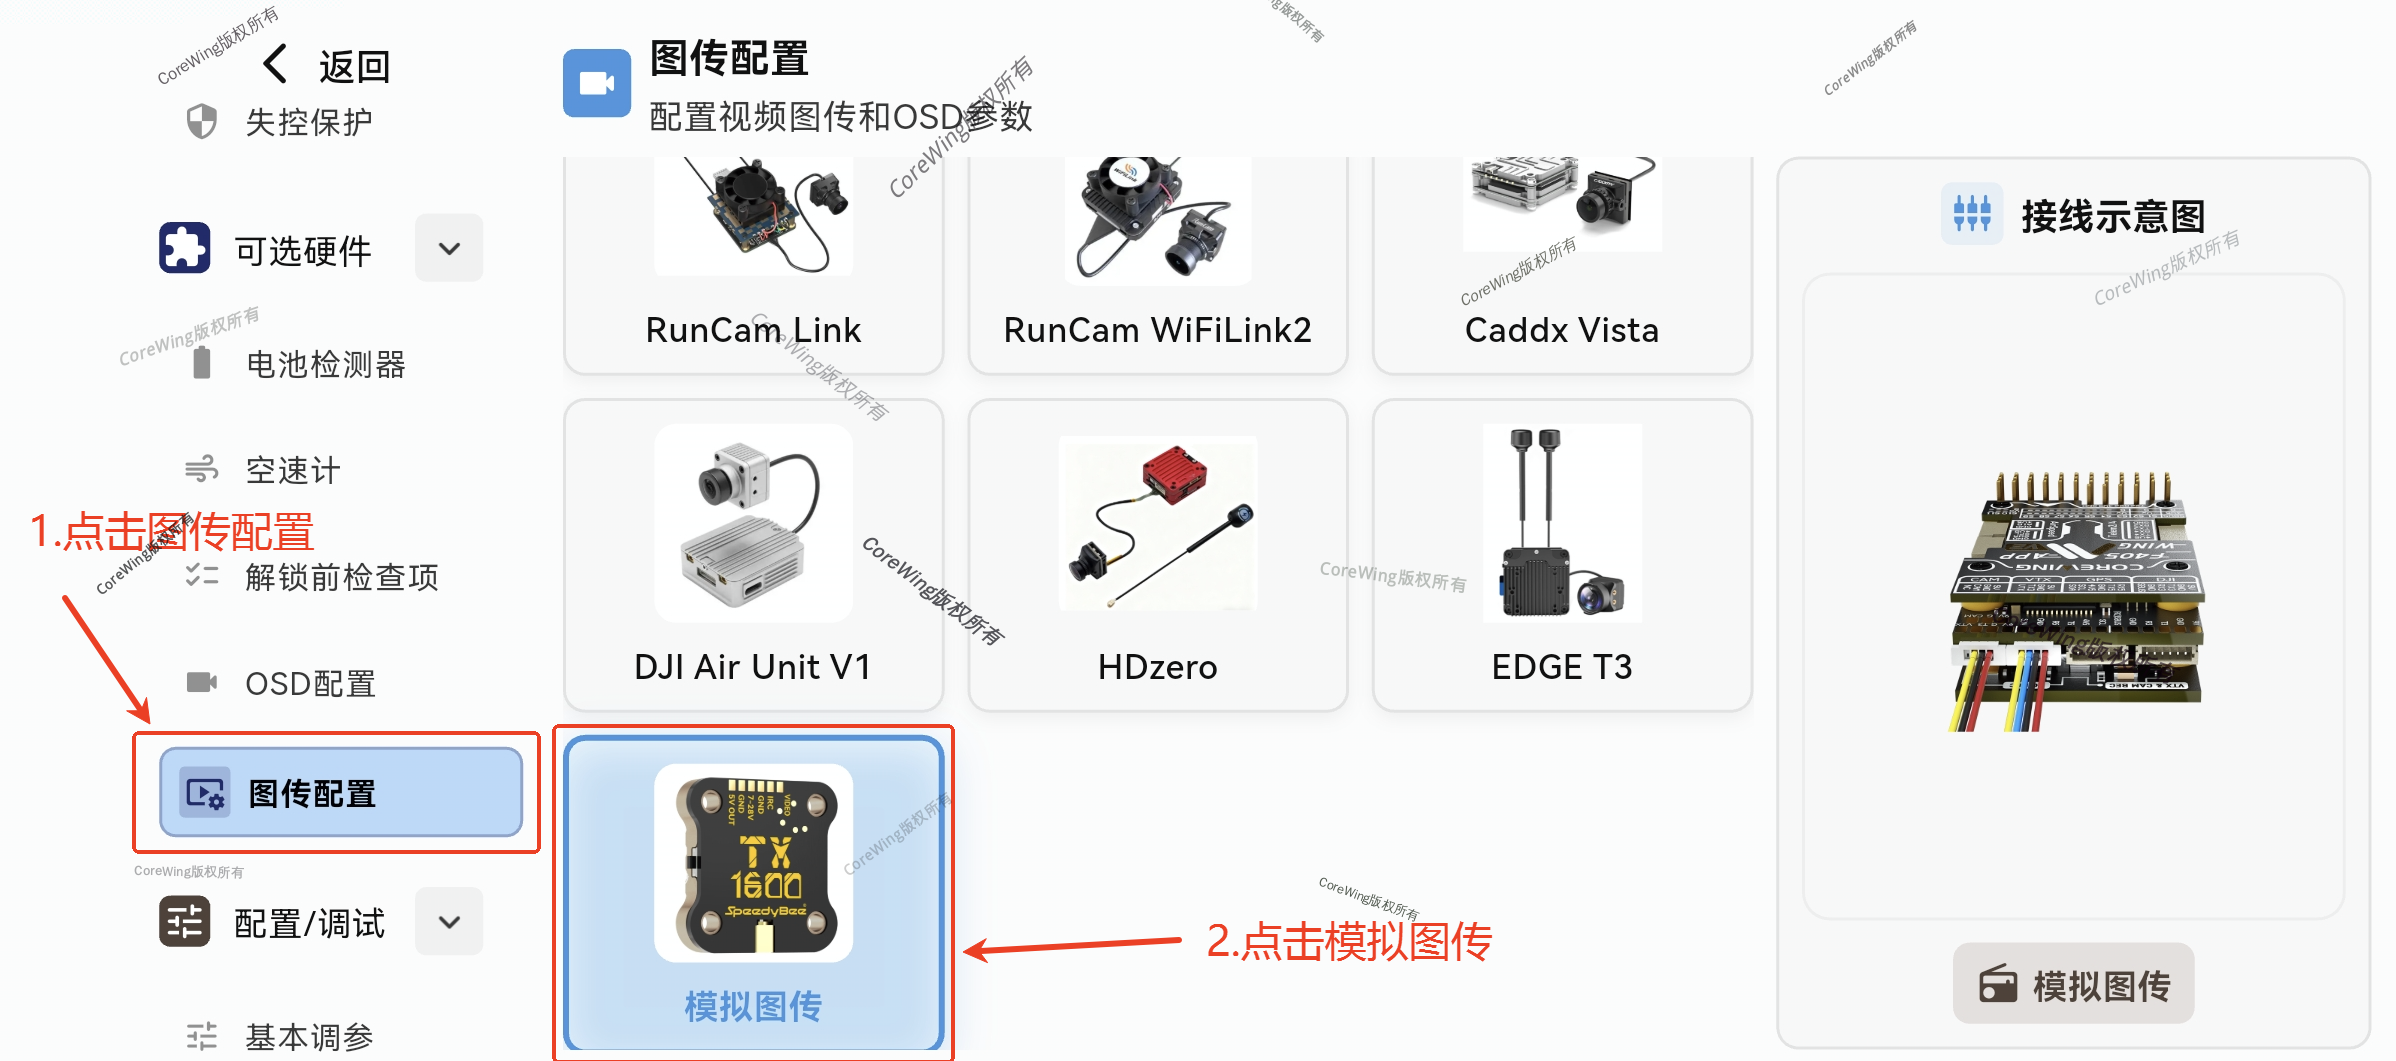
- Select Protocol and Aspect Ratio
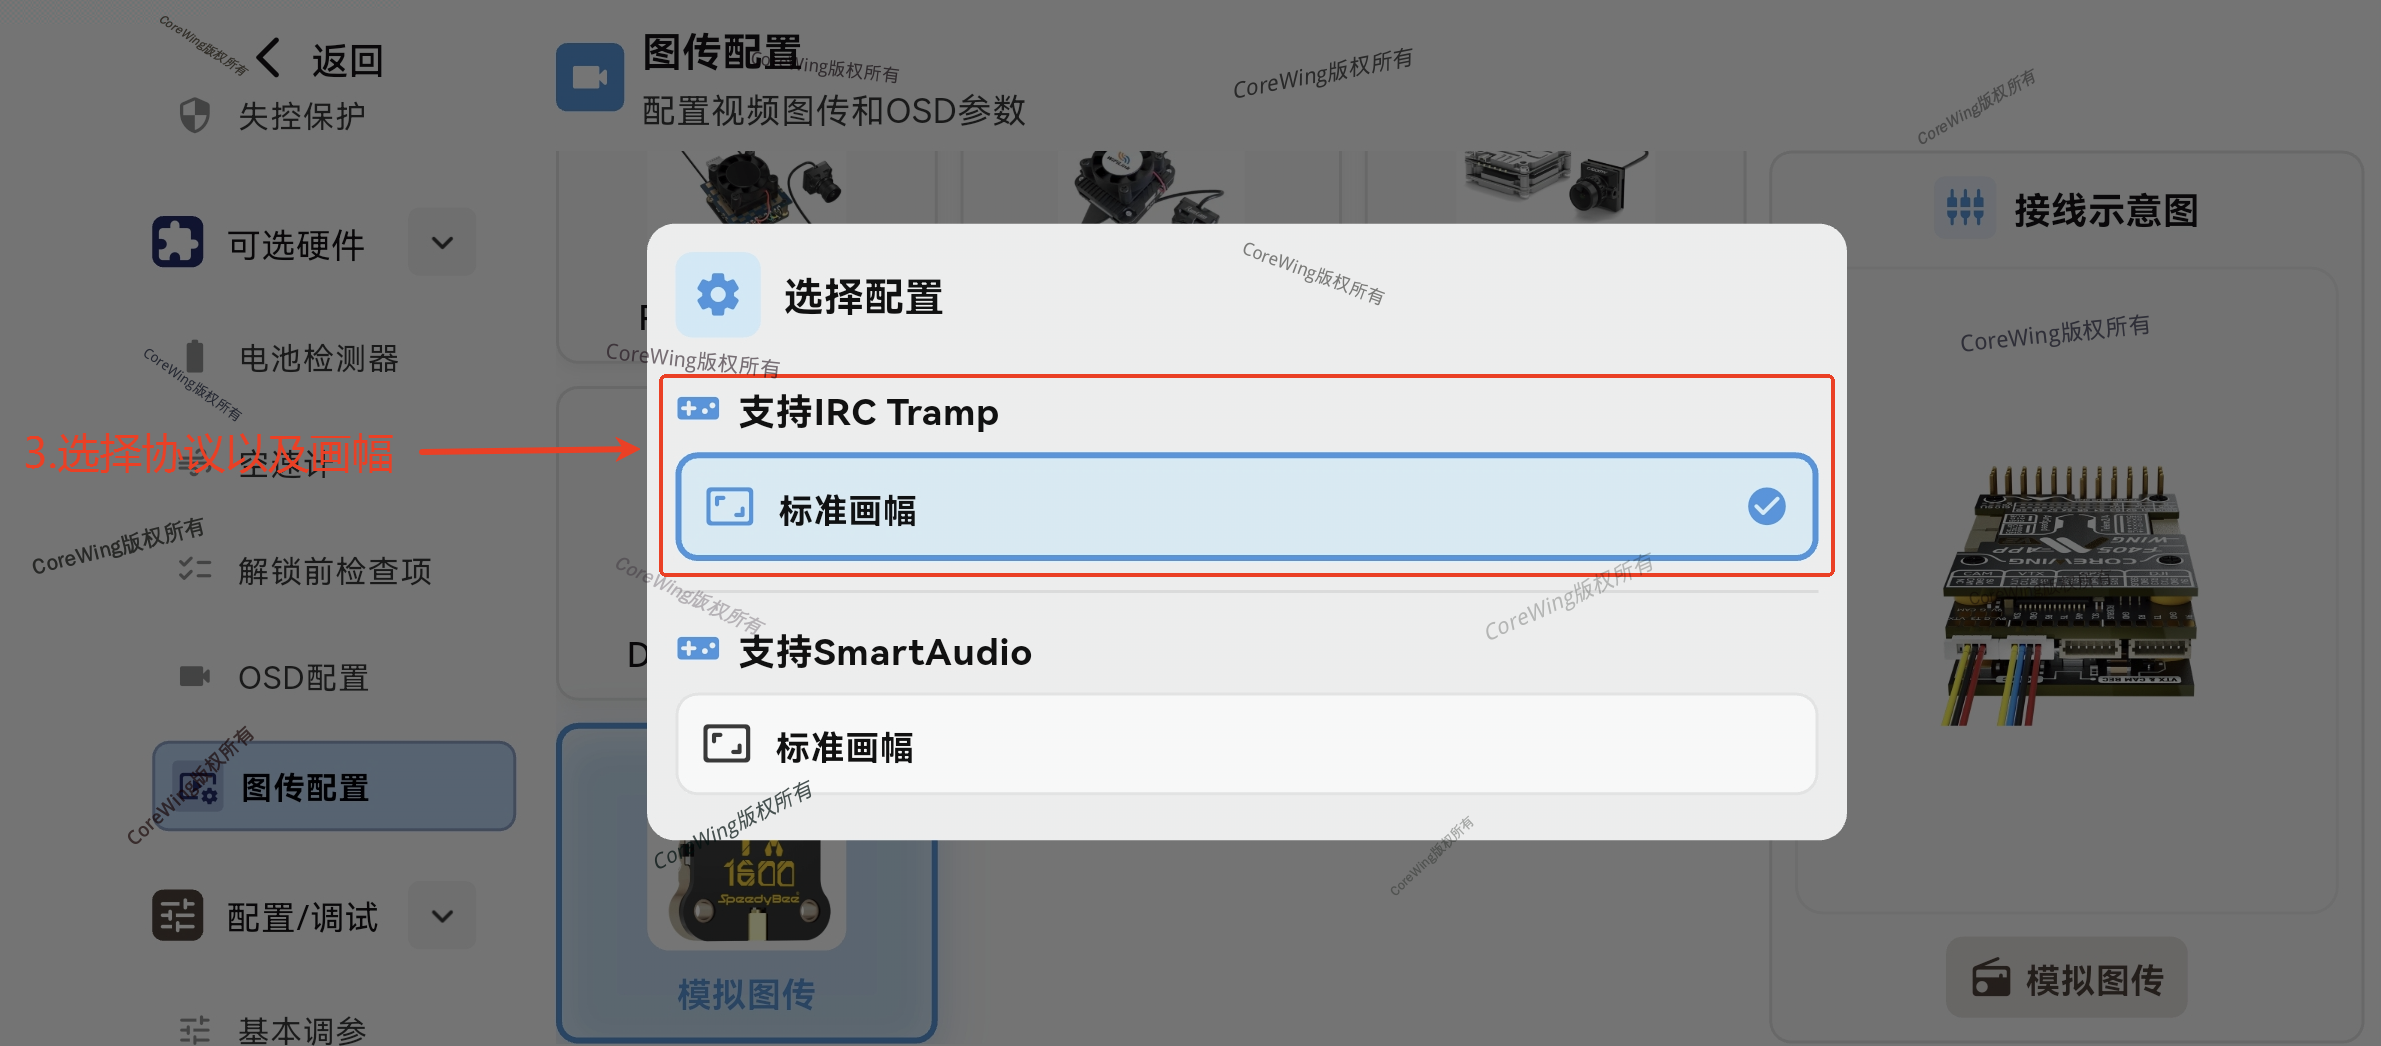
- Wire according to the diagram, click Save
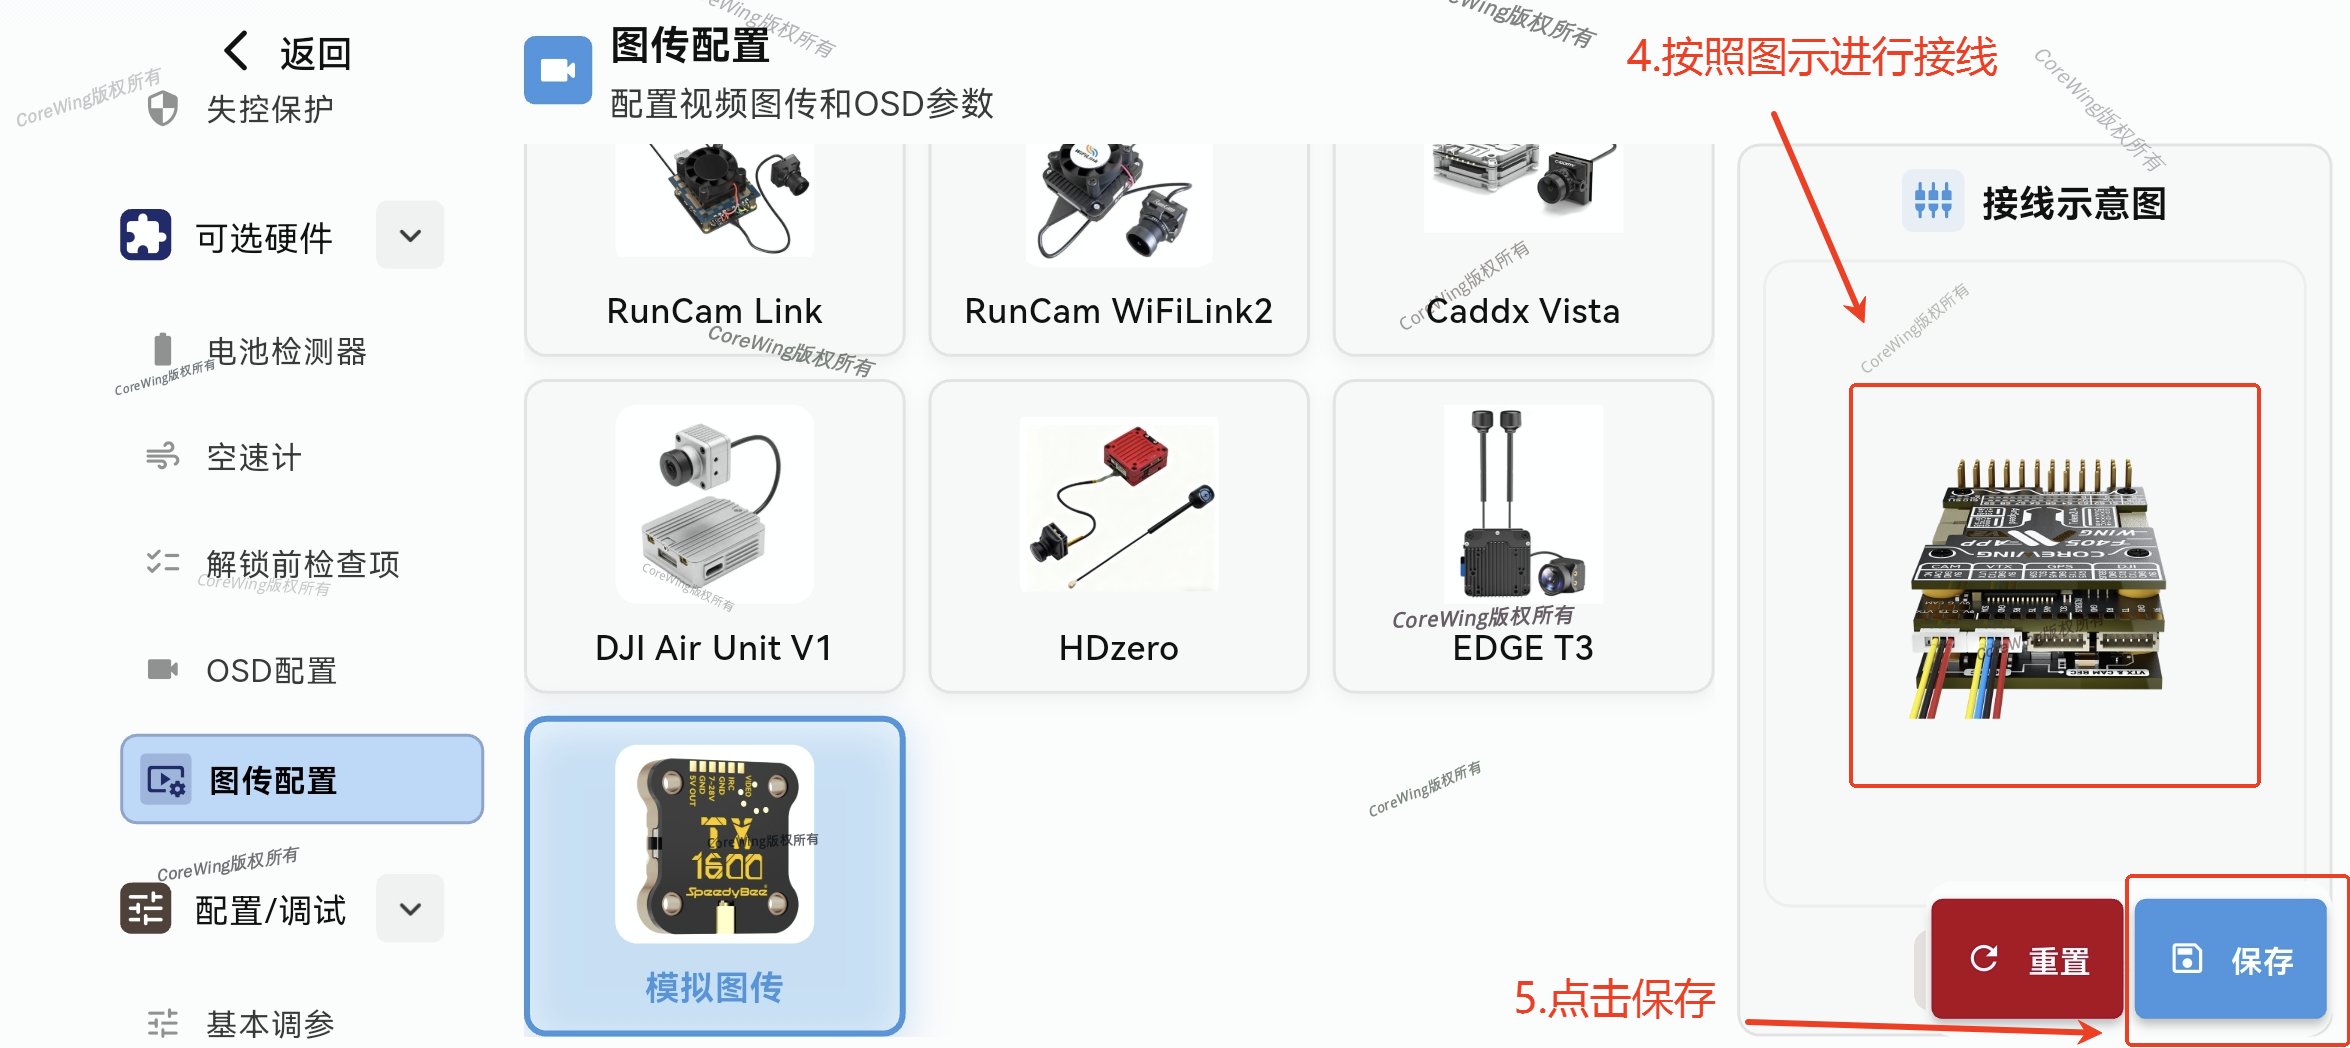
- Check if parameter modifications are correct, click Confirm Save
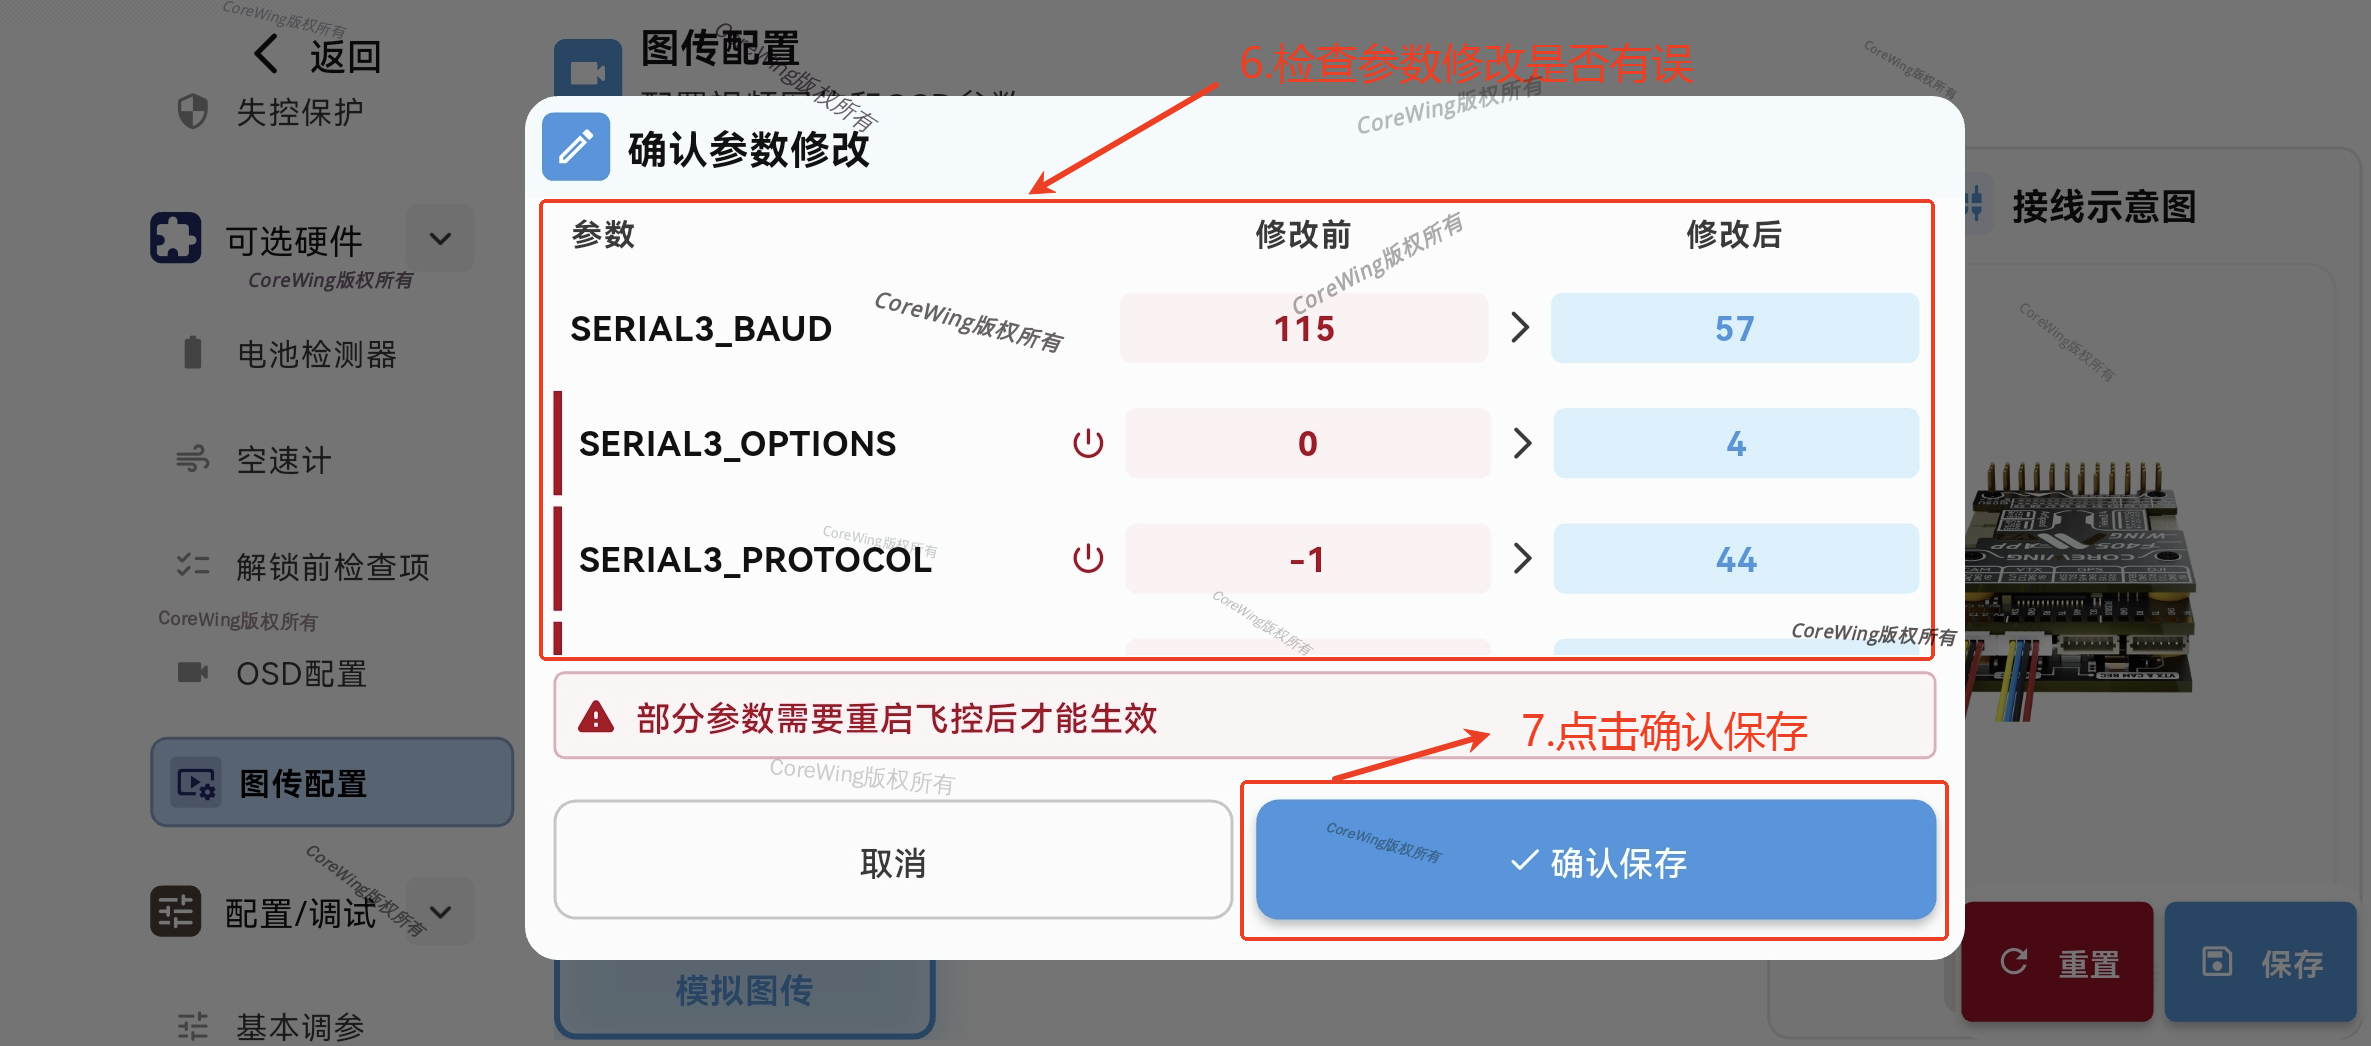
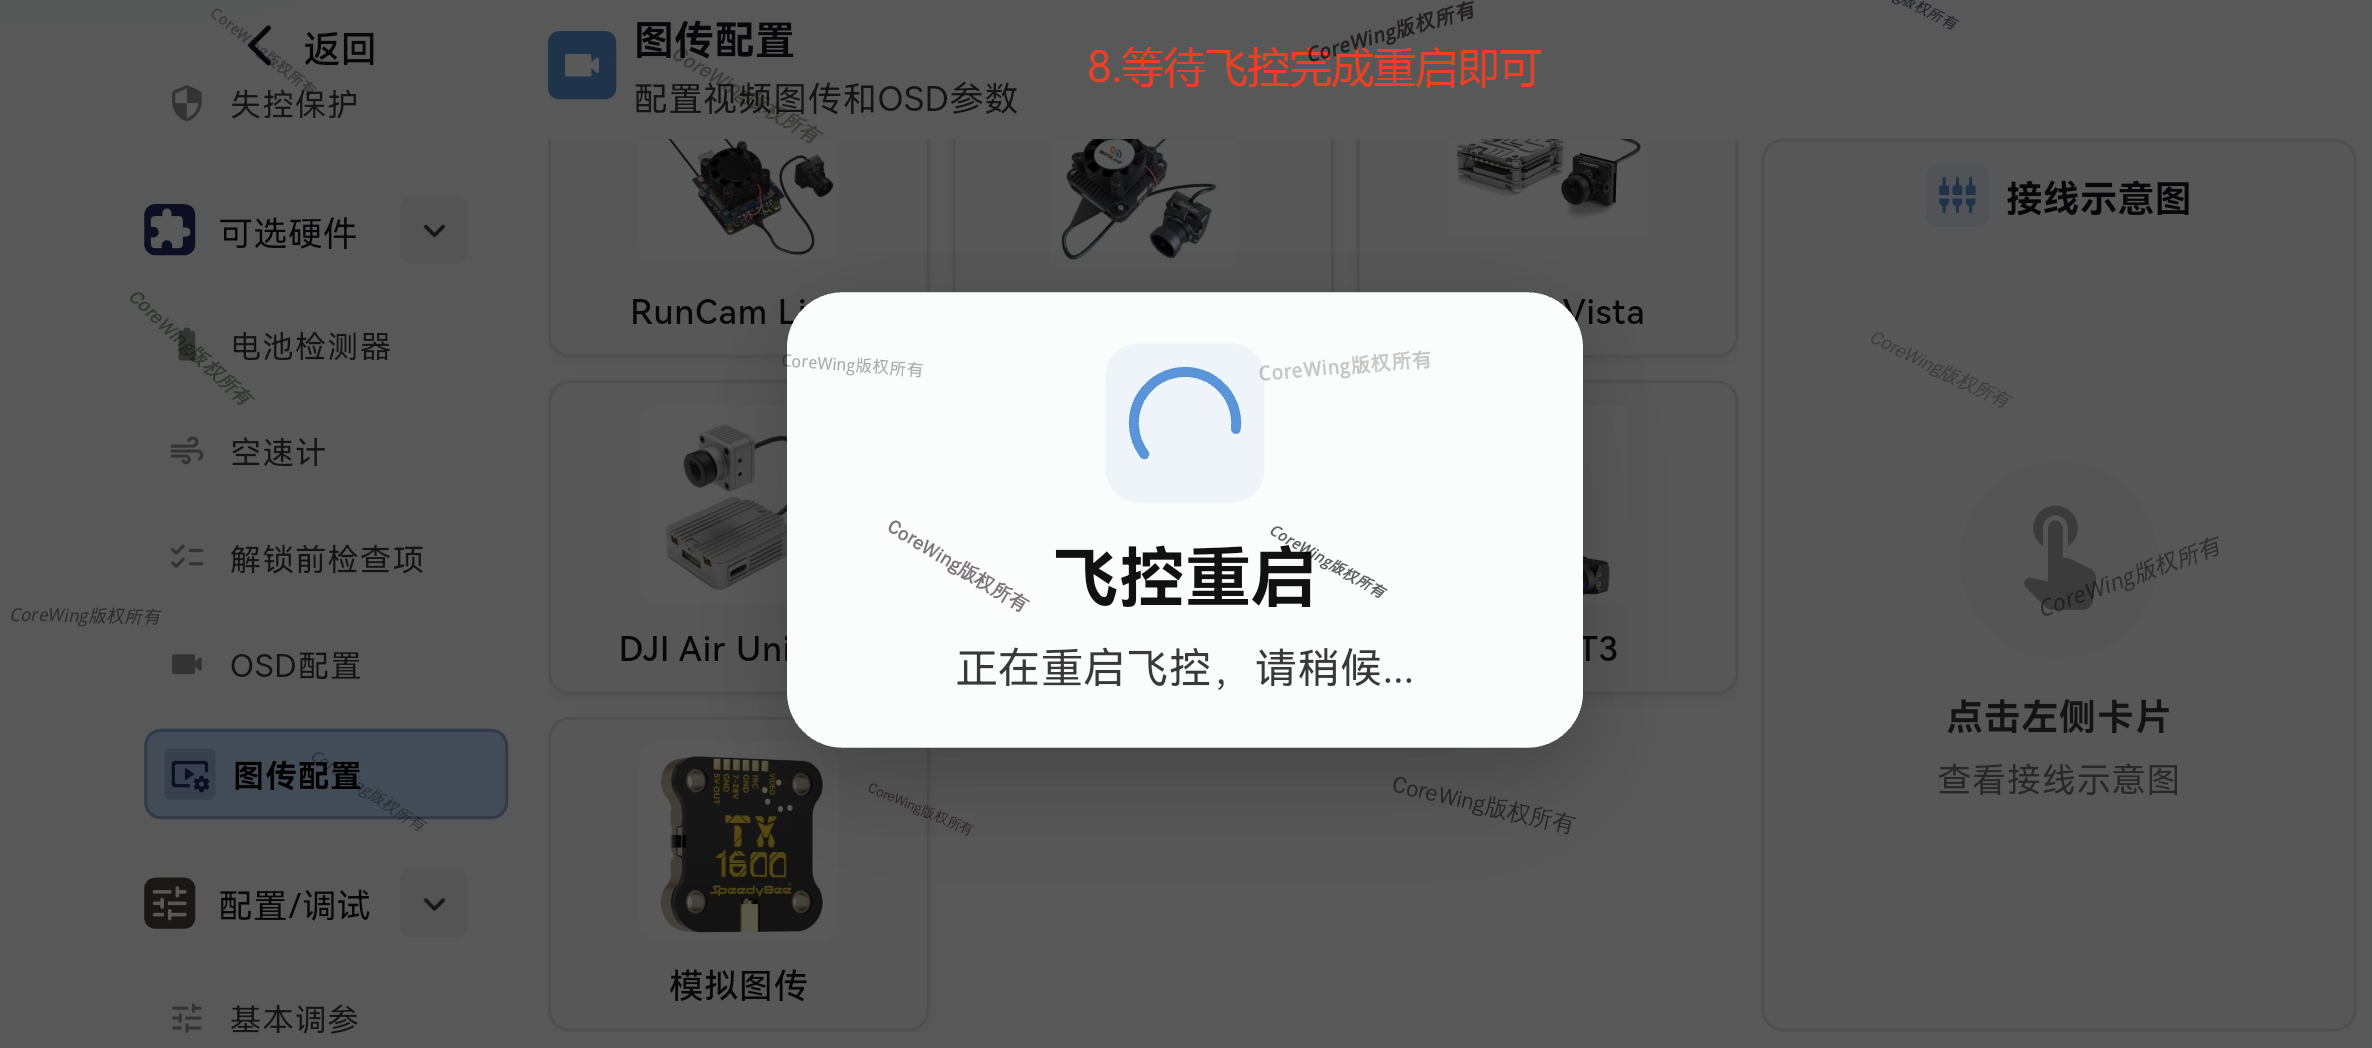
- Wait for the flight controller to restart
Important
For detailed information on analog VTX parameter configuration, refer to this article: https://docs.corewing.com/plane/ardupilot/settings/vtx/analog-vtx/config.html
- HD VTX Installation:

- HD VTX Parameter Configuration:
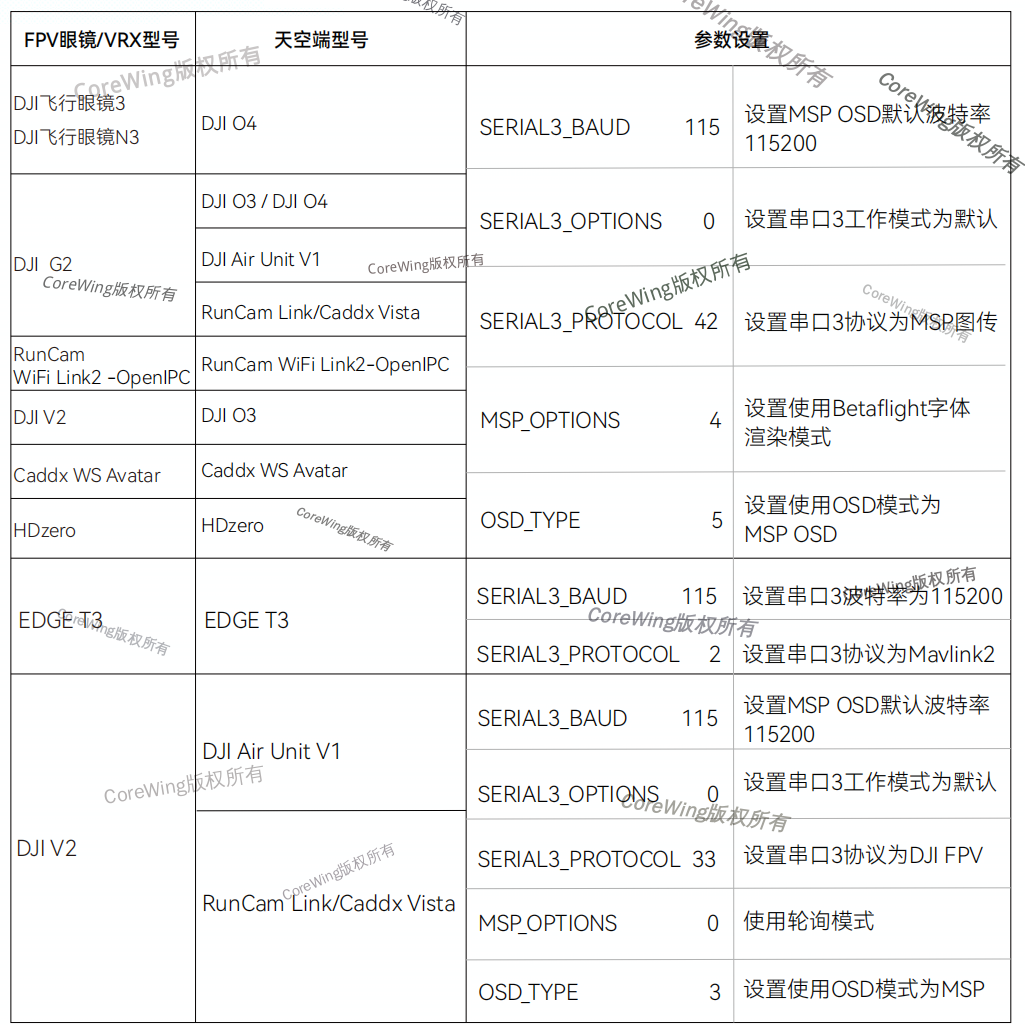
- Click VTX Configuration, click HD VTX
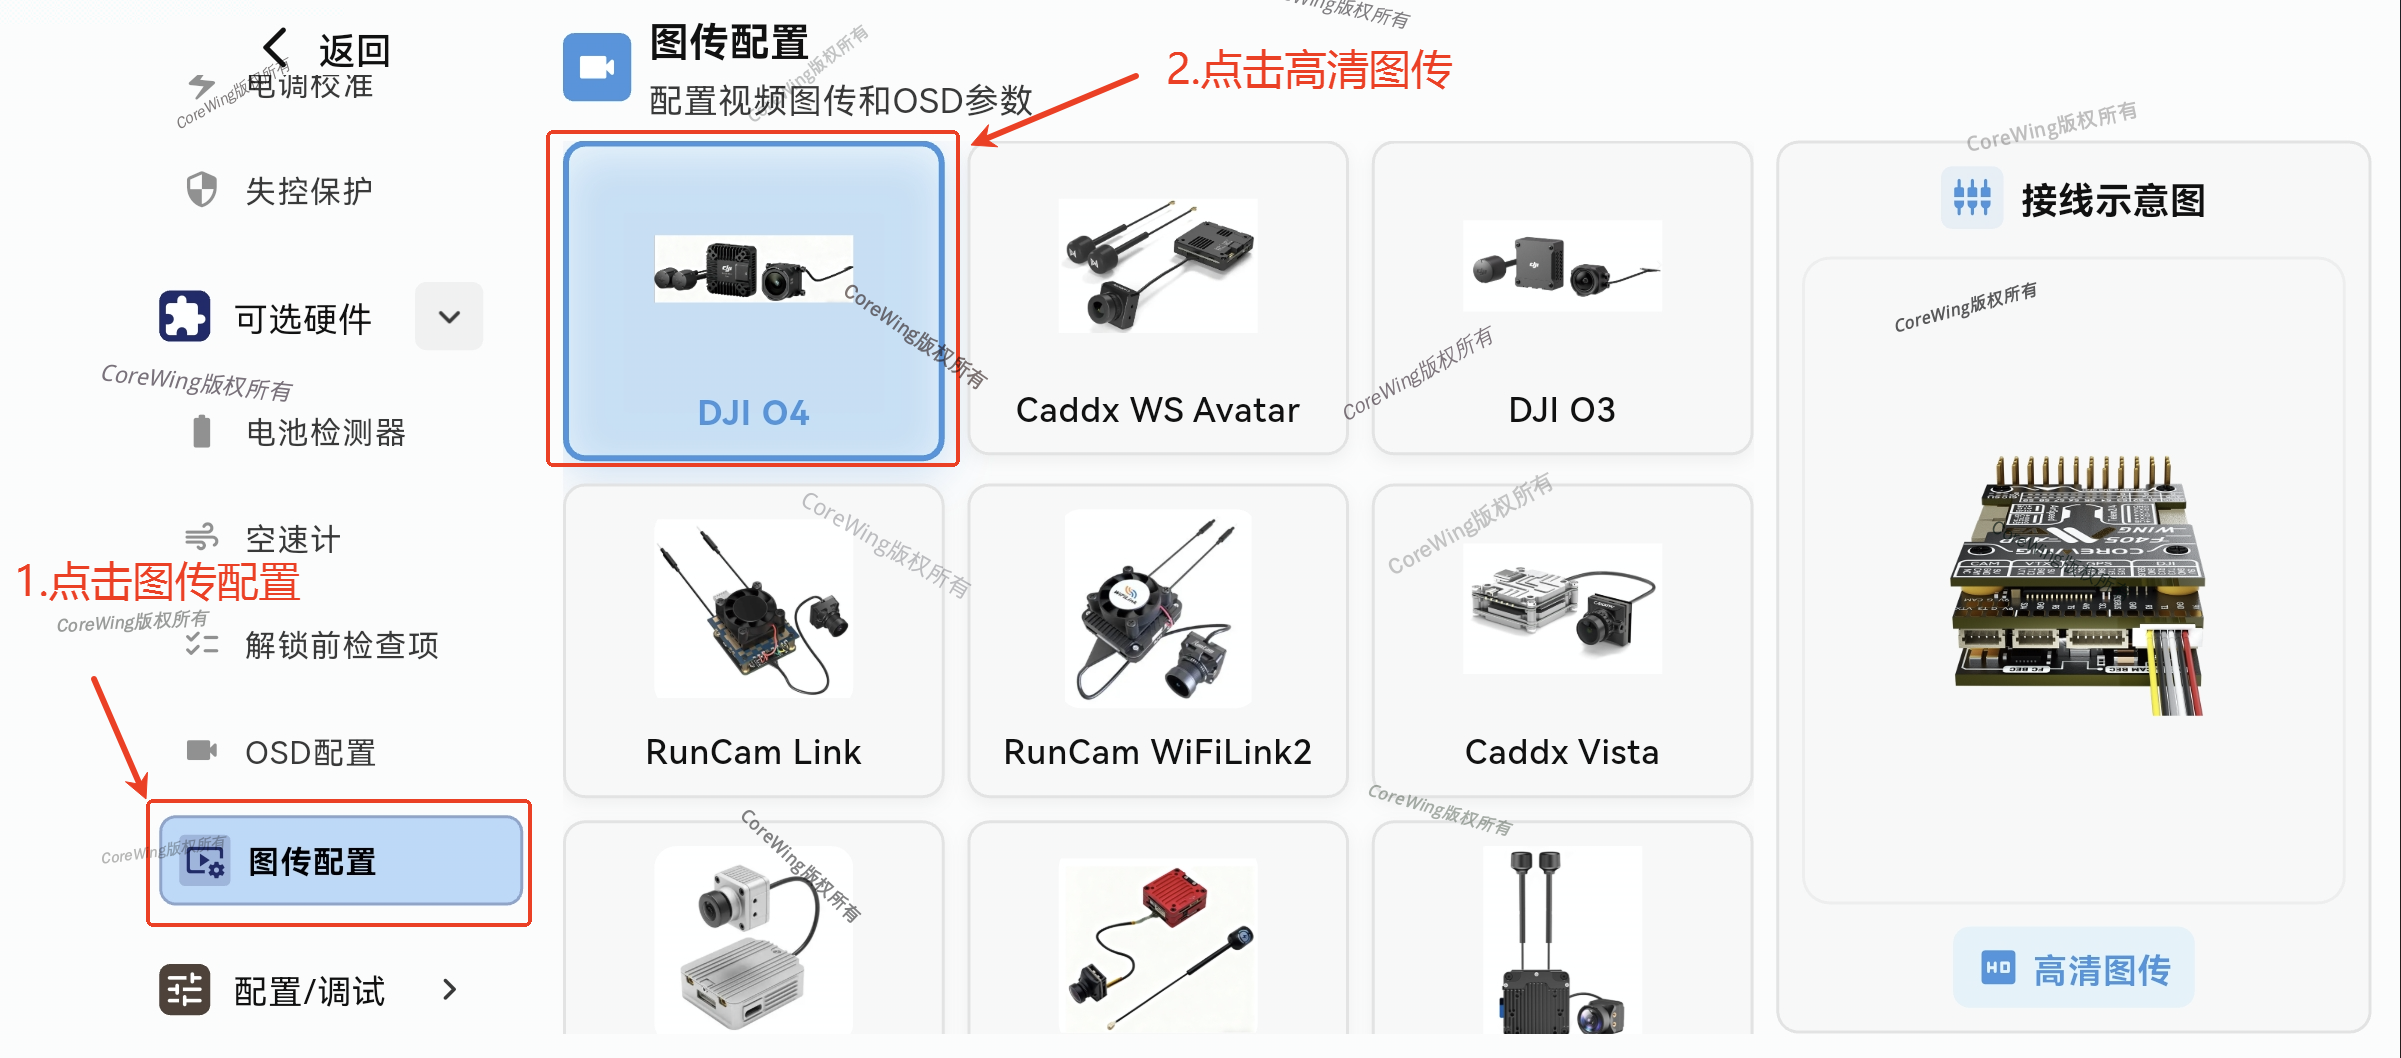
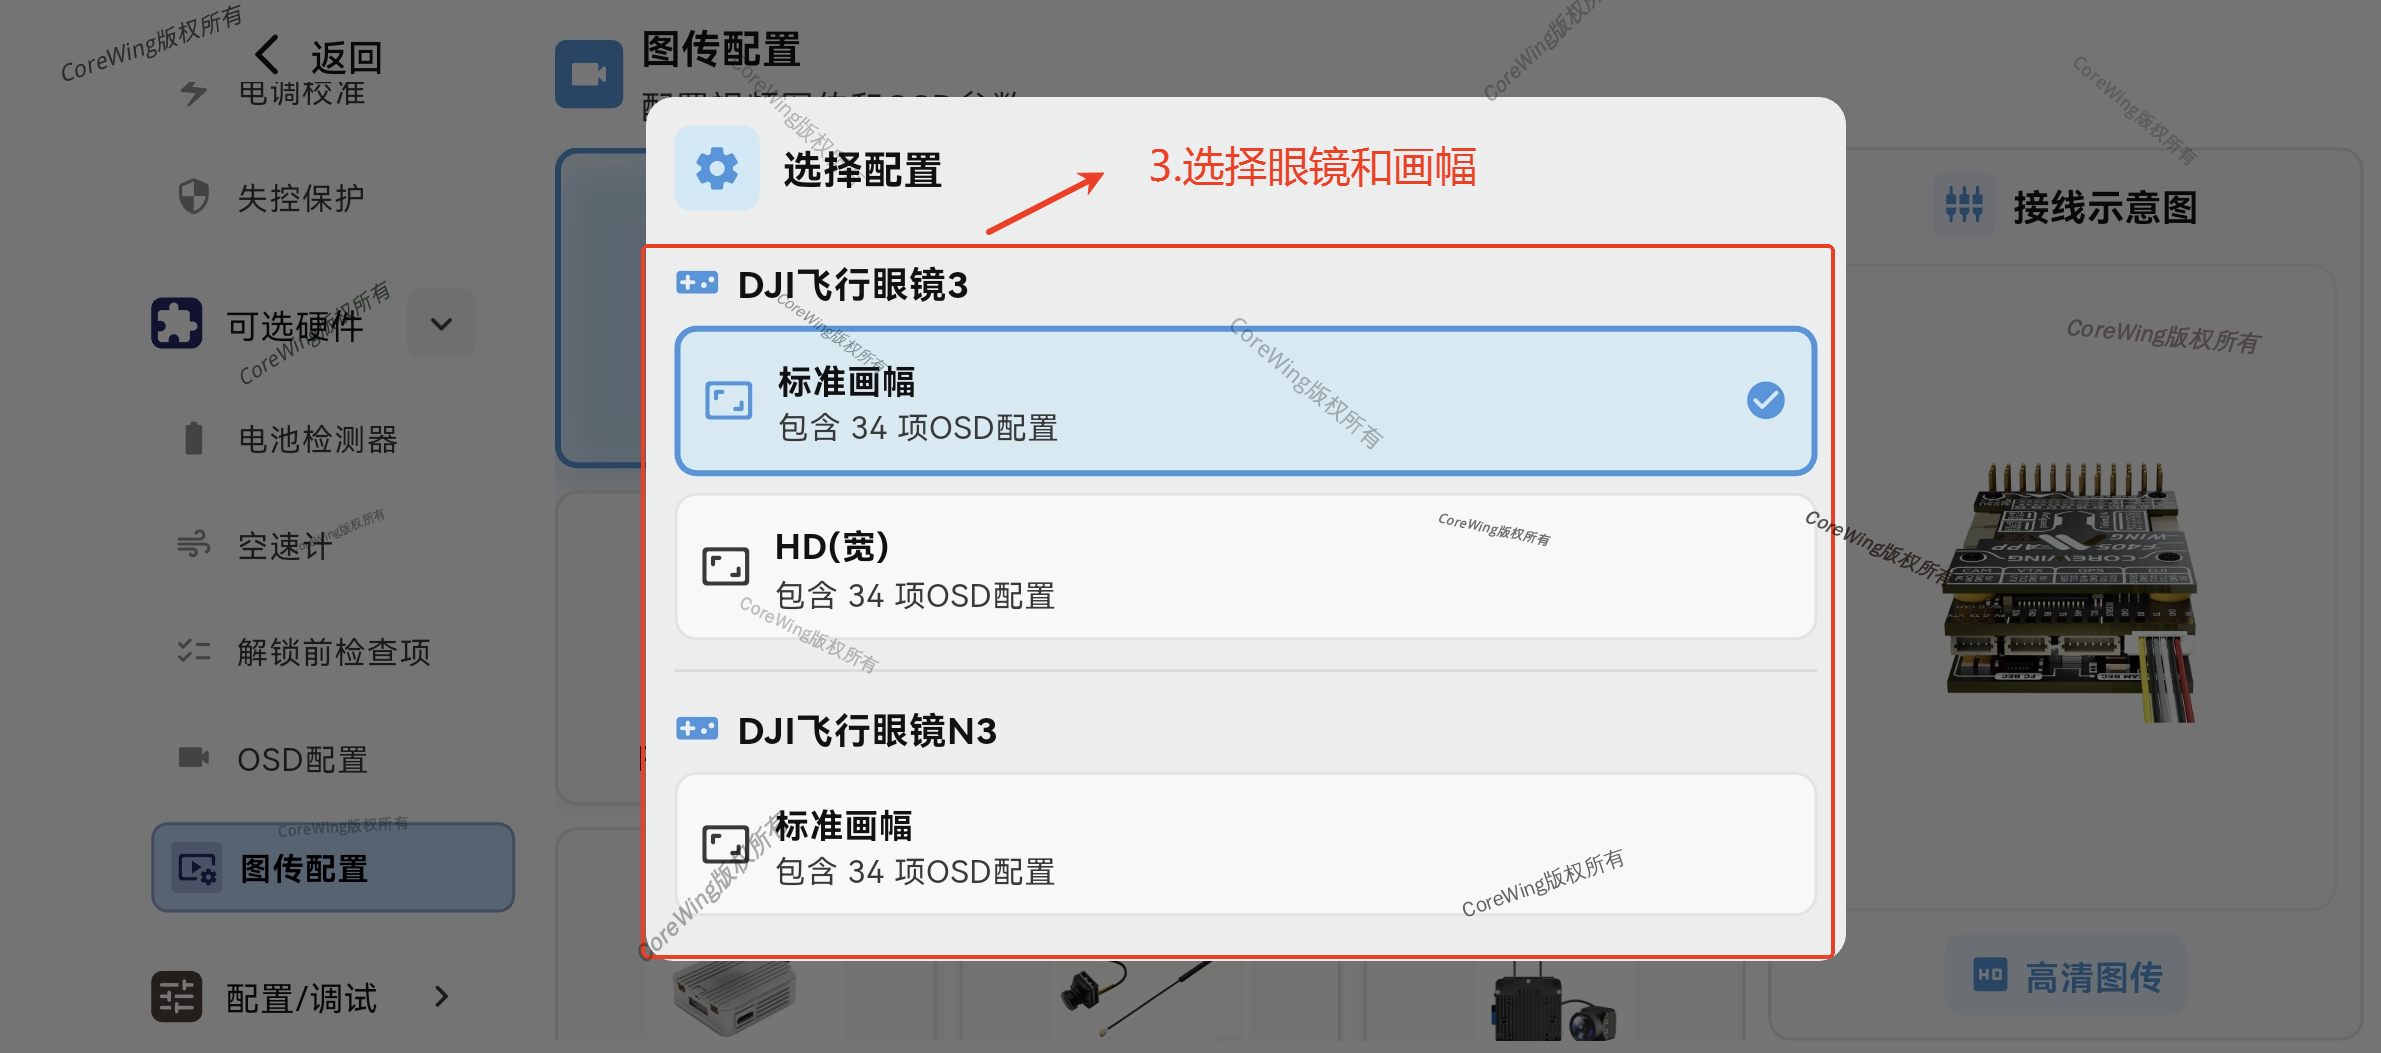
Select Goggles and Aspect Ratio
Wire according to the diagram, click Save
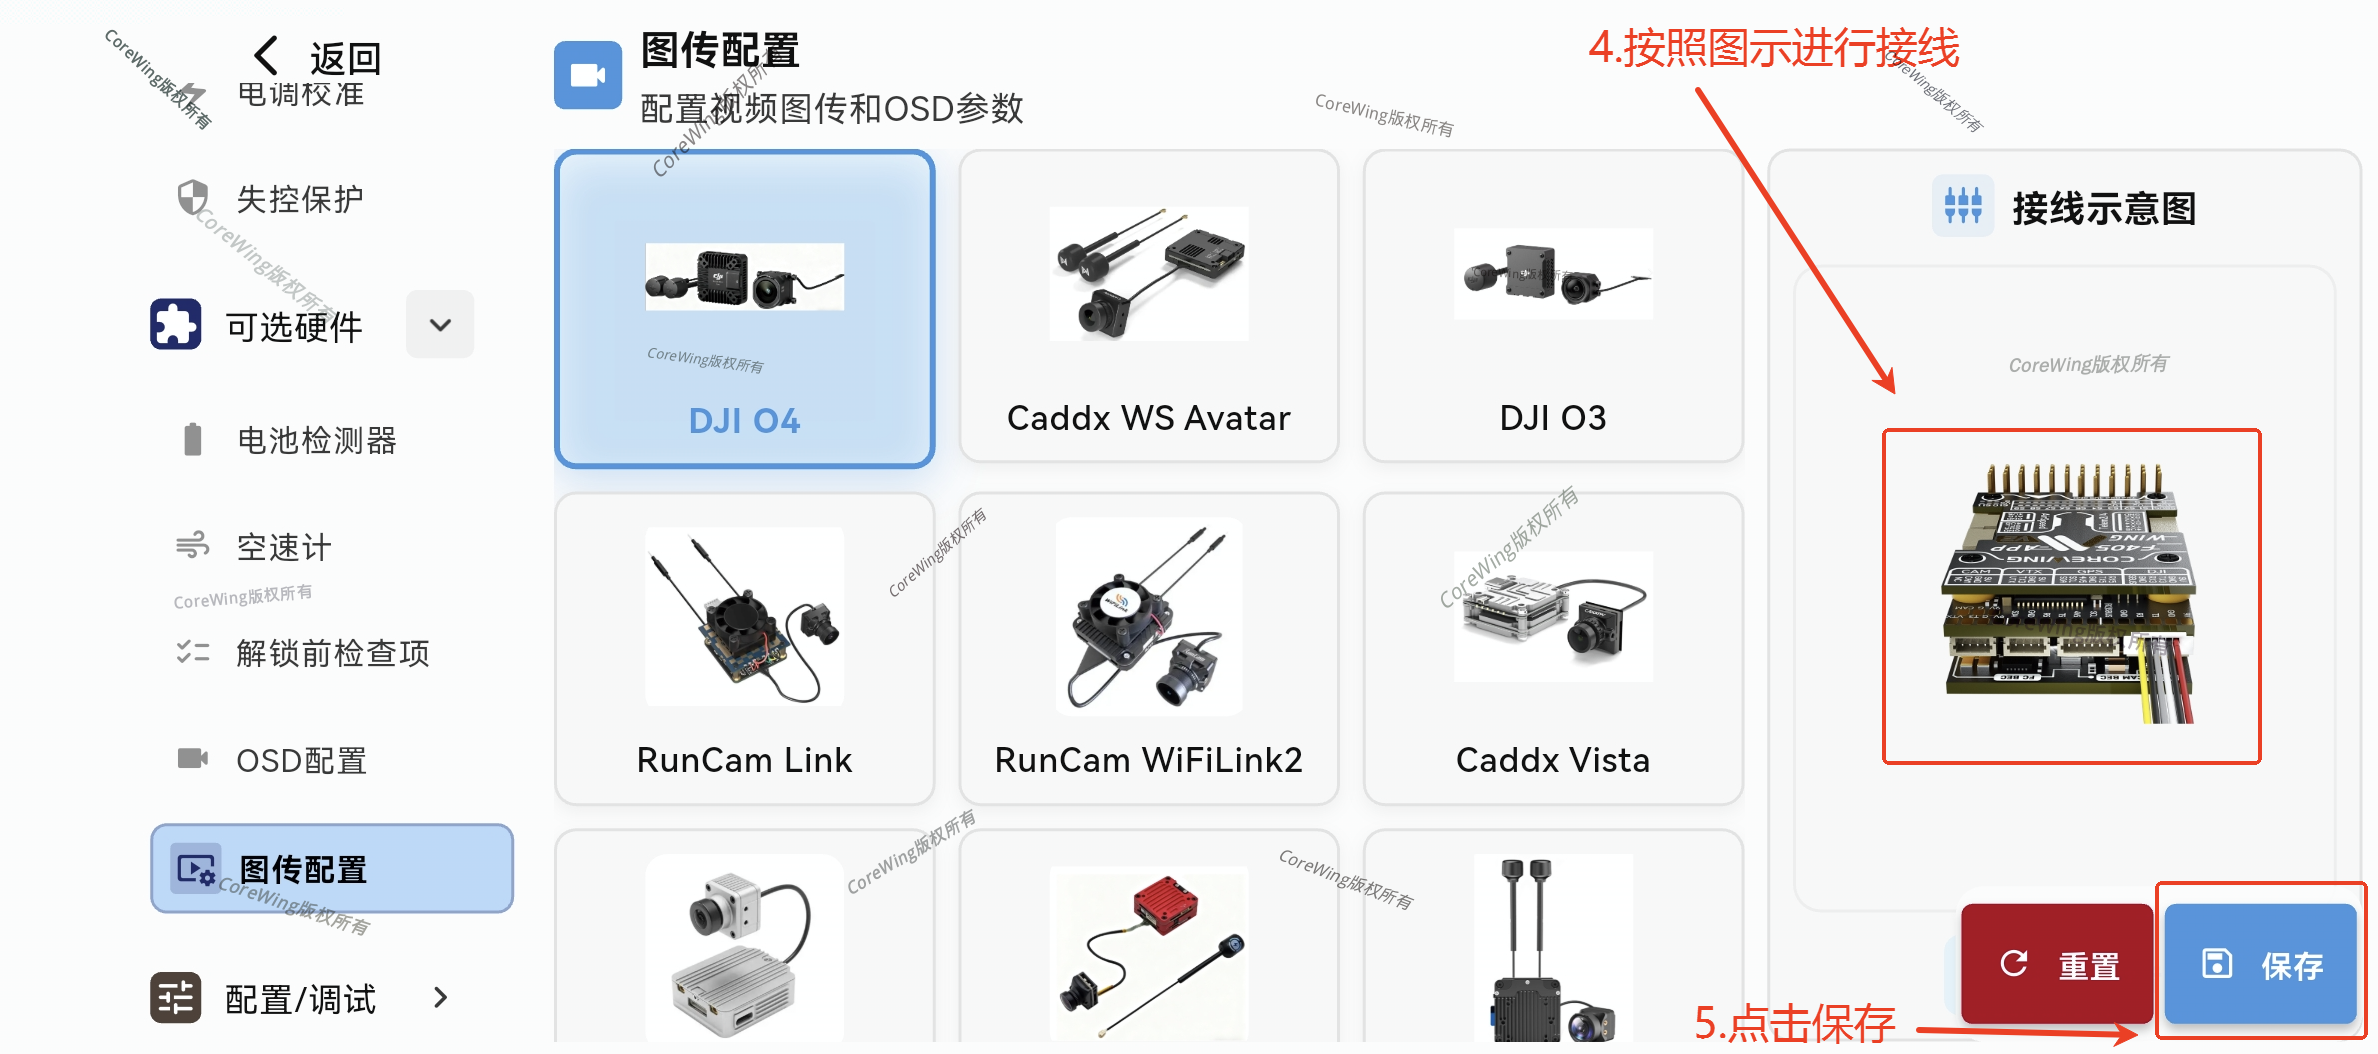
Check if parameter modifications are correct, click Confirm Save
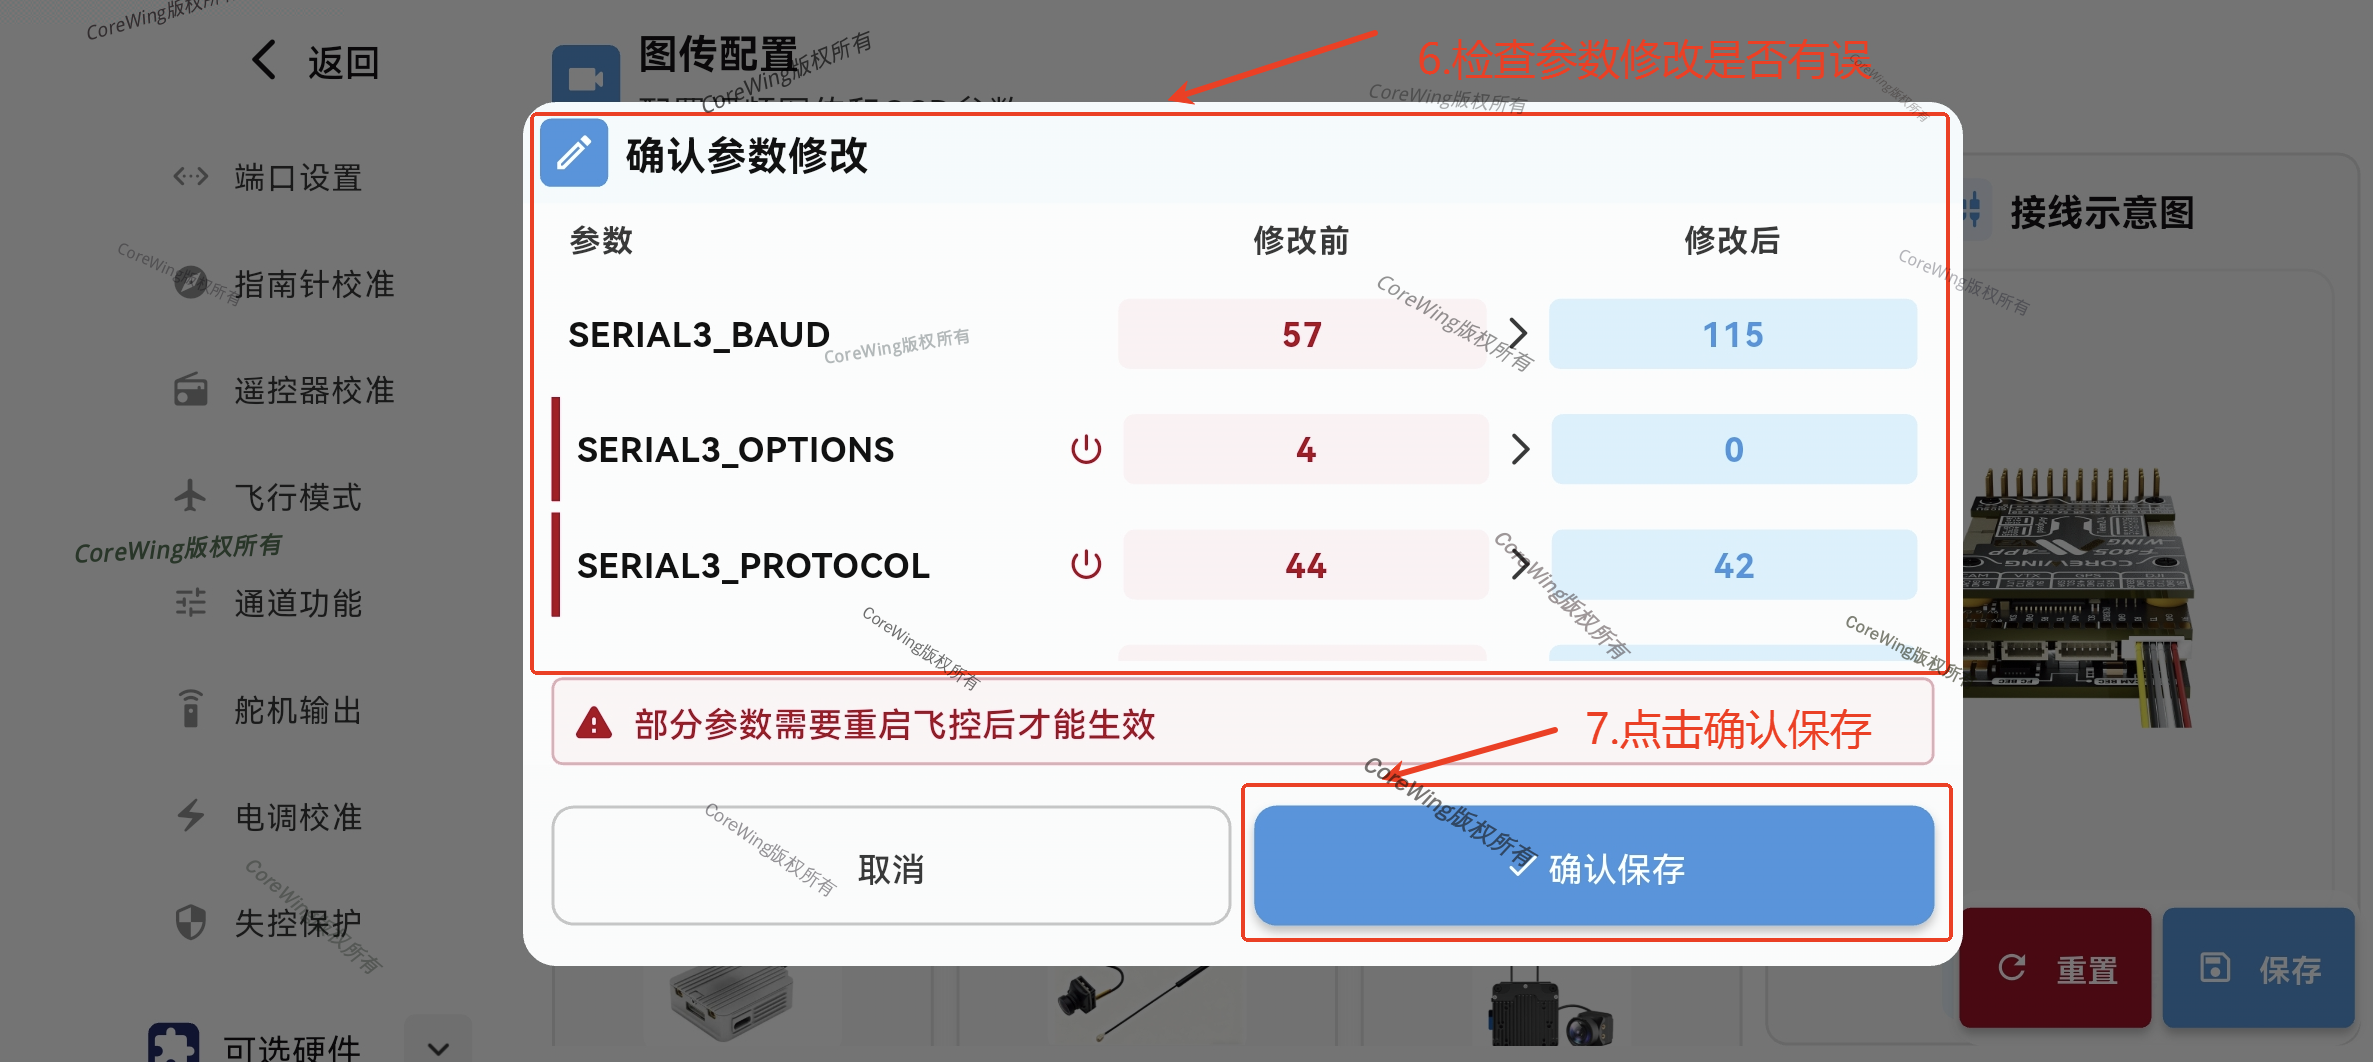
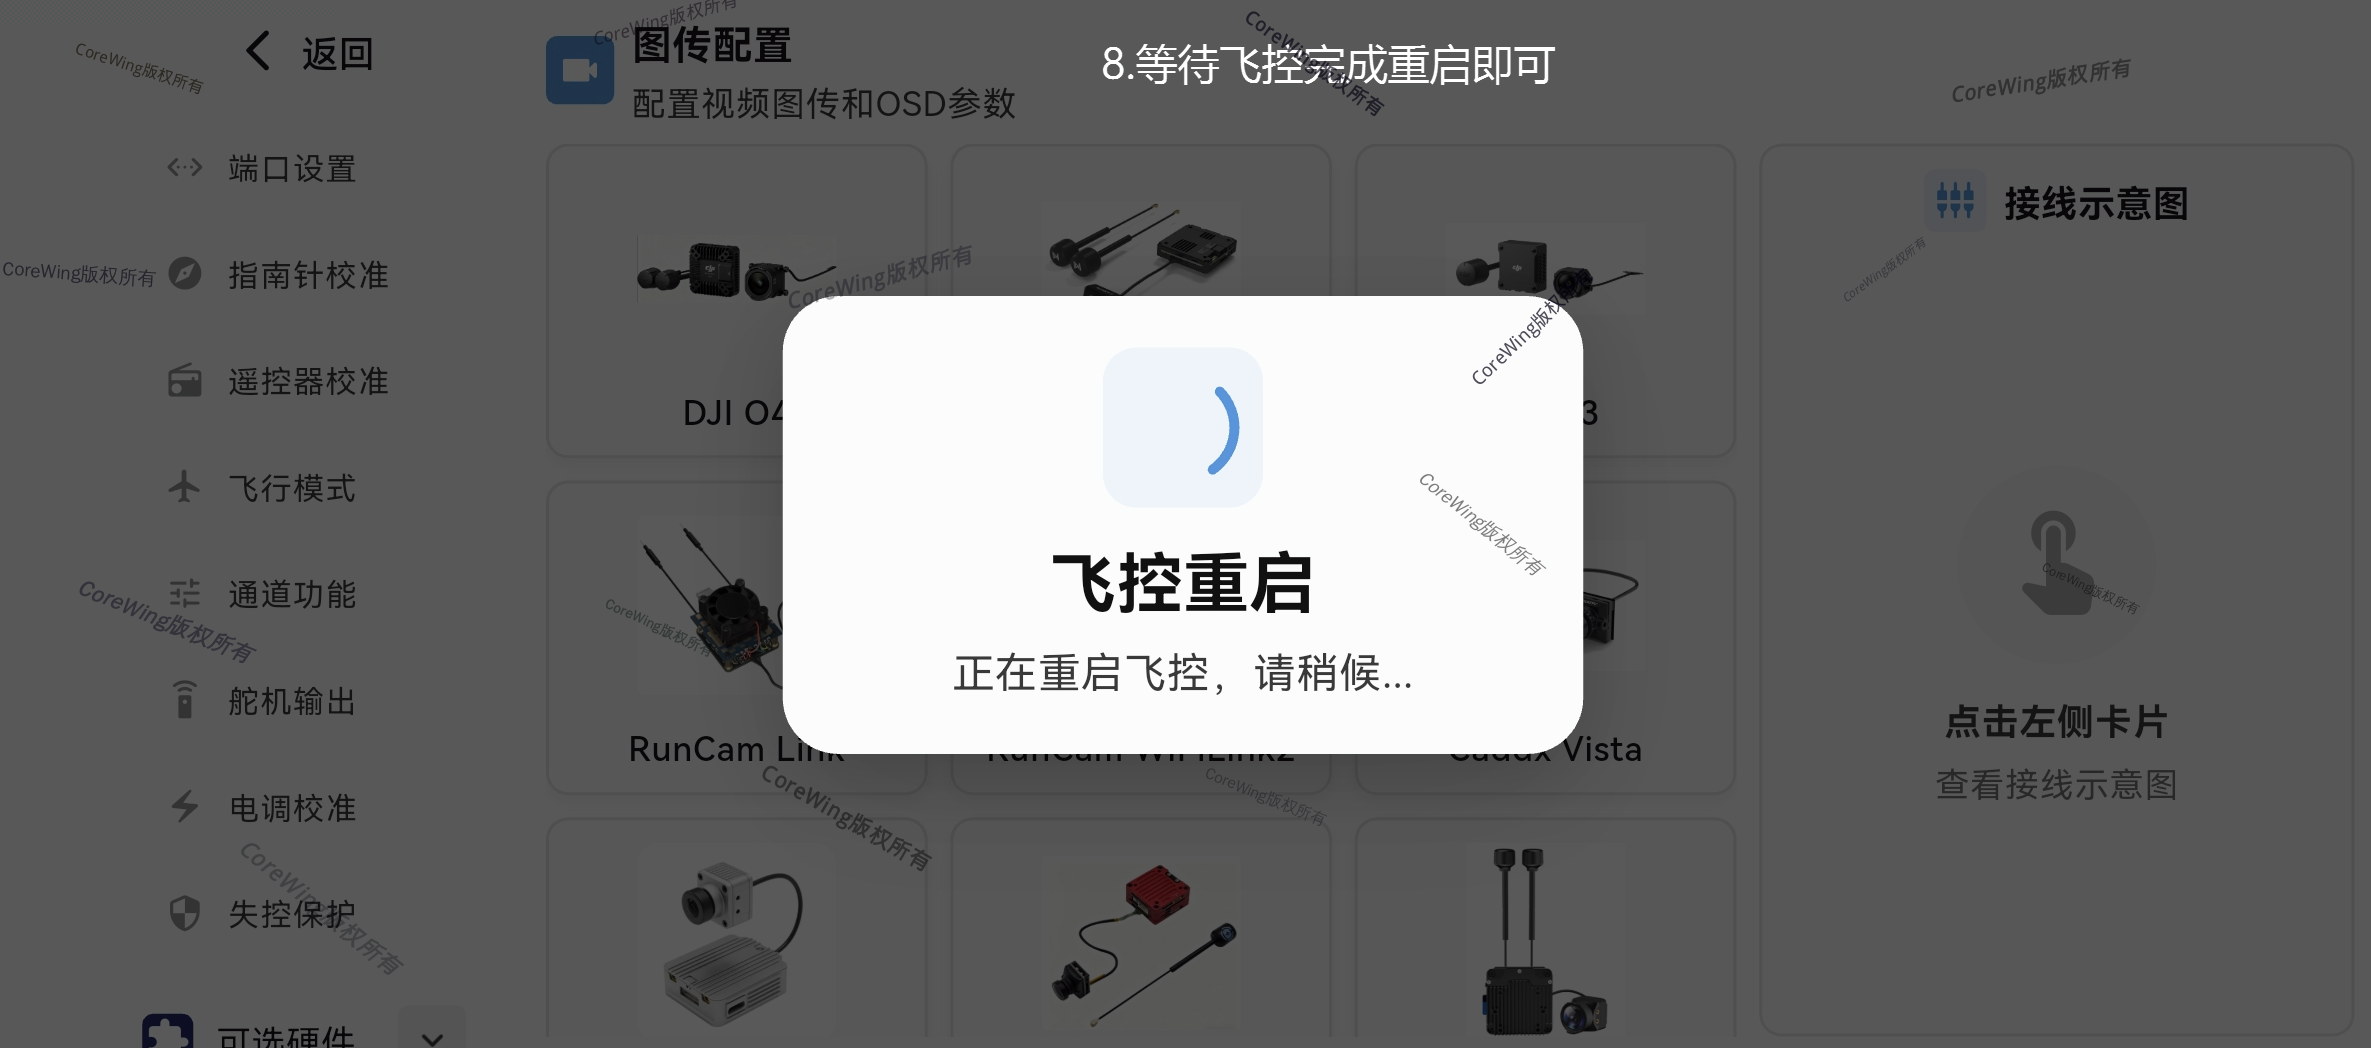
Wait for the flight controller to restart
Important
For detailed information on how to configure OSD elements, refer to this article: https://docs.corewing.com/plane/software/corewing-app/corewingapp-aptuning.html
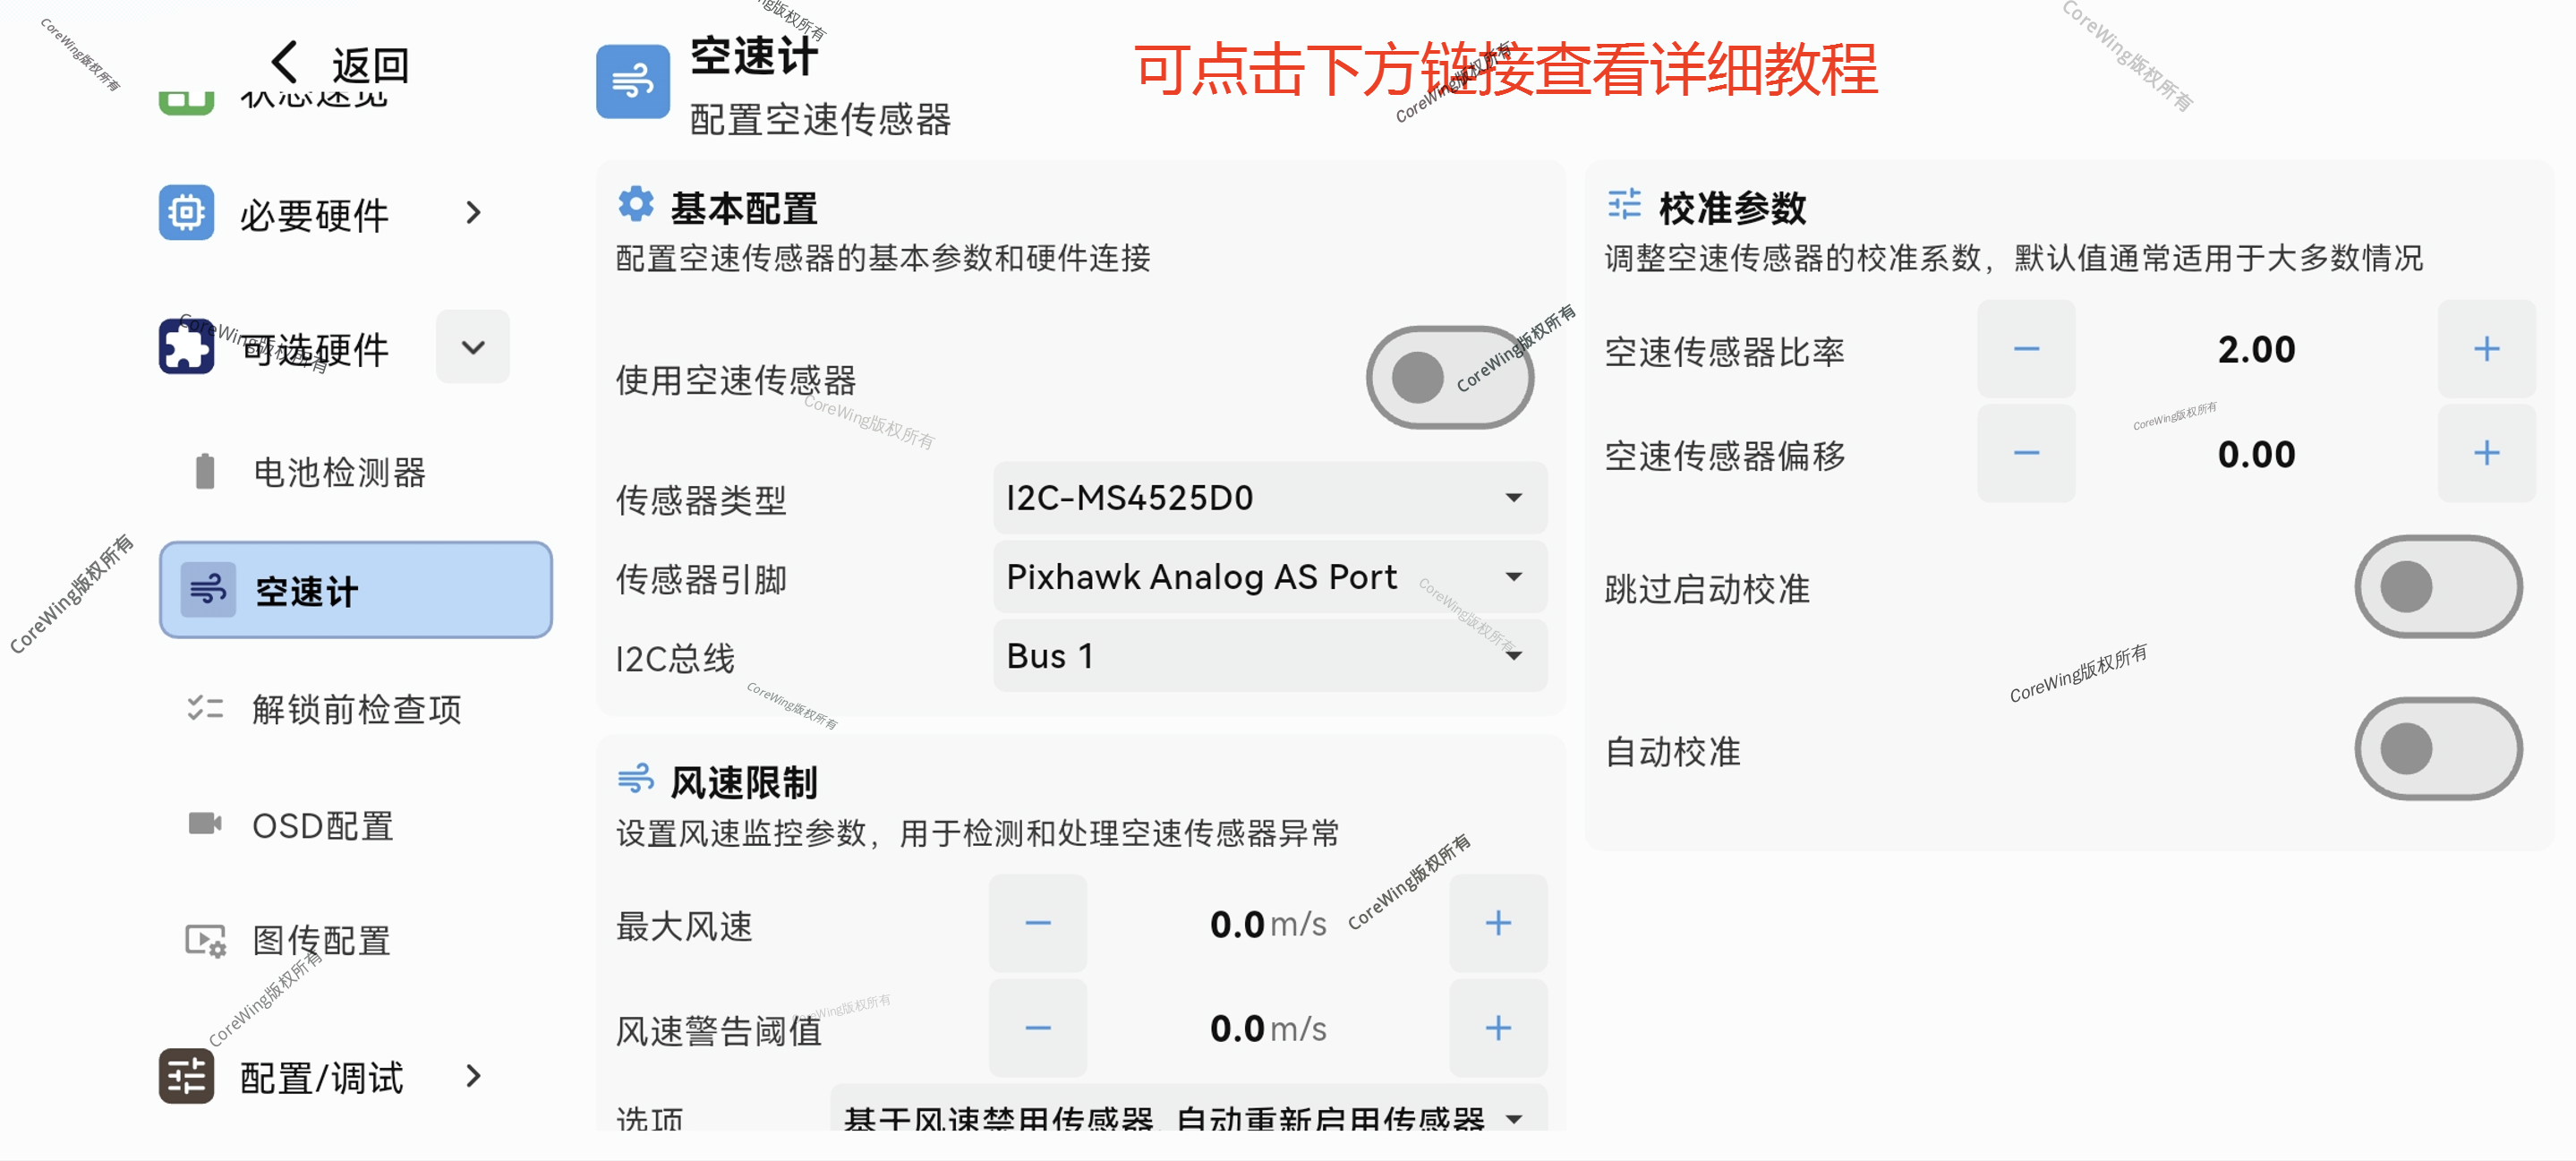
4.3.5 Airspeed Sensor Installation and Configuration
Airspeed sensor installation reference:

Important
For detailed information on airspeed sensor installation, parameter configuration, and calibration, refer to this article: https://docs.corewing.com/plane/ardupilot/settings/airspeed/airspeed-setup.html
5. Pre-flight Tuning
5.1 ESC Calibration
Important
Ensure the battery is disconnected, the receiver is paired, and propellers are removed!
- Click on the ESC calibration page, read the instructions, and after reading, click I understand, start calibration
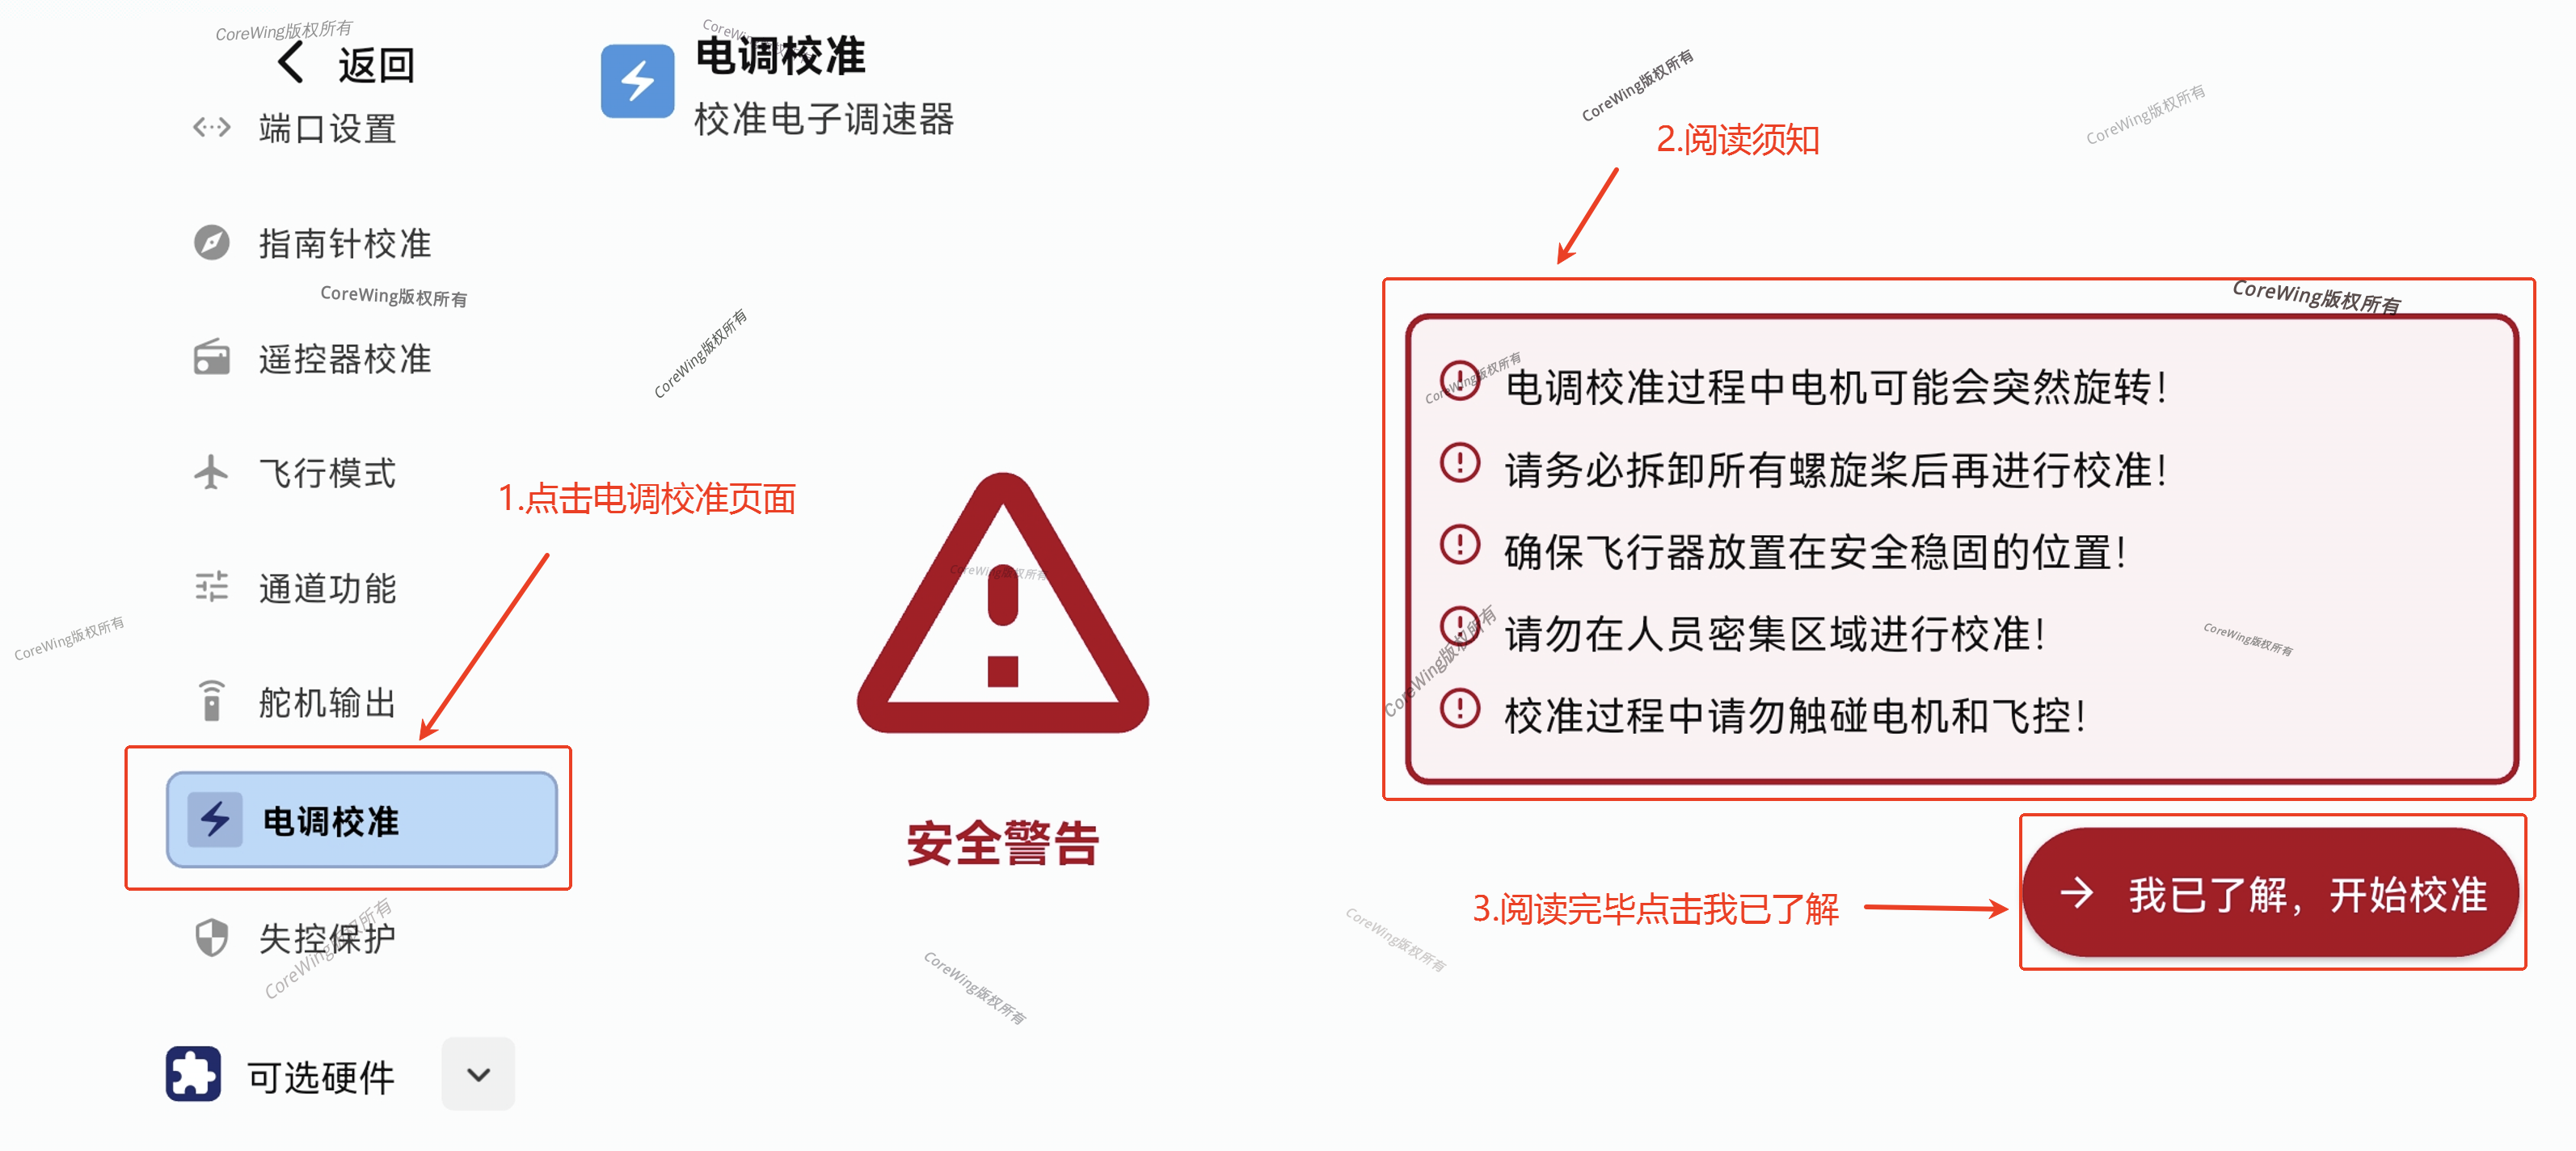
- Follow the steps in order, and click Next after completing each step
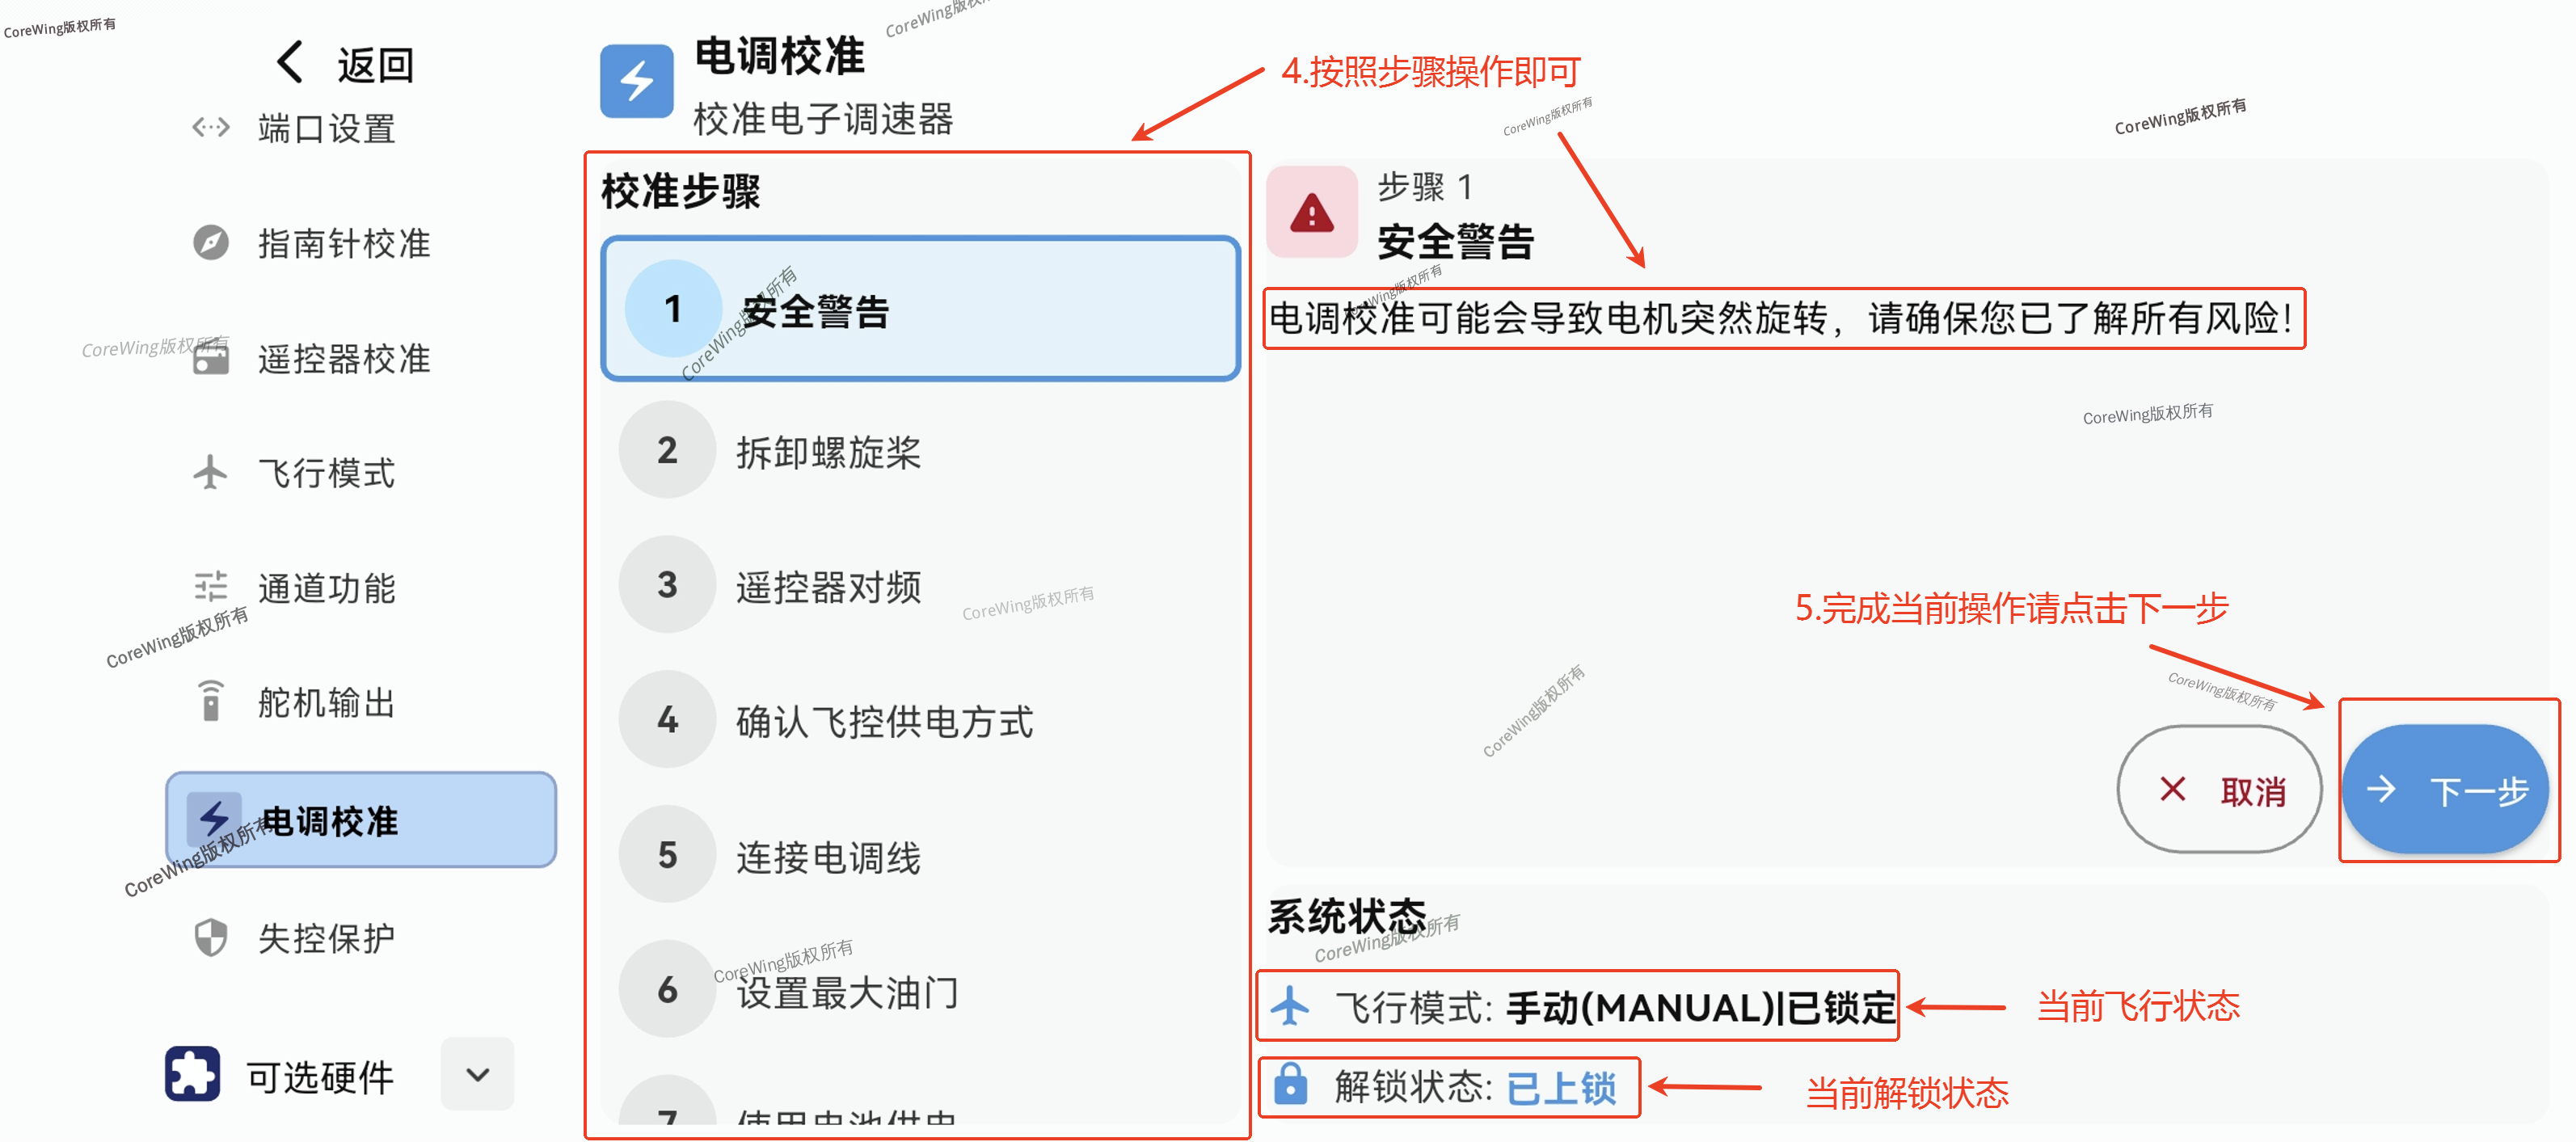
BLHeli32/BLHeli_S ESC Calibration Sounds
Connect the battery and wait 2 seconds → "Play a song" is the throttle maximum point confirmation sound → Wait for the song to finish → Push the throttle to minimum and wait 1 second → "Play another song, dee-dee-" is the throttle minimum point confirmation sound → Calibration complete
PWM ESC Calibration Sounds
Connect the battery and wait 2 seconds → "Beep-beep-" is the throttle maximum point confirmation sound → Push the throttle to minimum and wait 1 second, N beeps indicate the number of LiPo cells → "Beep-" is the throttle minimum point confirmation sound → Calibration complete
Gently push the throttle, the motor should rotate immediately. Push the throttle from 0% to 20% and check if the response is linear.
If there is any difference from the above effect, disconnect the battery and recalibrate.
Important
For detailed information on ESC calibration and enabling Dshot protocol, refer to this article: https://docs.corewing.com/plane/ardupilot/settings/esc/esc-dshot.html
5.2 Motor Direction Check and Propeller Installation
Motors rotating outward: Facing the nose, the left motor rotates counterclockwise, the right motor rotates clockwise.
Motors rotating inward: Facing the nose, the left motor rotates clockwise, the right motor rotates counterclockwise.
Important
If the motor direction is incorrect, swap any two of the three motor wires on the motor to adjust the direction.

5.3 Compass Calibration
Important
Stay away from metal objects during calibration, such as cars, electric vehicles, high-voltage towers;
Calibrate outdoors with good GPS signal (at least 8 satellites);
Use wireless tuning for calibration to avoid USB cable interference;
Must recalibrate if replacing GPS/compass module or adjusting FC mounting position.
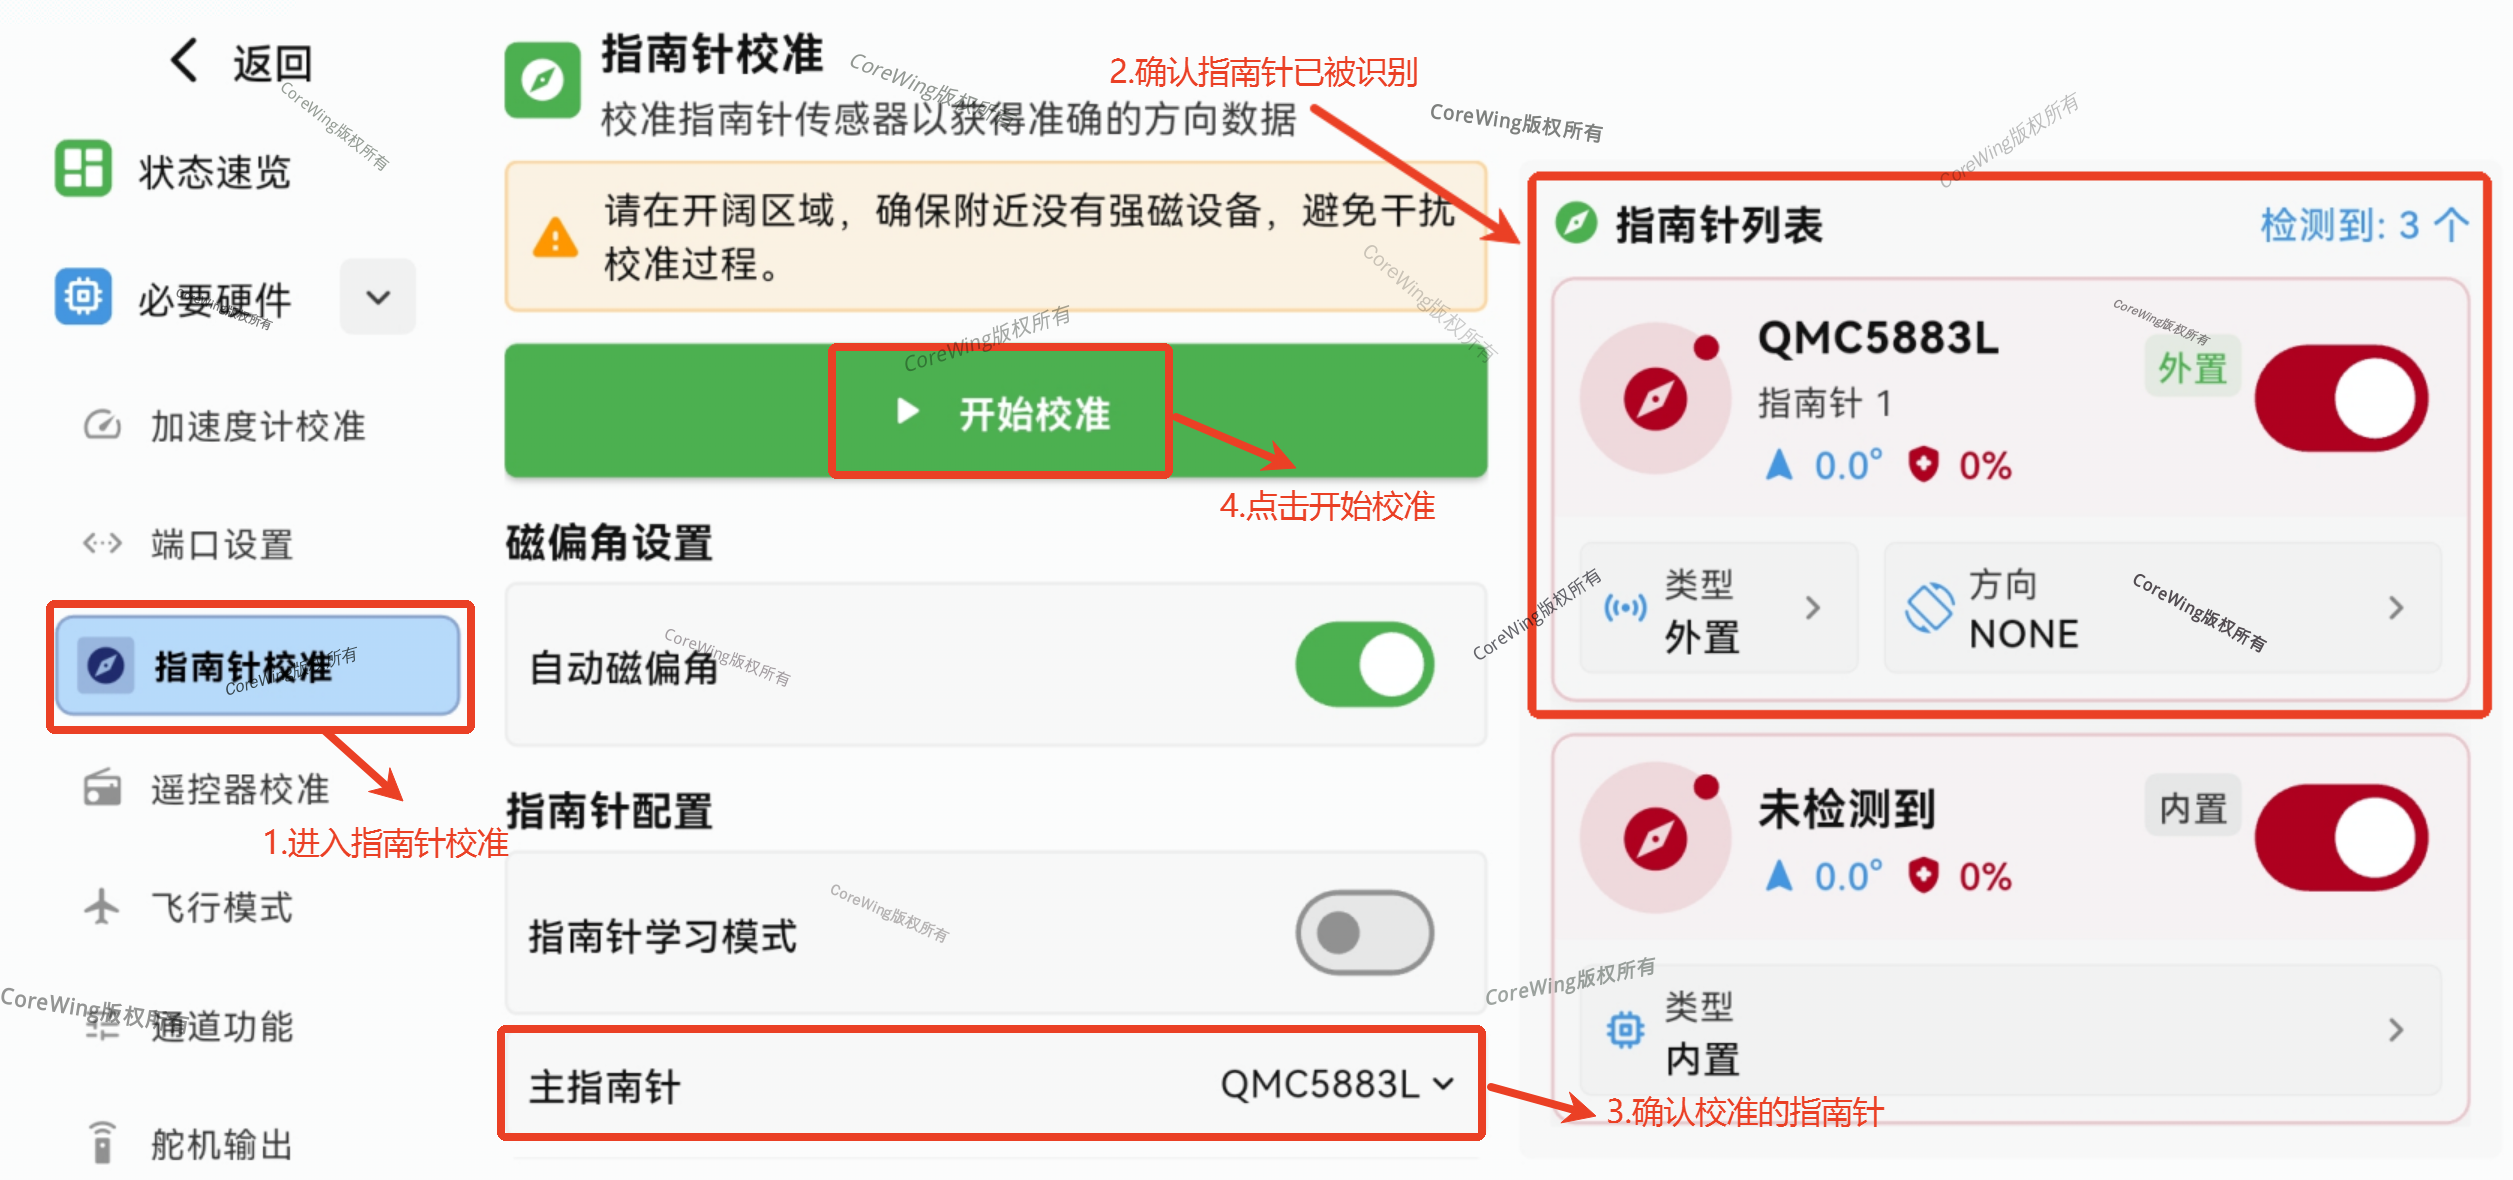
- Confirm the compass is recognized, then click Start Calibration
Important
If the compass is not recognized successfully and the wiring is correct, exit the APP, power off the FC, restart it, and then reconnect the APP
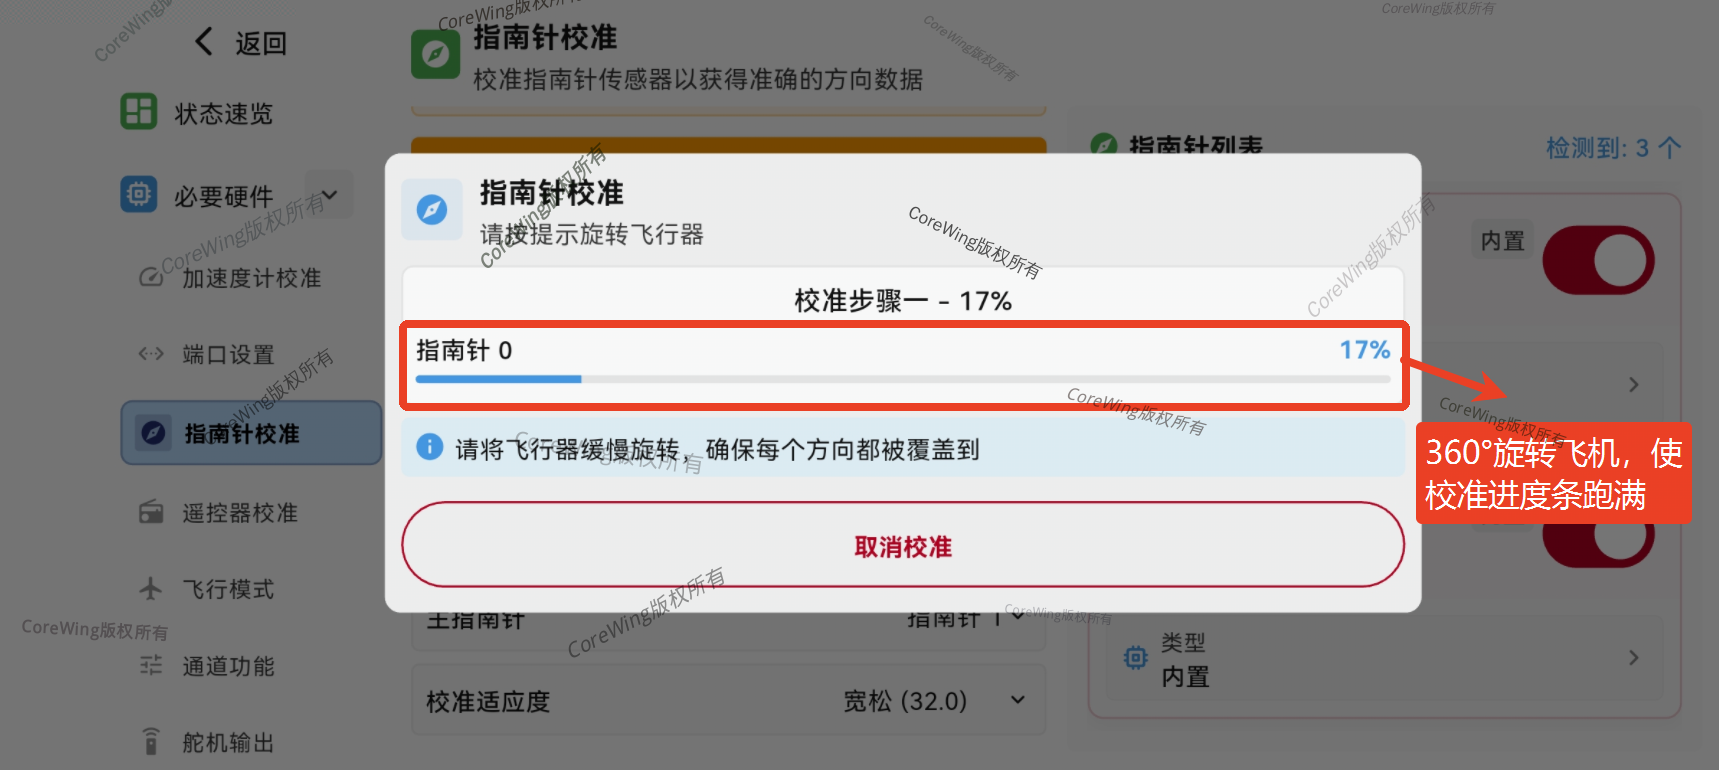
- Rotate the aircraft 360° to fill the calibration progress bar
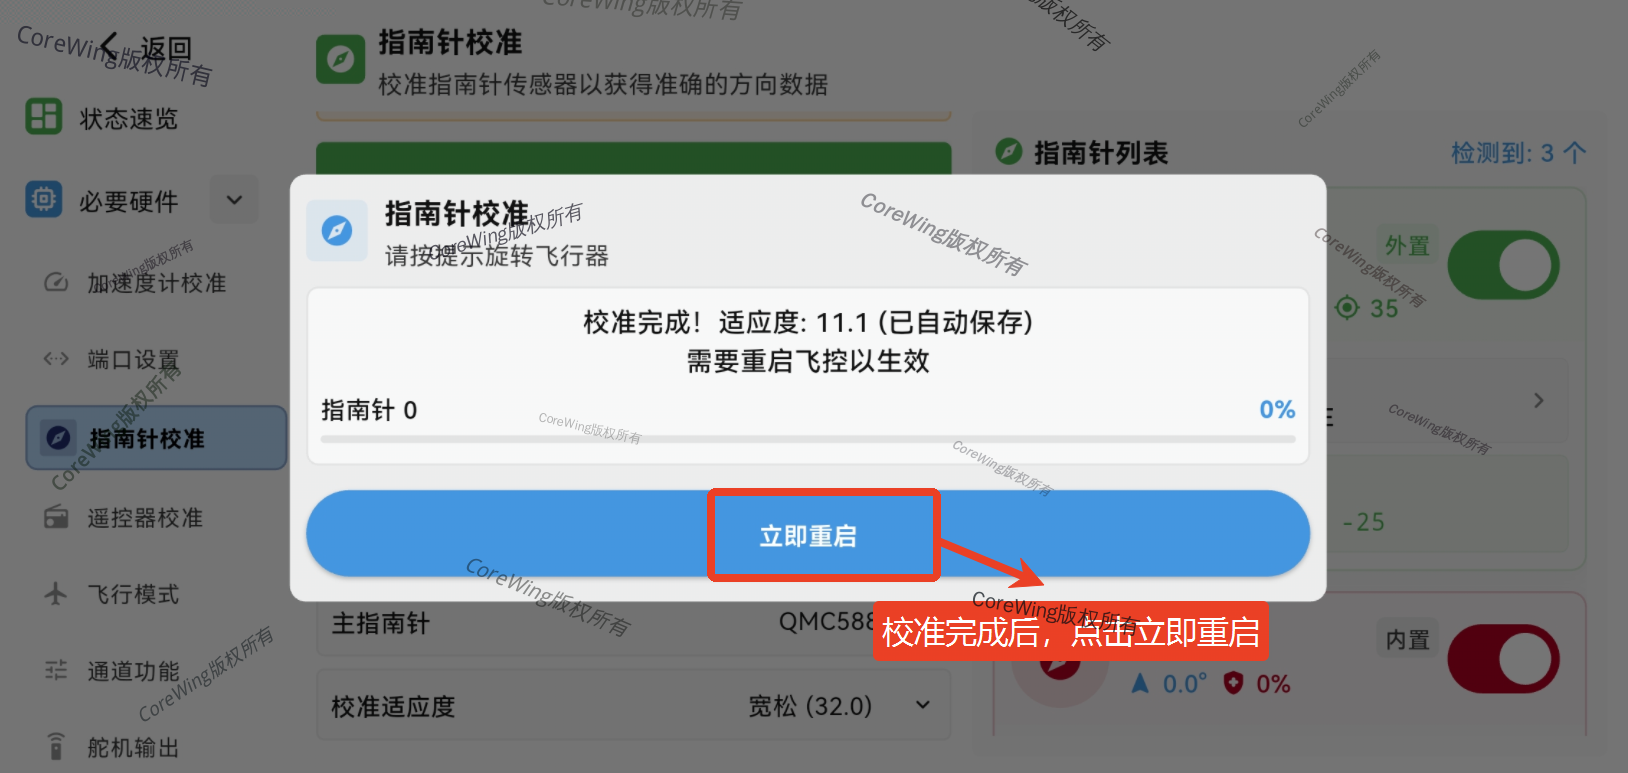
- After calibration is complete, click Restart Immediately.
Important
Compass calibration must be accurate, otherwise it will cause GCS errors: EK3 active/DCM active
Important
For detailed information on compass calibration, refer to this article: https://docs.corewing.com/plane/ardupilot/settings/gps/ap-compass-setup.html
5.4 Level Calibration
Important
After the flight controller is installed, a level attitude calibration must be performed to compensate for the gyro's mounting angle and determine the correct level flight attitude!
- Place the aircraft on a flat surface for level calibration.

- Go to the Status Overview page, click Calibrate Level
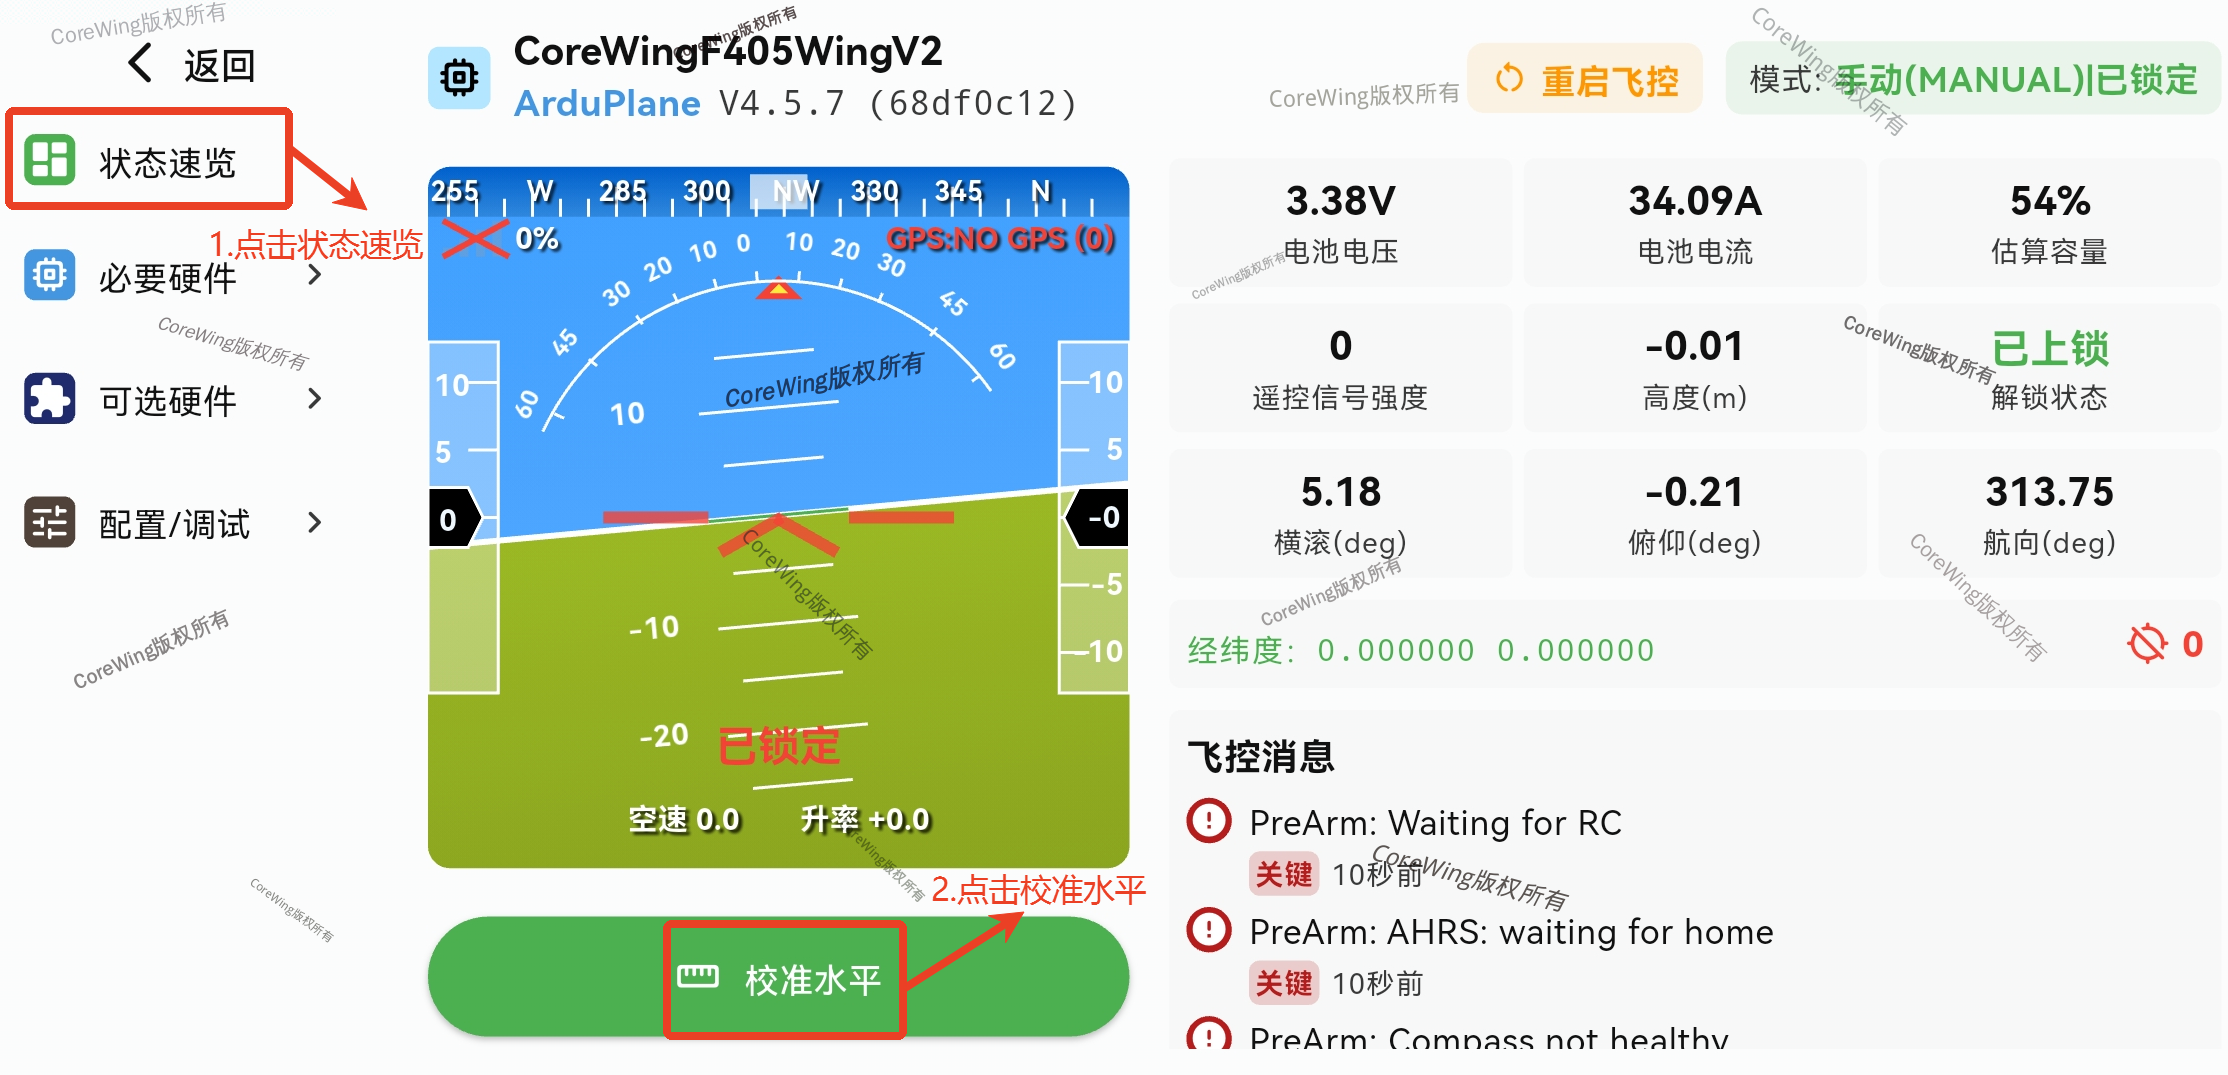
- After calibration is complete, the attitude line should be horizontal
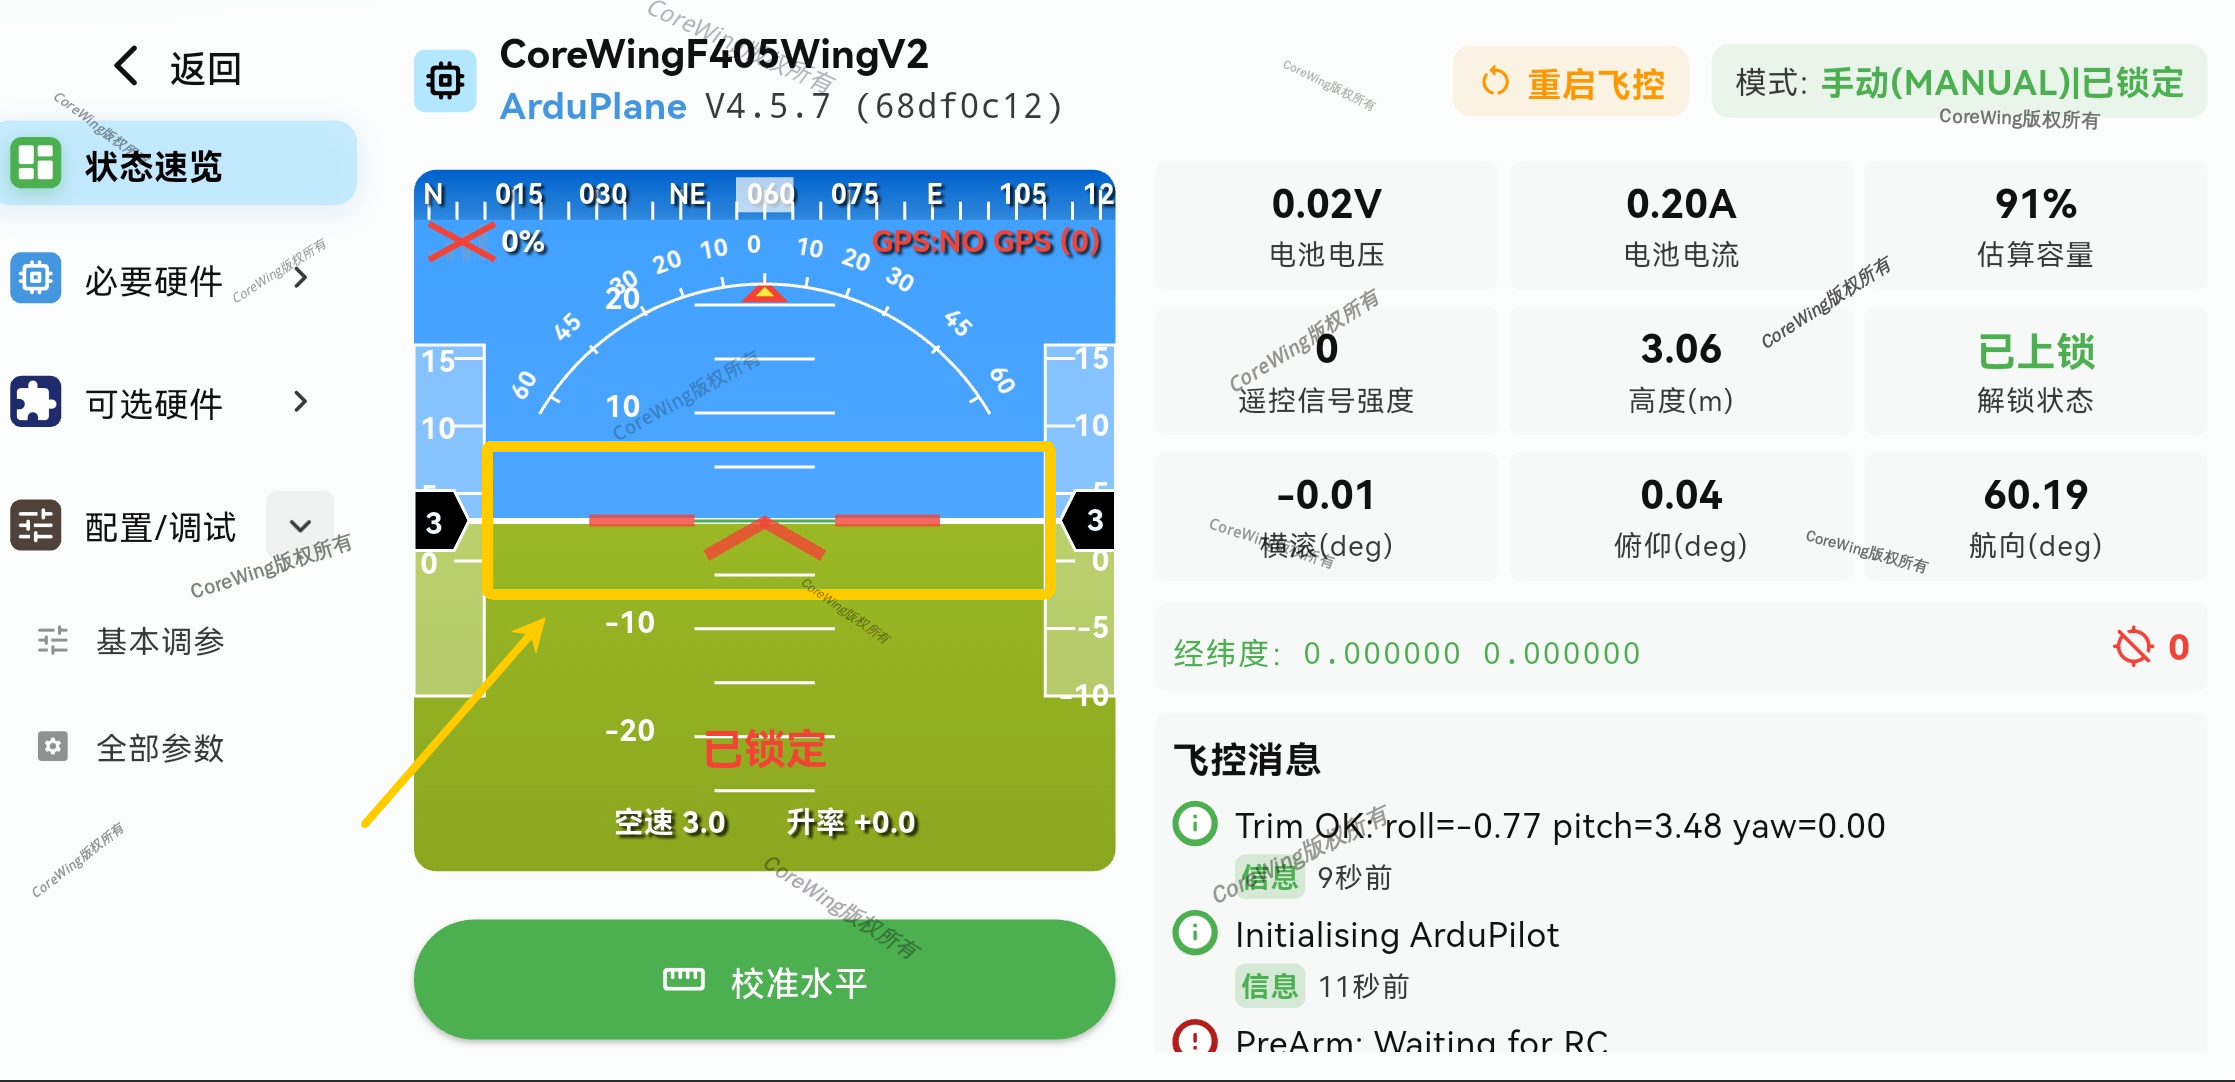
5.5 Failsafe Parameter Settings
Important
For detailed information on how to set failsafe parameters, refer to this article: https://docs.corewing.com/plane/ardupilot/settings/fc/failsafe.html
6. Flight Test
6.1 Pre-flight Check Parameter Settings
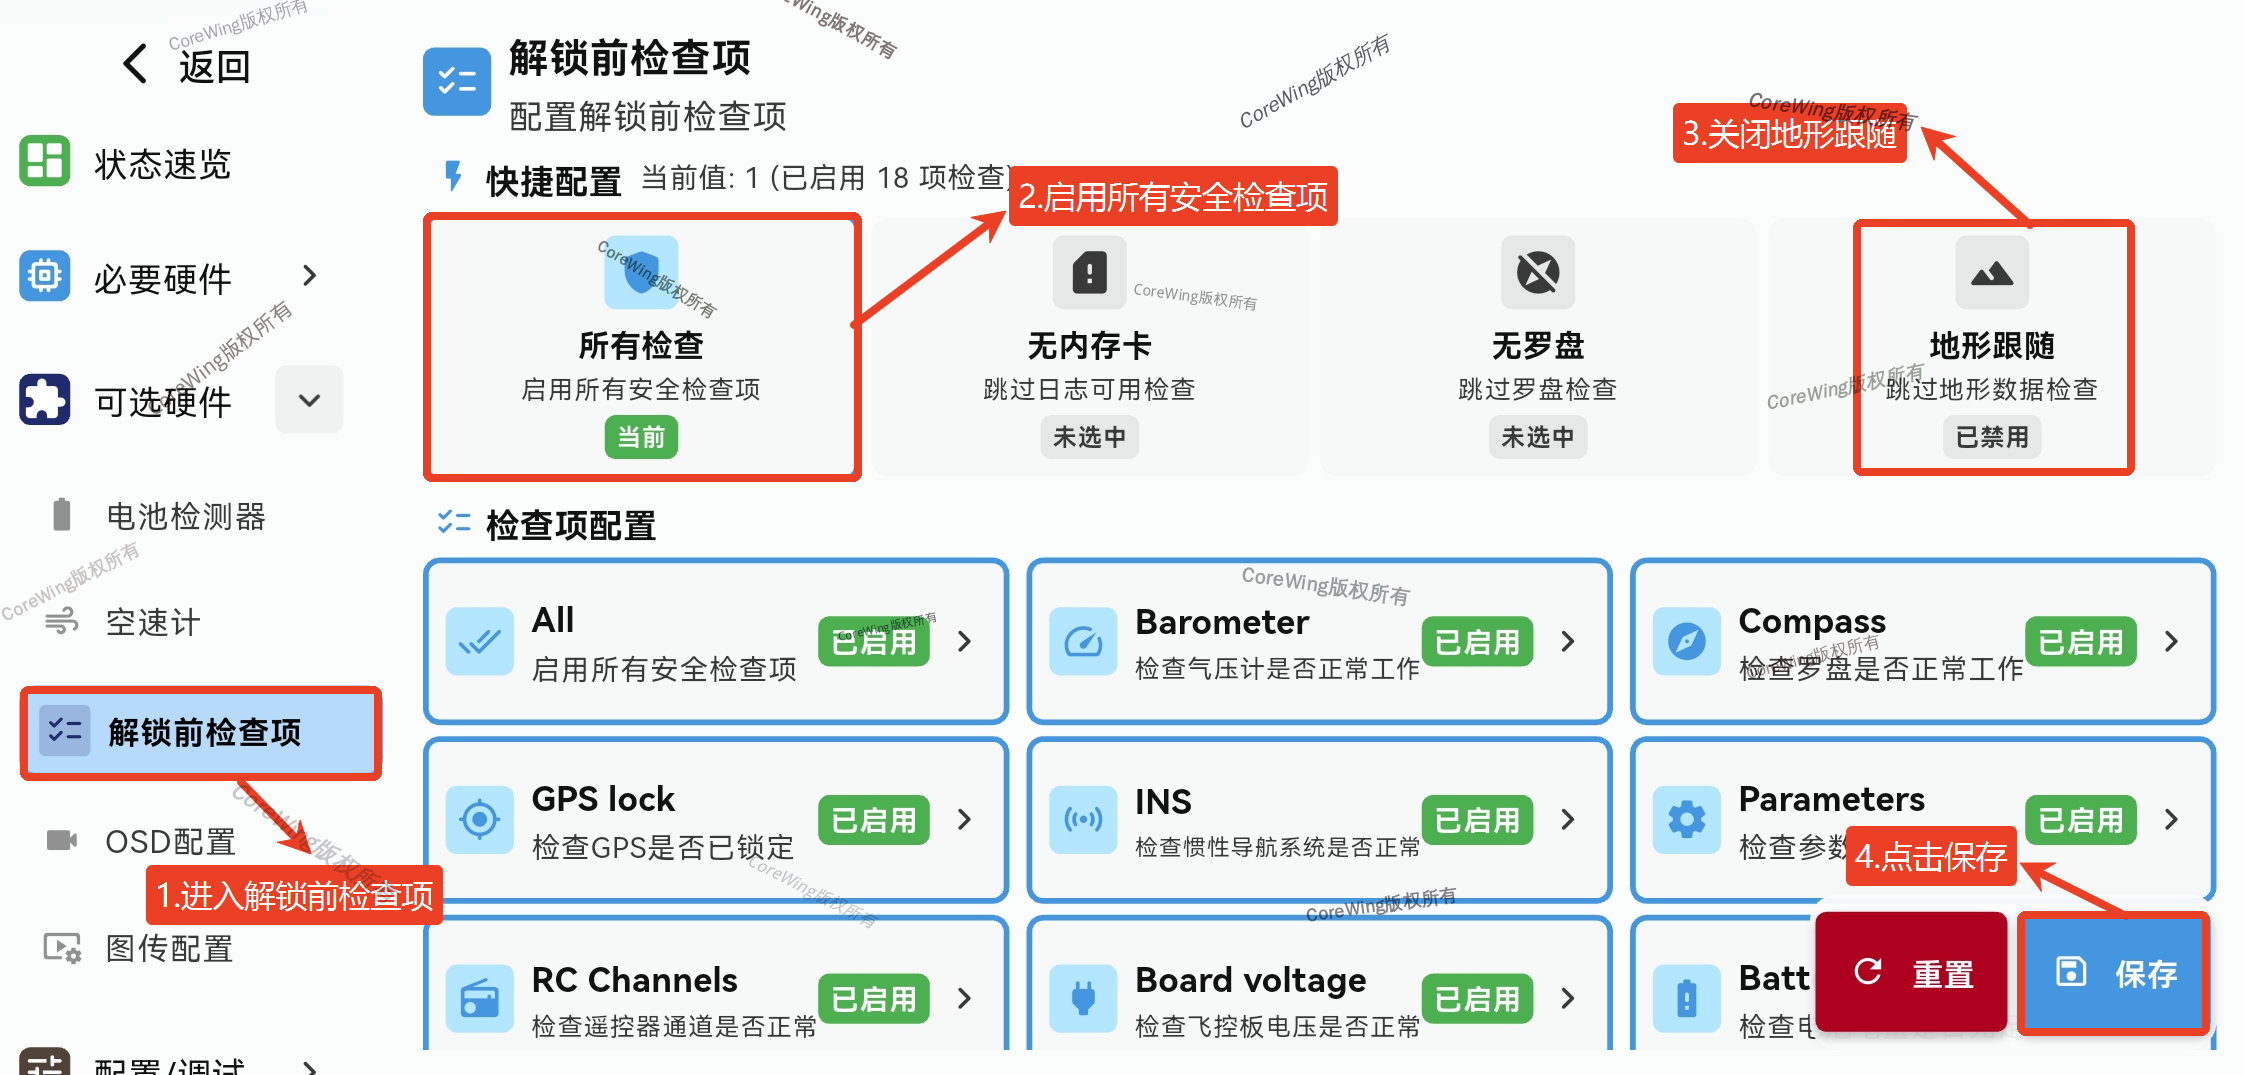
Enter pre-flight check items
Click to disable or enable this pre-flight check item
Important
The terrain following feature must be disabled, otherwise it will affect RC transmitter unlocking
Important
For detailed information on how to set pre-flight check parameters, refer to this article: https://docs.corewing.com/plane/ardupilot/settings/fc/prearm-check-setup.html
6.2 Pre-flight Inspection
6.2.1 Center of Gravity Check
1. Reference Aircraft Markings:
- Fixed-wing aircraft will have the recommended center of gravity marked, typically at 25-30% back from the leading edge of the main wing.

2. Finger Support Method:
Place the aircraft on two fingers at the recommended center of gravity point under the main wing, and gently balance the fuselage.
If the nose is too heavy or the tail is too heavy, adjust the battery or add ballast.
Nose Heavy (Center of Gravity Too Far Forward):
The aircraft will have difficulty climbing during flight, which may cause takeoff failure and crash.
Try moving the battery rearward or reducing nose ballast.
Tail Heavy (Center of Gravity Too Far Back):
The aircraft is prone to stalling on the upstroke.
Solution: Move the battery forward or add nose ballast.
6.2.2 Pre-flight Control Surface Check
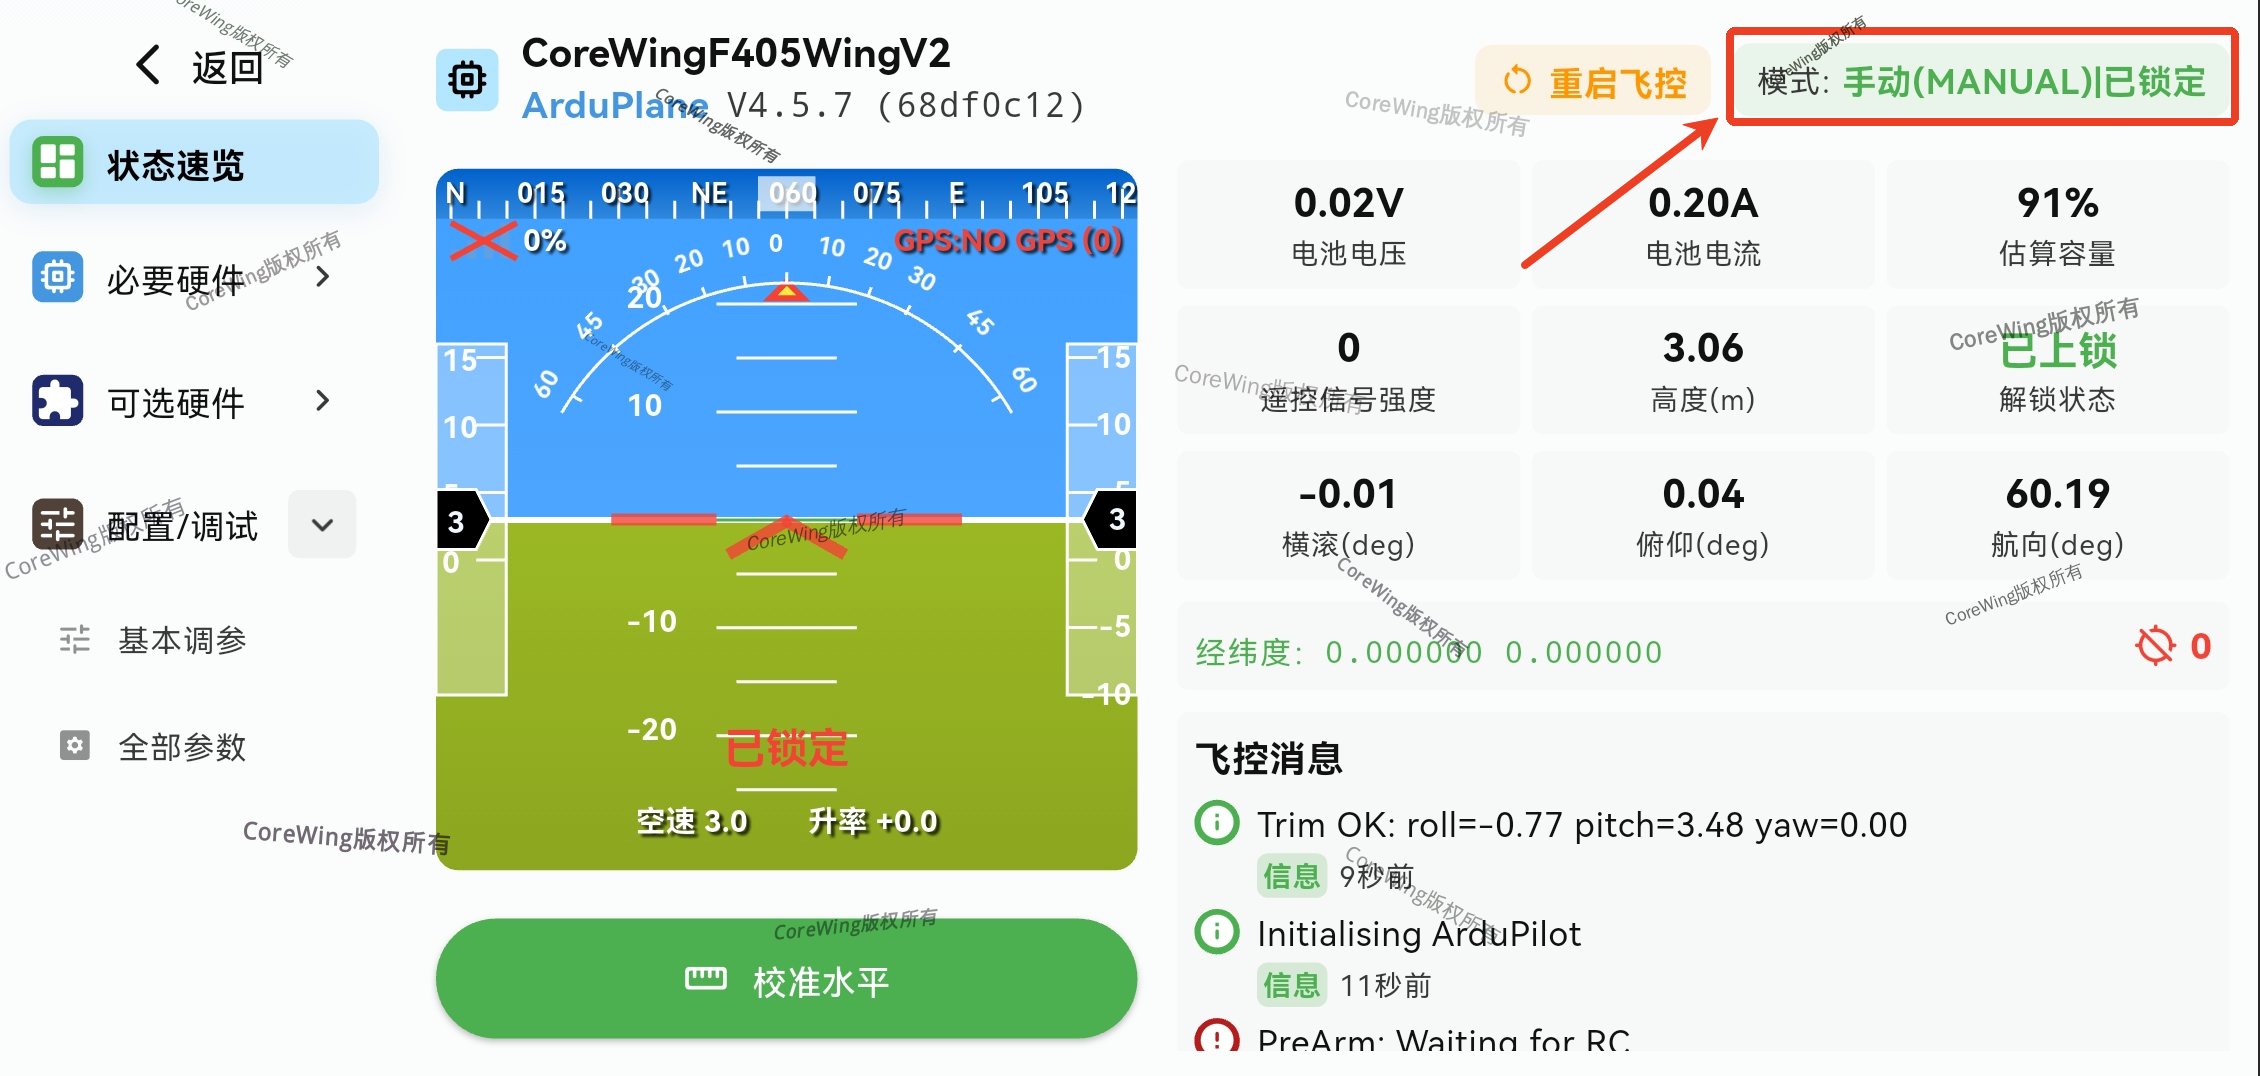
- After the RC transmitter establishes connection with the flight controller (FC), enter the status overview page to view the current flight mode
Important
Switch flight mode to FBWA Mode
When the aircraft rolls left, the left wing control surface deflects down, and the right wing control surface deflects up.
When the aircraft rolls right, the left wing control surface deflects up, and the right wing control surface deflects down.
When the aircraft pitches up, the response is both V-tail control surfaces deflecting down simultaneously.
When the aircraft pitches down, the response is both V-tail control surfaces deflecting up simultaneously.
Important
Switch flight mode to ACRO Mode
When the aileron stick is moved left, the response is the left wing control surface deflecting up and the right wing control surface deflecting down.
When the aileron stick is moved right, the response is the left wing control surface deflecting down and the right wing control surface deflecting up.
When the elevator stick is moved up, the response is both V-tail control surfaces deflecting down simultaneously.
When the elevator stick is moved down, the response is both V-tail control surfaces deflecting up simultaneously.
When the rudder stick is moved left, the response is both V-tail control surfaces deflecting left simultaneously.
When the rudder stick is moved right, the response is both V-tail control surfaces deflecting right simultaneously.
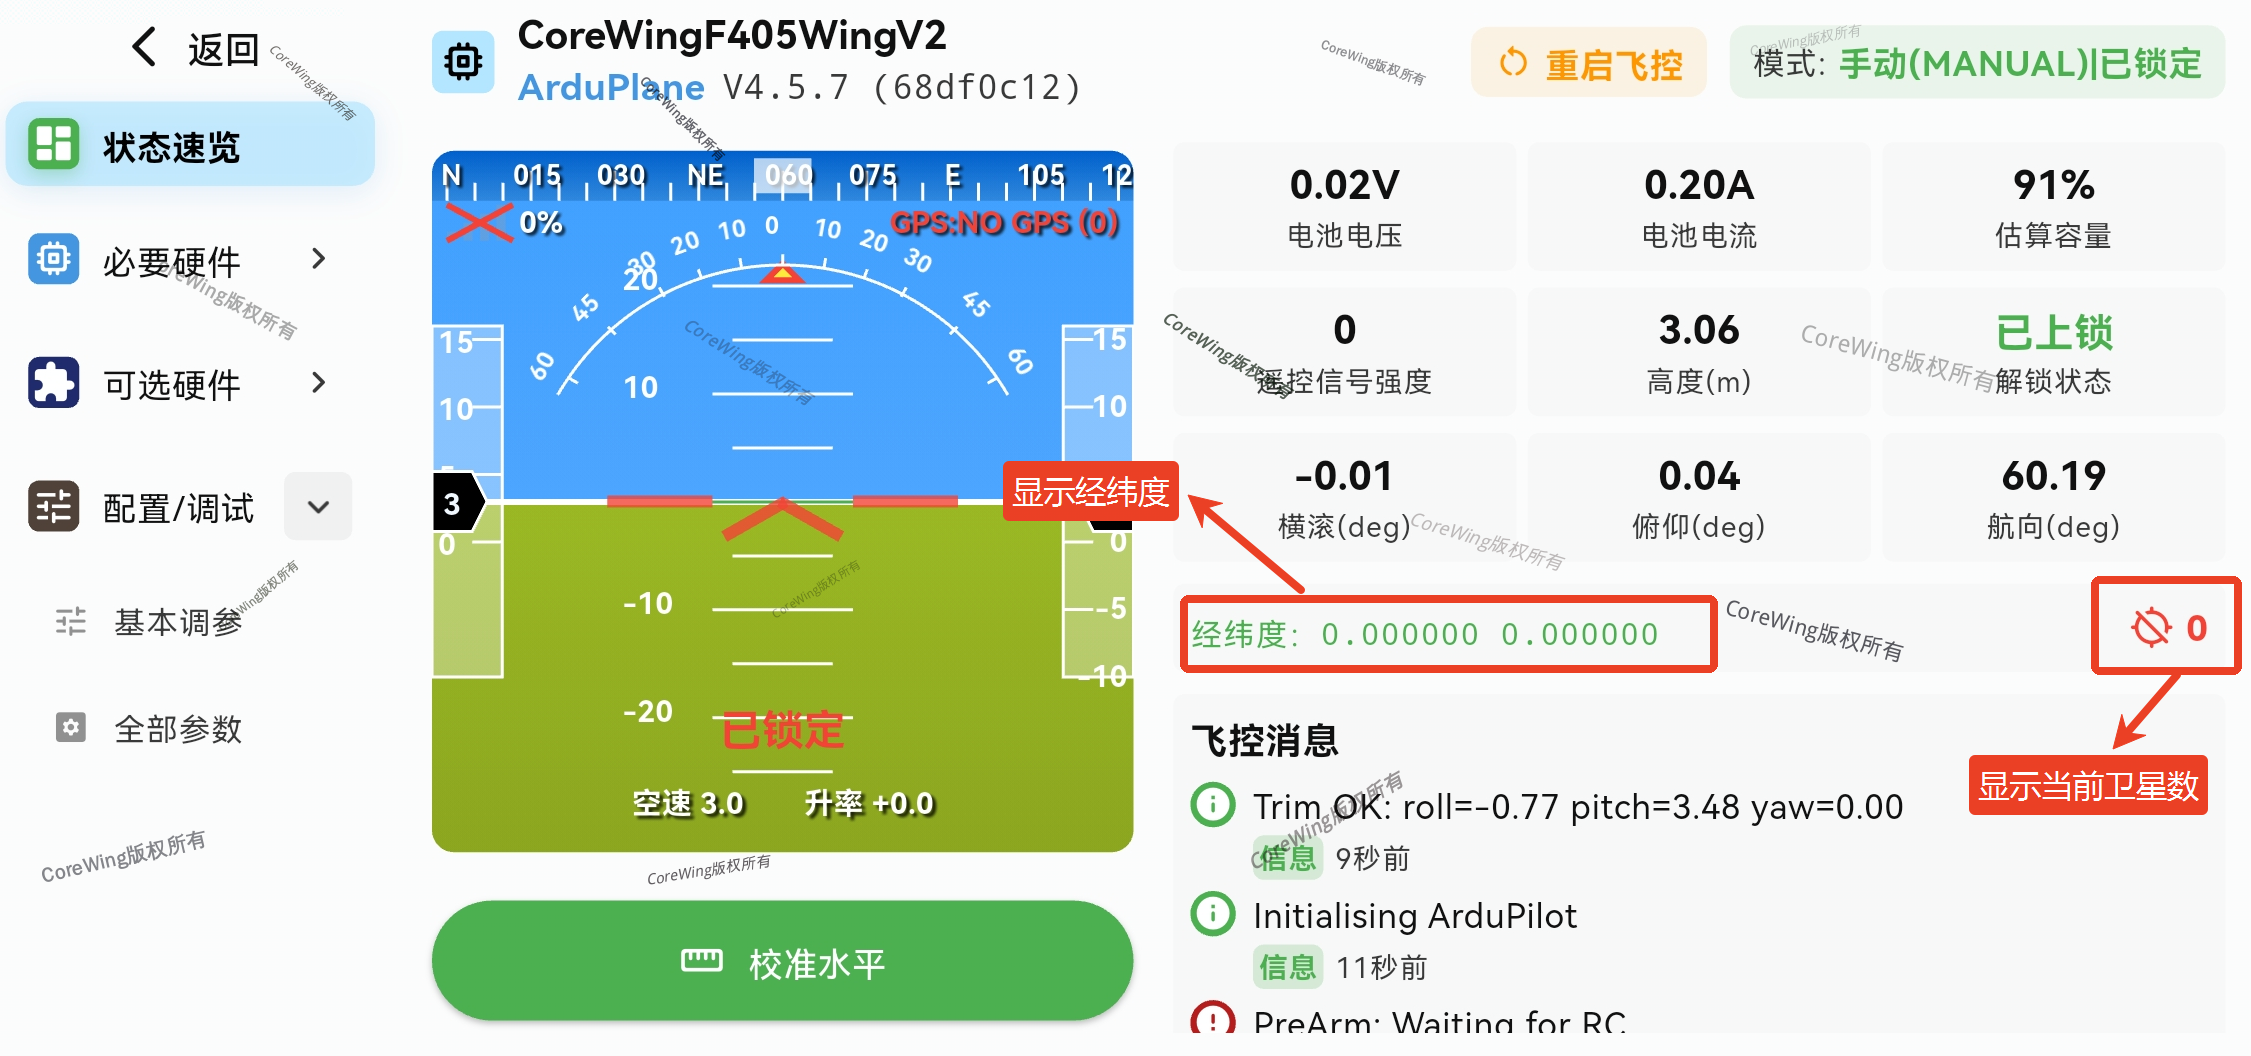
6.2.3 Satellite Count Check
Important
Outdoors, check if the satellite count is greater than 8. Greater than 8 satellites are required for takeoff!
If the satellite count consistently remains below 8, please move to an open area. If there is no improvement, replace the GPS module.
- Enter the status overview page to view the satellite count

6.2.4 Wind Direction Confirmation
Observe Wind Direction:
Observe wind direction indicators such as smoke, windsocks, flags.
Use light objects (like grass leaves) and throw them into the air to observe their drift direction.
Determine Upwind Takeoff Direction:
Upwind takeoff provides greater lift and reduces takeoff speed requirements.
Downwind takeoff may cause stalling or the nose being pushed down by the wind, easily leading to a crash.
6.3 Takeoff Instructions
Depending on the aircraft's actual configuration, choose between hand-launch or runway takeoff to ensure a successful takeoff.
6.3.1 Hand Launch
1. Mode Preparation:
Select
ACRO Modeto ensure sufficient control surface deflection.Throttle to 60-80% to ensure sufficient takeoff thrust.
2. Launch Posture:
Hold the aircraft under the wings. For flying wings, hold the wings themselves to prevent hand injury.
Launch at a 30° upward angle to ensure sufficient lift.
3. Launch Technique:
Use moderate force, avoiding too strong or too light (insufficient for climbing).
Follow through with the motion rather than throwing downward.
Important
Precautions:
Avoid launching with low throttle to ensure sufficient takeoff power. Immediately take control of the aileron stick after launch to prevent the aircraft from rolling out of control.
6.3.2 Runway Takeoff
Select
ACRO Mode.Throttle to 60%-70% to maintain moderate acceleration.
Maintain directional stability to prevent the aircraft from yawing out of control during the taxi.
After the aircraft reaches sufficient speed, slowly pull up the pitch to allow it to lift off smoothly.
Important
Precautions:
Ensure sufficient takeoff distance to avoid stalling from rapid ascent in a short distance.
Takeoff into the wind to increase lift and avoid crosswind effects.
Monitor flight status to prevent excessive pitch-up or rapid banking.
6.4 In-flight Testing
Important
Case Study
- During flight, it was not confirmed whether the aircraft's flight attitude matched the aircraft's angle of attack, resulting in the nose dropping during autonomous flight. At the same time, no auto-tuning was performed, and the PID values were insufficient, causing the aircraft to be unable to generate sufficient control surface deflection for adequate control response. When switching to RTL mode, after entering autonomous flight, the aircraft accelerated and dove directly into the ground, causing a crash!
First-person flight view:
Third-person flight view: Therefore, conducting a complete in-flight test is essential.1. OSD Settings
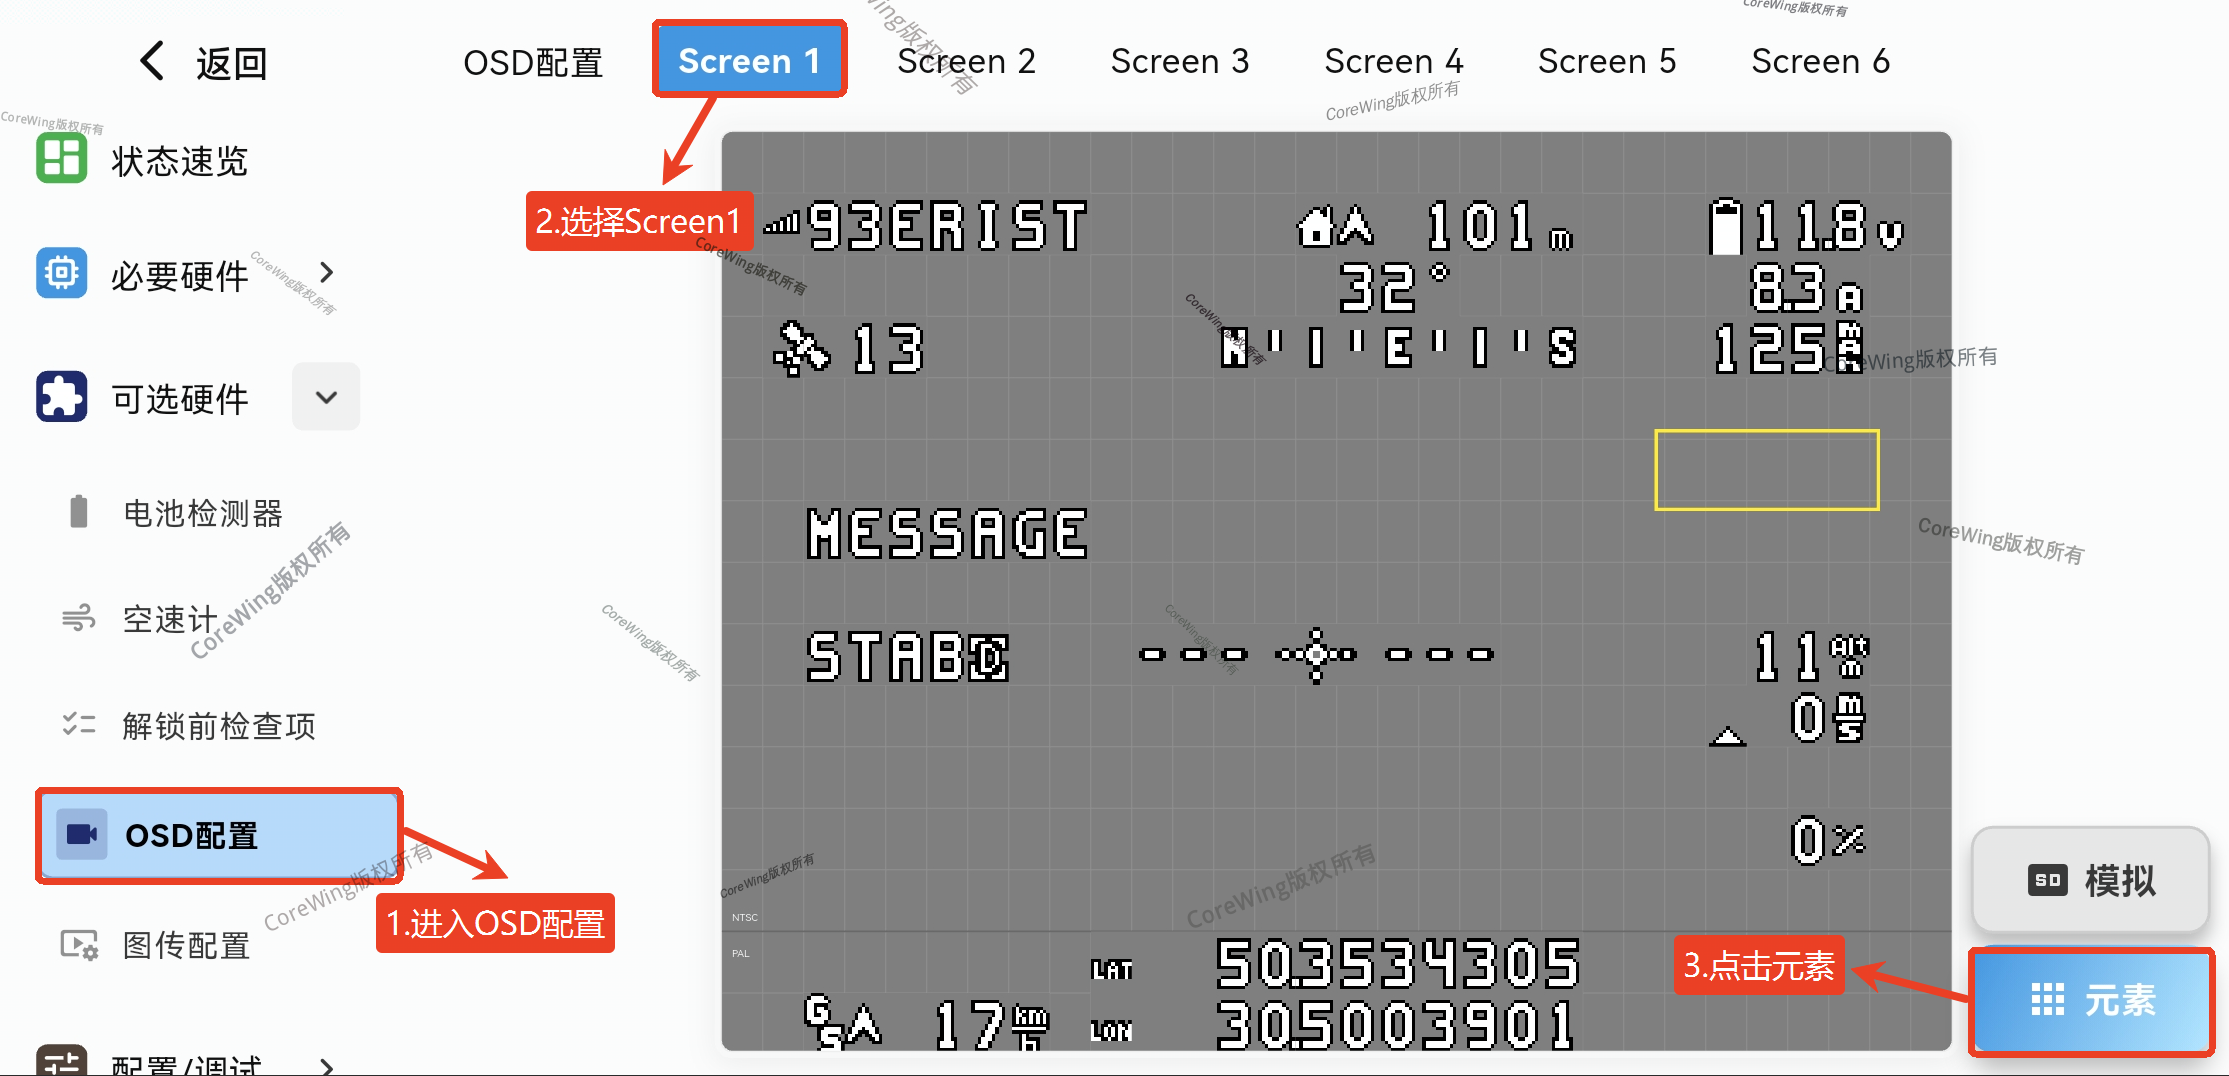
Enter OSD configuration, select screen1
Click on elements
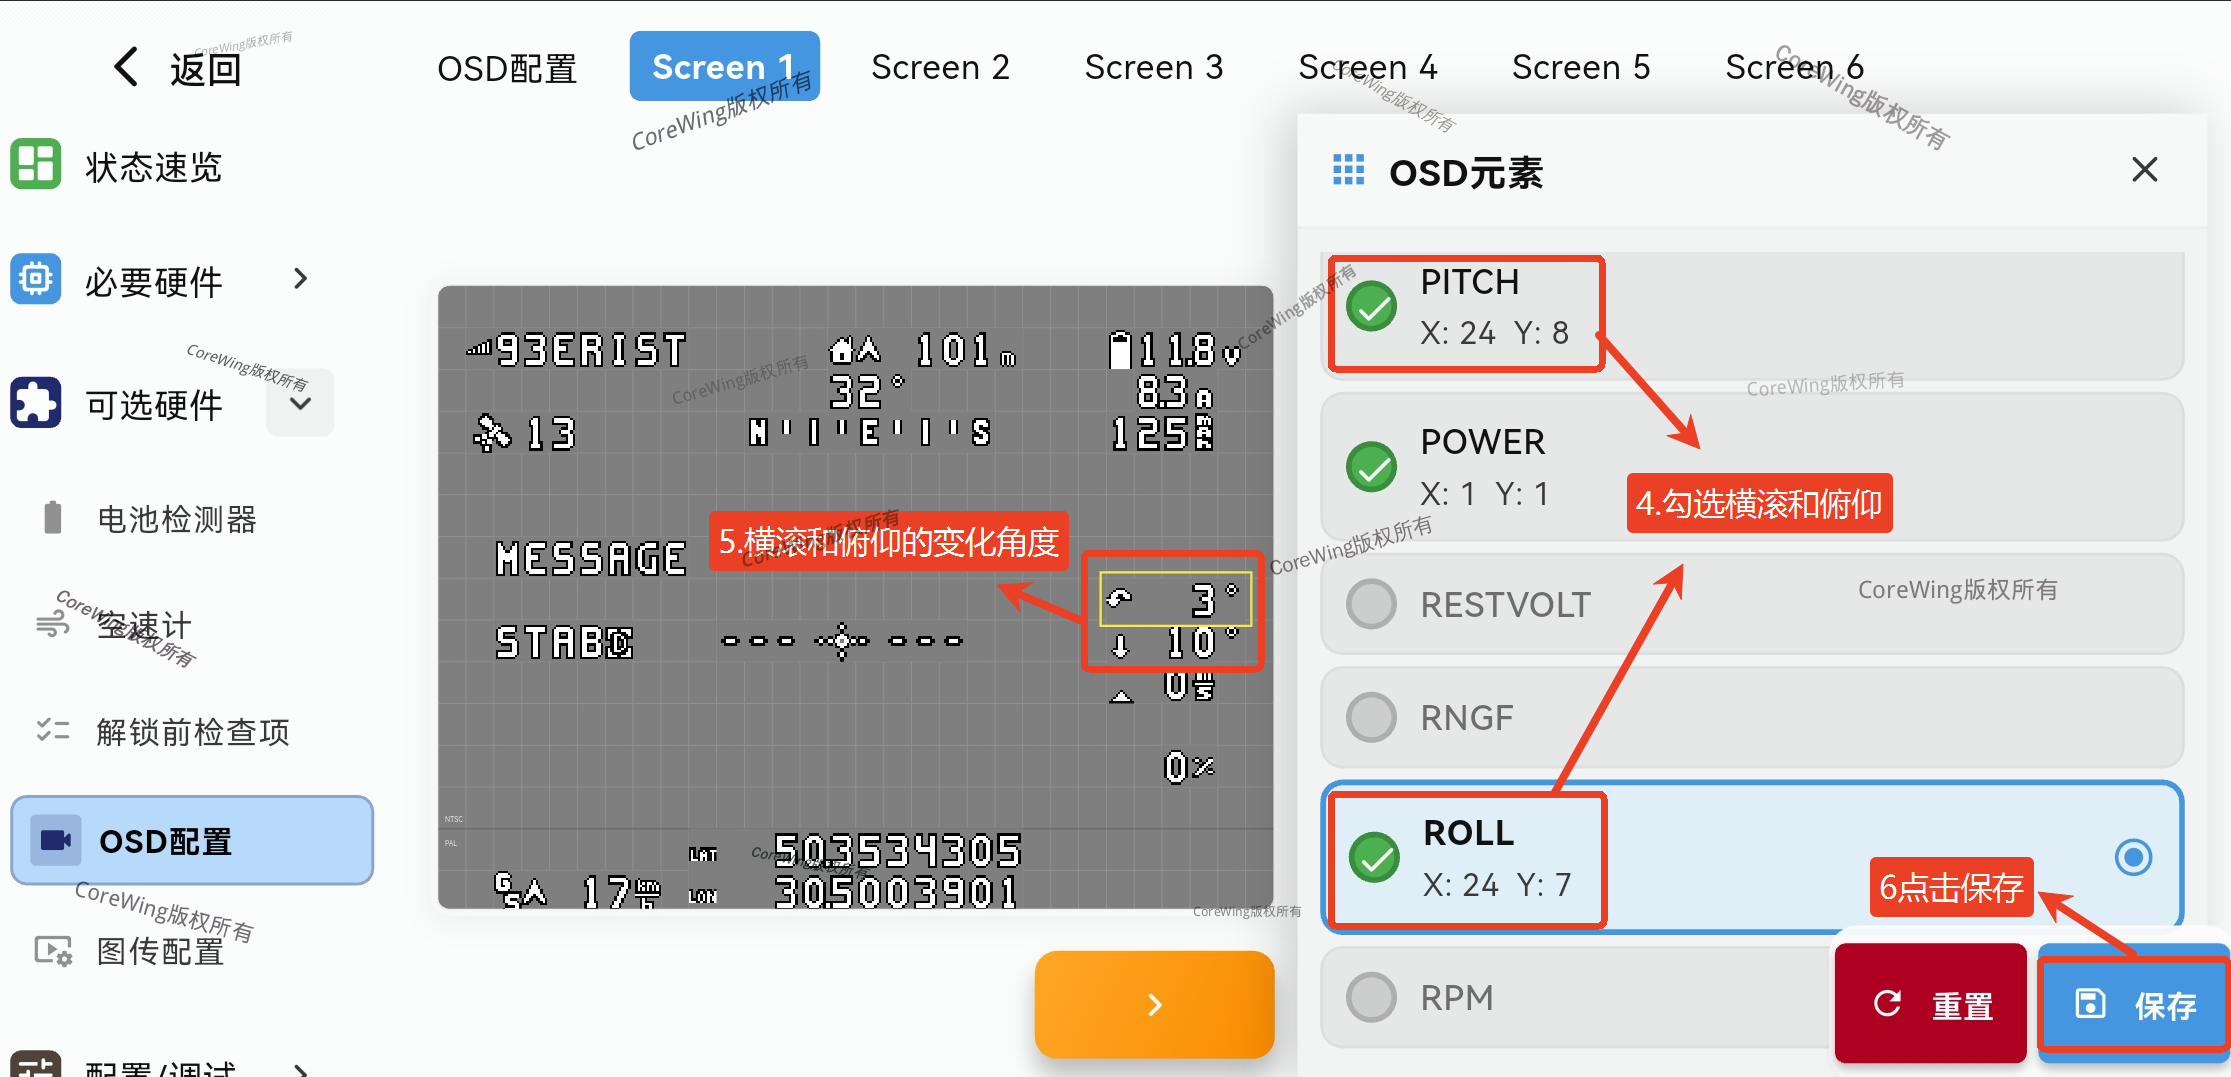
Check ROLL and PITCH
Click Save
2. Control Surface Test
- After successful takeoff, switch the flight mode to
FBWA Modeto check if the aircraft automatically corrects its attitude.
Important
If the aircraft's attitude is abnormal, switch to ACRO Mode Land and check the control surfaces under FBWA Mode.
3. Level Flight Test and Adjustment
Important
You can determine if the aircraft is pitching up or down by observing the attitude indicator on the OSD!

Switch to
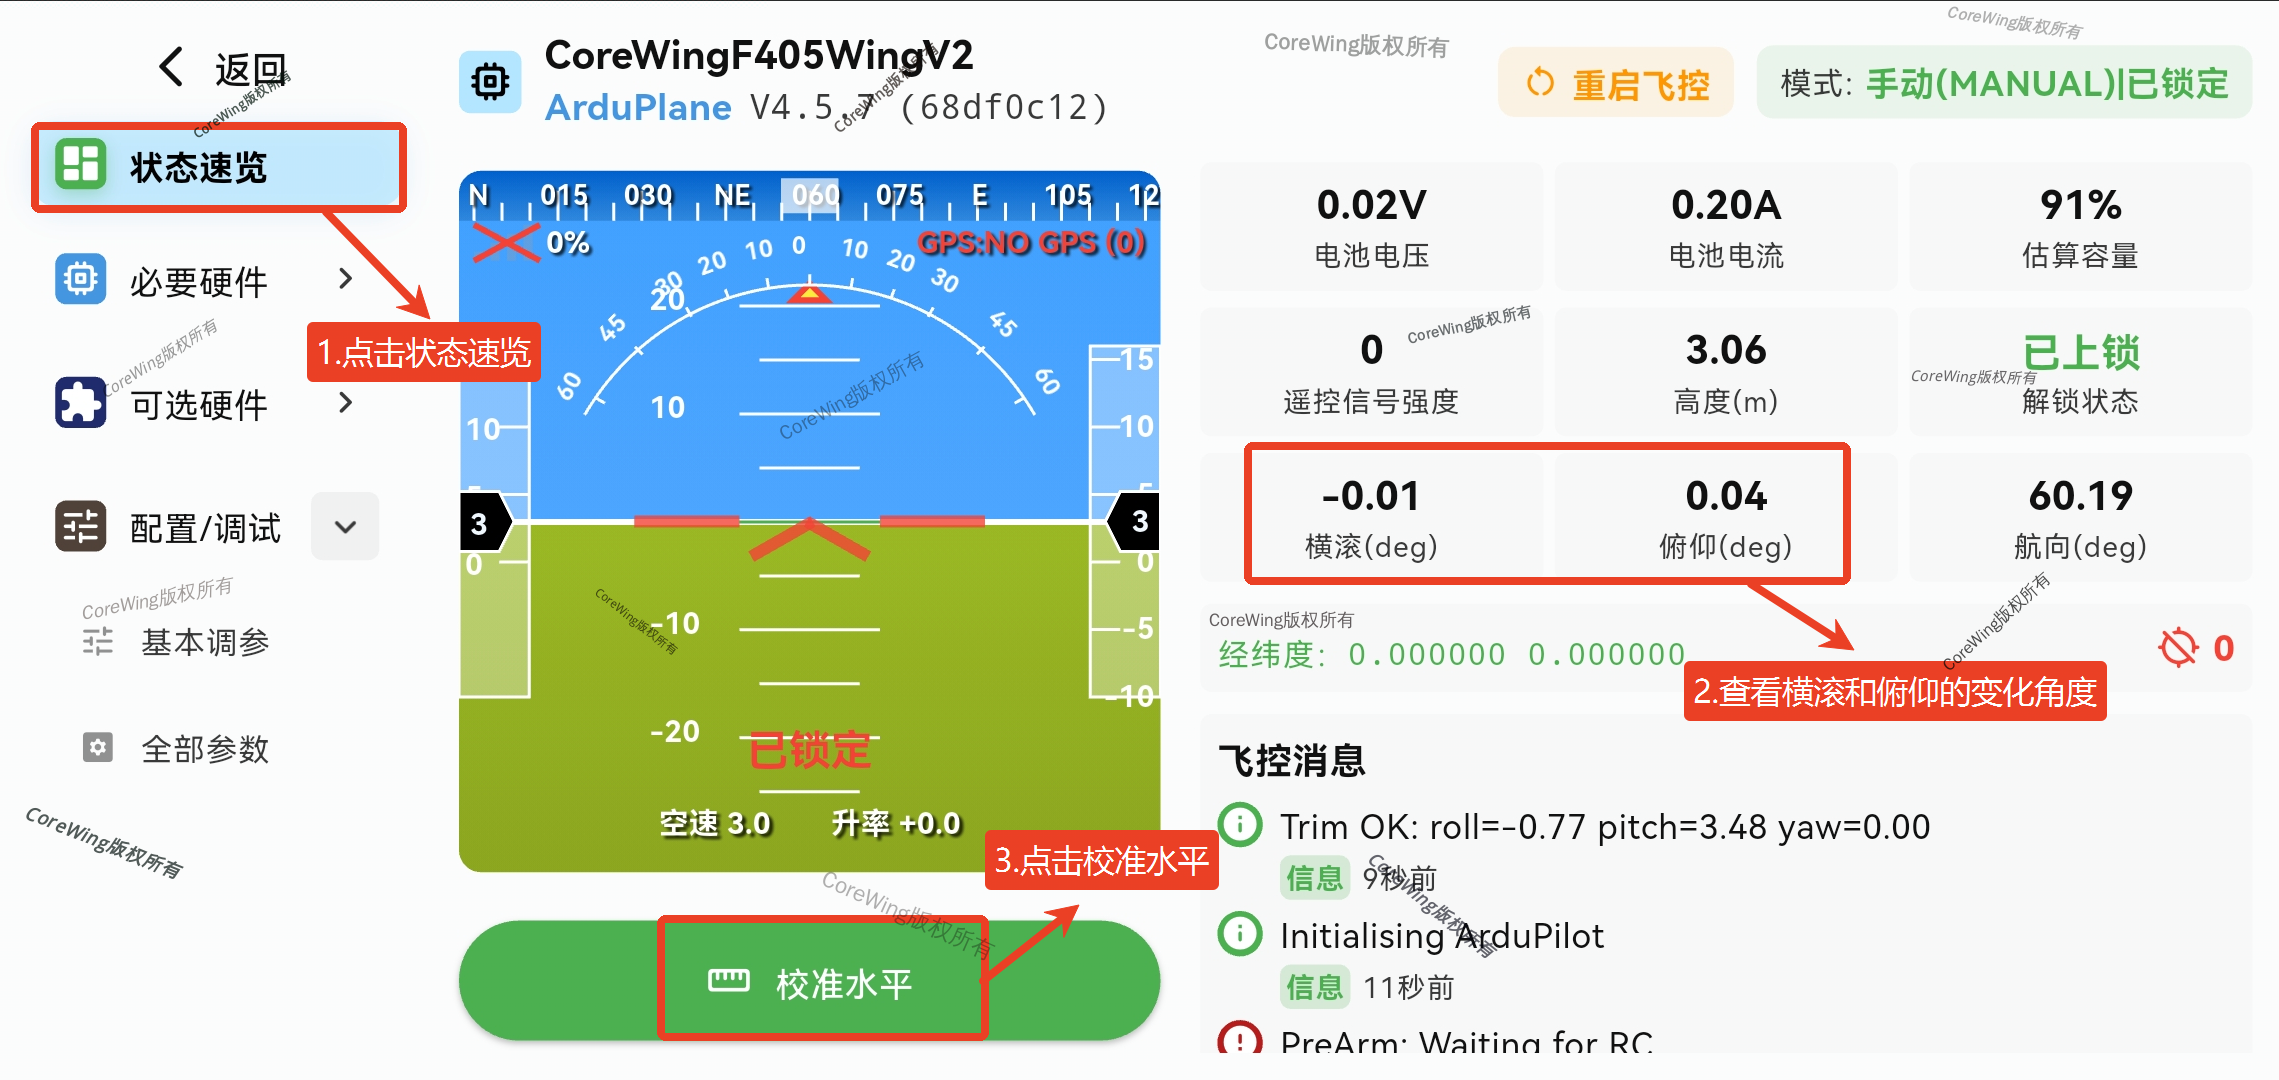
CRUISE Modeand fly once downwind and once upwind, observing the OSD attitude indicator and paying attention to the pitch and roll change angles.If the roll change angle exceeds 3°-5°, switch to
FBWA Modeto land promptly and perform level calibration again.
- If the pitch change angle exceeds 3°-5°, switch to
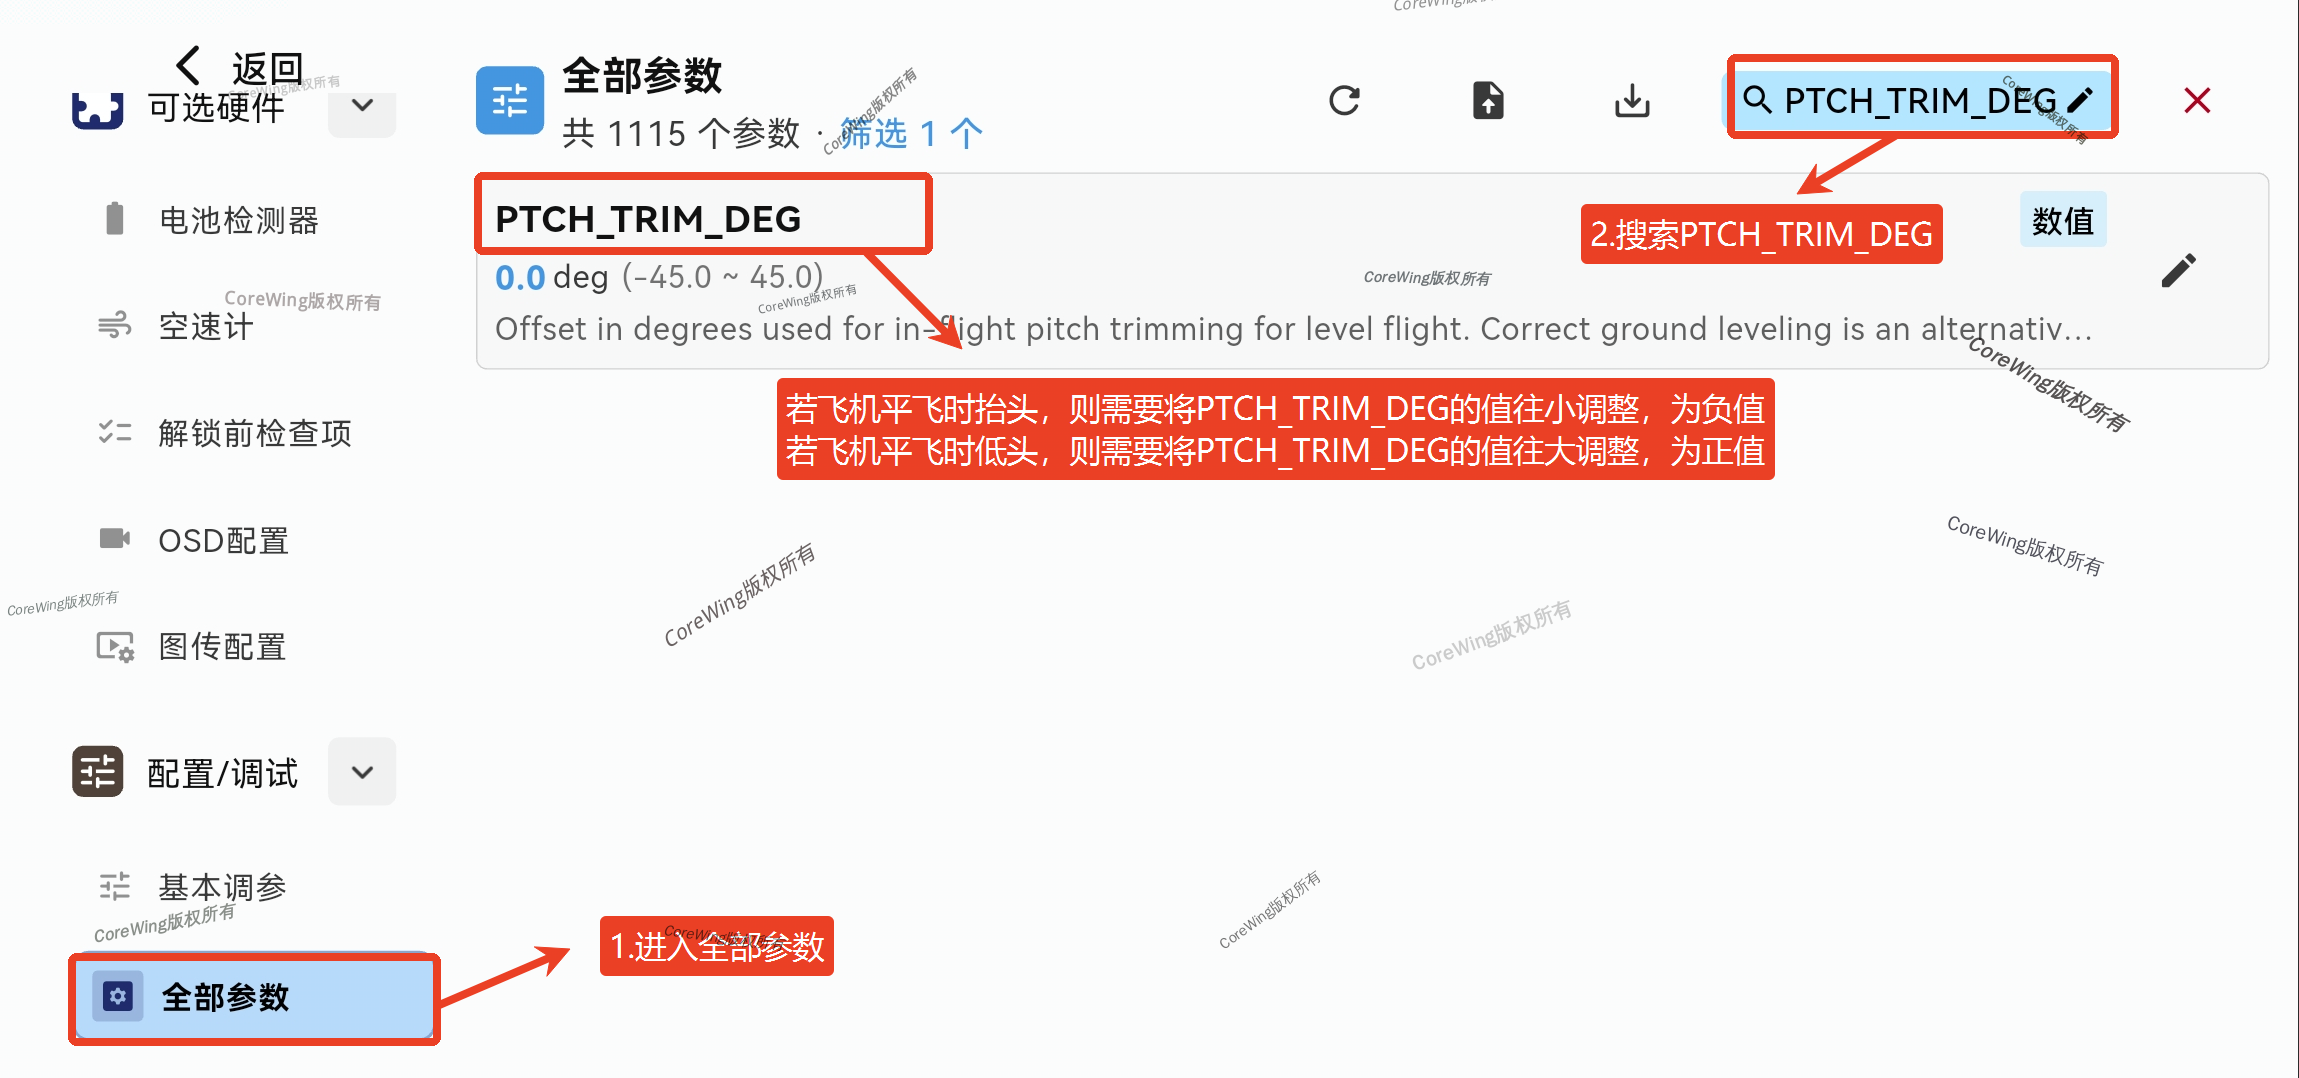
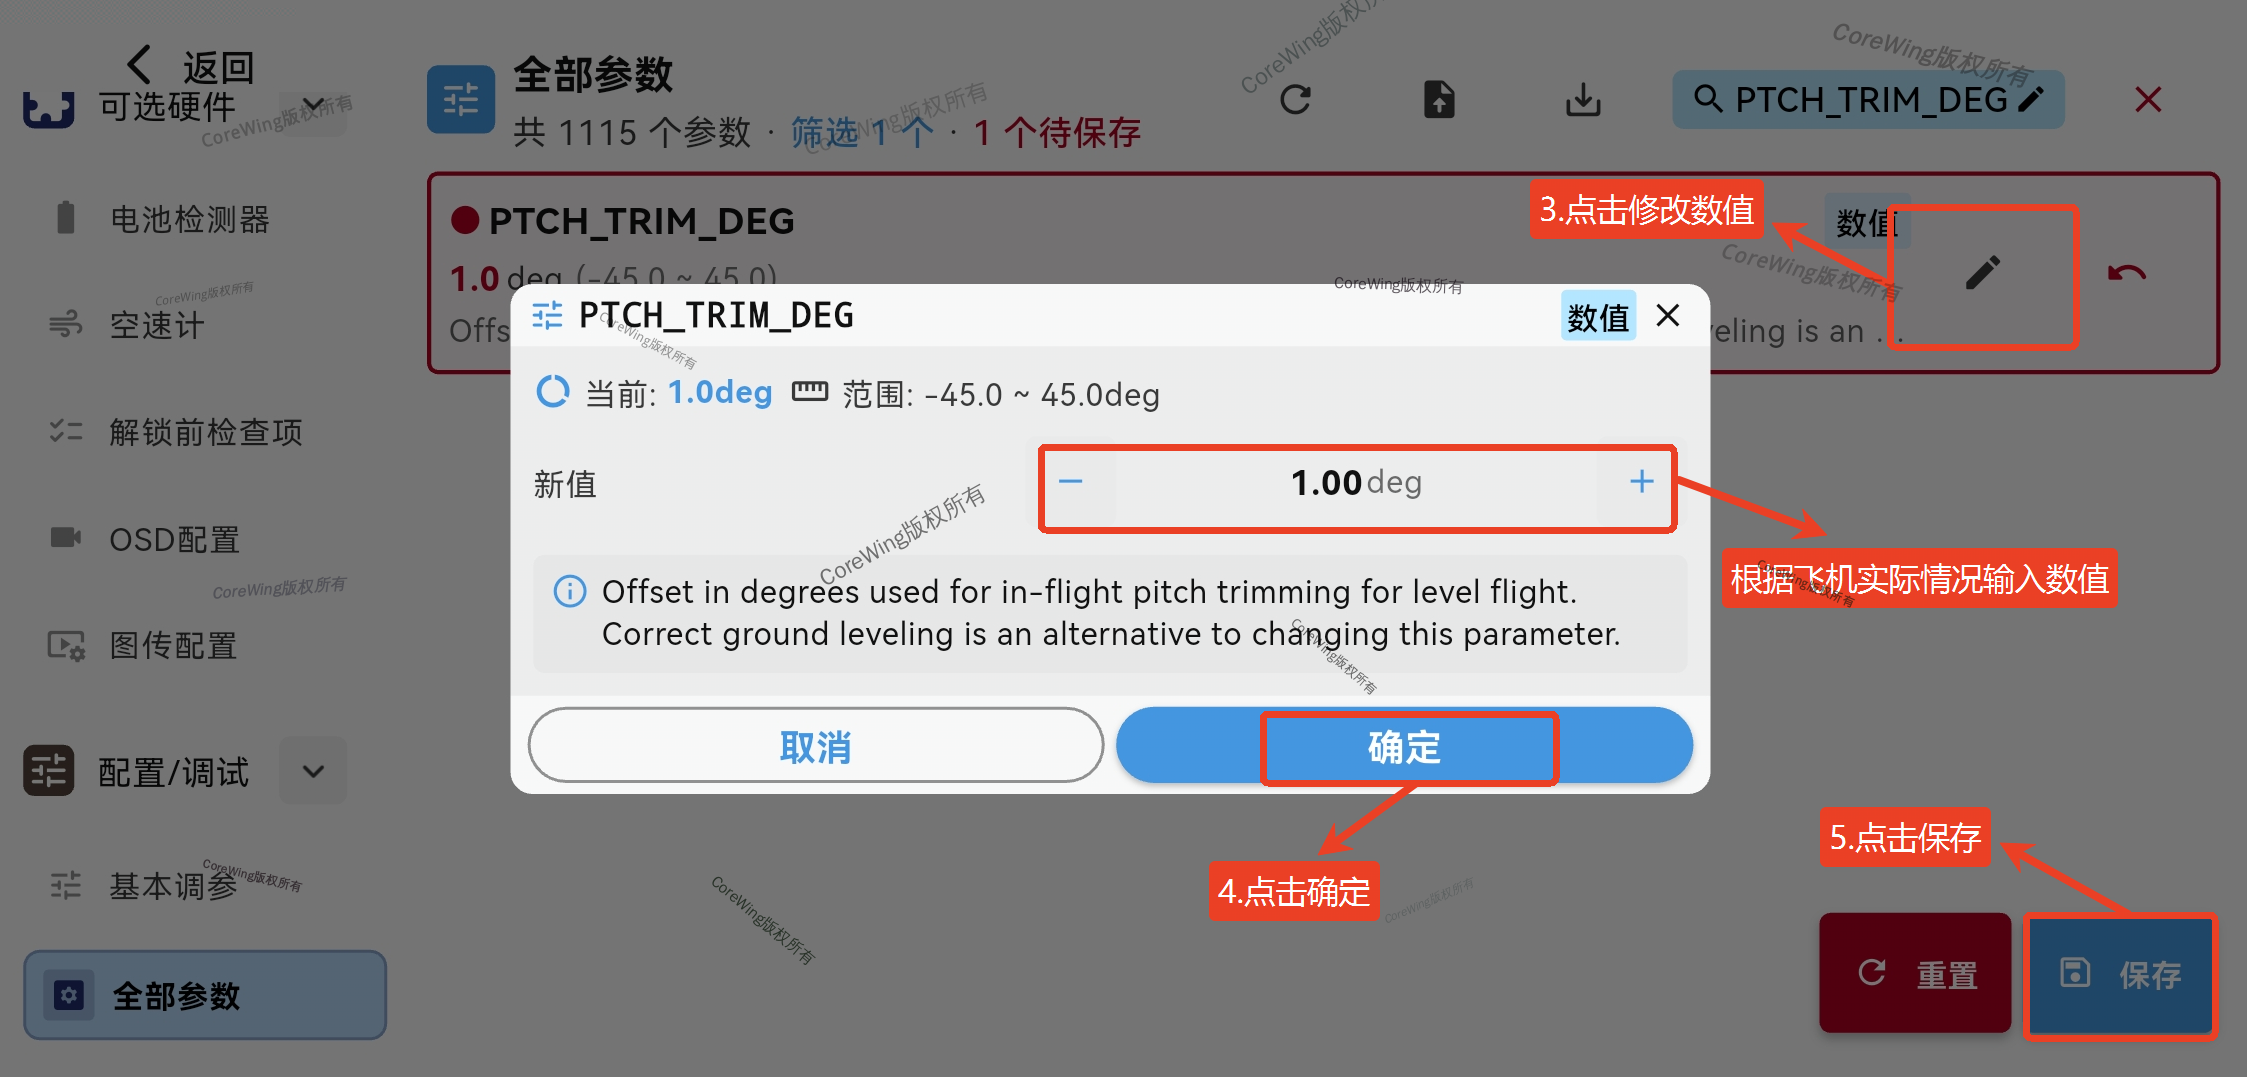
FBWA Modeto land and adjust the value ofPTCH_TRIM_DEGto allow the aircraft to maintain level flight at the correct angle of attack.

If the aircraft pitches down during level flight, increase the value of
PTCH_TRIM_DEGto a positive value.If the aircraft pitches up during level flight, decrease the value of
PTCH_TRIM_DEGto a negative value.
4. Perform SERVO_AUTO_TRIM (Servo Auto-trim)
- Take off, perform
SERVO_AUTO_TRIMtuning, then land after tuning is complete.
Important
For information on how to perform SERVO_AUTO_TRIM (Servo Auto-trim), refer to this article: https://docs.corewing.com/plane/ardupilot/settings/fc/servo-autotrim.html
5. Auto-tuning
- Take off, switch the flight mode to
AUTOTUNE Modeto perform auto-tuning, then land after tuning is complete.
Important
For detailed information on how to use auto-tuning, refer to this article: https://docs.corewing.com/plane/ardupilot/settings/fc/autotune.html
6. Throttle Optimization
Take off, switch to
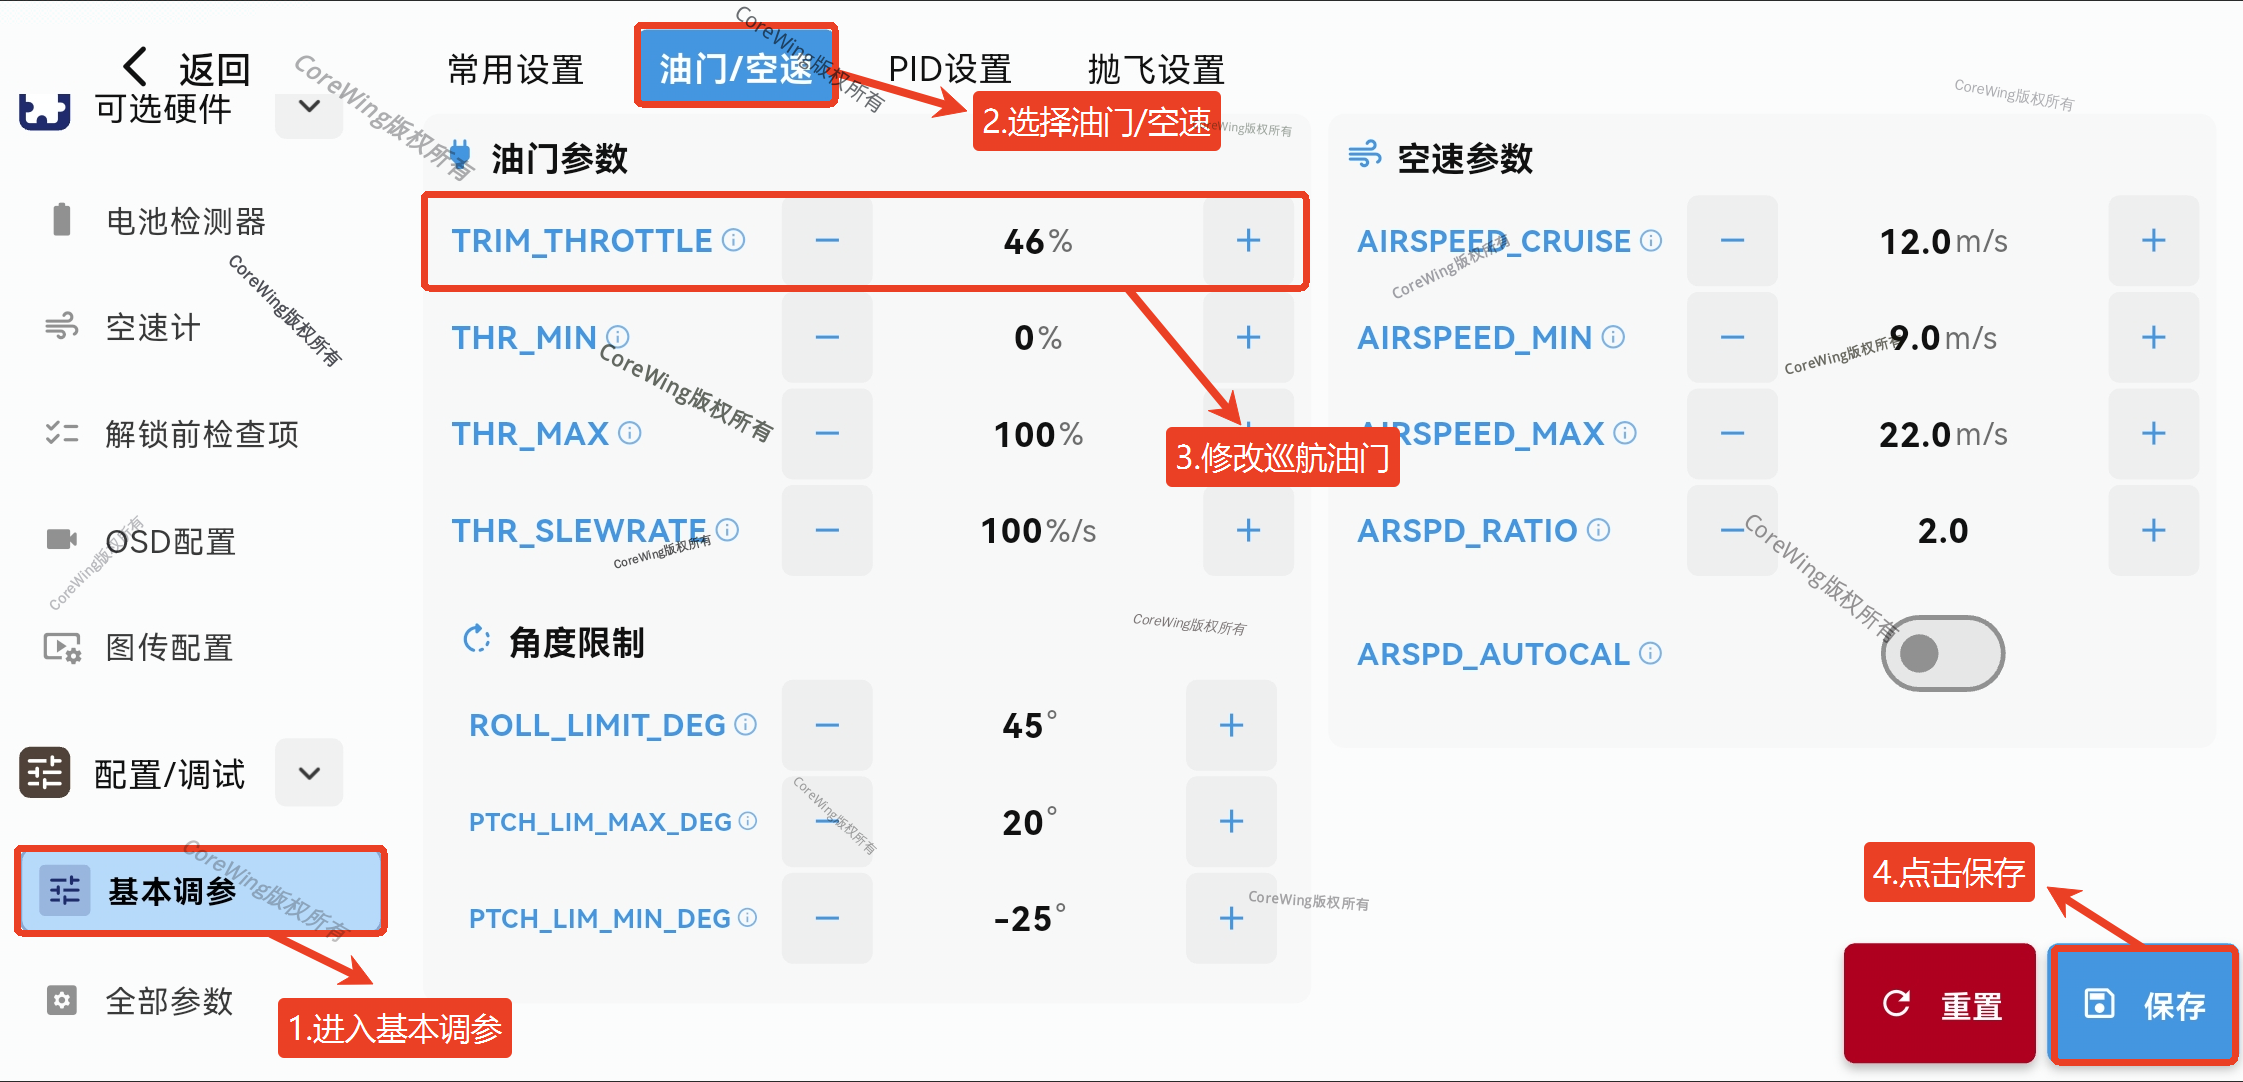
CRUISE Modeand fly upwind. Check if the current cruise throttle setting allows the aircraft to maintain level flight. If the aircraft pitches up or down, adjust the cruise throttle. Increase throttle if the nose drops, decrease throttle if the nose rises.Take off again, switch to
CRUISE Modeand fly upwind. Reconfirm if the current cruise throttle is appropriate while observing the ground speed displayed on the OSD, and record it as [Cruise Speed].
Switch to FBWA mode, maintain the throttle at cruise throttle, and fly downwind. Observe the ground speed displayed on the OSD and record it as [Downwind Ground Speed].
Stay in FBWA mode, maintain the throttle at cruise throttle, and fly upwind. Observe the ground speed displayed on the OSD and record it as [Upwind Ground Speed].
[Downwind Ground Speed] ÷ 3.6 =
[AIRSPEED_MAX], [Upwind Ground Speed] ÷ 3.6 =[AIRSPEED_MIN], round the results and enter them inAIRSPEED_MAXandAIRSPEED_MIN.
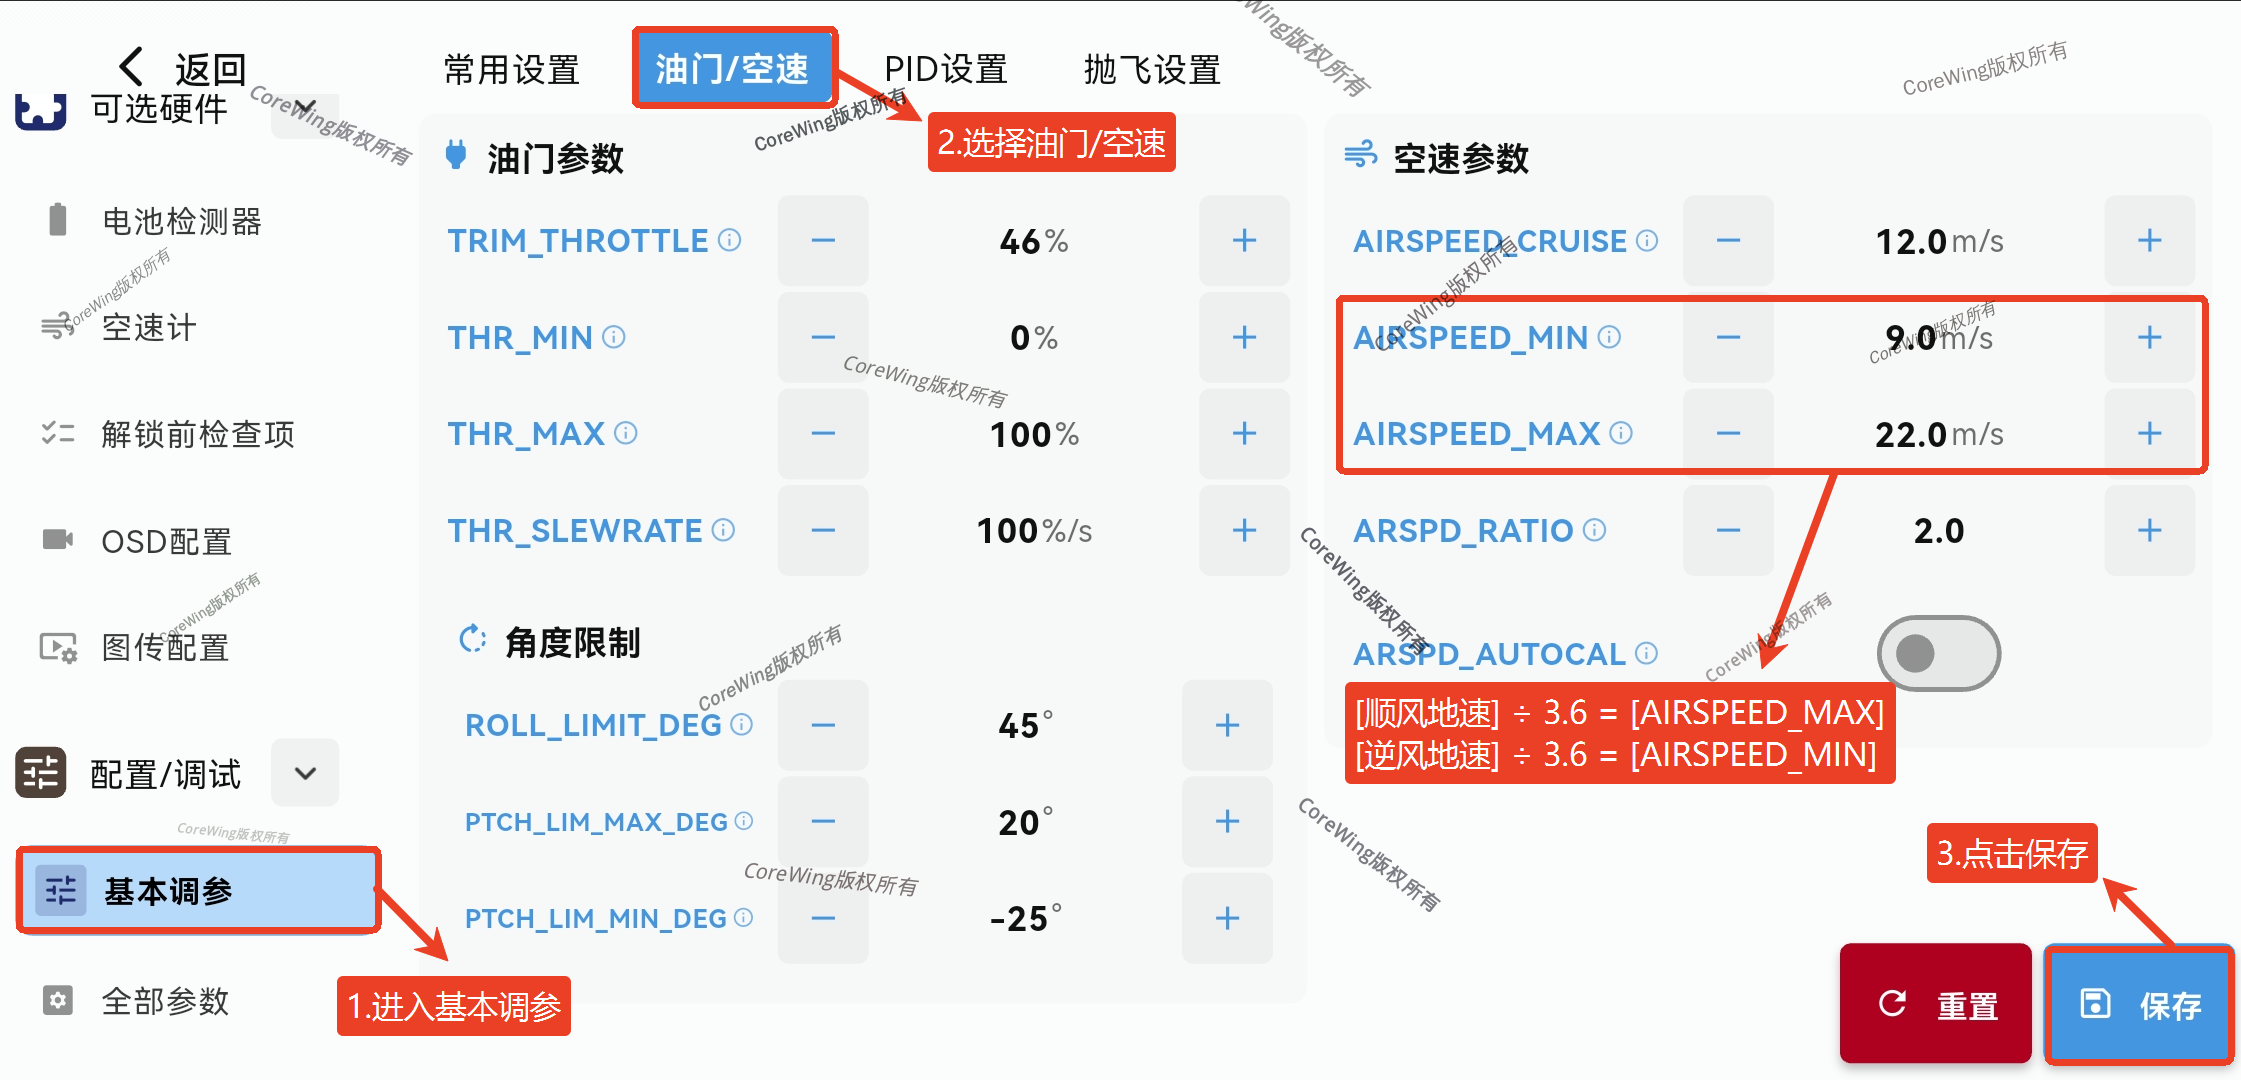
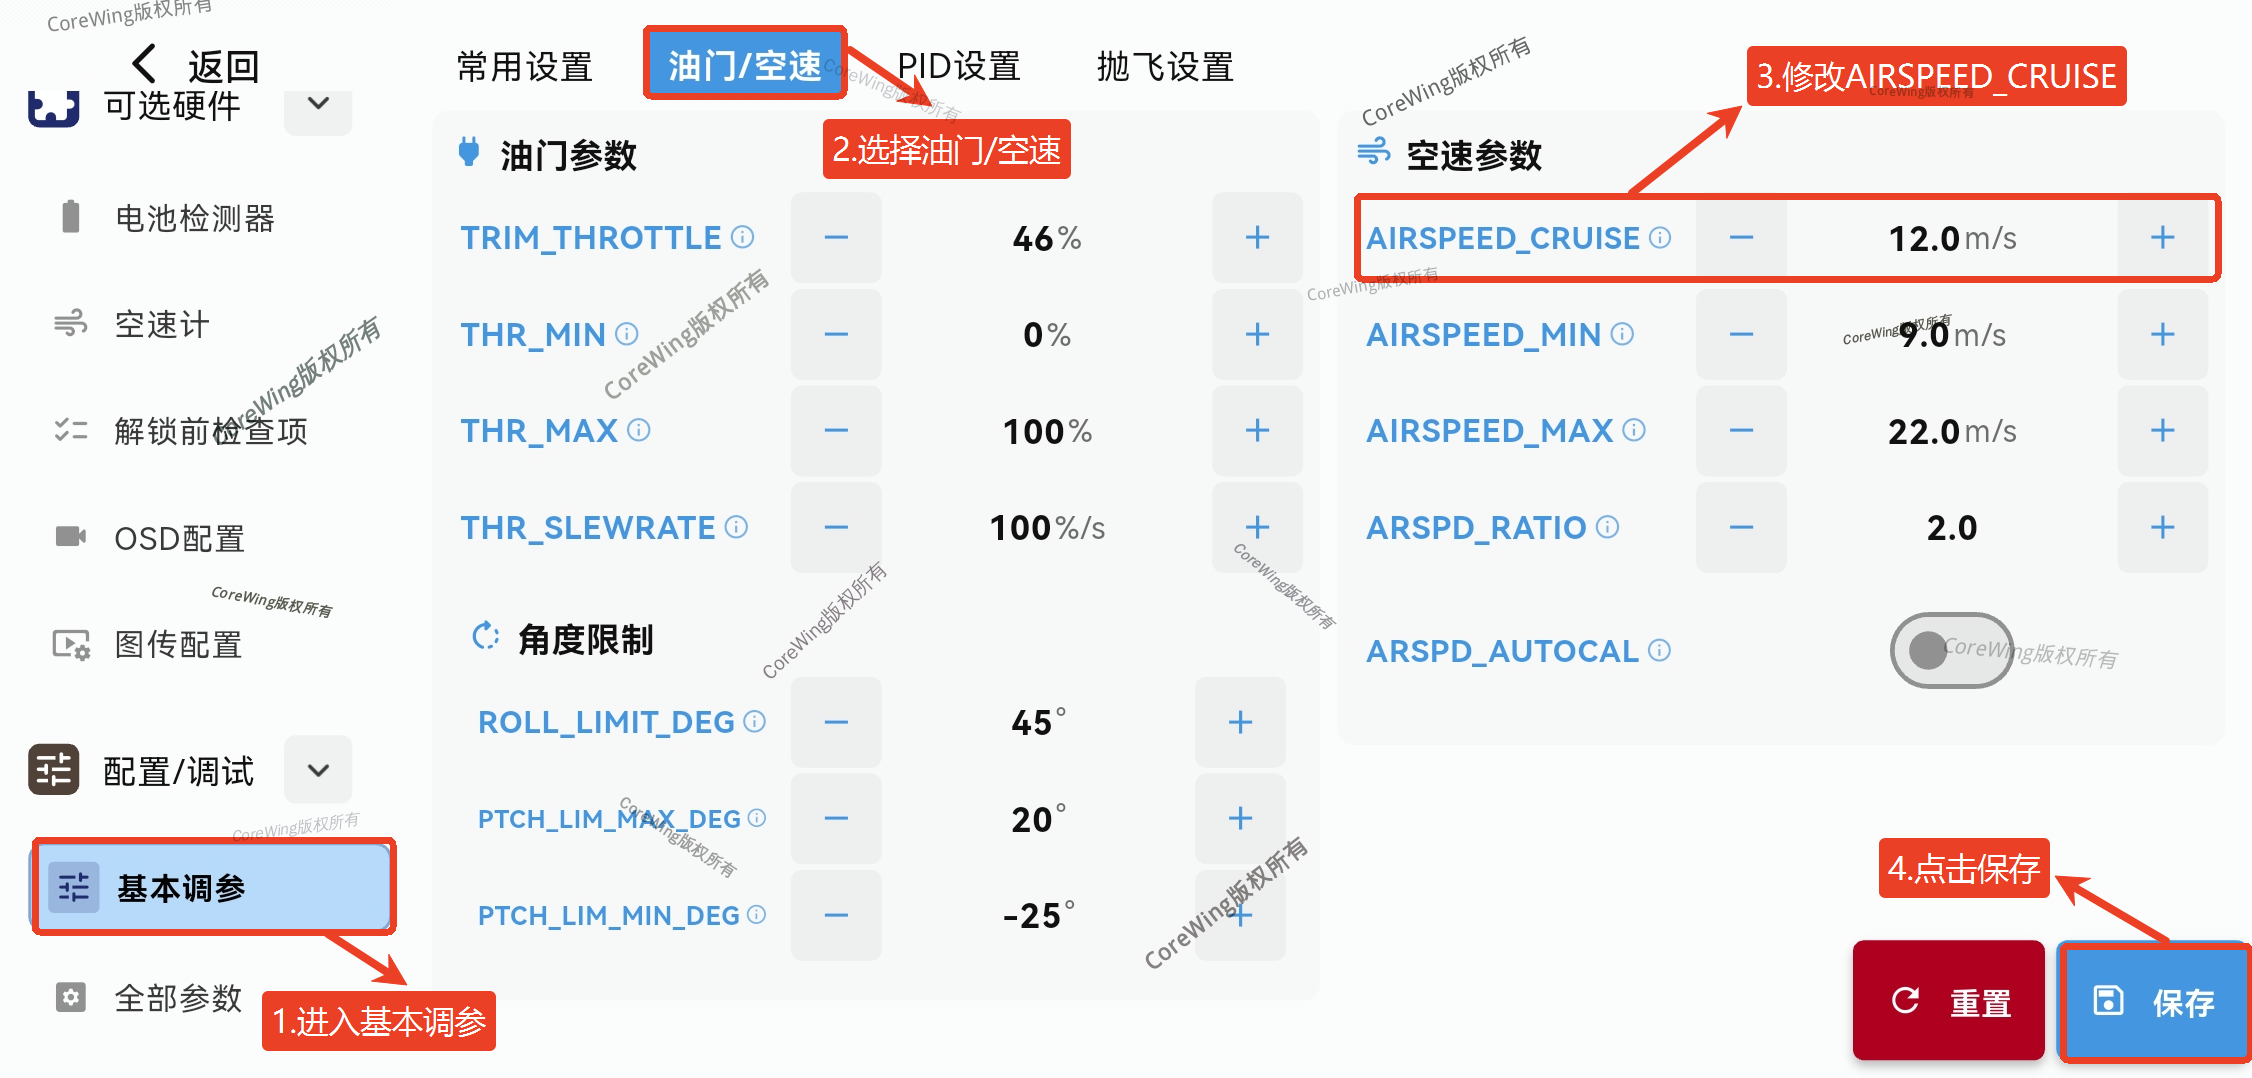
- [Cruise Speed] ÷ 3.6 =
[AIRSPEED_CRUISE], ensure[AIRSPEED_CRUISE]is slightly greater than[AIRSPEED_MIN], round the result and enter it inAIRSPEED_CRUISE.
7. Flight Data Check
- Observe data from Mission Planner or
OSDto confirm that GPS, heading, altitude, ground speed, voltage, current and other data are normal.
Important
If abnormal data is detected, land promptly and check the equipment!
8. Return-to-Home Function Test
- Switch the flight mode to
RTL Modeto test if the aircraft returns to circle near the takeoff/unlock point.
Important
If the flight attitude is abnormal in return-to-home mode, promptly switch to ACRO Mode or FBWA Mode and check the return-to-home parameter settings!
Technical Support QR Code
