
How to Configure Digital Protocol ESCs Using CoreWing APP ESC Configurator (AP Firmware)
I. Principle
The CoreWing APP ESC Configurator is a tool for configuring and tuning the parameters of Electronic Speed Controllers (ESC), especially suited for fixed-wing and multirotor aircraft. Through this application, you can fine-tune the ESC's operating modes and performance to suit different flight requirements. The ESC Configurator is typically used to set the ESC's direction, startup, braking, acceleration, and other parameters, thereby optimizing flight control.
II. Equipment Preparation
- Flight Controller: CoreWing F405 WING V2 / CoreWing F405 WING MINI V2 — either one is suitable for this tutorial.
- ESC: Supports AM32 / BLHeli_s / Bluejay protocol ESCs. Using the FlyingRC AM32 75A ESC V2.5 single ESC as an example.
- Battery: 3S–6S battery.
- Download the latest version of CoreWing APP.
Important
CoreWing APP Download Link: https://www.corewing.com/website/download
III. Specific Operations
- Confirm the motor and ESC soldering is complete, and the ESC power cable is connected to the flight controller.
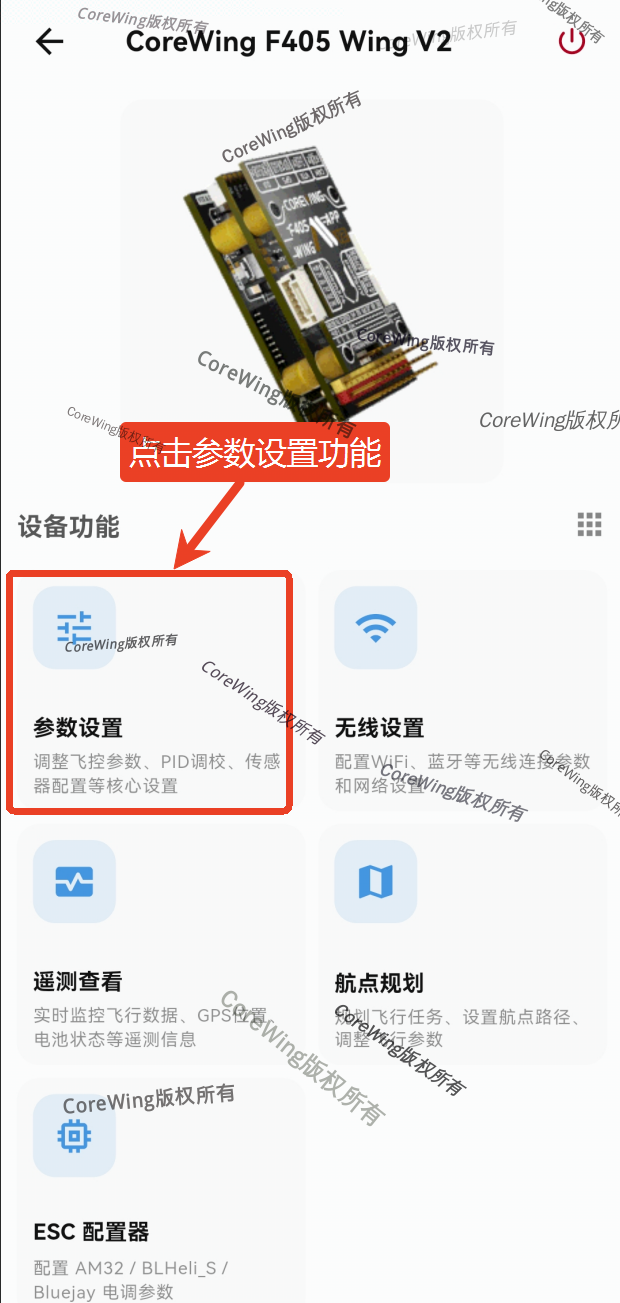
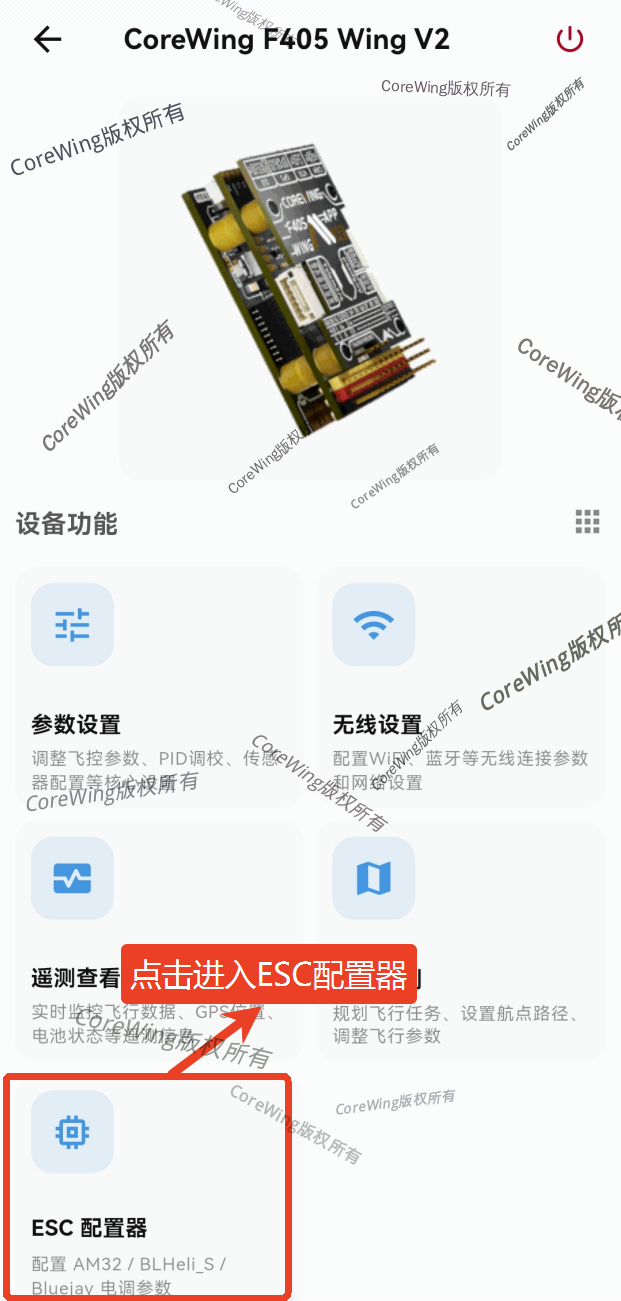
- Connect the flight controller to the CoreWing APP and click the Parameter Settings feature.
Important
For how to connect the flight controller to CoreWing APP, refer to: https://docs.corewing.com/plane/software/corewing-app/corewing-app-connect-fc.html
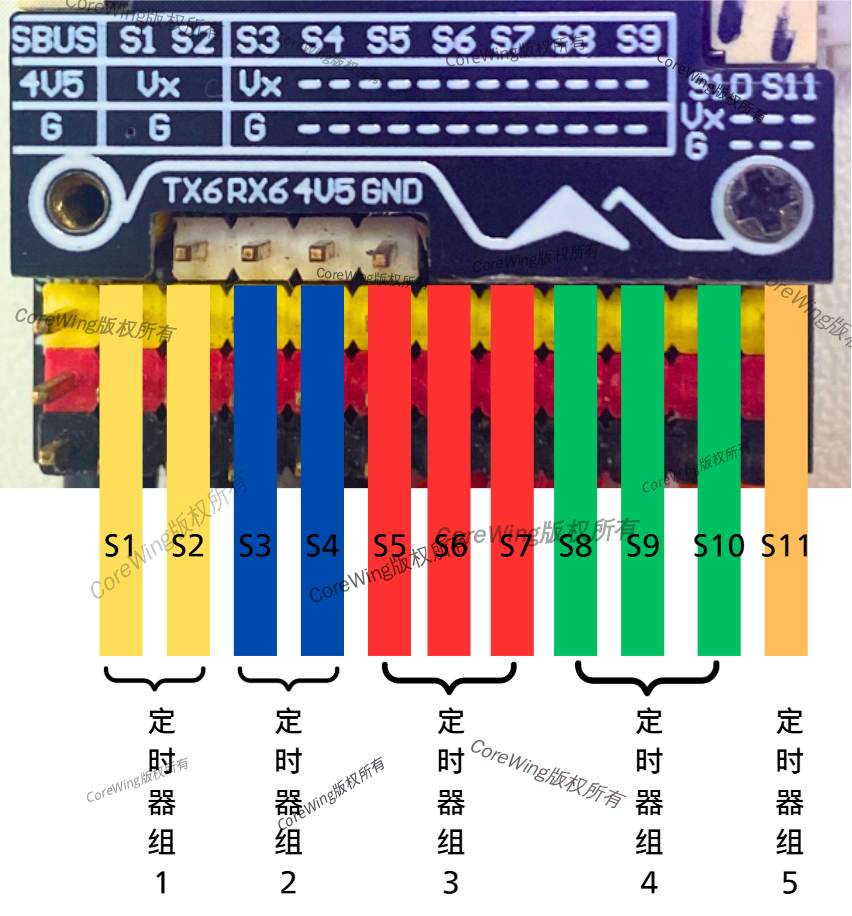
- Plug the ESC signal wire into the PWM output pins of the flight controller.
Important
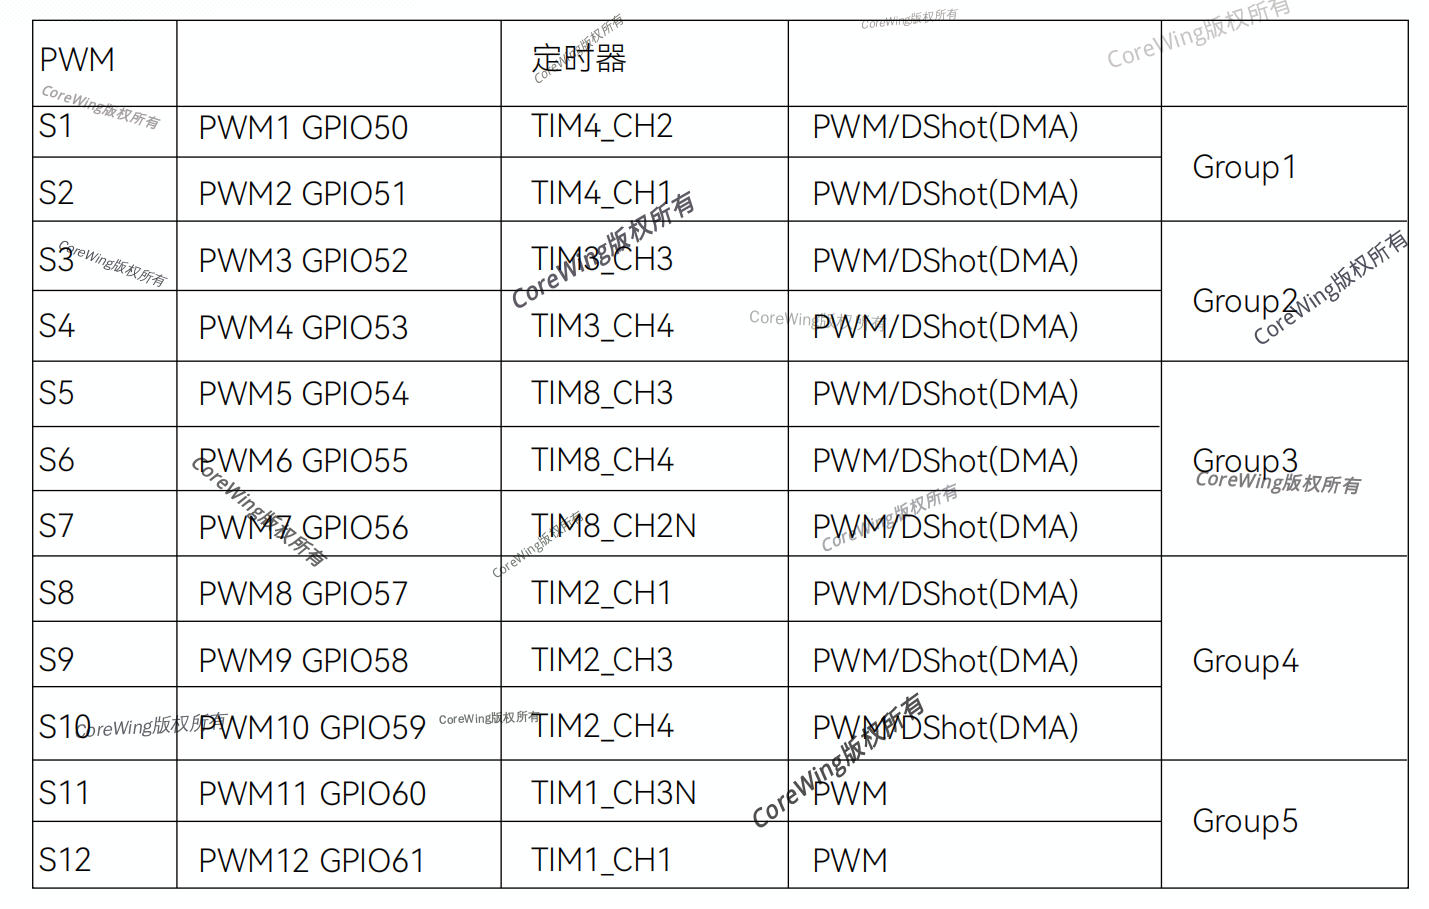
Note: Motors and servos cannot use the same timer group. Motor-type outputs need to be plugged into the same timer group; otherwise, it may cause stuttering in servos and motors.
Important
S1~S10 outputs support both DShot and PWM. However, within the same timer group, once Dshot is enabled on any channel, all channels in that group will have Dshot enabled. We provide a 2+2+3+3+2 grouping for convenient configuration of different aircraft types.
For example, in a single-motor fixed-wing, if S3 enables Dshot, S4 will also enable it; you cannot enable Dshot on a single channel alone.
For a dual-motor fixed-wing, set the motors on channels S3 and S4, enable Dshot, and the remaining servo channels use PWM protocol.
In a Y3 VTOL fixed-wing, set the three motors on channels S5, S6, and S7 to enable Dshot, and the remaining servo channels use PWM protocol.
In a 4+1 VTOL fixed-wing, set the motors on channels S5, S6, S7, S8, and S9 to enable Dshot, S10 will also enable DSHOT, and the remaining servo channels use PWM protocol.
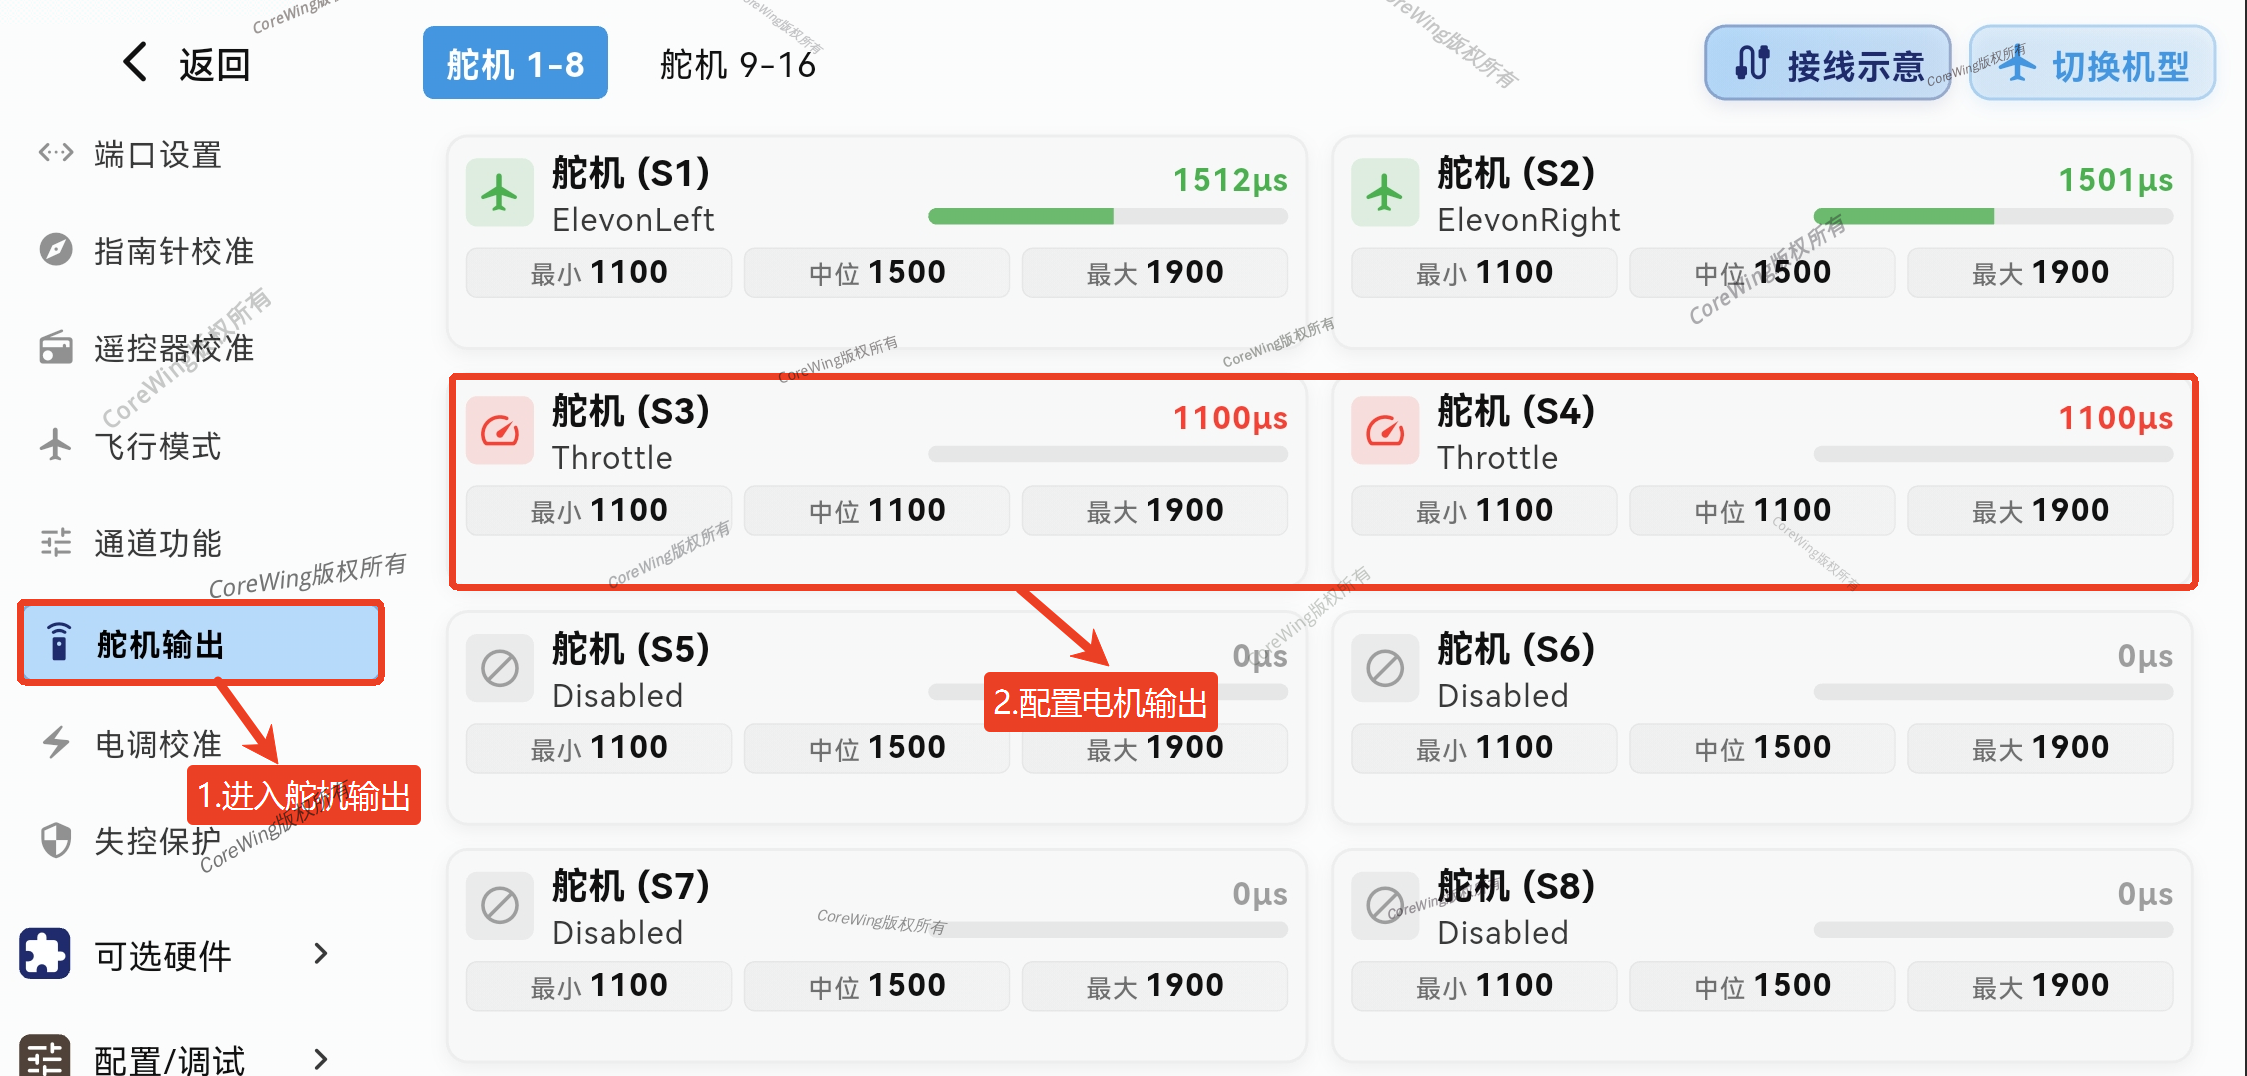
- Enter the tuning interface and configure the relevant settings.
According to the wiring of the motor output pins, configure the motor output channels
Important
AP advanced tuning requires entering the full parameter list; search and set the following parameters:
Search for the parameter
SERVO_BLH_AUTO, set it toEnable.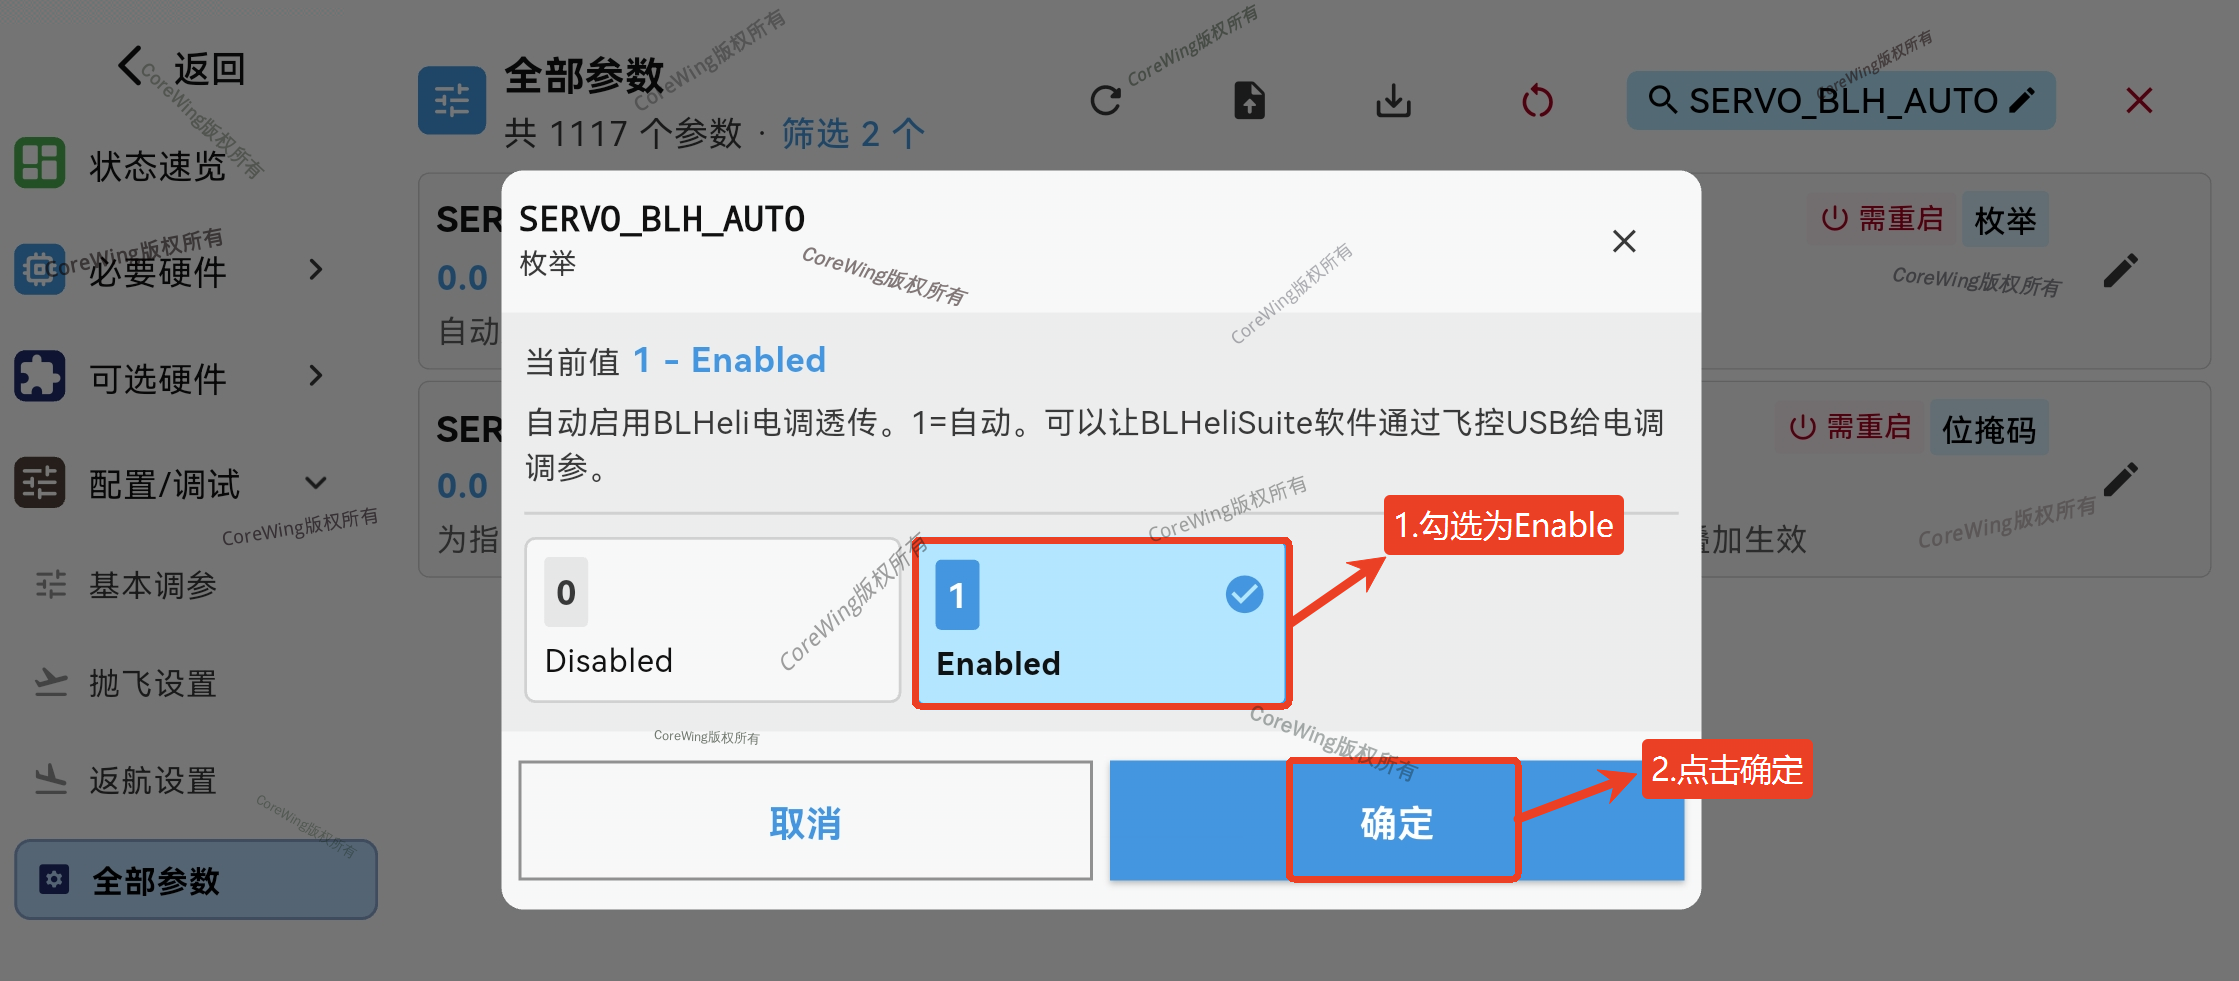
Search for the parameter
SERVO_BLH_MASK, check the corresponding motor output channels.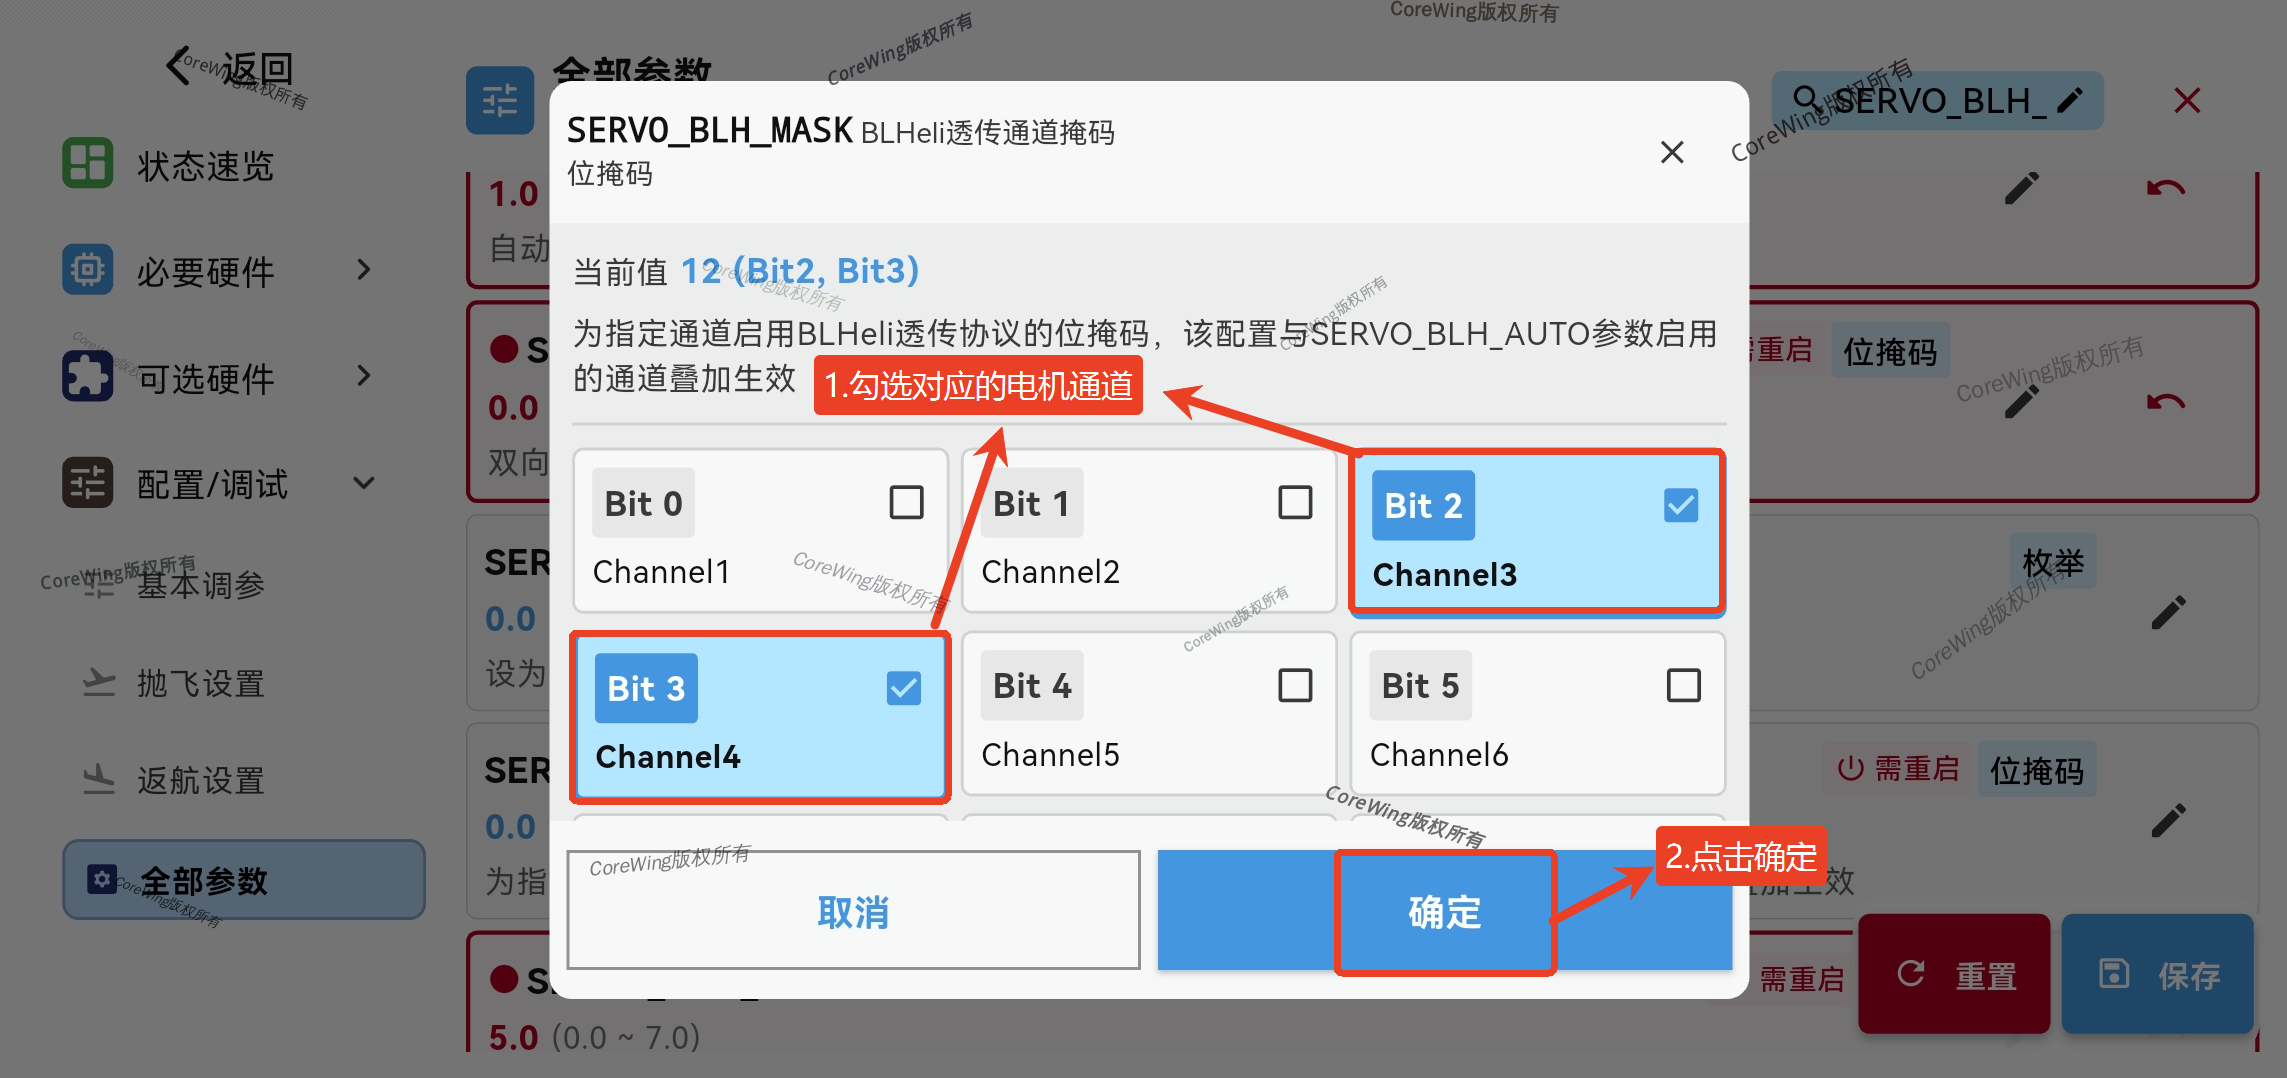
Important
As mentioned in the image above, the motor output channels are S3 and S4, so check Channel3 and Channel4.
Search for the parameter
SERVO_BLH_OTYPEand enable the DSHOT protocol.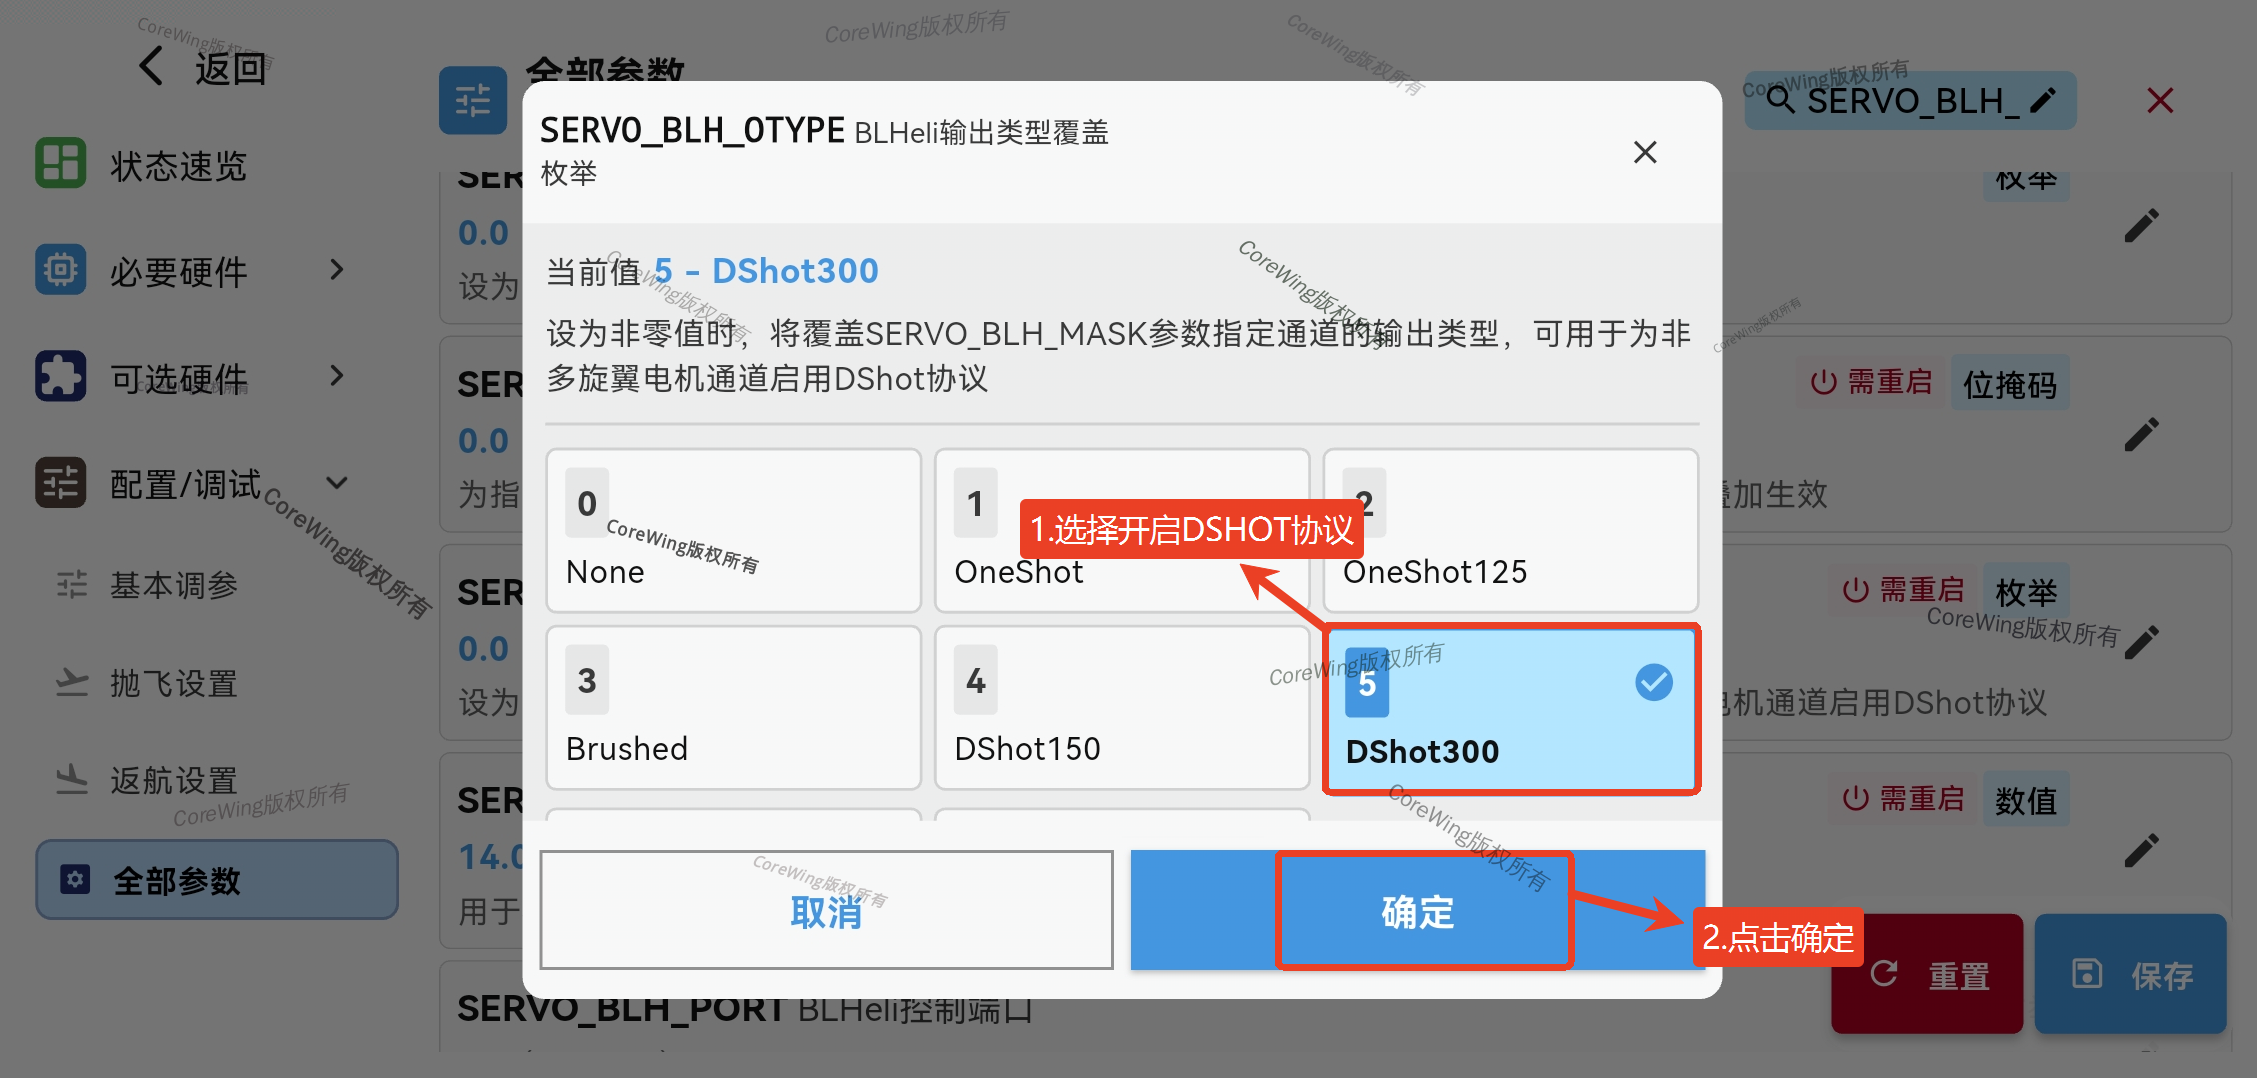
Important
When tuning 4+1 VTOL, Y3 VTOL, and similar airframes, you also need to search
Q_M_PWM_TYPEto enable the DSHOT protocol; otherwise, it will cause problems such as motors not spinning.Search for the parameter
SERVO_BLH_PORTand set it toMavlink Serial Channel1.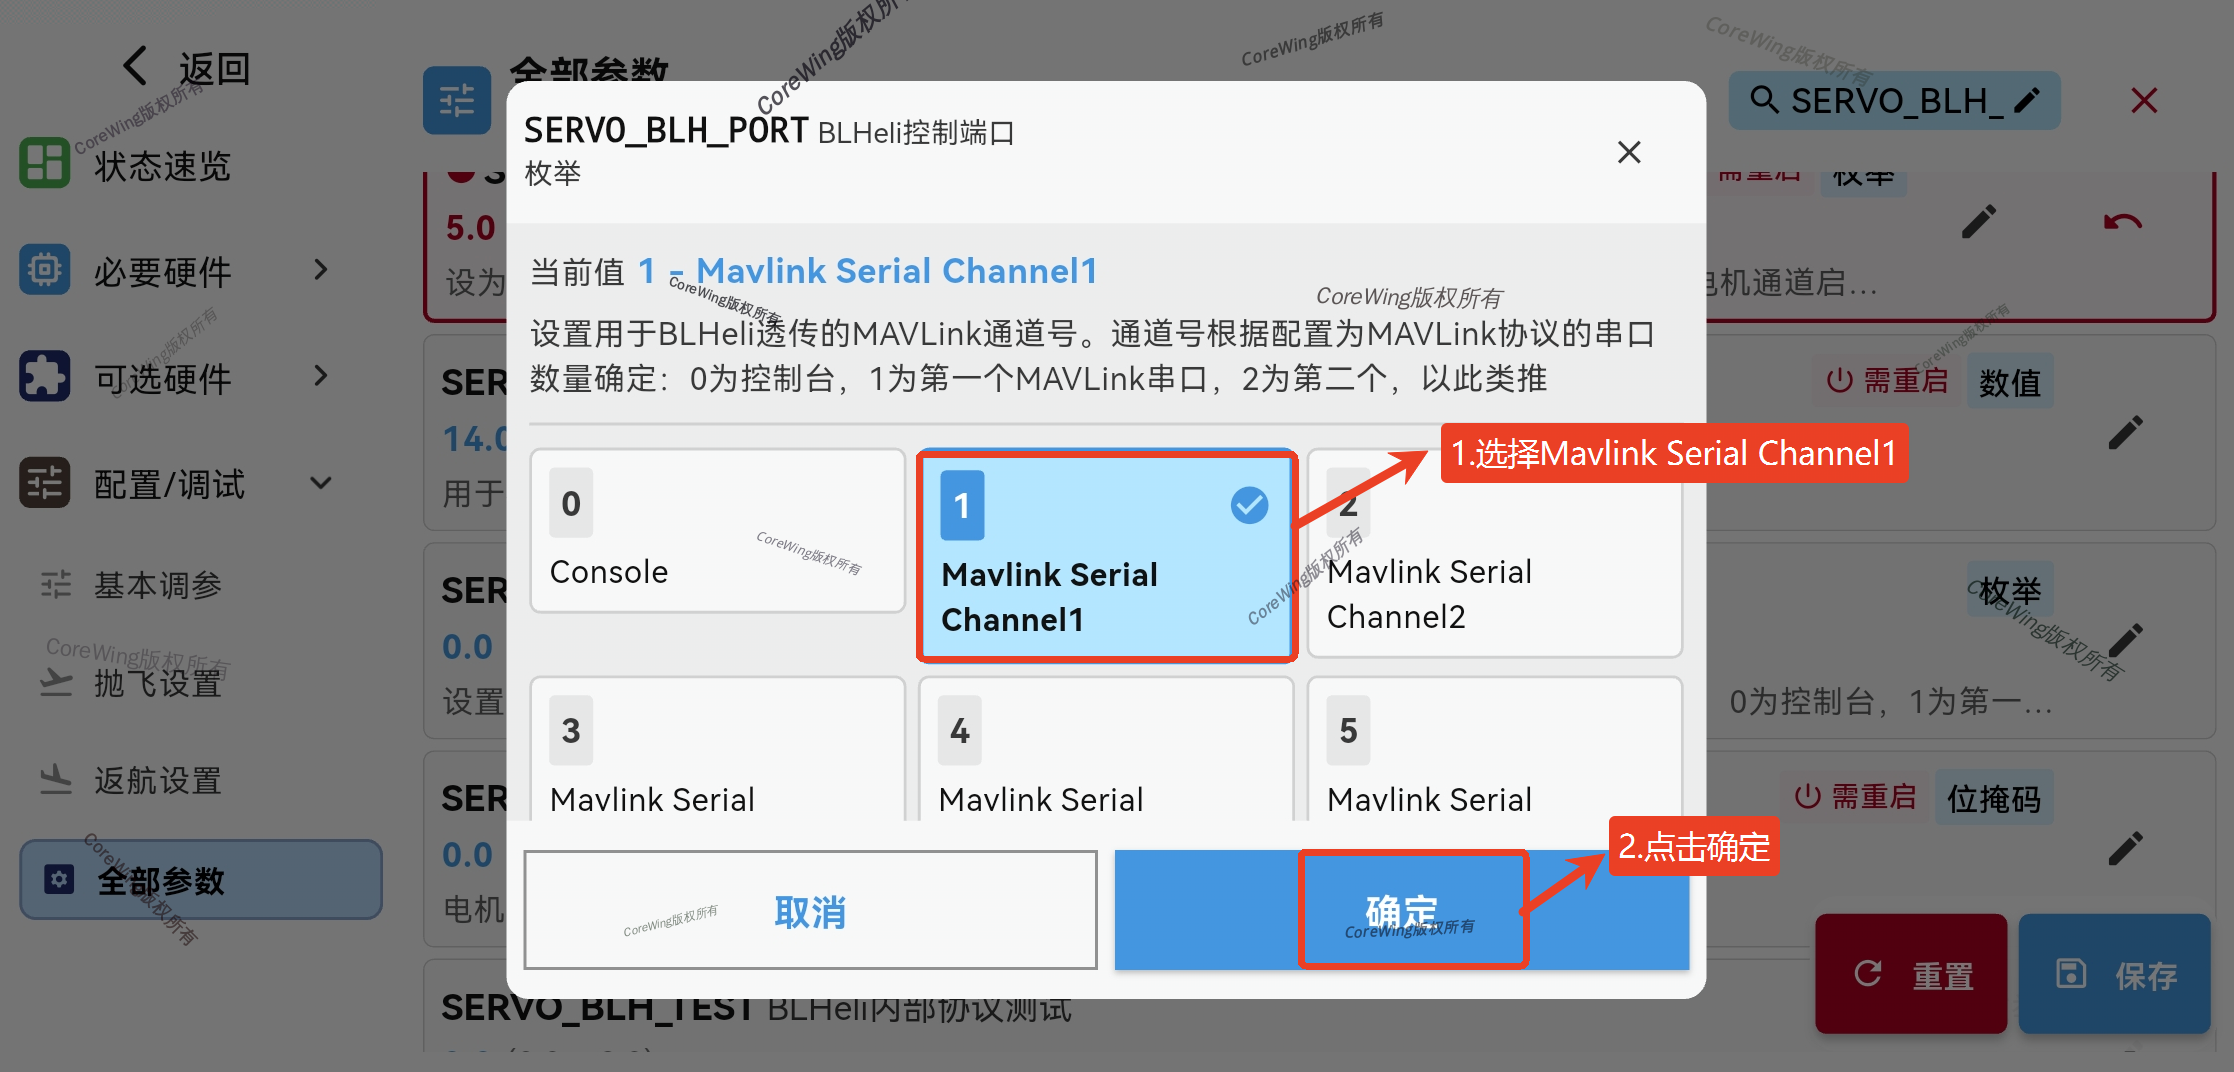
Important
Click Save after completing the settings!
Power the flight controller using a battery.
Exit Parameter Settings, click into ESC Configurator, the ESC settings will be auto-detected.
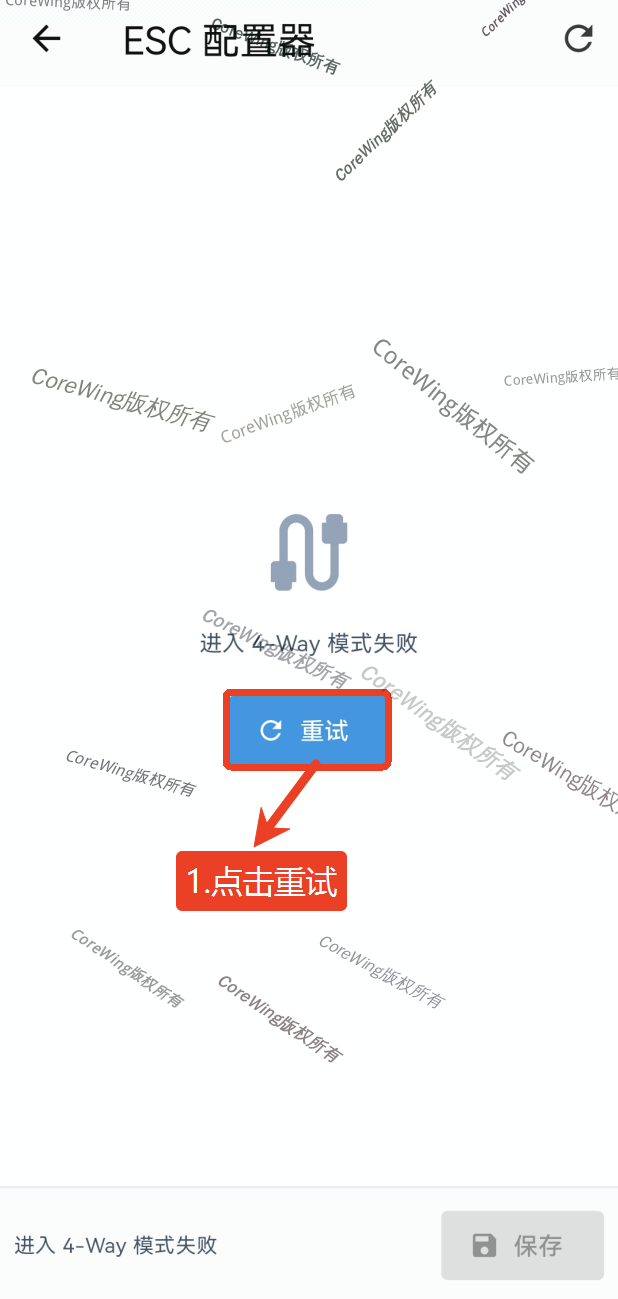
If the ESC settings are not detected, click Retry.
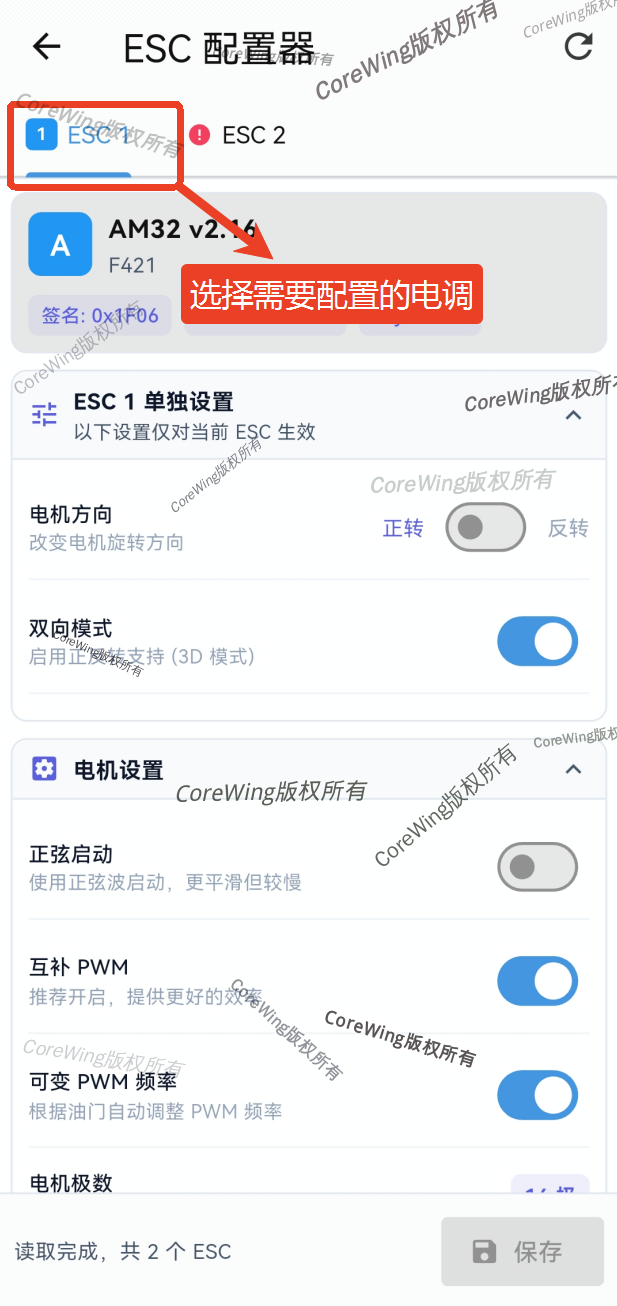
- Select the ESC you want to configure and configure the relevant ESC parameters.
Important
If an ESC is not read, as shown by ESC2 in the image above, check the following:
- Whether the ESC protocol is AM32 / BLHeli_s / Bluejay protocol.
- Whether the motor output channels with the Dshot protocol enabled are correct.
- Whether the ESC signal wire is properly plugged into the flight controller.
Important
Note: After completing the parameter settings, click Save and power cycle the flight controller.
1. ESC Individual Settings
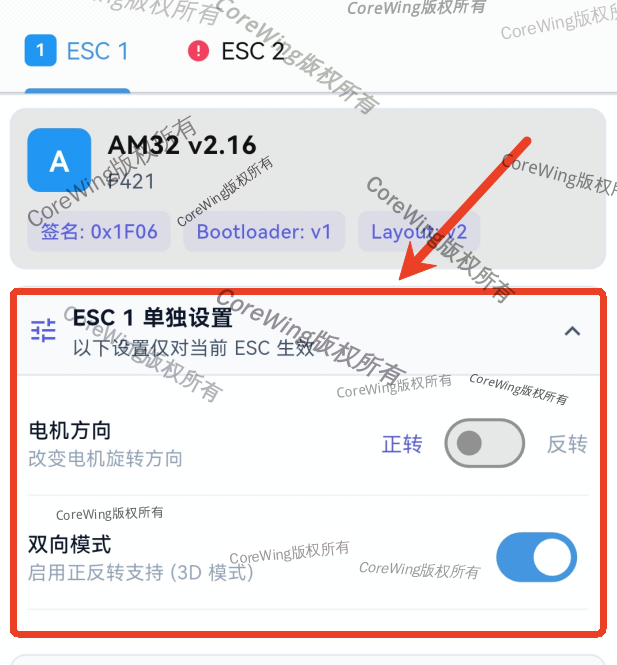
- Motor Direction: Check this option to change the motor rotation direction without changing the motor wire sequence.
- Application: Sometimes you need to change the motor's rotation direction, typically used in aircraft that require special maneuvers.
- Bidirectional Mode: Enables 3D mode — above the throttle midpoint the motor rotates forward, below the throttle midpoint the motor rotates in reverse.
- Application: For example, aircraft that need to reverse or perform reverse-direction control.
2. Motor Settings:
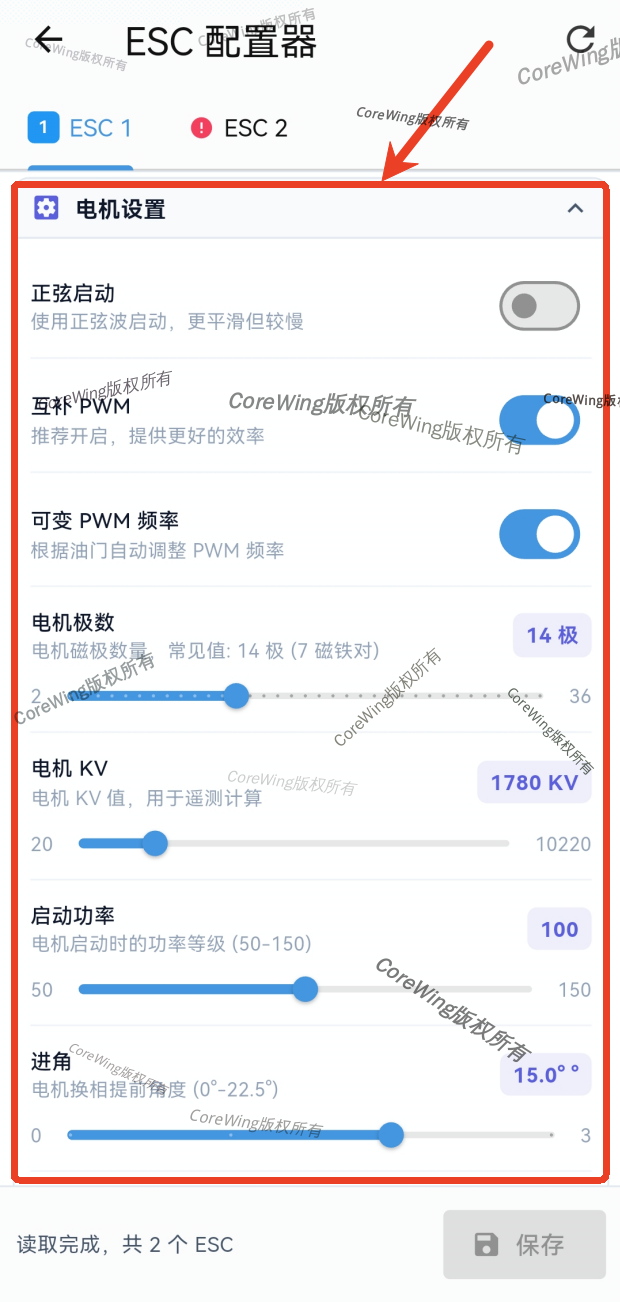
- Sine Startup: Uses a sine wave drive to smoothly start the motor, reducing startup shock.
- Application: Suitable for situations requiring smooth startup and reduced wear, especially in high-efficiency ESC systems.
- Complementary PWM: Under dual-rate control conditions, generally no special settings are needed; keep the default enabled.
- Application: Suitable for reducing interference during motor operation, improving ESC and motor efficiency, and maintaining stable motor operation.
- Variable PWM Frequency: Automatically adjusts the PWM frequency based on throttle, changing the efficiency of ESC operation.
- Application: Can automatically adjust motor frequency based on load changes. Lowering the frequency improves motor efficiency and reduces losses; raising the frequency makes the motor respond more sensitively.
- Motor Poles: The motor's number of magnetic poles determines the motor's speed characteristics. Generally, keep the default of 14 poles.
- Application: Generally, the higher the motor's pole count, the lower the motor's speed, but the greater the output torque. The ESC can adjust the motor's behavior based on the pole count.
- Motor KV Value: Set to the KV value closest to the actual motor KV value.
- Application: KV value represents the motor's speed constant, i.e., the motor's RPM per volt of voltage. The higher the motor's KV value, the higher the motor's speed, but the greater the power demand.
Important
Note: AM32 ESCs need to be set to the motor KV value closest to the actual application; otherwise, it may cause the ESC to fail to work and the motor to not spin!
- Application: KV value represents the motor's speed constant, i.e., the motor's RPM per volt of voltage. The higher the motor's KV value, the higher the motor's speed, but the greater the power demand.
- Startup Power: Startup power settings control the motor's power output during startup. Increasing startup power allows the motor to start faster, but it also increases the battery's load.
- Application: Typically, the ESC adjusts the startup power based on battery voltage and battery type.
- Advance Timing: In the vast majority of cases, it is recommended to keep the default 15° advance timing; only consider adjusting it when using special motors.
- Application: Higher advance timing means higher motor speed and greater thrust, but it increases power consumption and the risk of motor burnout. Conversely, lower advance timing means lower power output but is more power-efficient.
3. Protocol Settings
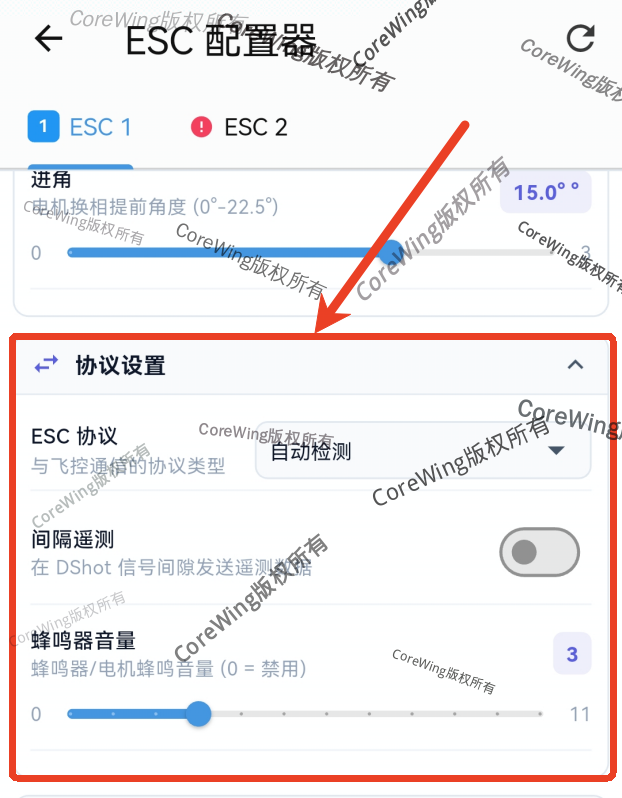
- ESC Protocol: Choose the ESC protocol according to your needs; the default is auto-detect.
- Bidirectional Dshot: When the DSHOT protocol is enabled, telemetry data can be sent in signal gaps.
- Buzzer Volume: Adjusts the volume of the ESC buzzer.
4. Protection Settings
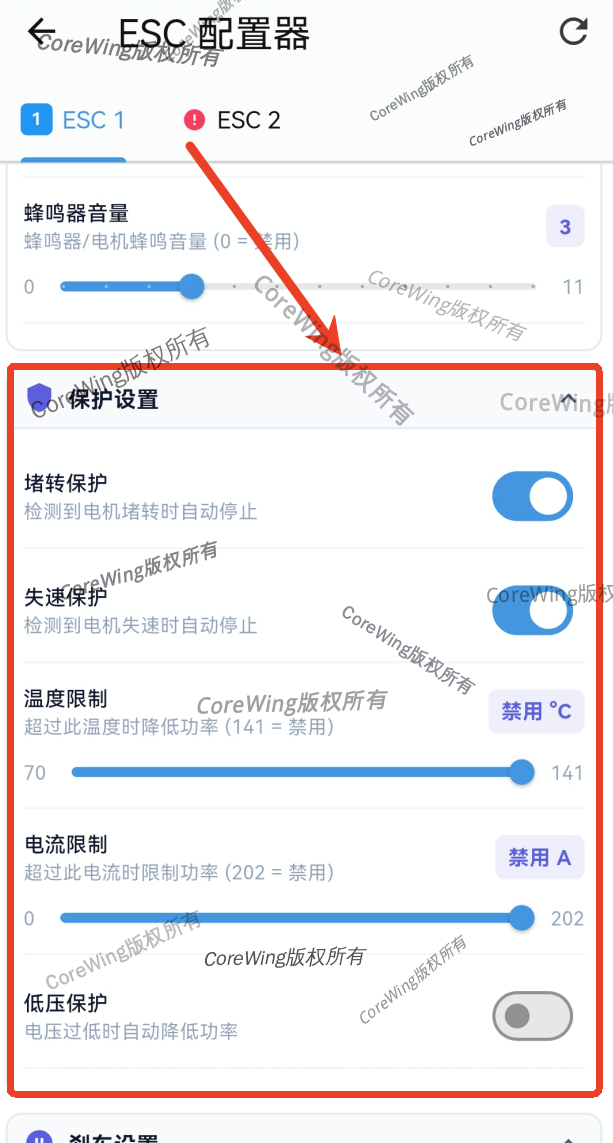
- Stall Protection: When the motor stalls, the ESC stops output to prevent motor damage.
- Application: Protects the motor from damage caused by seizing or malfunctioning.
- Stall Prevention: Prevents the motor from stalling under high load and promptly reduces speed.
- Application: Prevents motor stalling caused by excessive load, increasing aircraft safety.
- Temperature Limit: Sets temperature protection for the ESC. When the ESC exceeds the set temperature, it automatically reduces power to prevent overheating damage.
- Application: This setting helps protect the ESC, especially under high load or high-temperature environments. Setting it to 141°C disables this feature.
- Current Limit: Sets the maximum current limit. When the current exceeds the set value, power is limited to prevent damage to the ESC or motor.
- Application: This setting helps protect the ESC and motor. Setting it to 202A disables this feature.
- Low Voltage Protection: Automatically reduces ESC power when voltage is too low.
- Application: Recommended to keep disabled unless you have special requirements; otherwise, it may cause crashes.
4. Brake Settings
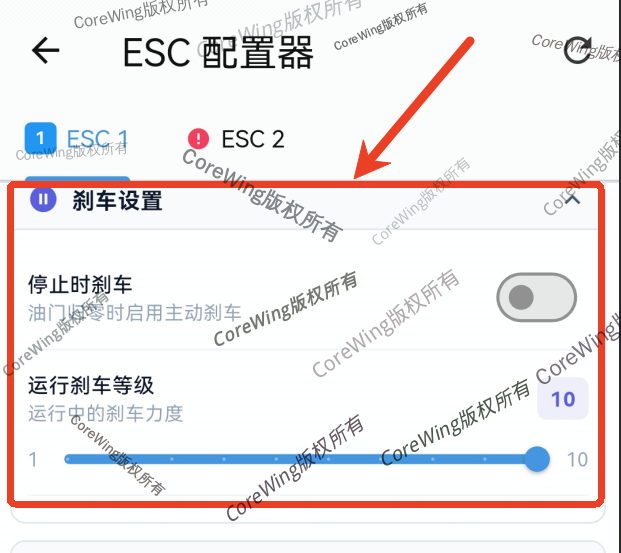
- Stop Brake: Enables active braking when the throttle returns to zero.
- Application: Makes the motor respond more sensitively when stopping, preventing the motor from continuing to rotate due to inertia.
- Running Brake Level: This setting controls the brake force when the motor stops. When stopping, the ESC performs braking to bring the motor to a quick stop.
5. PWM Servo Settings:
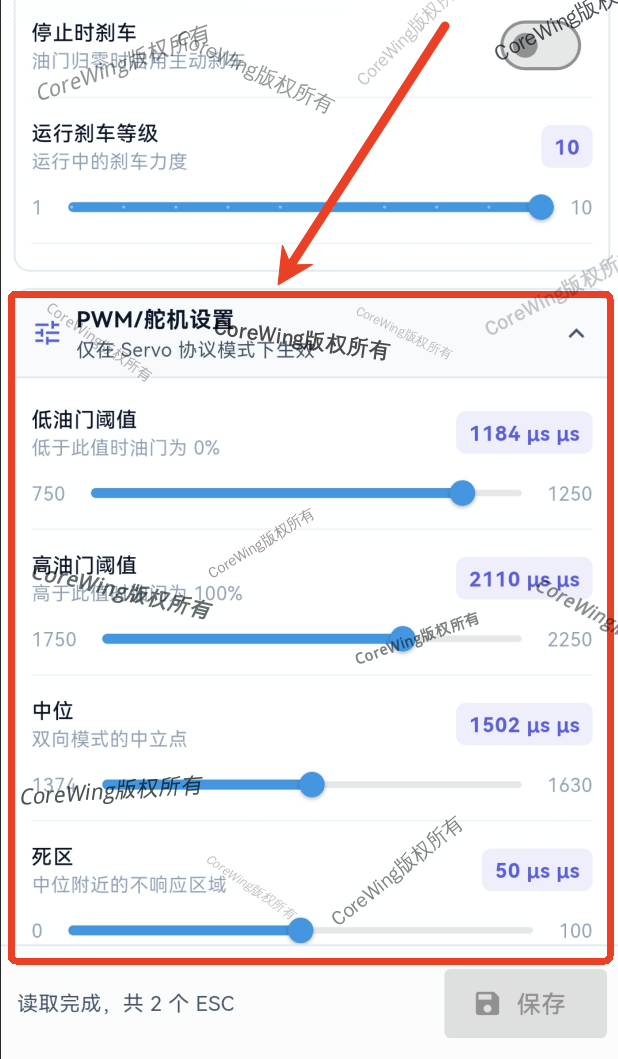
Important
This setting only takes effect in PWM protocol mode!
- Low Throttle Threshold: Sets the lower limit of the throttle. When the throttle signal is below this value, the throttle signal output is 0%.
- Application: The response of the ESC system will be limited; typically used to prevent signals that are too low from causing the ESC to not respond.
- High Throttle Threshold: Sets the upper limit of the throttle. When the throttle signal exceeds this value, the throttle signal output is 100%.
- Application: Prevents the throttle signal from being too high, preventing the ESC from operating outside the safe range, and protecting the ESC and motor.
- Center: Sets the midpoint of the throttle signal.
- Application: Typically used to set the throttle signal midpoint in bidirectional mode (3D mode).
- Deadband: Sets the range within which the throttle signal fluctuations do not produce a response from the ESC.
- Application: If a deadband is set, the motor will not act within this range. This helps avoid unnecessary motor actions caused by minor input changes.
6. Advanced Settings:
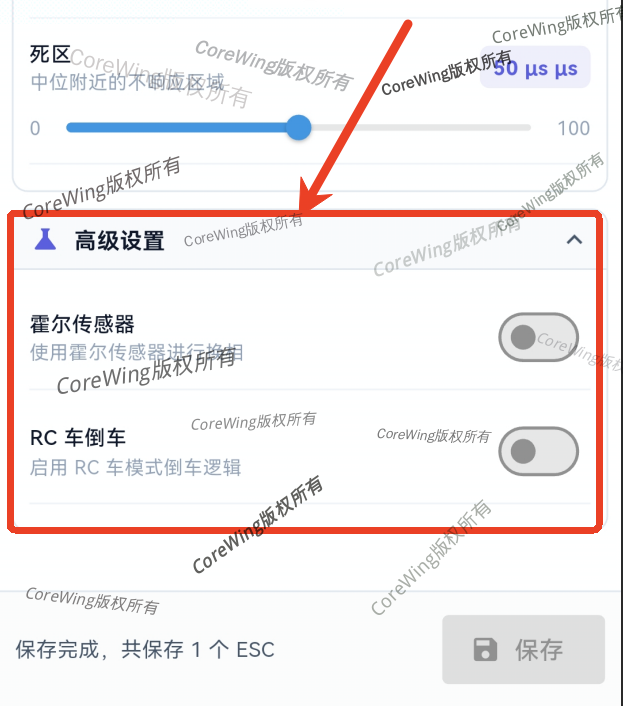
- Hall Sensor: By sensing changes in the magnetic field inside the motor, it provides the ESC with information about the rotor position. This allows the motor to start more smoothly and avoids skipping or vibration.
- Application: Recommended for brushless motors with Hall sensors. Keep disabled unless you have special requirements.
- RC Reverse Mode: Enabling this mode allows the drone to reverse smoothly while moving forward.
- Application: For RC cars or autonomous vehicles, reversing in complex or tight spaces is a common requirement. Keep disabled unless you have special requirements.
IV. Q&A
Technical Support QR Code
