
Resolving Abnormal Servo Motor Behavior
I. Symptoms
When using a flight controller with ArduPilot firmware connected to servos, the following abnormal phenomena may occur:
Symptom 1: Servo has no obvious response and cannot work properly
Symptom 2: Servo continuously shakes or makes abnormal noises
Symptom 3: Servo movement is slow or jerky
Symptom 4: Aircraft is stationary, control surfaces continue to change, control surface angle keeps increasing
Symptom 5: Servo intermittent twitching (occurs when connecting peripherals like telemetry)
Symptom 6: Servo abnormally heats up or severely shakes (possibly connected to a motor port with Dshot enabled)
Normal Phenomenon Explanation
When servo output is properly configured, except in pure manual mode (such as Manual), in other flight modes (such as FBWA, Stabilize, RTL modes), the servo output port will output signals to correct the aircraft's attitude. At this time, slight shaking of the servo is a normal phenomenon and does not require handling.
II. Cause Analysis
For the above abnormal phenomena, possible causes are analyzed as follows:
Symptom 1: Servo has no obvious response and cannot work properly
| Possible Cause | Description |
|---|---|
| Wiring Error | Servo port connected incorrectly (connected to SBUS port instead of S1 port) or poor contact |
| Insufficient Power | Flight controller power supply abnormal, no 5V output on servo pin header |
| Firmware Setting Error | Servo output not enabled or channel configuration error in SERVO_OUTPUT |
| Servo Hardware Failure | Servo itself damaged or internal circuit failure |
Symptom 2: Servo continuously shakes or makes abnormal noises
| Possible Cause | Description |
|---|---|
| Peripheral Interference | Other peripherals or soldering residues (flux, conformal coating) causing signal interference |
| Brand Compatibility Issues | Certain brands (such as Kingmax) servos have compatibility issues with the flight controller |
| Power Supply Conflict | ESC BEC connected to the flight controller causing power supply conflict, leading to voltage instability |
Symptom 3: Servo movement is slow or jerky
| Possible Cause | Description |
|---|---|
| Insufficient Power | Low voltage causes insufficient servo torque |
| Mechanical Installation Issues | Control surface mechanical jam or excessive resistance |
Symptom 4: Aircraft is stationary, control surfaces continue to change, control surface angle keeps increasing
| Possible Cause | Description |
|---|---|
| Flight Controller Installation Angle Deviation | Flight controller installation has angle deviation, in self-stabilization mode the PID I value continuously accumulates, causing control surface output to continuously increase |
| Servo Neutral/Travel Setting Error | Minimum/maximum/neutral values in servo output are set incorrectly, causing control surfaces to continuously deflect to one end |
| Incorrect Flight Mode | Currently in self-stabilization mode (such as FBWA/Stabilize) instead of manual mode, flight controller is outputting correction signals |
| Transmitter Input/Trim | Transmitter stick has input or trim settings offset from center position |
Symptom 5: Servo intermittent twitching (occurs when connecting peripherals like telemetry)
| Possible Cause | Description |
|---|---|
| Telemetry Interference | Telemetry module generates electromagnetic interference during operation, affecting servo signals |
| Improper Telemetry Installation | Telemetry is too close to servo or servo cable, interference coupled to signal cable |
| Power Fluctuation | Telemetry operation causes power supply voltage fluctuations, affecting servo operation |
| Poor Signal Shielding | Servo signal cable not using shielded wire, susceptible to external electromagnetic interference |
Symptom 6: Servo abnormally heats up or severely shakes (possibly connected to a motor port with Dshot enabled)
| Possible Cause | Description |
|---|---|
| Wrong Dshot Port | Servo mistakenly connected to motor output port configured for Dshot protocol, frequency mismatch |
| Protocol Frequency Mismatch | Servo working frequency (50-333Hz) differs greatly from Dshot frequency (9-37kHz), by dozens of times, causing abnormal servo behavior |
Frequency Comparison
| Device/Protocol | Working Frequency |
|---|---|
| Analog Servo | 50Hz |
| Digital Servo | 250-333Hz (up to 400-500Hz max) |
| DShot150 | ~9.375 kHz |
| DShot300 | ~18.75 kHz |
| DShot600 | ~37.5 kHz |
Dshot frequency is 30-750 times the servo frequency, which may cause abnormal heating, shaking or even burning of the servo!
III. Hardware Inspection
3.1 Servo Self-Inspection
Brand Compatibility
If using Kingmax brand servos, it is recommended to try replacing with other brands (such as EMAX, PTK, GDW, etc.) to rule out brand compatibility issues.
Servo Tester Verification:
Using a servo tester can quickly confirm if the servo itself is functioning properly:
| Step | Operation |
|---|---|
| 1 | Connect the servo to the servo tester |
| 2 | Operate the tester and observe the servo response |
| 3 | If the servo still has no response or behaves abnormally, it indicates a fault with the servo itself and needs to be replaced |
Receiver Testing Method (when no servo tester is available):
If no servo tester is available, you can test using a receiver that supports PWM output:
| Step | Operation |
|---|---|
| 1 | Ensure the receiver has been successfully paired with the RC transmitter |
| 2 | Connect the servo directly to the PWM channel output of the receiver |
| 3 | Operate the corresponding channel on the RC transmitter and observe if the servo responds normally |
| 4 | If the servo still has no response or behaves abnormally, it indicates a fault with the servo itself and needs to be replaced |
Troubleshooting Order
It is recommended to prioritize using the above methods to verify if the servo is functioning properly before continuing to troubleshoot other possible causes such as the flight controller, wiring, firmware, etc.
3.2 Power Supply and Connection Inspection
ESC Power Supply Check:
- Check if the ESC red wire has been removed (to avoid conflicts with flight controller BEC power supply)
- Confirm that the flight controller power supply voltage is stable. It is recommended to use a multimeter for measurement. If the servo voltage jumper has not been modified, the default output is around 5V
Servo Wiring Check:
- Confirm correct servo wiring: On the CoreWing F405 WING V2 flight controller, the default port from left to right is the SBUS port, the second port is the S1 port
- Confirm that the servo is connected to the servo output interface
- If using servo extension cables, check if the connections are secure to avoid loose connections
Flight Controller Installation Check:
- Confirm that the flight controller is installed level (to avoid abnormalities caused by mechanical installation)
- Check if the flight controller is securely mounted and not prone to shaking
3.3 Peripheral Interference Troubleshooting
Soldering Residue Handling
Confirm whether flux or conformal coating has been used. If there is residue, it needs to be cleaned with board cleaner or alcohol from the pin headers and flight controller interfaces to prevent signal interference
Excluding Other Device Interference:
- Remove other peripherals except the servos (such as telemetry, which might cause servo twitching), keeping only the servos
- Check if the servo output is normal
IV. Receiver and Transmitter Inspection
Frequency Pairing Check:
- Confirm that the RC transmitter has completed frequency pairing with the receiver
- Check if the receiver indicator light is constantly on (indicating successful pairing)
Channel Mapping Check:
- Confirm that the receiver channel mapping is correct
- Avoid channel correspondence errors that cause abnormal servo signals
V. Firmware and Settings Inspection
5.1 Firmware Version Confirmation
- Confirm that the flashed firmware version is correct (ArduPilot 4.5.7 version is recommended)
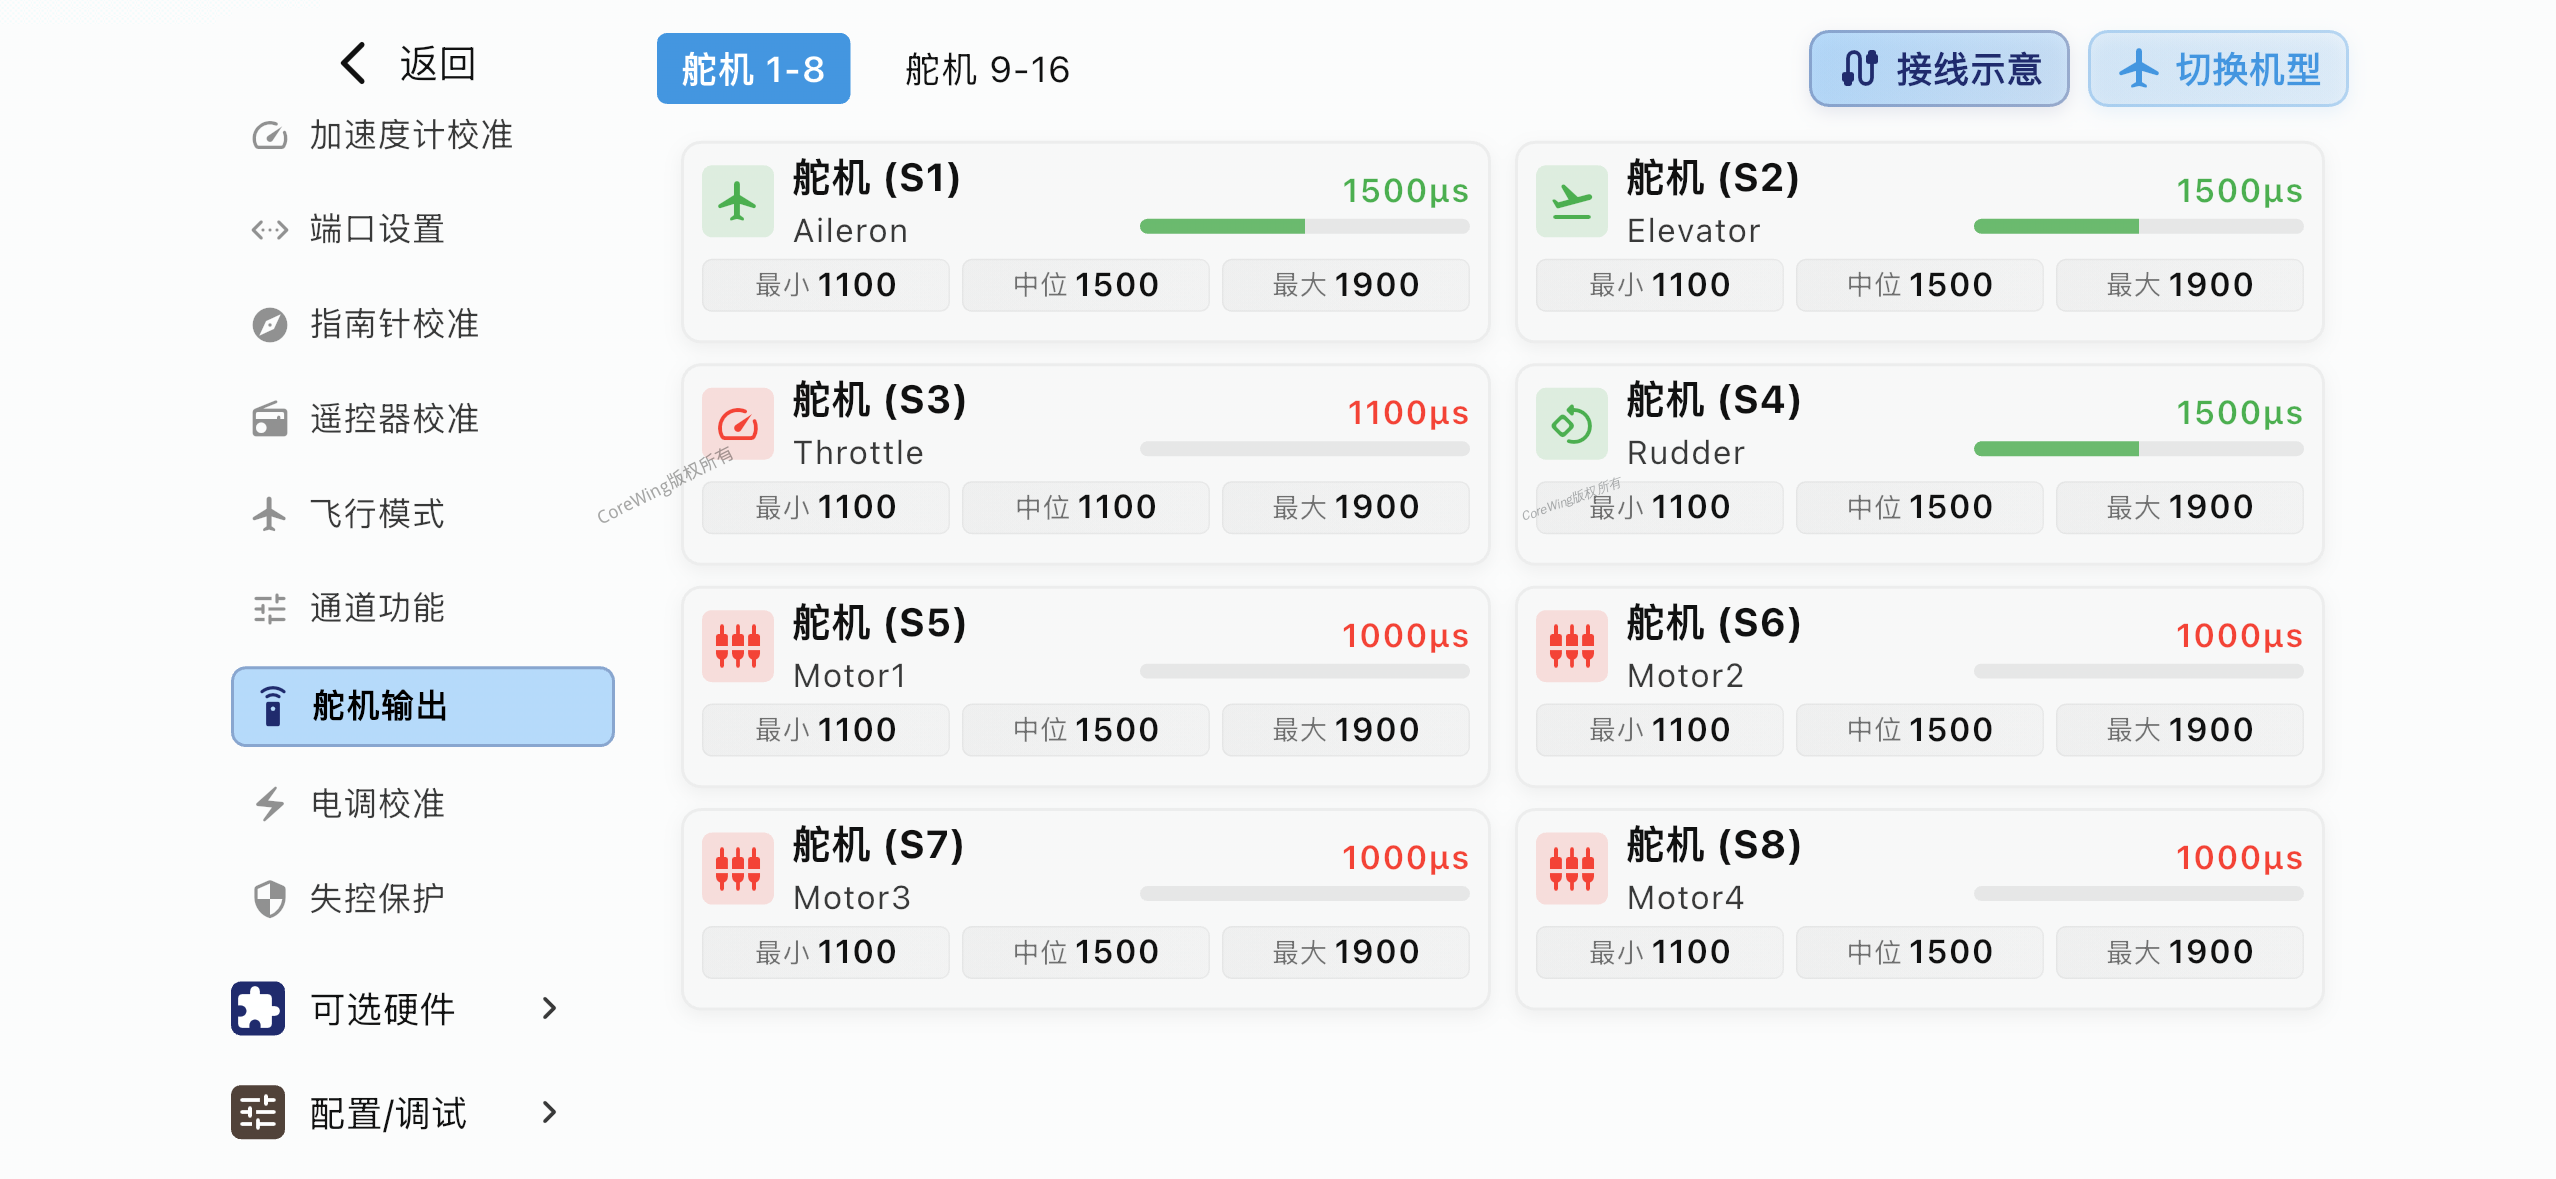
5.2 Servo Output Page Settings
Check in the Ground Control Station:
| Step | Operation |
|---|---|
| 1 | Connect the flight controller to CoreWing APP |
| 3 | Find the Servo Output page |
| 4 | Confirm that motor and servo output mixing has been configured |
| 5 | Check if the minimum/maximum/neutral values for the corresponding channel are correct |
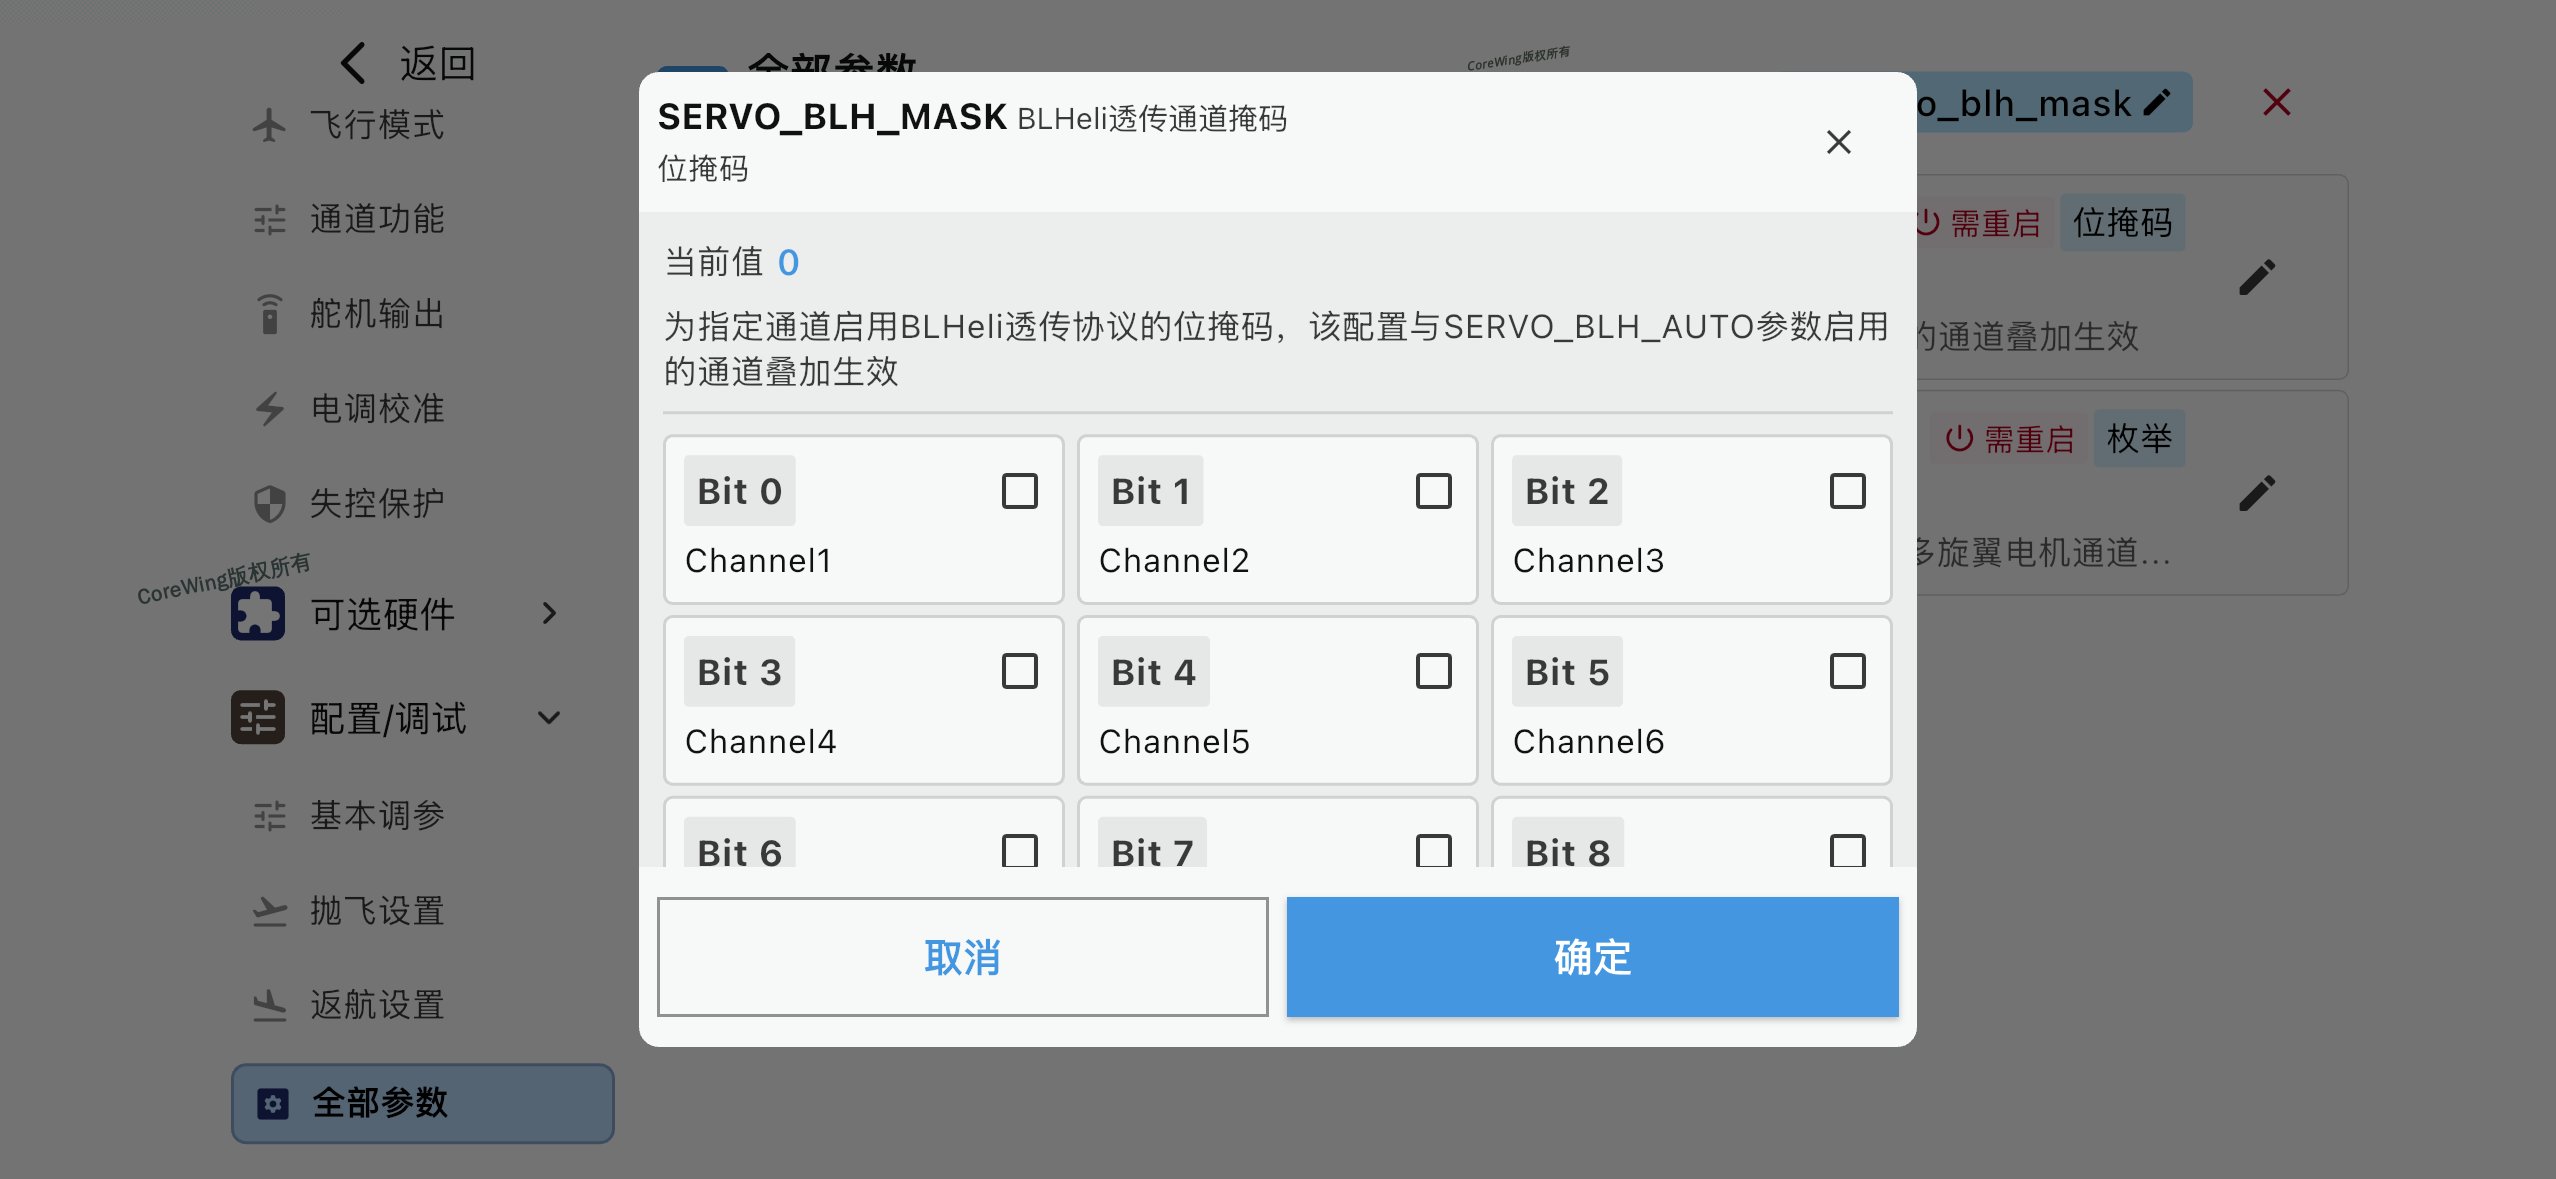
| 6 | Check the SERVO_BLH_MASK parameter to confirm that the servo output channel is not configured for Dshot |
| 7 | Confirm that the servo is not mistakenly plugged into a motor output channel |
Important Reminder
Check the SERVO_BLH_MASK parameter. This parameter is used to configure which channels use the Dshot protocol. If a servo output channel is incorrectly configured for Dshot (DShot150/300/600), due to the huge frequency difference (Dshot is 9-37kHz, servos only need 50-333Hz), it will cause the servo to overheat, twitch, or even burn out!
5.3 Flight Mode Check
Testing Recommendation
Switch to Manual mode for testing. In this mode, the flight controller will not output attitude correction signals. If the abnormal servo behavior disappears, the issue is related to autolevel mode settings; if the abnormality persists, continue troubleshooting hardware or configuration issues.
- Switch to Manual mode and observe if the servo still behaves abnormally
- Do not test servos in autonomous modes such as RTL or AUTO, as the flight controller will actively output correction signals in these modes
5.4 Timer Group Check
Importance of Timer Groups
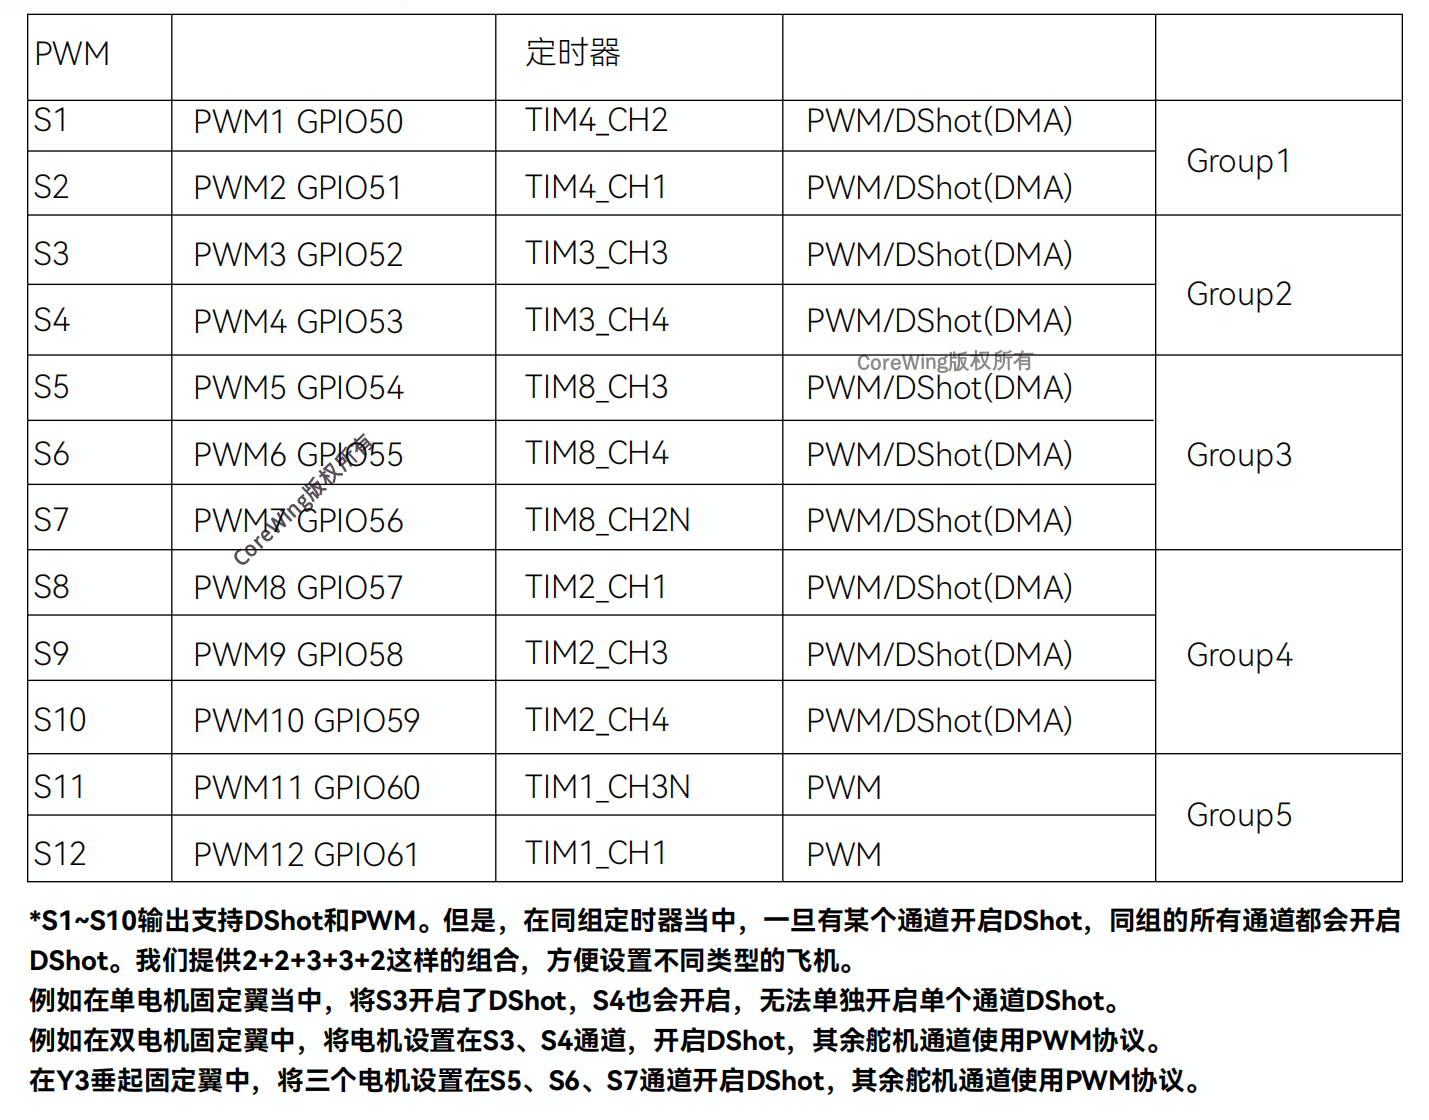
Servos and motors should preferably not share the same timer group to avoid the situation where motor channels have Dshot protocol enabled, causing other channels in the same group to also output Dshot signals, which in turn causes servo abnormalities.
CoreWing F405 WING V2 Timer Groups:
Key Points to Check:
- Confirm that the channels connected to servos do not share the same timer group with already configured motor channels
- Try to place all servos under the same timer group
- If timer groups are limited, ensure all channels in that group use the PWM protocol and do not mix with Dshot
- Refer to the flight controller manual's timer group table to confirm the timer group corresponding to each channel
VI. Final Confirmation and Verification
6.1 Flight Controller Voltage Test
Use a multimeter to measure the flight controller servo pin headers:
Info
Confirm whether there is a default output of around 5.0V. If so, it indicates that the servo BEC power supply is normal.
6.2 Function Verification Checklist
VII. Common Questions FAQ
Q: Is slight servo twitching considered a fault?
A: No. In autolevel modes (such as FBWA, Stabilize, RTL), the flight controller continuously outputs fine-tuning signals to correct attitude. Slight twitching is a normal phenomenon.
Q: The servo still doesn't work after replacement, what should I do?
A: Please use a multimeter to measure the voltage at the flight controller pin headers. If there is no 5V output, it may be a flight controller hardware issue. Please contact technical support.
Q: When should the ESC red wire be removed?
A: The flight controller power supply board has a servo BEC, so the ESC red wire needs to be removed to avoid power supply conflicts.
Q: What should I do if the servo twitches intermittently after connecting the telemetry?
A: This is caused by electromagnetic interference from the telemetry. Troubleshooting methods:
- Remove the telemetry and observe if the twitching stops
- Install the telemetry away from the servo and signal wires
- Check if the servo signal wire uses shielded cable
- Confirm that the telemetry power supply is stable
Q: What causes abnormal servo heating, overheating, or severe twitching?
A:
- The servo may be mistakenly connected to a motor output interface configured for Dshot protocol
- Please check the
SERVO_BLH_MASKparameter to confirm if the servo output channel is configured for Dshot - Check if the servo is mistakenly plugged into a motor output channel
- Dshot frequency (9-37kHz) is dozens of times higher than the servo working frequency (50-333Hz), which will damage the servo
Technical Support QR Code
