
How to Use the ExpressLRS Flasher in CoreWing APP
Important
This guide only applies to devices that are already running ExpressLRS firmware and are being upgraded or re-flashed with another version of ExpressLRS firmware. It is not applicable to upgrading or switching from MLRS firmware to ExpressLRS firmware. If the device is currently running MLRS firmware, using this feature to flash ExpressLRS firmware may fail.
I. Principle
The CoreWing APP ExpressLRS Flasher provides a convenient way to flash ELRS firmware, supporting receivers and high-frequency heads. With this feature, users no longer need a computer or dedicated flashing tools (such as ELRS Configurator). Simply connect the device, select the device model, firmware version, and parameters in the APP, and the firmware configuration and flashing can be completed. This simplifies the upgrade process and is suitable for firmware updates, parameter configuration, and device maintenance.
II. Equipment Preparation
Flight Controller: Either CoreWing F405 WING V2 or CoreWing F405 WING MINI V2 is suitable for this tutorial.
RC Transmitter: Using RadioMaster TX16S / RadioMaster Boxer as examples.
Receiver: Using SpeedyBee ELRS Nano 2.4G as an example.
High-Frequency Head: Using CoreWing Sirius 2.4G high-frequency head as an example.
Phone: Download the CoreWing APP
Important
CoreWing APP download link: https://www.corewing.com/website/download
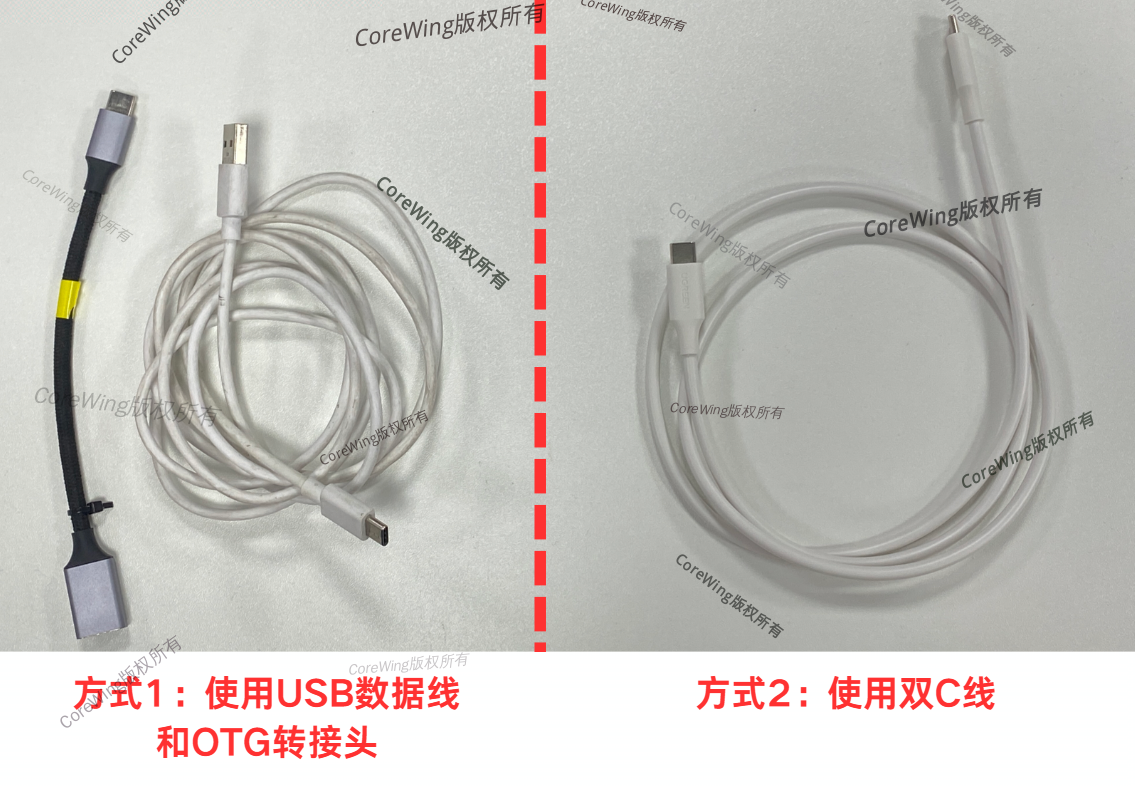
Data Cable: A USB data cable with communication capability plus an OTG adapter, or a dual Type-C cable with communication capability
Important
If you don't have a suitable cable, you can use the WiFi method to flash firmware.
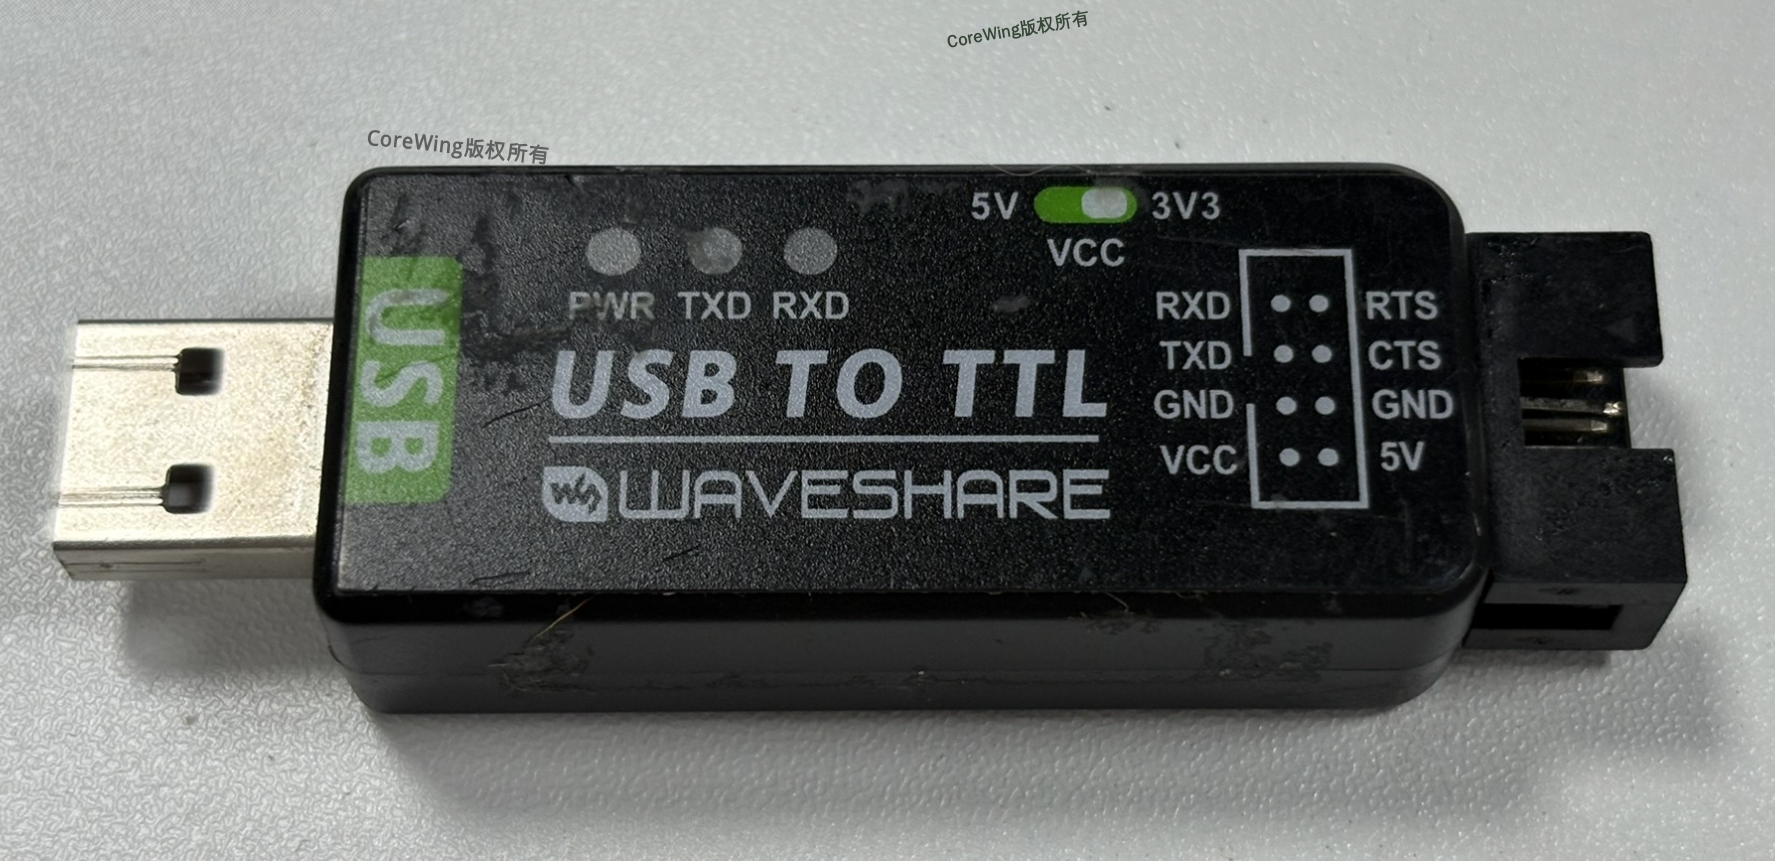
- USB-TTL Tool
III. Flashing ELRS Firmware on the High-Frequency Head
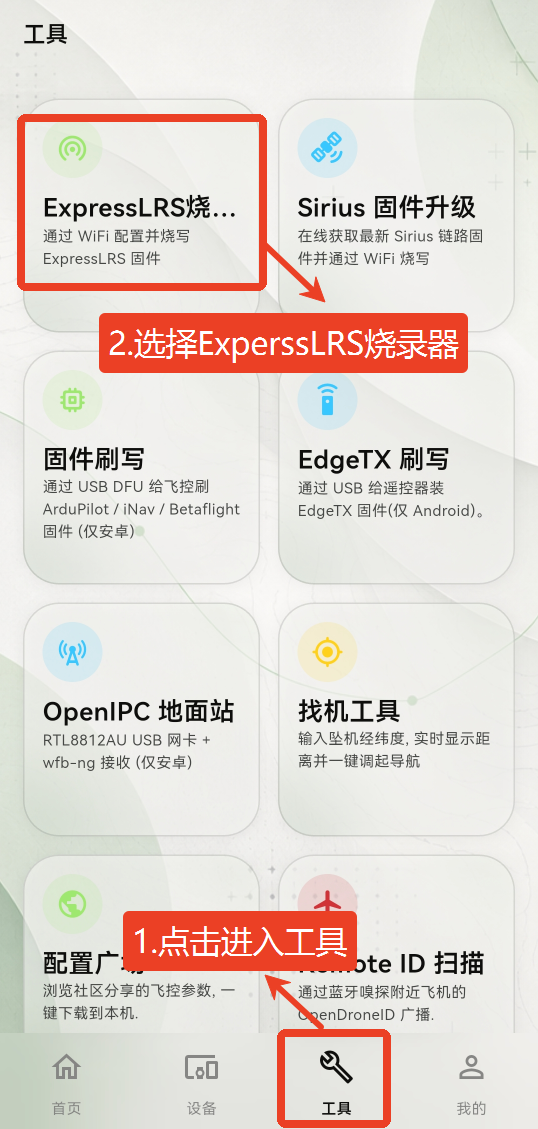
Open the CoreWing APP's Tools page and click ExpressLRS Flasher
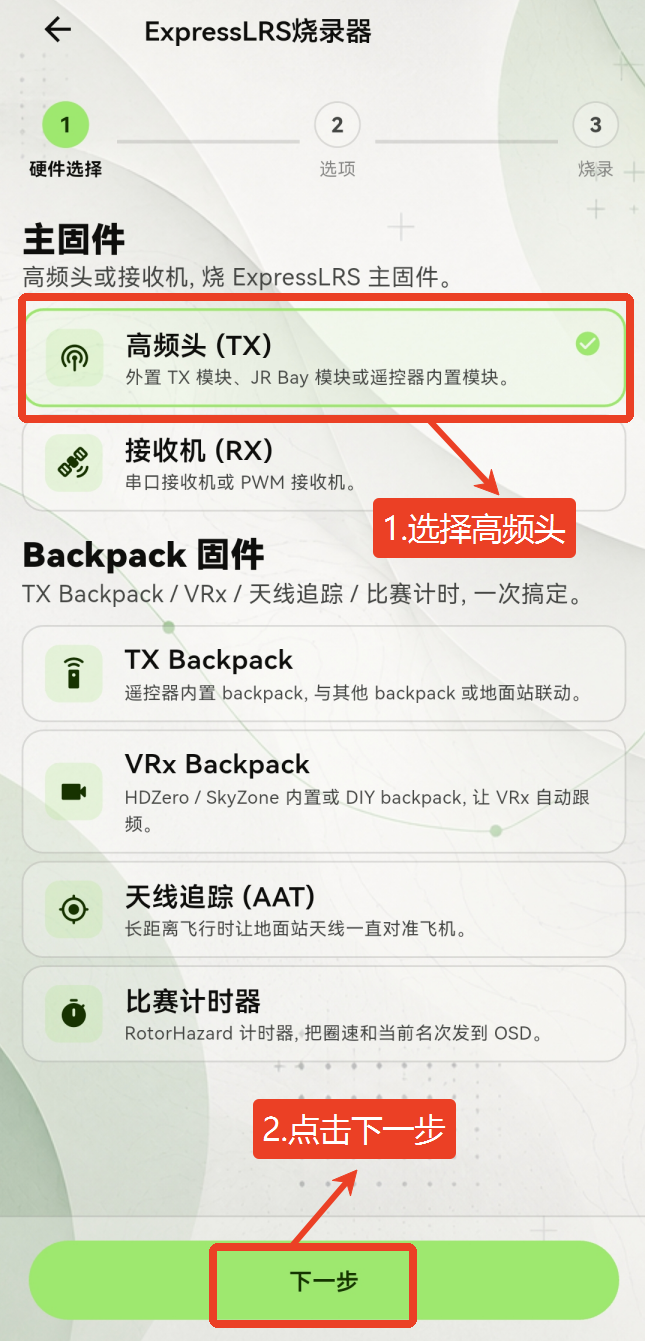
Select High-Frequency Head and click Next
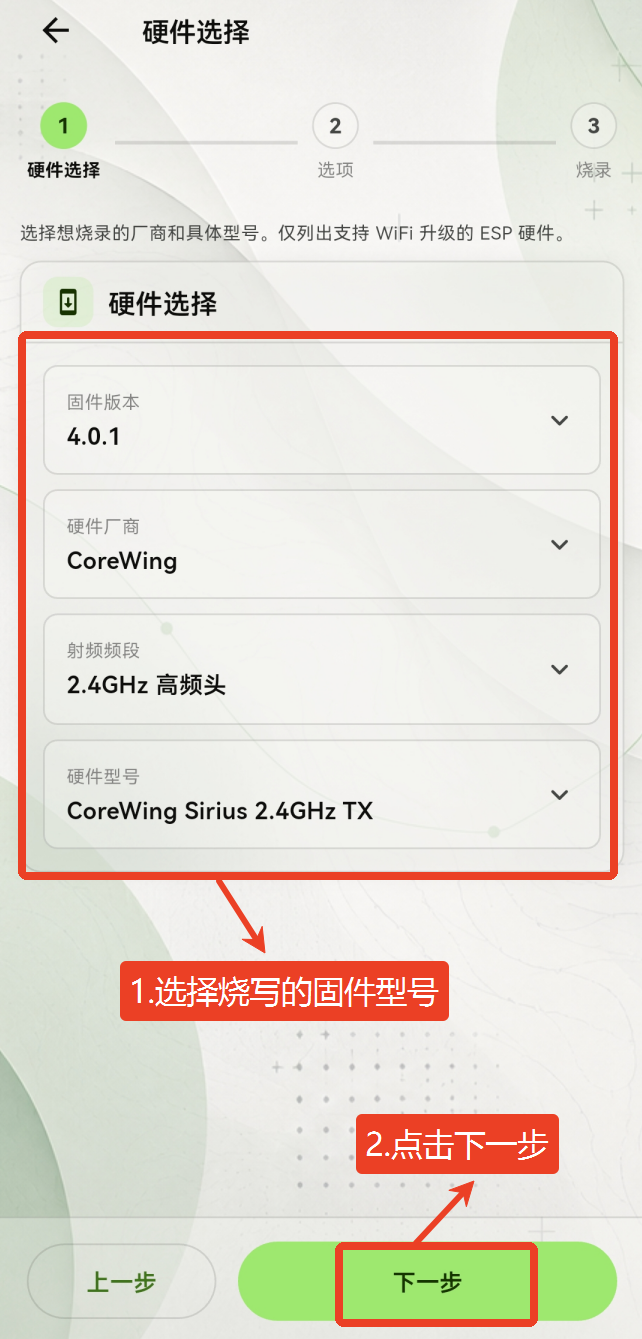
Select the firmware version, head manufacturer, RF band, and hardware model to flash
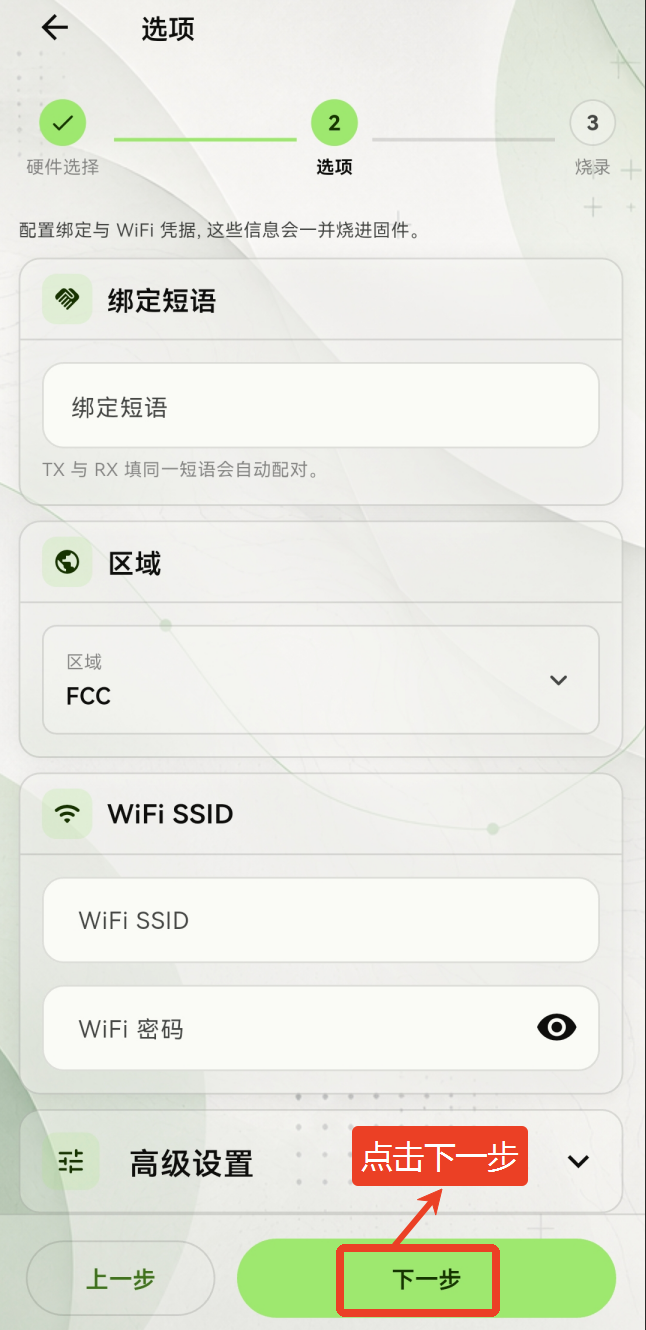
Set the binding phrase and WiFi password as needed, then click Next (this step can be skipped)
Select the flashing method as needed
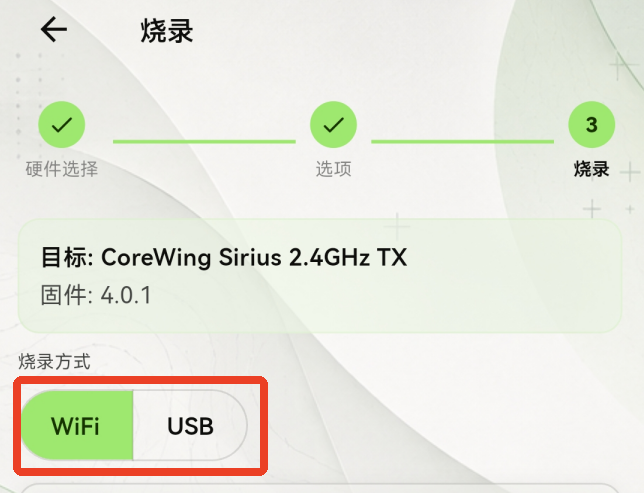
| Flashing Method | Required Equipment | Use Case |
|---|---|---|
| WiFi flashing | None | Higher success rate; suitable when no tools are available |
| USB direct flash | USB data cable (dual Type-C cable) | Highest success rate; plug in and flash |
(1) Make sure the phone has a network connection, click Prepare Firmware, and wait for the download to finish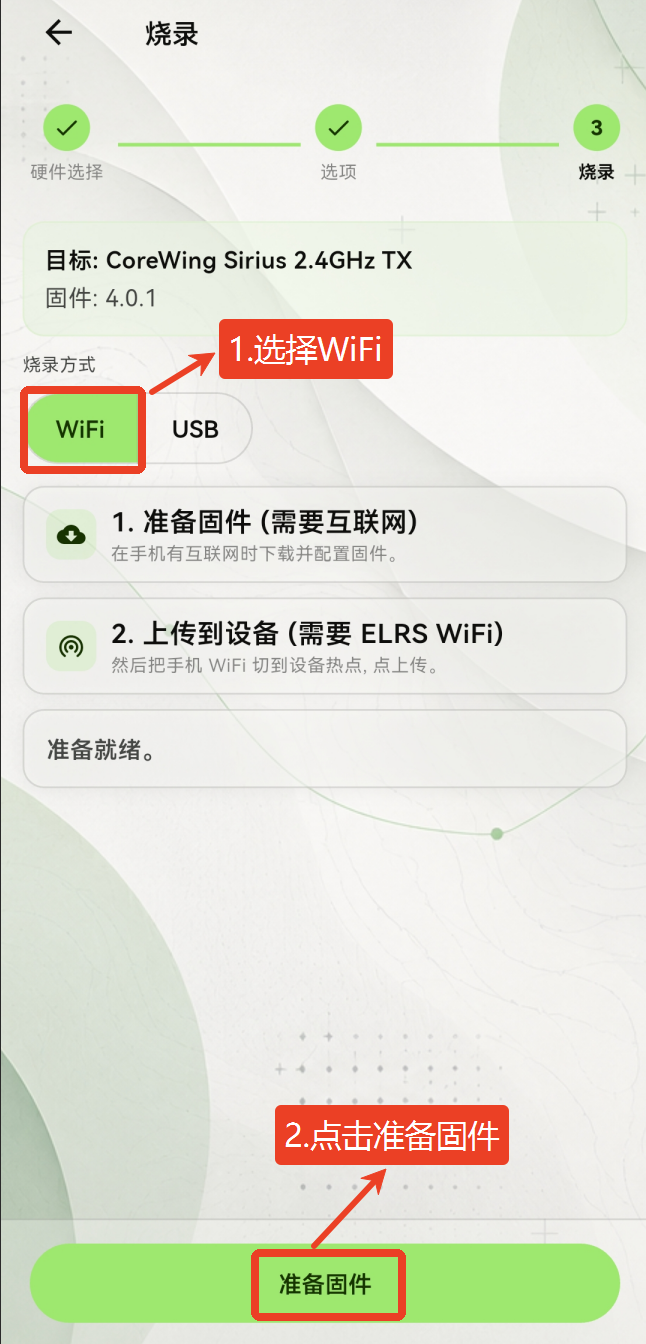
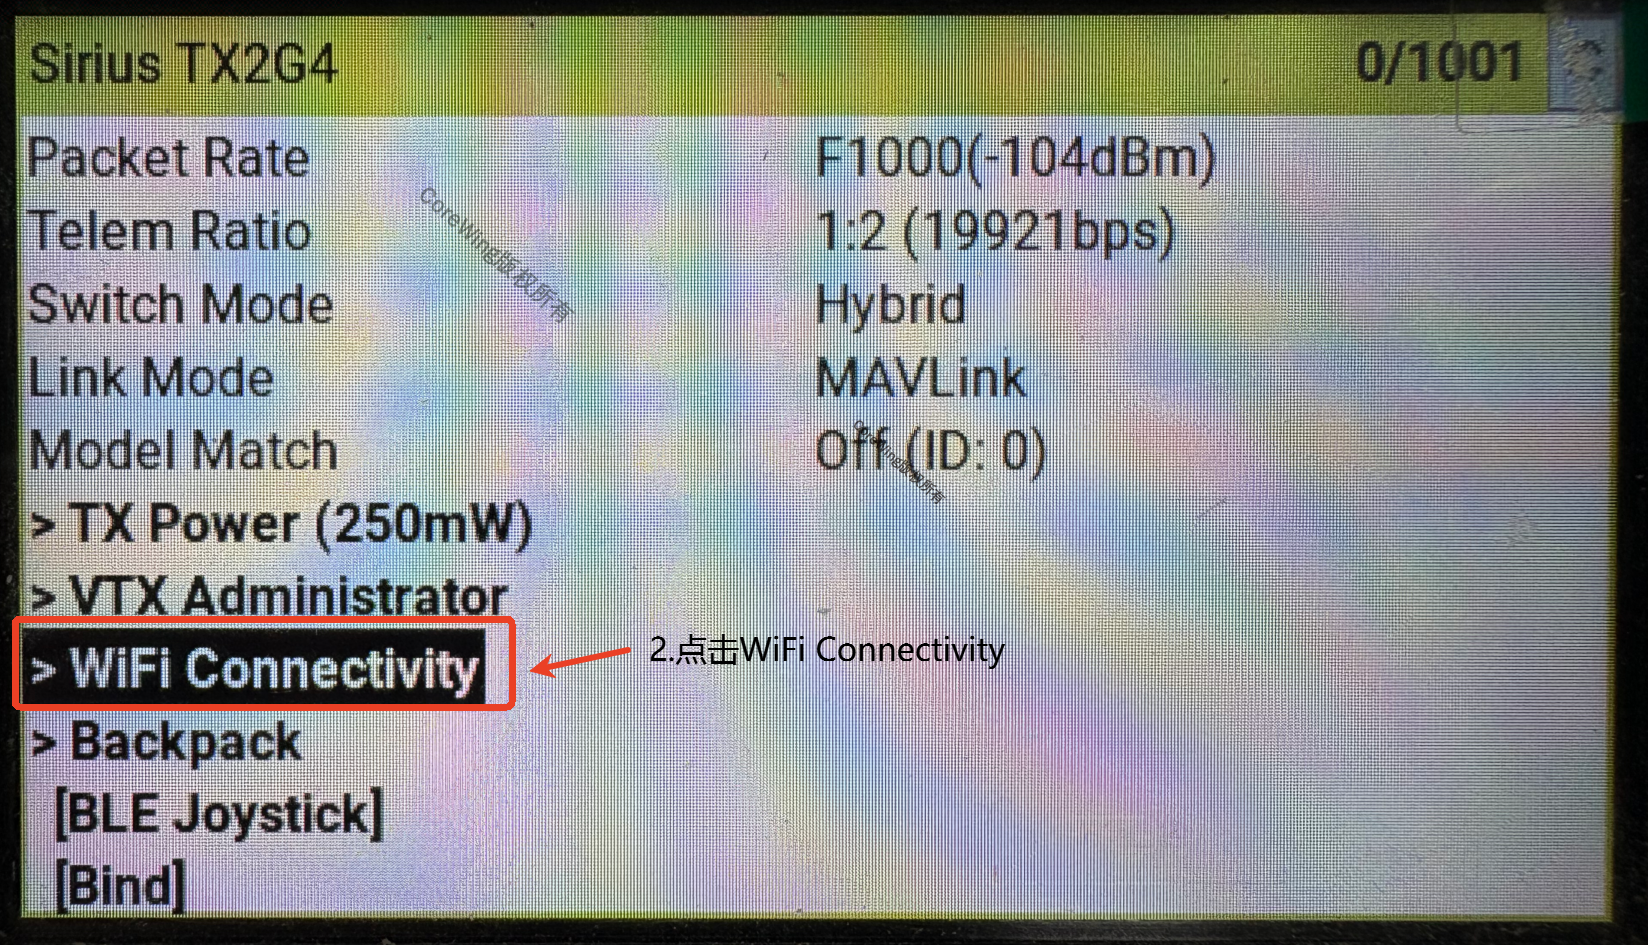
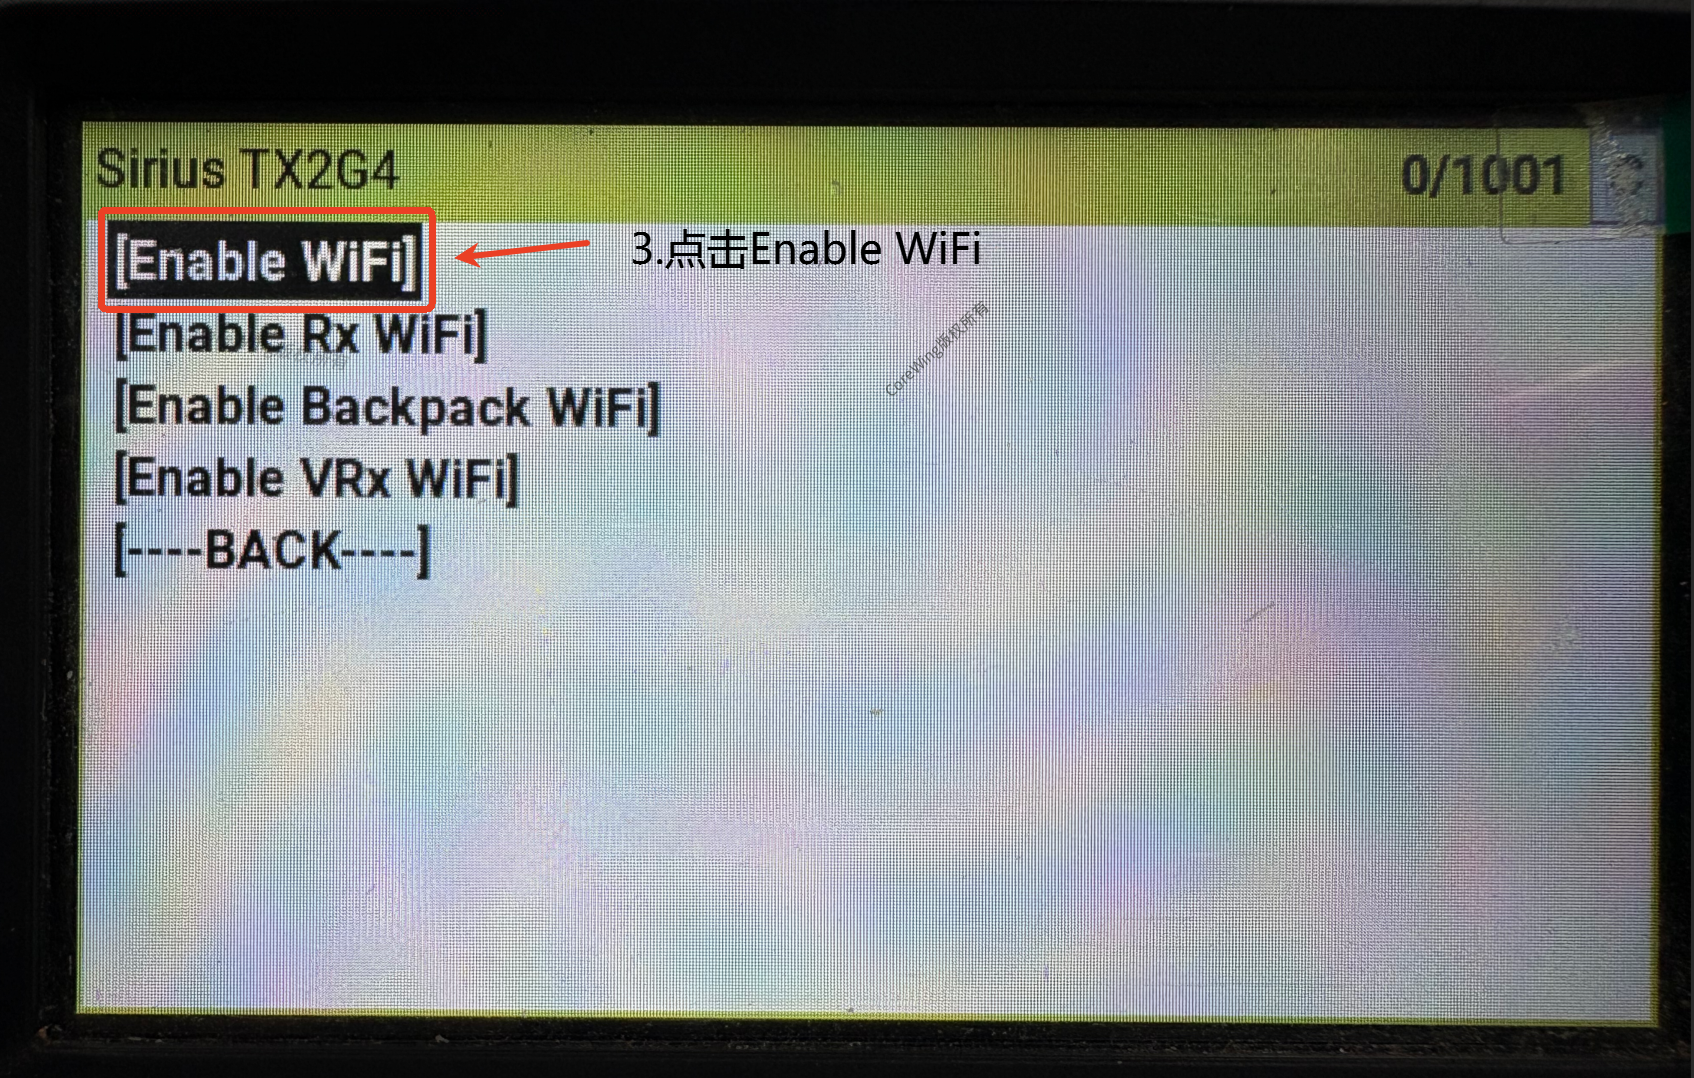
(2) Enable the high-frequency head's WiFi. On the radio, enter the system menu, open the ExpressLRS script, and select WiFi Connectivity → Enable WiFi in turn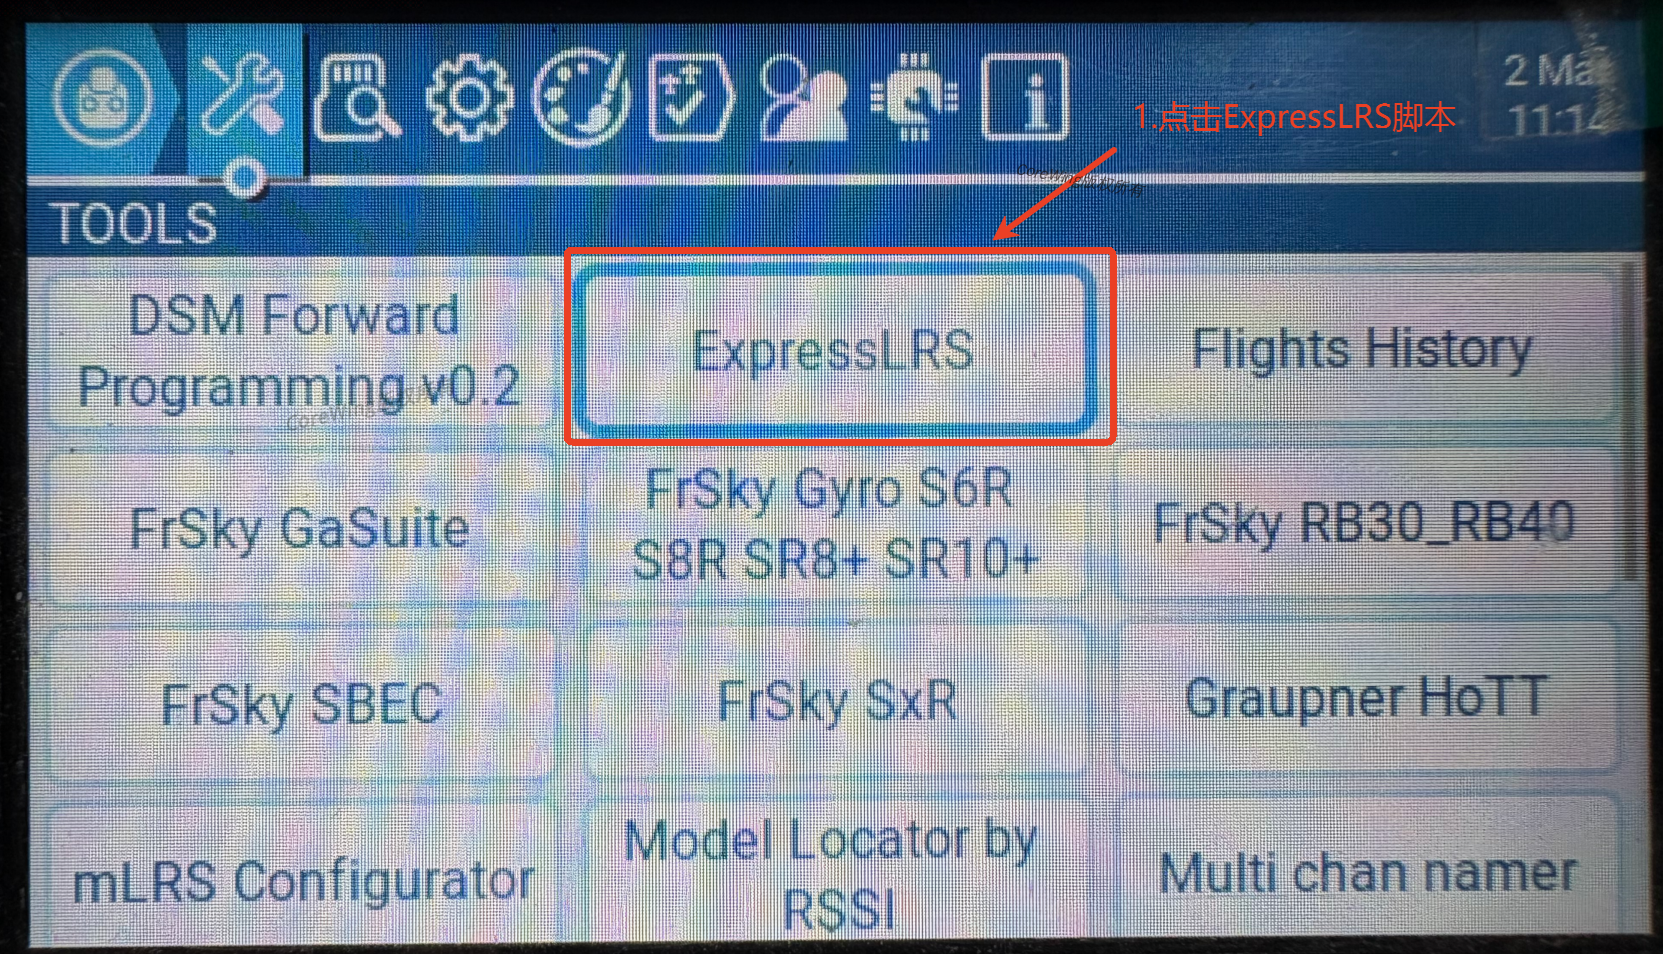
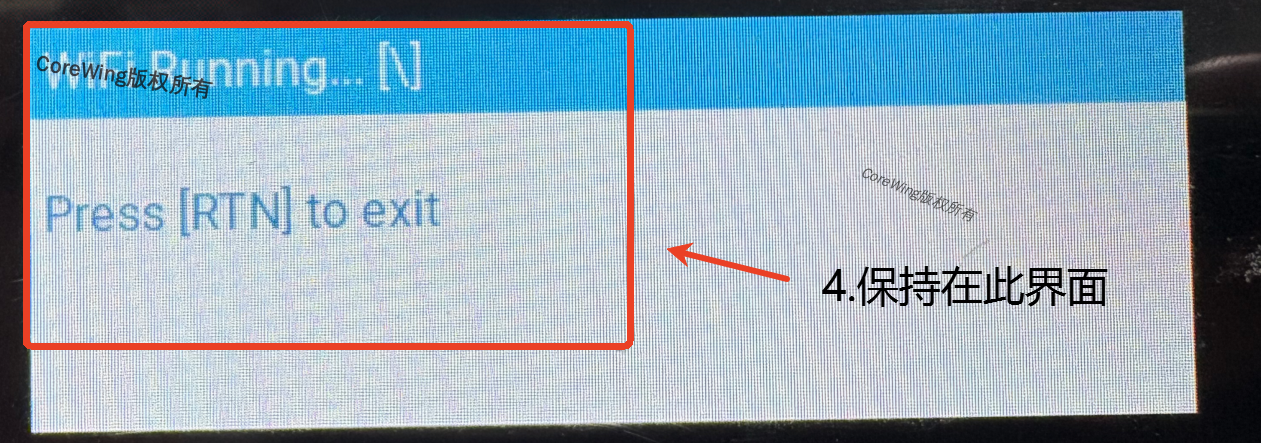
(3) Open the phone's WiFi settings, find the ExpressLRS TX WiFi, and tap to connect. The password is expresslrs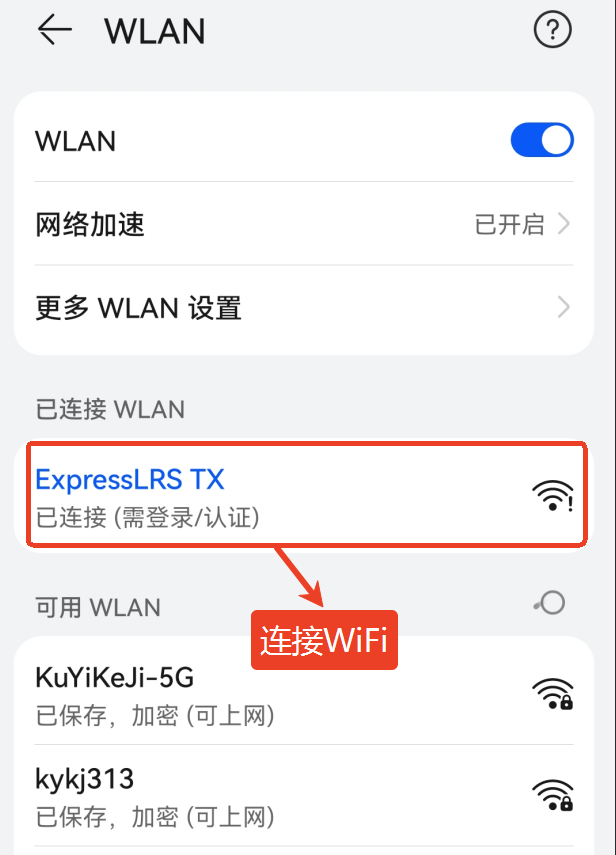
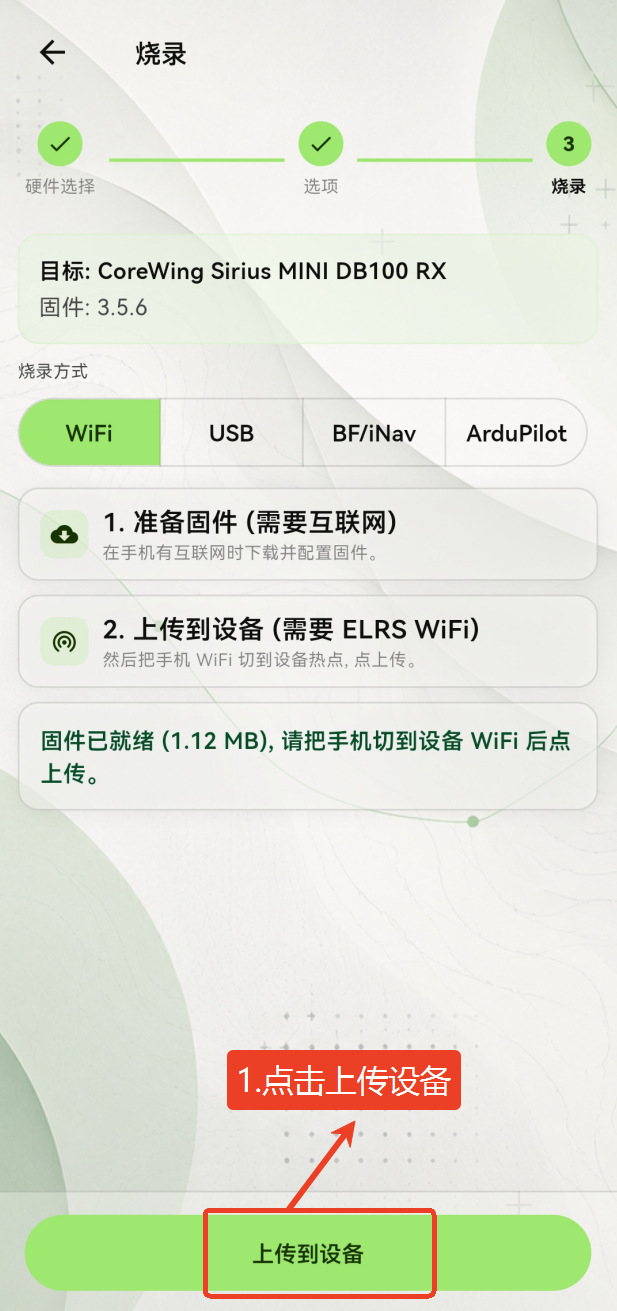
(4) Return to the APP flashing page and click Upload to Device. Wait for the firmware flashing to complete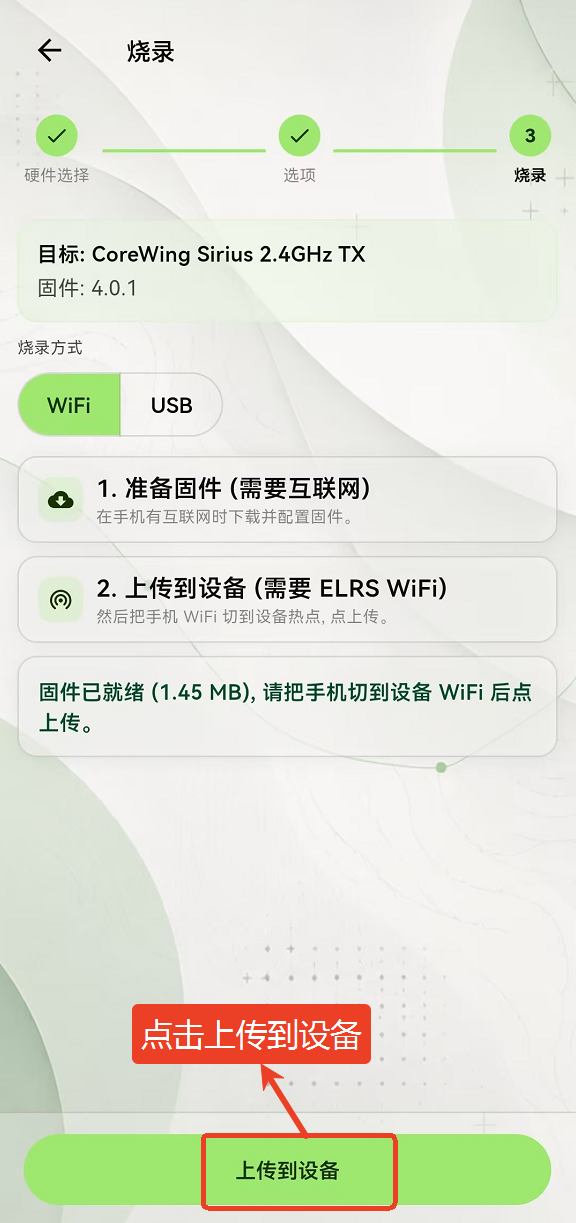
(5) Flashing complete, firmware upgraded successfully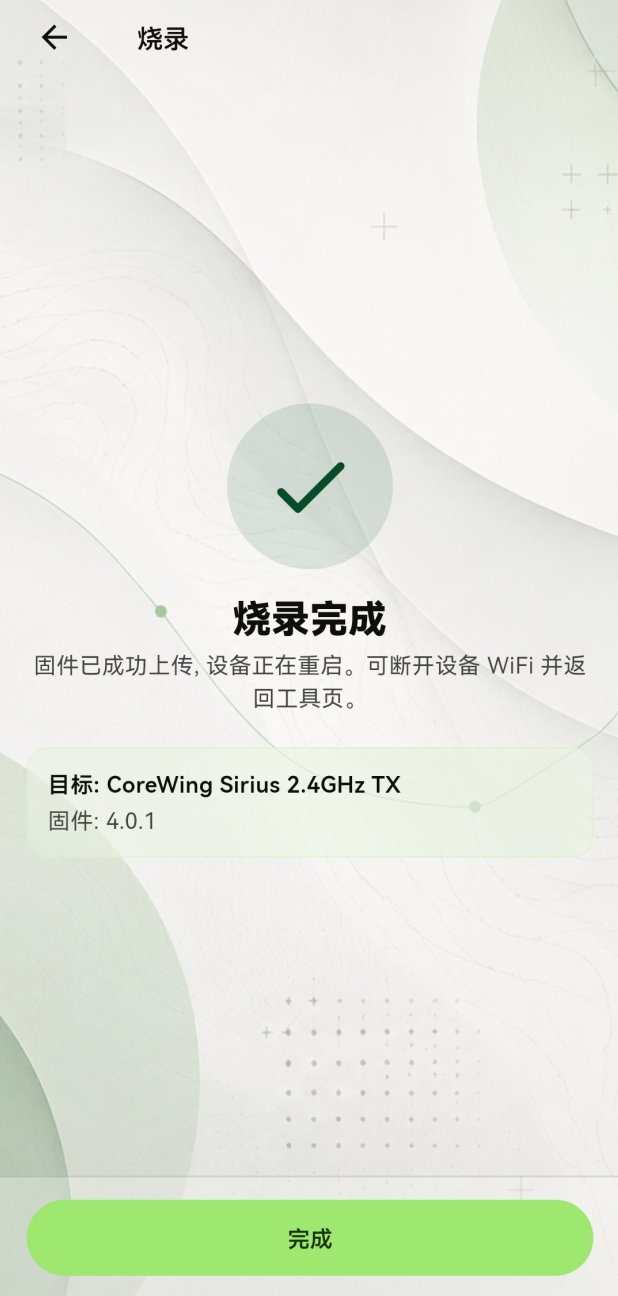
(1) Connect the data cable to the phone and the high-frequency head
Note: When using an OTG adapter + data cable, the OTG adapter must be plugged into the phone, otherwise the device will not be detected. Connect as shown below!
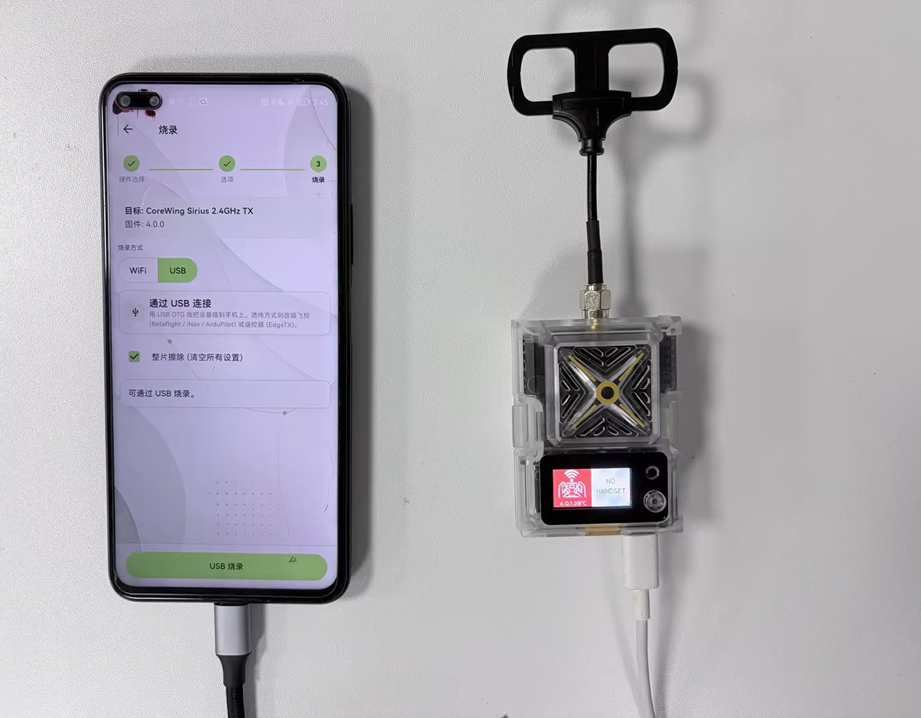
(2) Click USB Flash and wait for flashing to complete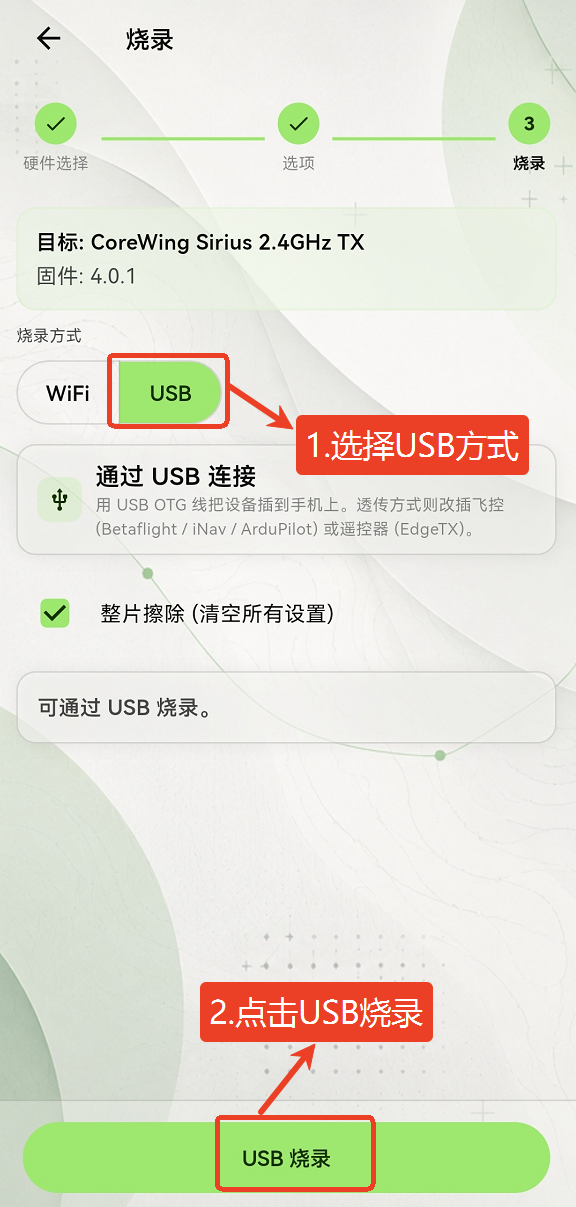
(3) Flashing complete, firmware upgraded successfully
IV. Flashing ELRS Firmware on the Receiver
Open the CoreWing APP's Tools page and click ExpressLRS Flasher
Select Receiver and click Next
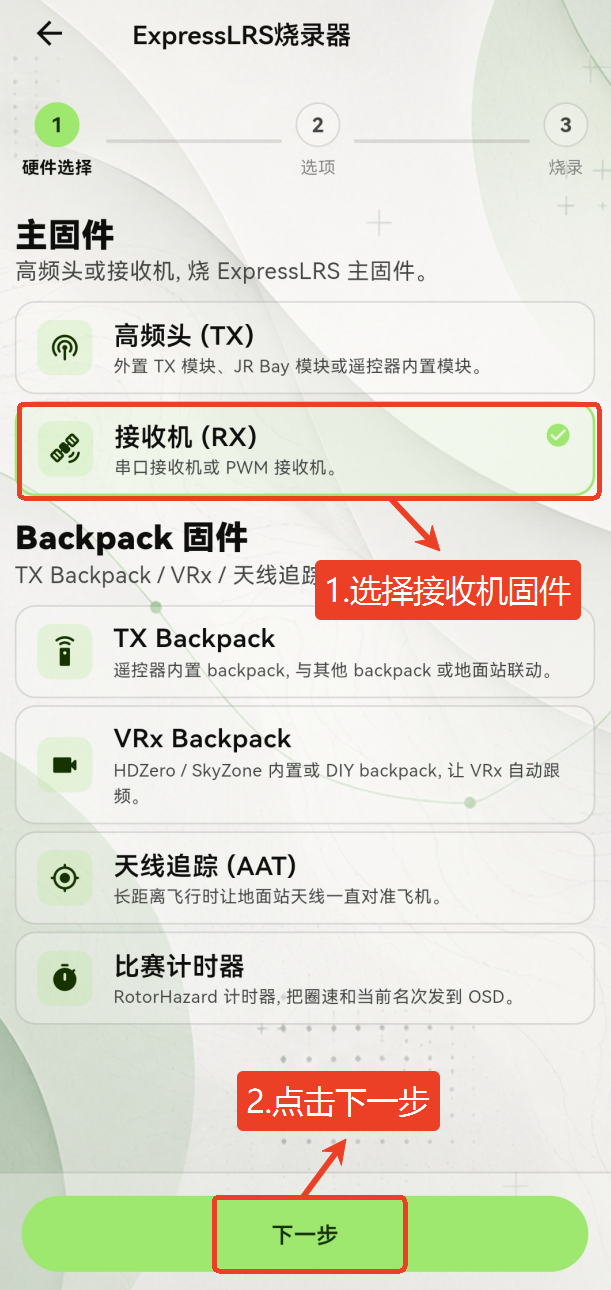
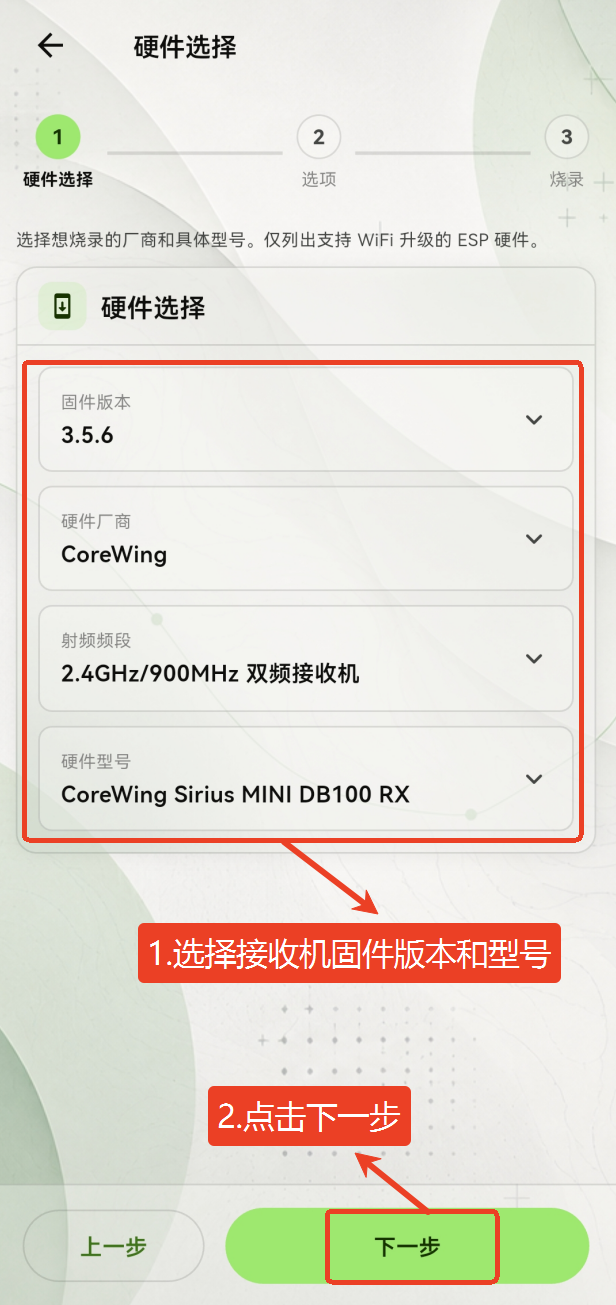
- Select the firmware version, receiver manufacturer, RF band, and hardware model, then click Next
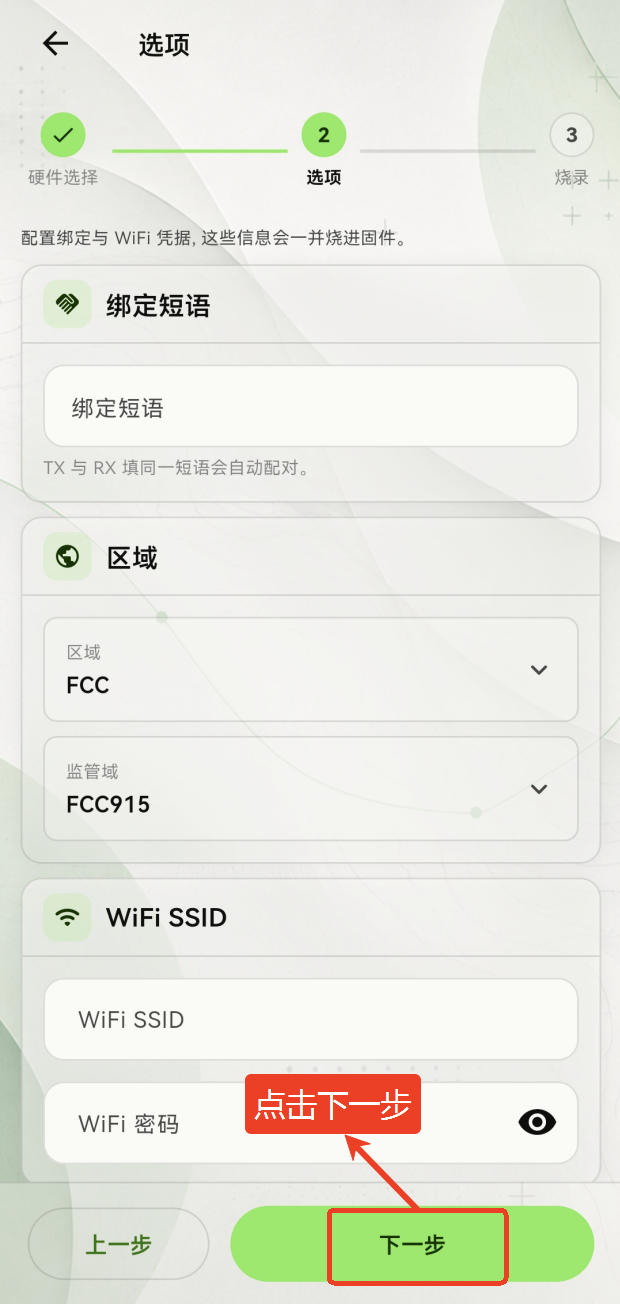
- Set the binding phrase and WiFi password as needed, then click Next (this step can be skipped)
- Select the flashing method as needed
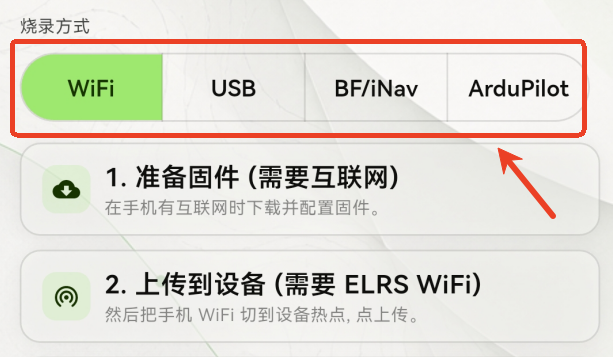
| Flashing Method | Required Equipment | Use Case |
|---|---|---|
| WiFi flashing | None | Highest success rate; suitable when no tools are available |
| USB direct flash | USB data cable (Type-C) | High success rate. Requires a USB-TTL tool |
| iNav Passthrough | Flight controller (iNav firmware) + USB cable | High success rate; convenient wired flashing |
| ArduPilot Passthrough | Flight controller (ArduPilot firmware) + USB cable | May fail occasionally; prefer one of the three methods above |
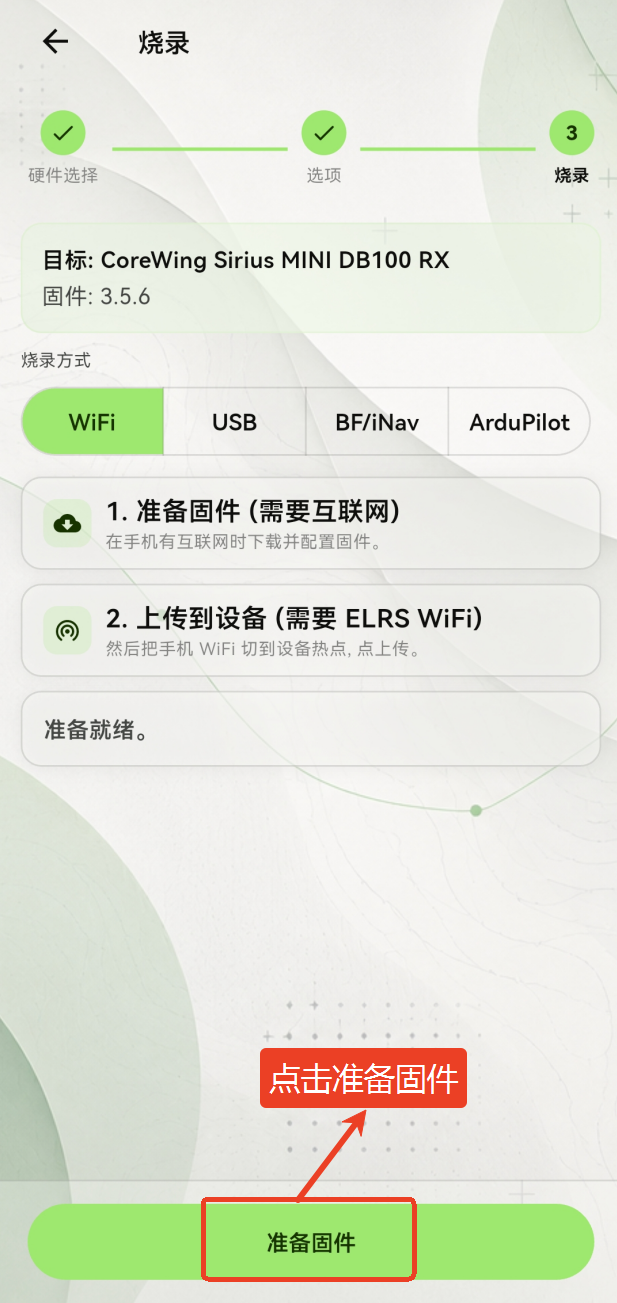
Make sure the phone has a network connection, click Prepare Firmware, and wait for the download to finish
Plug the receiver into the flight controller and power the flight controller via a USB cable.
CoreWing F405 WING V2 / MINI V2 / H743 WING receiver wiring:
- Port required: must be connected to Serial 6
- Why:
Serial 6 has built-in DMA support
Supports 460800 bps high baud rate communication
⚠️ Note: Connecting to other serial ports (such as Serial 4) is hardware-compatible, but without DMA, MAVLink mode cannot communicate with the flight controller properly.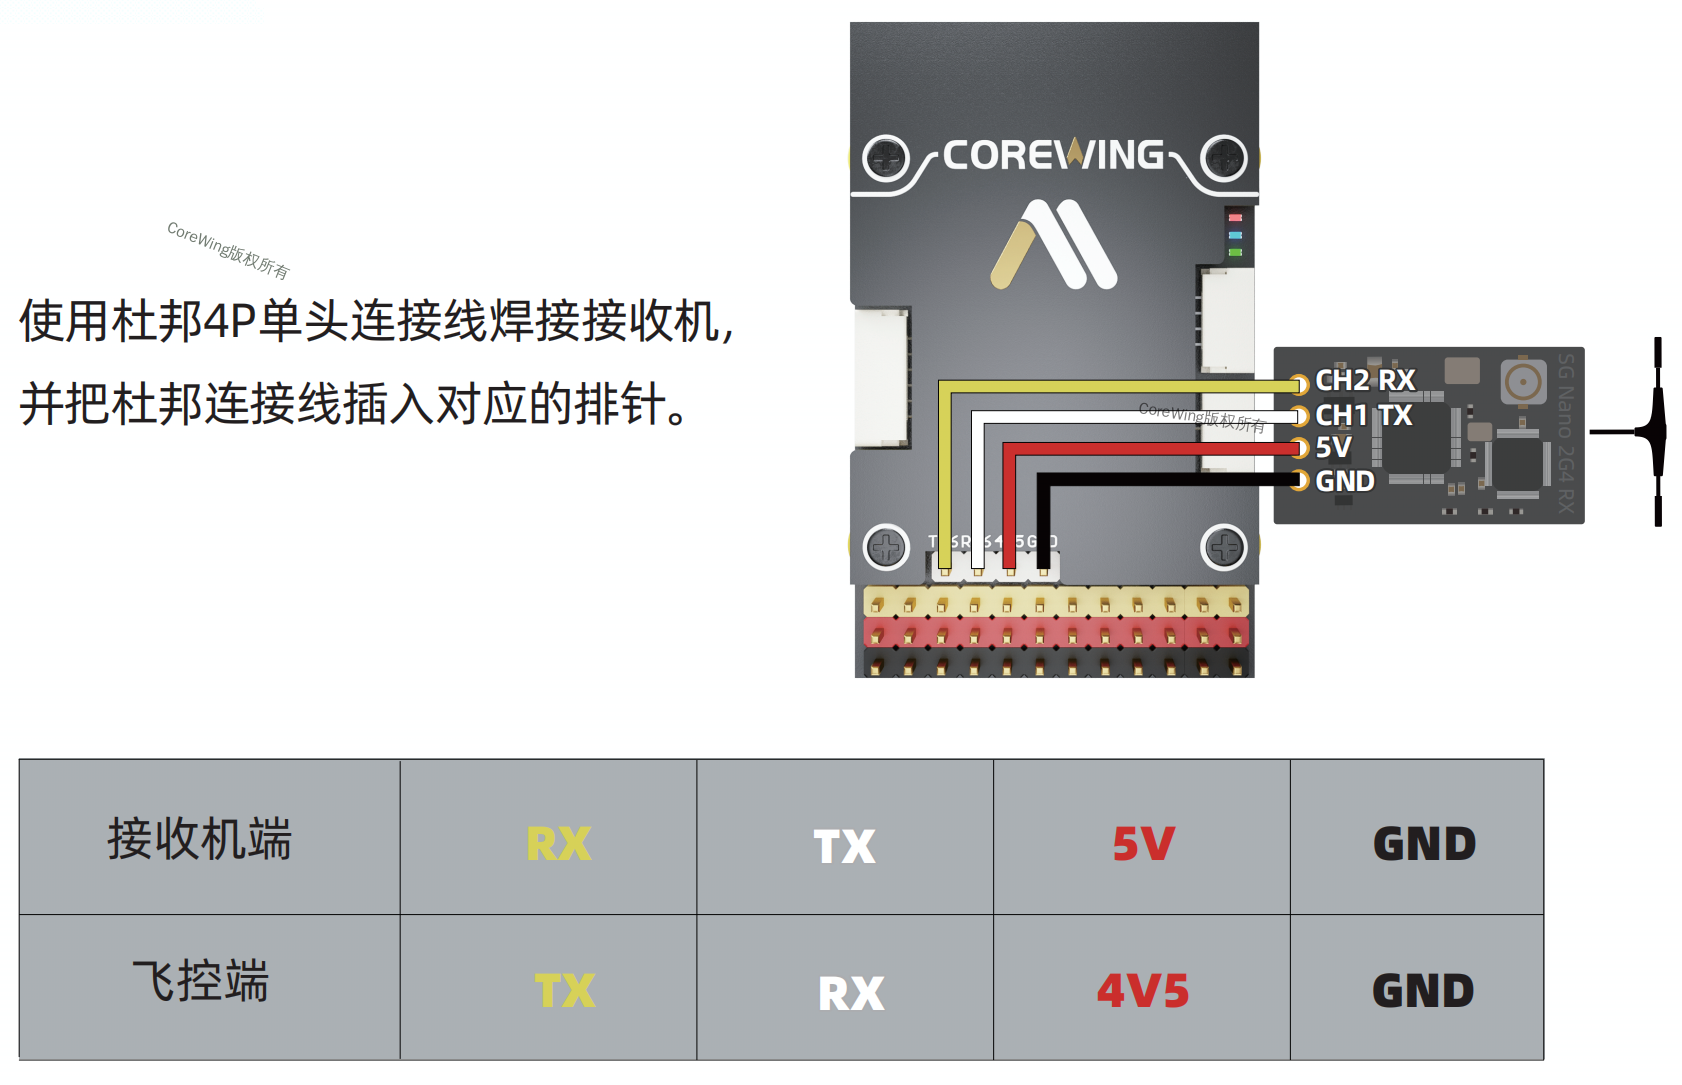
After the receiver is powered on, wait 60 seconds or long-press the BAT button for 5 seconds to enter WiFi mode. The receiver's status LED fast-blinking indicates WiFi mode has been entered.

Open the phone's WiFi settings, find the ExpressLRS RX, and tap to connect. The password is
expresslrs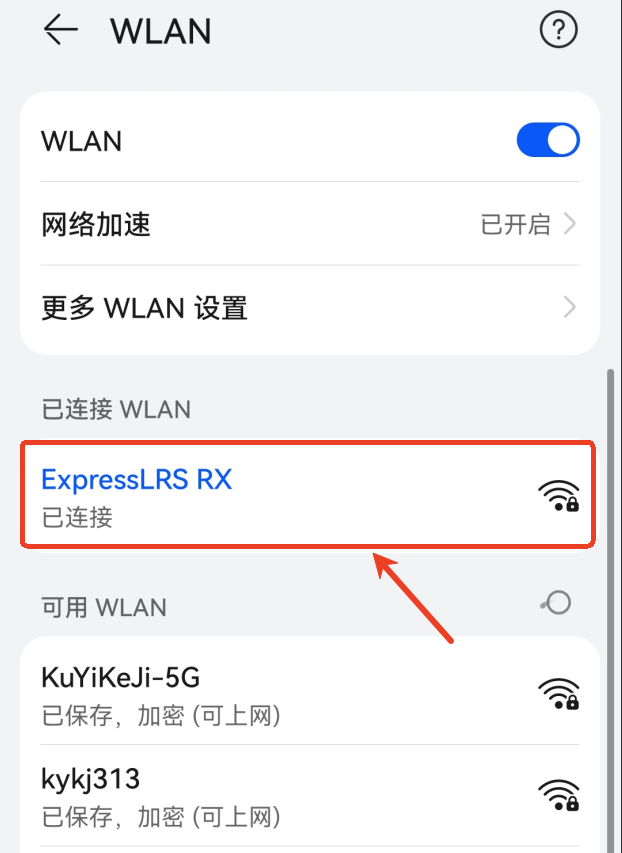
Return to the APP flashing page and click Upload to Device. Wait for the firmware flashing to complete
- Use an OTG adapter to connect the USB-TTL device to the phone
Note: When using an OTG adapter + USB-TTL device, the OTG adapter must be plugged into the phone, otherwise the device will not be detected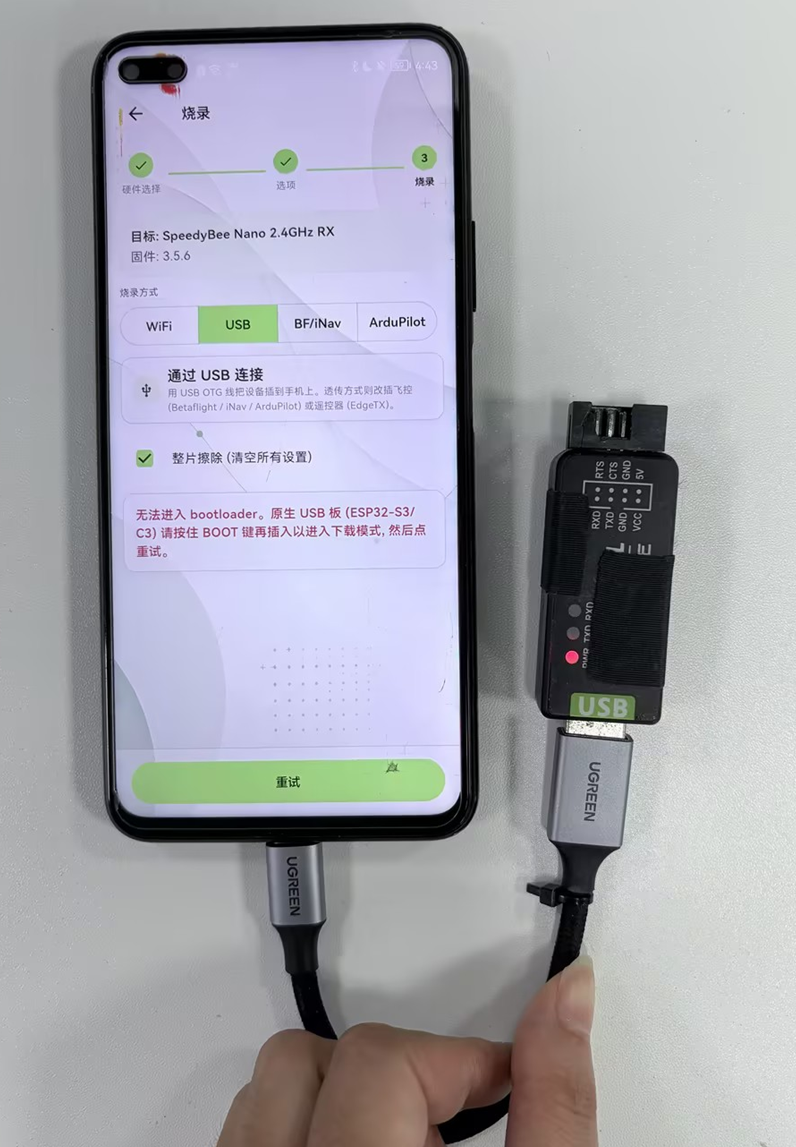
- Hold the receiver's
BOOT button, plug it into the USB-TTL device, then release theBOOT button. If the receiver LED stays off, the device is in flash mode
Receiver to USB-TTL module wiring
5V → VCC
TX → RX
RX → TX
GND → GND- Click USB Flash and wait for the FC flashing to complete
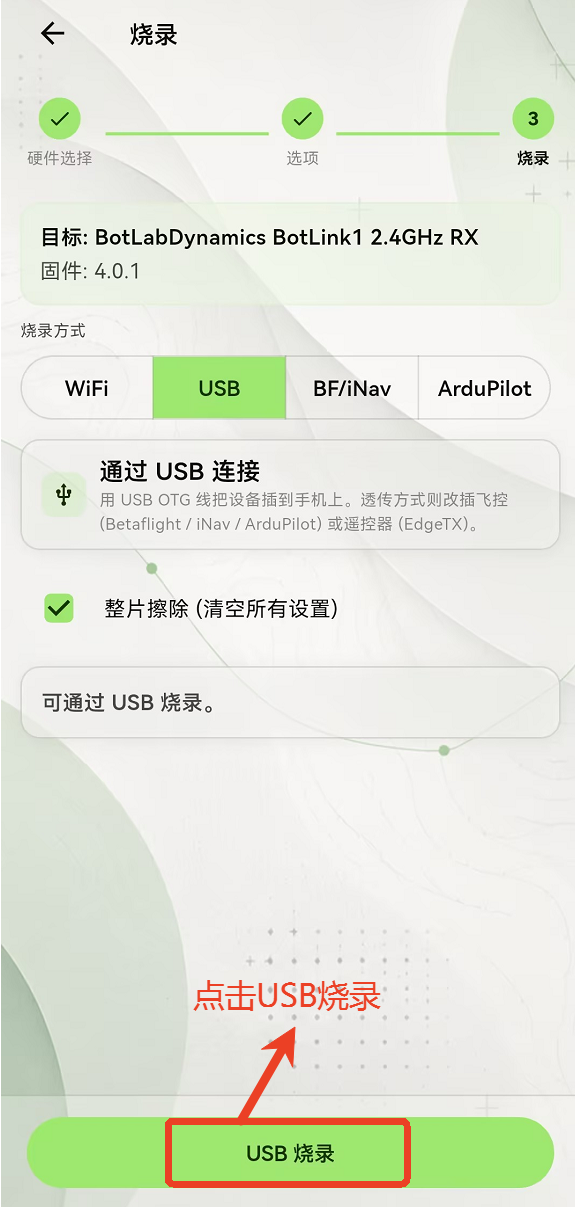
If the FC is currently running BF/iNAV firmware, select the BF/iNAV passthrough method. If the FC is currently running ArduPilot firmware, select the ArduPilot passthrough method.
(1) Plug the receiver into the flight controller
CoreWing F405 WING V2 / MINI V2 / H743 WING receiver wiring:
- Port required: must be connected to Serial 6
- Why:
- Serial 6 has built-in DMA support
- Supports 460800 bps high baud rate communication
⚠️ Note: Connecting to other serial ports (such as Serial 4) is hardware-compatible, but without DMA, MAVLink mode cannot communicate with the flight controller properly.
(2) Connect the data cable to the phone and the flight controller
Note: When using an OTG adapter + data cable, the OTG adapter must be plugged into the phone, otherwise the device will not be detected. Connect as shown below!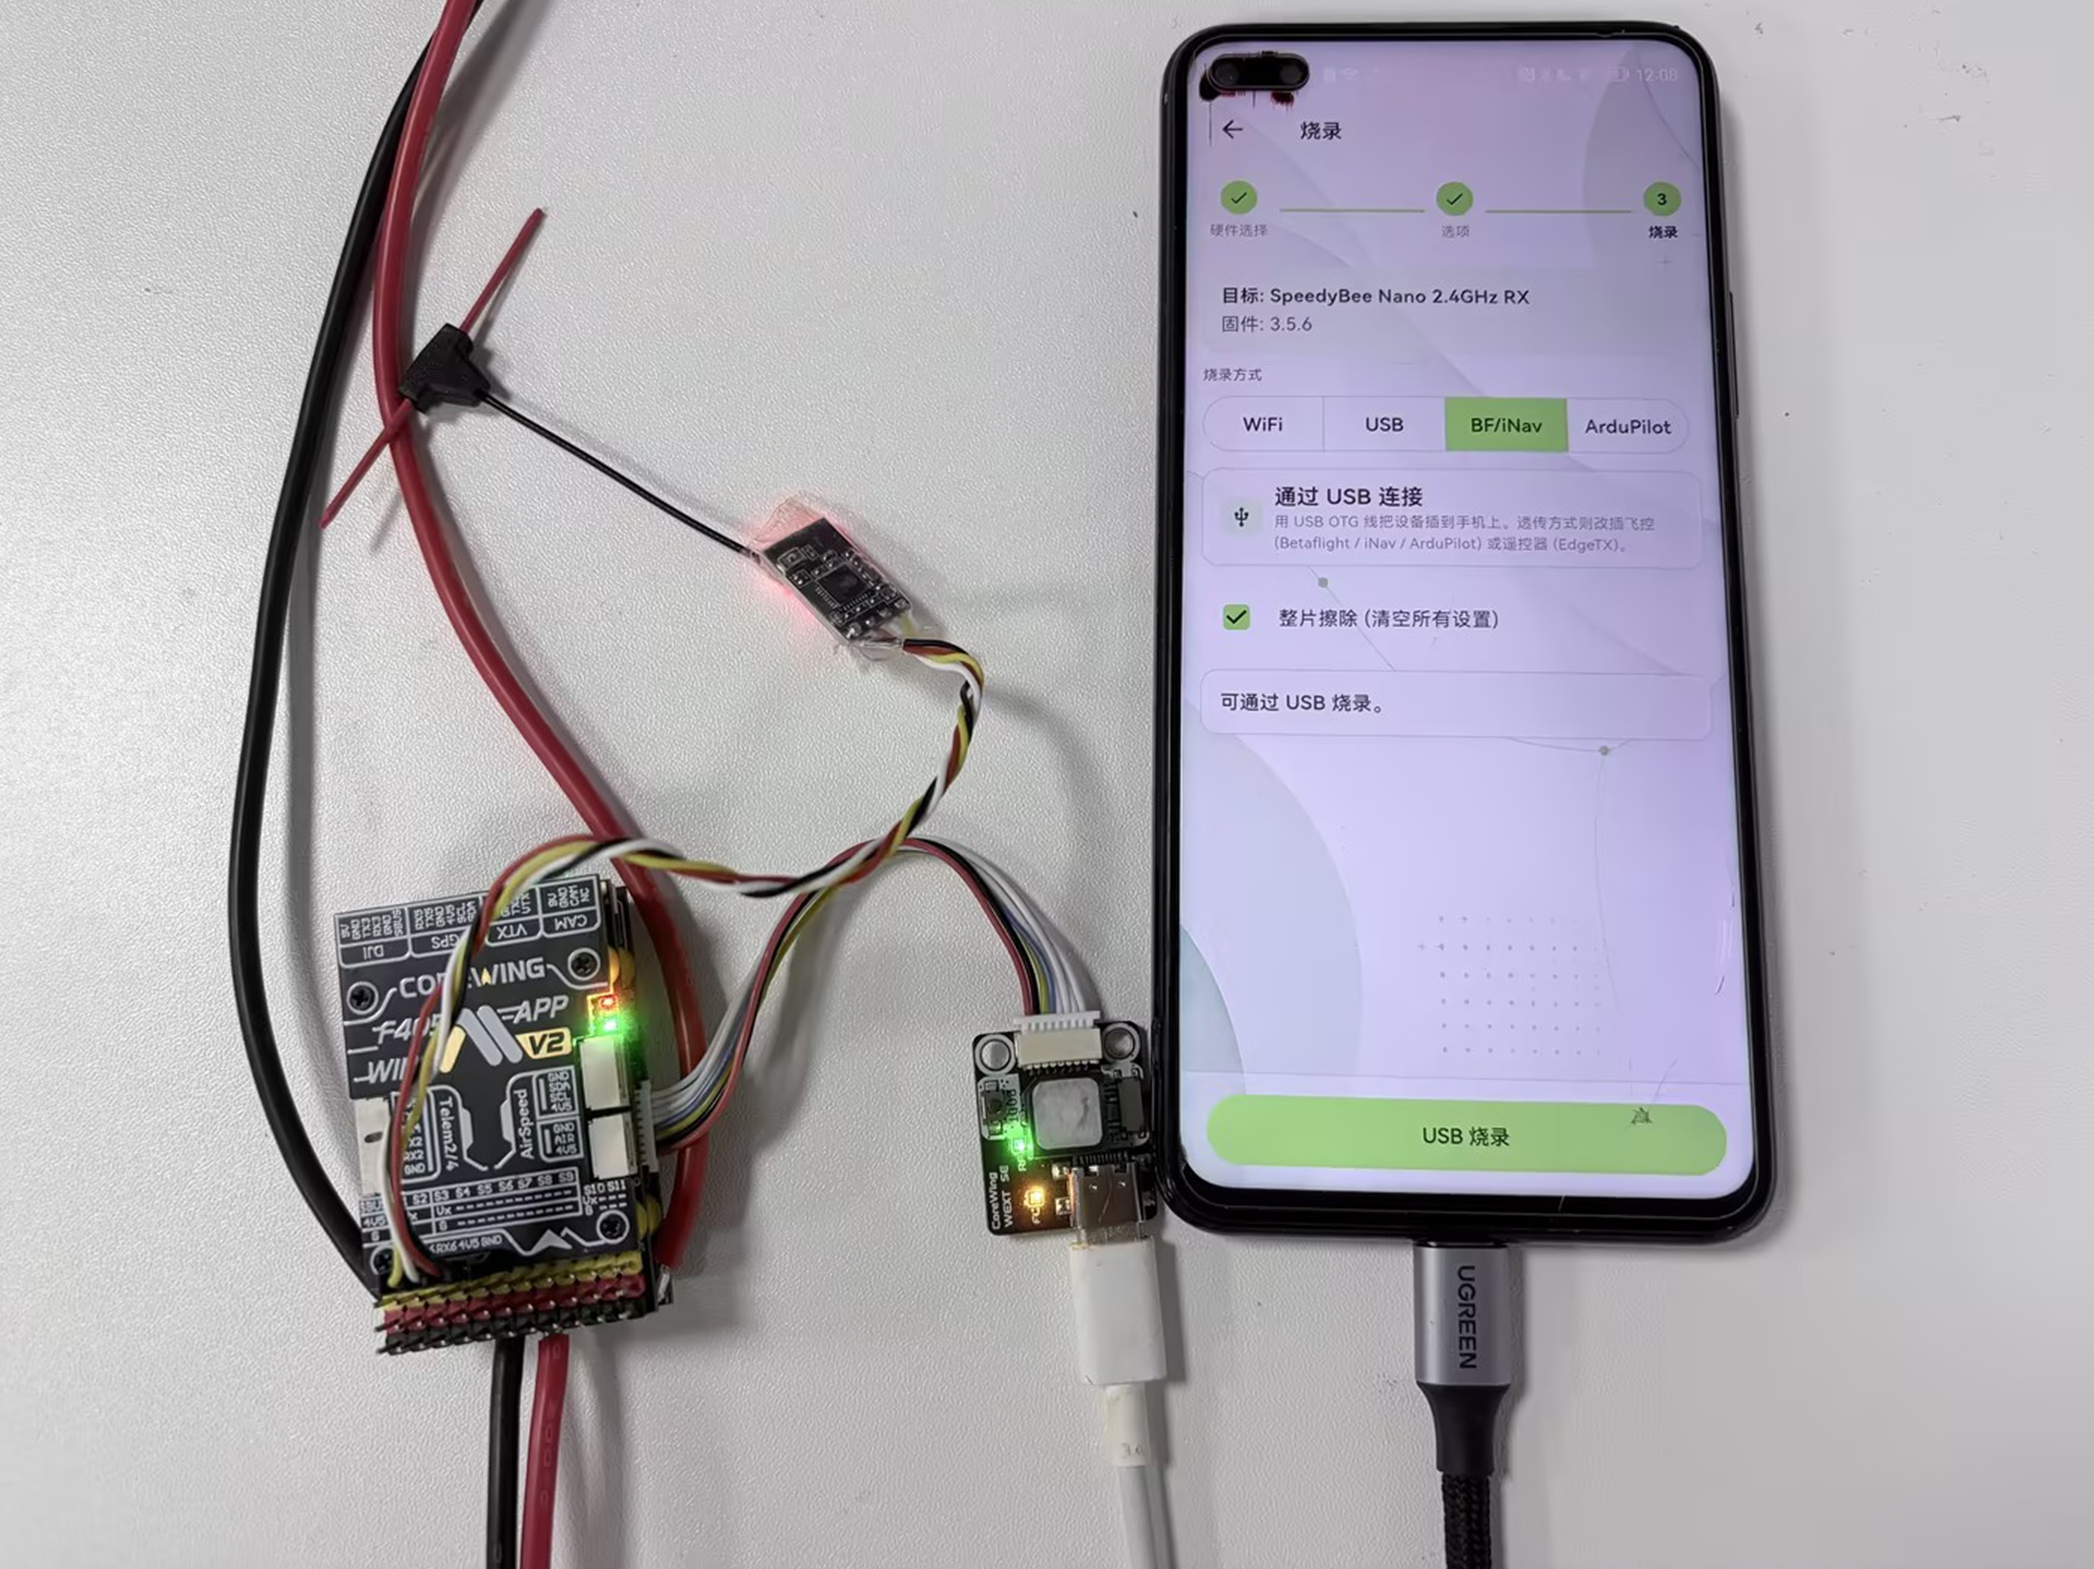
(3) Click USB Flash and wait for the FC flashing to complete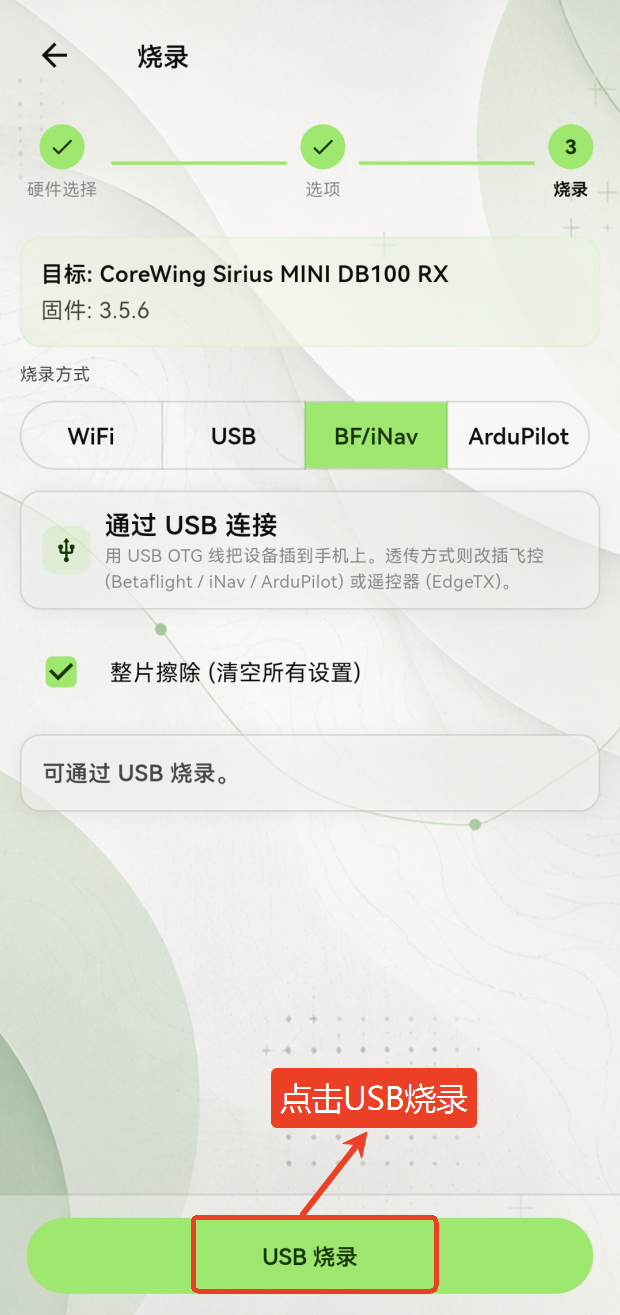
V. Flashing Backpack Firmware
Open the CoreWing APP's Tools page and click ExpressLRS Flasher
Select Backpack firmware and click Next
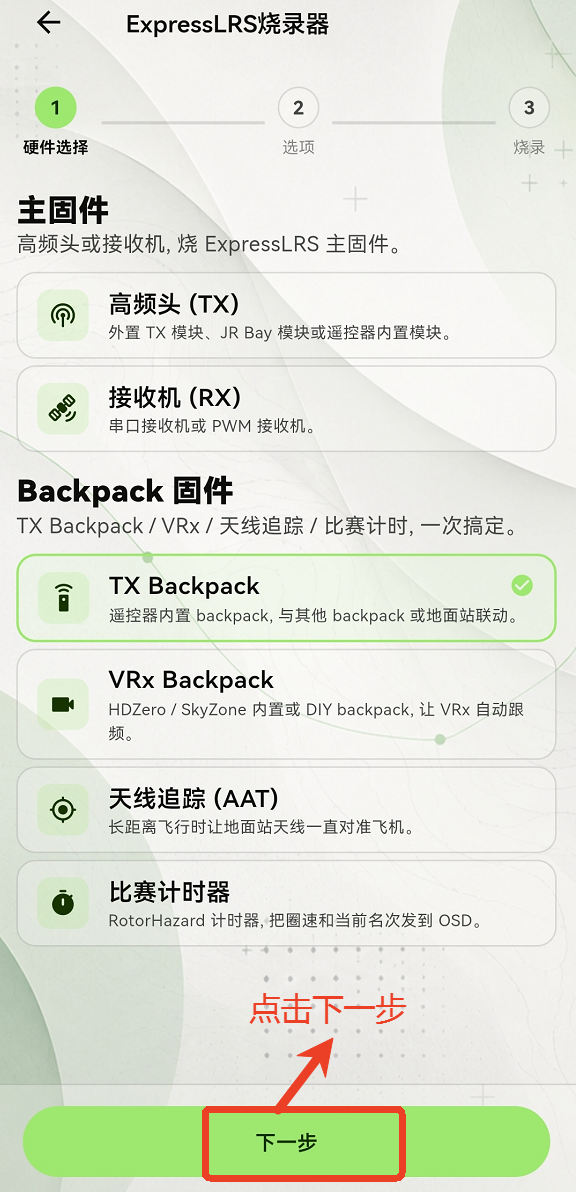
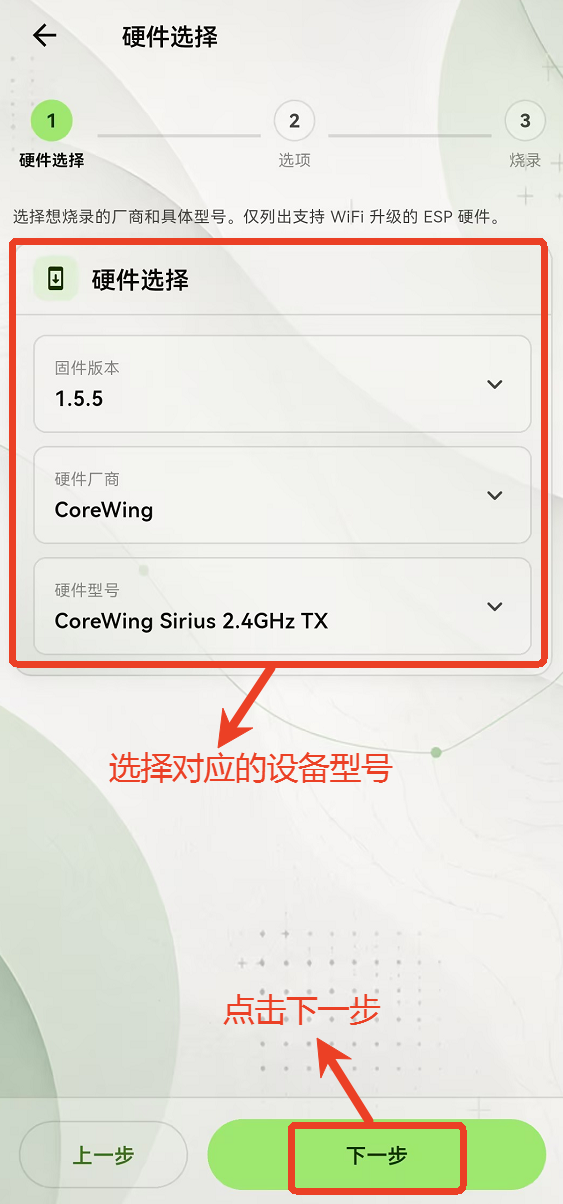
Select the firmware version, head manufacturer, RF band, and hardware model, then click Next
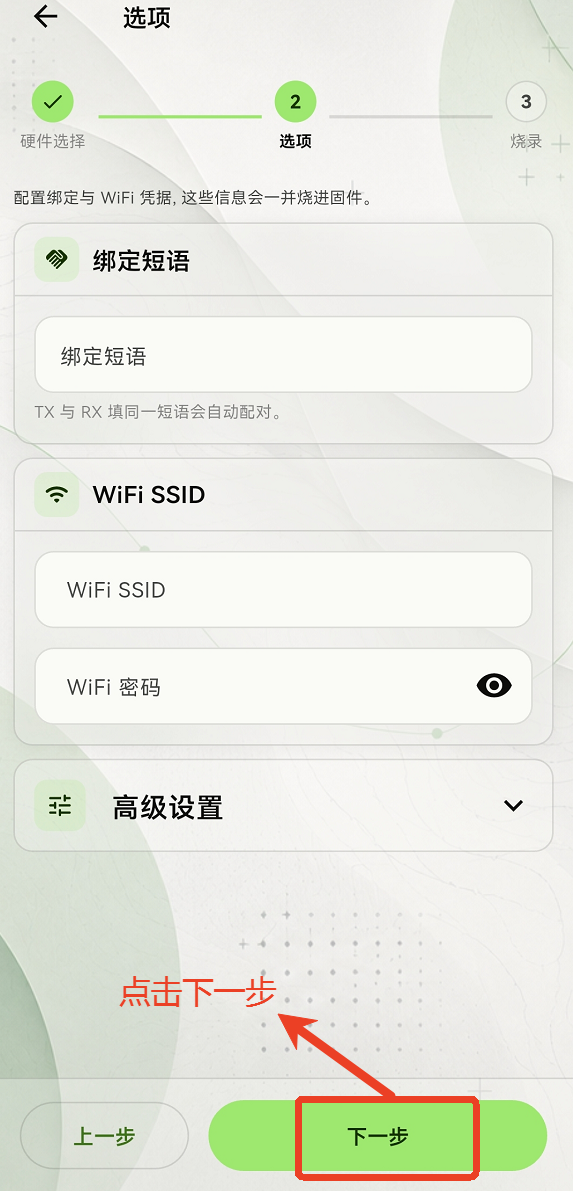
Set the binding phrase and WiFi password as needed, then click Next (this step can be skipped)
Select the flashing method as needed
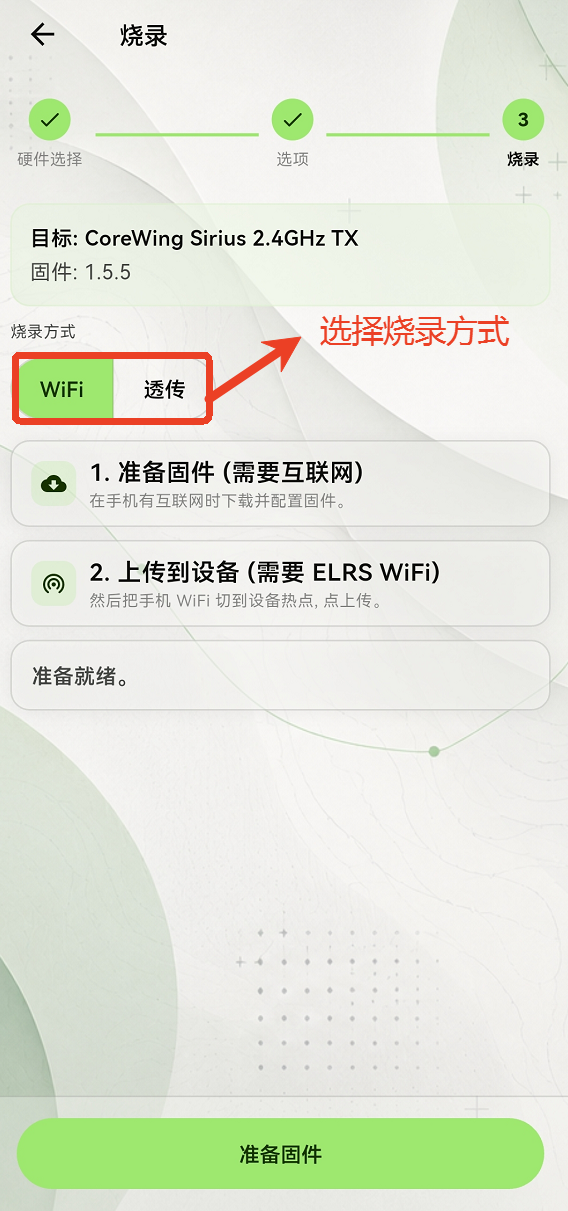
| Flashing Method | Required Equipment | Use Case |
|---|---|---|
| WiFi flashing | None | Highest success rate; suitable when no tools are available |
| Passthrough | USB data cable (dual Type-C) | High success rate; plug in and flash |
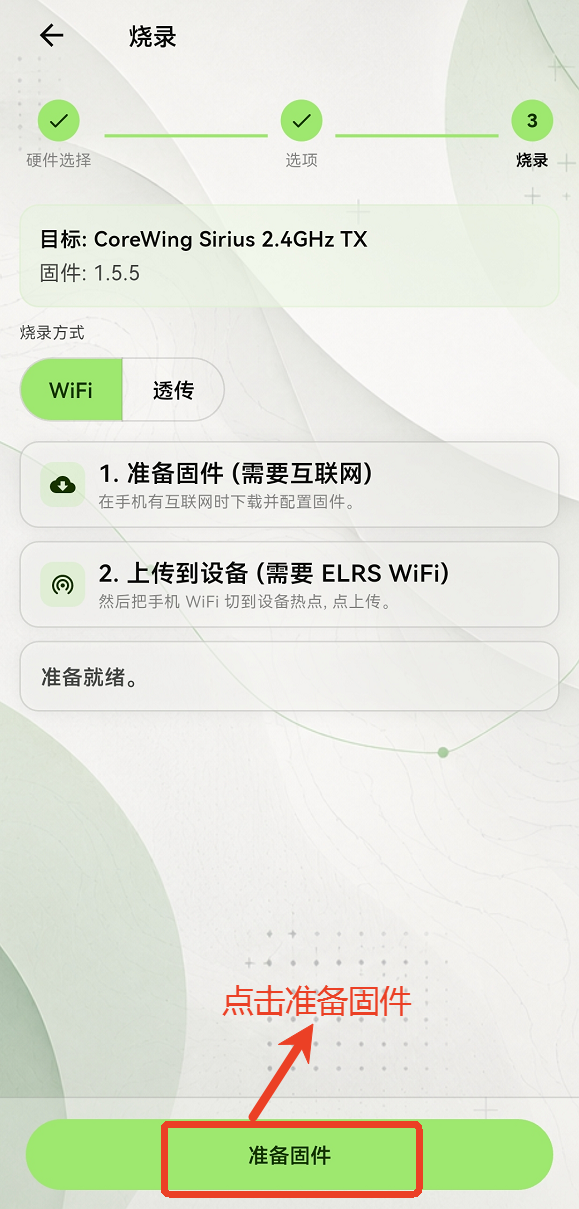
Make sure the phone has a network connection, click Prepare Firmware, and wait for the download to finish
On the radio, enter the system menu and open the ELRS script, then select "WiFi Connectivity".

Select the high-frequency head "Backpack WiFi" and enable WiFi.

On the WiFi running page, it is normal for it to auto-exit after 5 seconds. Do not touch the radio — WiFi is running.

Open the phone's WiFi settings and connect to "Backpack WiFi". The password is
expresslrs.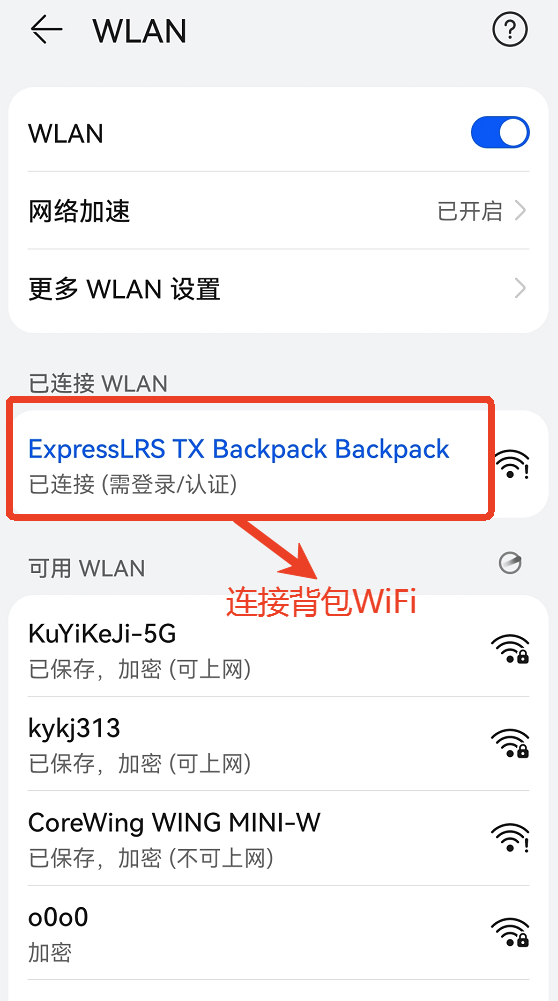
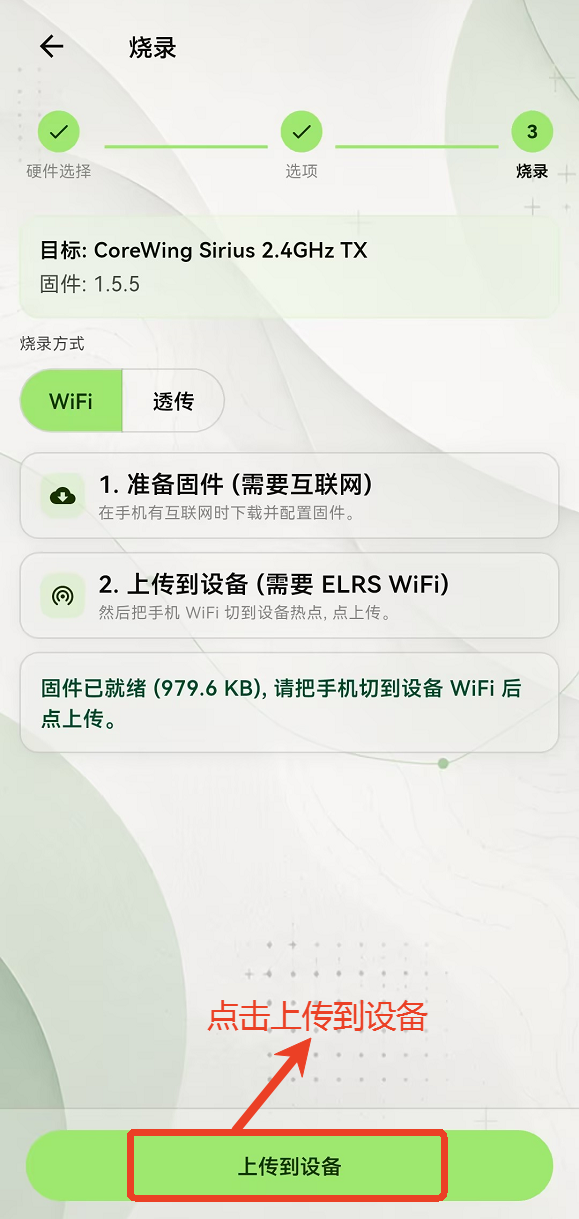
After connecting to the Backpack WiFi, return to the APP and click Upload to Device. Wait for flashing to complete
- Connect the data cable to the phone and the high-frequency head
Note: When using an OTG adapter + data cable, the OTG adapter must be plugged into the phone, otherwise the device will not be detected. Connect as shown below!
(2) Click USB Flash and wait for flashing to complete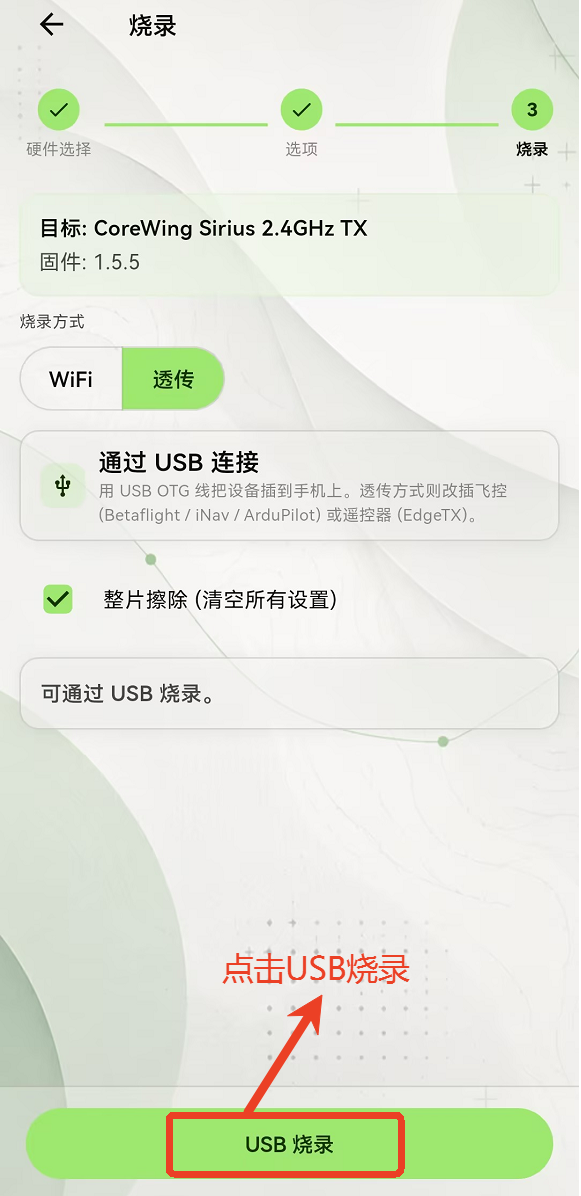
(3) Flashing complete, firmware upgraded successfully